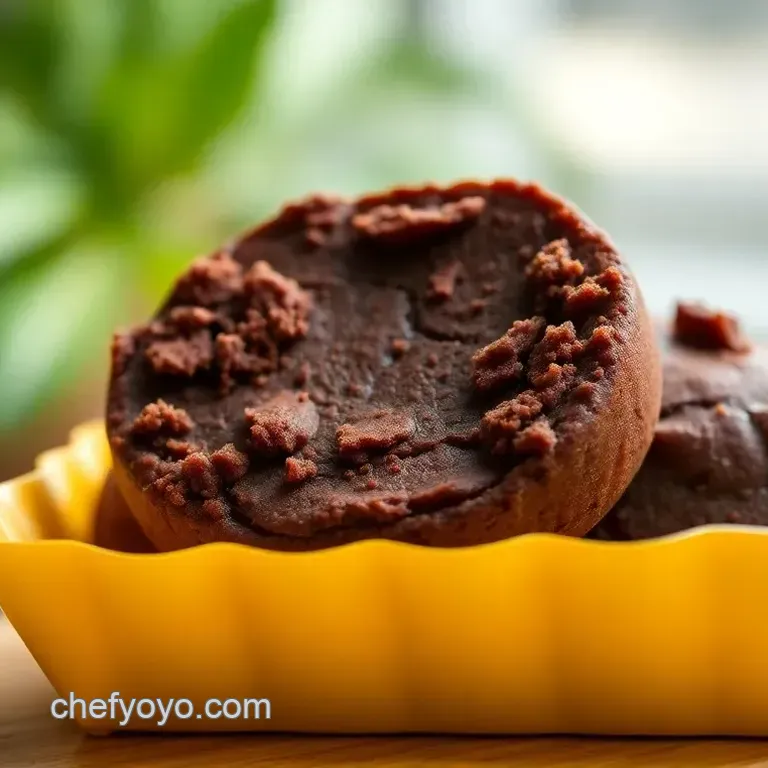
Chewy Chocolate Bites in a Yellow Box
- Indulge in Chewy Chocolate Bites: The Ultimate Sweet Treat
- Sweet History Meets Modern Delight
- Why You’ll Love These Chewy Bites
- Making These Chocolate Delights Your Own
- Time to Gather the Ingredients!
- Your Go-To Guide for Essential Ingredients
- Unlocking the Secrets of Professional Cooking: Crafting Chewy Chocolate Bites
- Pro Tips & Secrets for Chewy Chocolate Bites
- 📝 Recipe Card
Indulge in Chewy Chocolate Bites: The Ultimate Sweet Treat
You know that moment when a rich, fudgy chocolate bite melts in your mouth? yeah, that’s what i'm talking about! a few weekends ago, i decided to whip something up for my buddies during our saturday movie night.
We needed a quick dessert idea that would satisfy our sweet tooth without breaking the bank or taking hours in the kitchen.
As i was browsing through my go-to recipes, i stumbled across this gem! those adorable chewy chocolate bites in a yellow box caught my eye, and honestly, i couldn’t resist giving them a try.
This wasn’t just about a sweet treat recipe; it was about sharing joy. chocolate has this incredible power to bring people together, right? i couldn't wait to see their faces when they tasted these gooey little bites that seemed almost too good to be true.
And with their inviting yellow packaging, they also made a perfect gift wrapped up and ready for sharing.
Sweet History Meets Modern Delight
Did you know that brownies originated in the u.s. around the late 19th century? those classic brownie inspired treats have evolved, and now we have these chewy chocolate bites that take all the best parts of brownies and, well, bite size them!
Nowadays, they’re super popular at parties, bake sales, and for those sweet "just because" moments.
This recipe is as simple as it gets. you’ll only need about 65 minutes total from prep to bake, and trust me, it's worth every second.
It’s pretty easy for anyone, whether you're a beginner or a seasoned pro. besides, this dessert yields around 24 bites, so it’s perfect for sharing if you can manage to not eat them all yourself first!
Why You’ll Love These Chewy Bites
Now, talking health benefits may not sound too exciting when it comes to dessert, but hear me out! chocolate especially the dark kind has some surprising nutrition highlights, like high levels of antioxidants.
Plus, these bites are customizable! want to add nutty chocolate variations ? go for it! you could throw in walnuts or pecans to give them an extra crunch.
These treats are perfect for special occasions, too. Whether it's a birthday bash, a casual get-together with friends, or even as a part of edible gifts for occasions , they’re a hit every time! I mean, who wouldn't want to receive a cheerful yellow box filled with these little pieces of happiness?
You know what's even better? compared to those pre-packaged chocolate snacks that often disappoint, these homemade gifts for chocolate lovers stand out because you know exactly what’s going into them plus, the fudgy brownie texture is unbeatable.
Making These Chocolate Delights Your Own

We’ve all had those moments when we're suddenly inspired in the kitchen, right? i love that this recipe allows you to embrace that creativity.
If you’d prefer a dairy-free chocolate option , just swap out the butter for coconut oil and use dairy-free chocolate chips.
Feeling adventurous? add a swirl of peanut butter or nutella before baking for a creamy twist!
Honestly, i think the best part is just how easy it is. if you’re looking for a fun weekend project, this is it! these bites can be a sweet family activity kids will love helping pour in the cocoa and whisking the batter.
So, why not gather everyone for some quality baking time?
Time to Gather the Ingredients!
So, are you ready to dive into this delicious madness? all you need are a few simple ingredients to whip up these irresistible chewy chocolate bites.
Grab your butter, sugar, eggs, and cocoa powder, and let’s get started! because trust me, once you taste one of these, you'll never want to miss out on having them in your baking repertoire.
Now, let’s move on to what you’ll need to gather for this heavenly treat…
Your Go-To Guide for Essential Ingredients
Alright, let’s chat about the magic that makes your kitchen run, shall we? whether you’re a pro or just starting out, having a solid grasp on essential ingredients can take your desserts from good to unbelievably delicious.
And let’s be real, who doesn’t want that? we’re diving into everything from the nitty gritty of quality indicators to the perfect storage tips for your favorite ingredients.
Premium Core Components
First up, we need to talk about premium core components. When you’re making something like chewy chocolate bites in a yellow box , knowing your stuff is key.
- Detailed Measurements: If you’re measuring in cups, you might get 1 cup of packed flour versus 1 cup of loose flour. Go for the scale! 1 cup (230g) of butter is your friend.
- Quality Indicators: Always check the expiration date on your ingredients, especially baked goods. Quality makes a difference, folks!
- Storage Guidelines: Keep your flour in a cool, dry place. It could last up to 1 year in your pantry if stored properly.
- Freshness Tips: For herbs, freshness is a must! If you’re picking up parsley or basil, look for vibrant colors. Dull leaves? Skip ‘em!
Signature Seasoning Blend
Now let’s add a little zing to those ingredients. When it comes to creating a signature seasoning blend , you want to nail those spice combinations.
- Mix cinnamon with nutmeg for a fall vibe.
- For your chocolate, use vanilla extract - this elevates those fudgy chocolate bites to another level.
- Flavor Enhancers: Consider adding a touch of sea salt; it really brings out that rich flavor.
- Regional Variations: Doesn’t hurt to explore. Try cayenne for a spicy twist.
Smart Substitutions
So, what happens when you’re out of an ingredient? Don’t panic! Smart substitutions can save the day!
- If you’re out of eggs, mix flaxseed with water for a vegan swap.
- Got a nut allergy? Use pumpkin seeds in those nutty chocolate variations.
- In a pinch, you can use applesauce for butter in some recipes.
- Seasonal Options: Swap in seasonal fruits for a fresh take. Dried cranberries in fall? Yes, please!
Kitchen Equipment Essentials
Let’s get real about kitchen gear. Here are the must have tools you need to whip up those sweet treat recipes.
- Mixing Bowls: Multiple sizes are key. Why? One for wet, one for dry!
- Whisk: A sturdy whisk is your friend for mixing batters.
- Baking Pan: You’ll want a good 9x9 inch baking pan perfect for those brownie inspired treats .
- Spatula: A rubber one for scraping down sides is a lifesaver.
If you don’t have fancy equipment, don’t sweat it. Use what you have! A fork works for a whisk in a pinch, trust me.
Get Ready to Bake!
Now that you’re well versed in the essentials, we’re gearing up to put this knowledge to work. picture it: mixing up your chewy chocolate bites in a sunny kitchen, the scent of melting chocolate wafting through the air.
It’s downright heavenly!
These quick dessert ideas are simple and fun to make, making them perfect for a baking activity with kids. plus, these bites wrapped up in: that cheerful yellow box make a fantastic gift.
Whether it’s an edible gift for a birthday or just a treat for yourself, you can't go wrong.
So, let’s roll up our sleeves and get to the baking part! your kitchen is about to smell like a chocolate lover’s paradise .
Get ready to indulge in the chocolatey sweetness of chewy chocolate bites , where your fresh ingredients and smart skills combine into something delicious!
Unlocking the Secrets of Professional Cooking: Crafting Chewy Chocolate Bites
Alright, folks! let’s dive headfirst into the world of professional cooking. and let me tell you, nothing screams “sweet success” quite like those chewy chocolate bites in a yellow box .
But before you get lost in a chocolate-y dream, let’s break down the essentials of whipping up this fudgy delight.
Essential Preparation Steps
First things first, we gotta talk about mise en place . this french term is basically the chef’s secret weapon. it means "everything in its place.
" before you even think about turning on the oven, gather all your ingredients. you’ll need butter, sugar, eggs, vanilla, flour, cocoa powder, sea salt, and those oh-so-delicious chocolate chips.
Having everything at arm's reach saves you from looking like a frenzied tornado in the kitchen trust me, i've been there.
Speaking of being organized, time management is crucial. you’re looking at about 15 minutes of prep , 20 minutes of baking , plus another 30 minutes to chill .
Setting a timer helps keep everything running smoothly. you don't want to find yourself staring at a mixing bowl while your oven's just chilling at 350° f everything gets chaotic.
Now, let’s not forget safety . when you're melting butter or handling a hot pan, use oven mitts! i cannot stress this enough.
One slip, and you’ll end up with more than just chocolate on your hands.
Step-by-step Process
You ready? Let's kick this off with clear, easy-to-follow steps.
- Preheat your oven to 350° F ( 175° C) .
- Grease a 9x9 inch baking pan or line it with parchment paper this helps with that post baking drama.
- In a mixing bowl, whisk together melted butter and granulated sugar until smooth.
- Add three large eggs one at a time. Whisk well so they’re fully integrated!
- In another bowl, mix flour , cocoa powder , and sea salt . Gradually fold this mix into the wet ingredients.
- Don’t forget to stir in one cup of chocolate chips . Feel free to toss in some nuts for a nutty chocolate variation!
- Pour the batter into that baking pan and pop it in the oven. Bake for about 20 minutes or until the edges seem set while the center still looks a wee bit soft.
- Let them cool, and sprinkle some sea salt flakes on top if you’re feeling fancy.
- Finally, cut those fudgy gems into bite sized pieces and place them in your cheerful yellow box.
Expert Techniques
Alright, let’s talk like we’re in a culinary school. first off, temperature control is key. the better you maintain that 350° f heat, the more consistently you'll bake those bites.
For that fudgy brownie texture , you might be tempted to underbake them slightly, and hey, it’s a win-win.
Next is timing precision. seriously, don’t just wing it; set a timer for 20 minutes . and watch for visual cues for doneness the edges should be firm, and the center should just jiggle ever so slightly.
Success Strategies
So, here’s the deal: avoid common mistakes like not measuring accurately. you know, using too much flour could lead to dry bites, and that’s not what we want.
Adjustments are cool, too. want to switch up flavors? try adding peanut butter or different chocolate chips for those unique flavors.
And when it comes to make-ahead options, you can prepare the batter a day earlier, just put it in the fridge overnight.
Pull it out, let it sit at room temp for about 30 minutes, and then bake away!
When it comes down to it, these chewy chocolate bites aren’t just dessert they're a little piece of joy in a yellow box .
Perfect for gifting or simply indulging yourself because, let's be real, who doesn’t deserve that?
Stay with me, because next, we’ll explore Additional Information on how you can diversify your baking game with easy chocolate recipes, perfect for all kinds of occasions!
Pro Tips & Secrets for Chewy Chocolate Bites
Let’s get real for a second baking chewy chocolate bites in a yellow box should be a fun experience! here are a few pro tips and secrets to make sure yours turn out fantastic.
First off, timing is key ! these little bites need to chill for at least 30 minutes after mixing. this isn’t just a wait and-see situation; letting them rest solidifies that fudgy brownie inspired texture we all crave.
Honestly, it transforms these from "just okay" to "oh my gosh, yum!"
When it comes to flavor enhancement , you can't go wrong with a sprinkle of coarse sea salt on top after baking.
Sweet and salty is always a winning combo. plus, you can swap in some dark chocolate chips or even flavored ones if you're feelin' adventurous.
Think mint or even orange zest totally brings a fresh twist to your fudgy chocolate bites!
Perfect Presentation: Plating Your Treats
Let’s talk about the look of your chewy chocolate bites. presentation matters, y’all! grab a pretty plate or a festive box.
I love how the vibrant color of the yellow box makes everything pop.
For garnish , a simple dusting of powdered sugar or a few sprigs of mint adds a nice touch. and don’t forget about color! consider pairing them with fresh strawberries or a scoop of vanilla ice cream for a splash of color and a nice contrast in flavors.
When you plate these bites, consider stacking a few up with a drizzle of chocolate sauce. It’s like creating your own dessert masterpiece! Trust me, your friends will definitely appreciate the effort.
Storage & make-ahead: Keep It Fresh
So, you made a big batch of these delicious chocolate bites ? great! but what do you do with the leftovers? here’s the scoop: store them in an airtight container at room temperature for about 4 to 5 days.
They’ll still be perfectly soft and chewy nothing worse than dry chocolate snacks, right?
If you want to keep them fresh longer, pop those bites in the fridge for up to two weeks. Just remember to let them come back to room temperature before serving; trust me, nobody likes a cold chocolate treat!
Creative Variations: Switch It Up
Now, here comes the fun part experimenting! want to try seasonal twists ? add pumpkin spice for fall or swap in peppermint chips during the holidays.
You could even make nutty chocolate variations by tossing in some chopped pecans or walnuts right into the mix.
Got dietary needs? no worries! you can go for dairy-free chocolate options with almond milk and coconut oil, or even make them gluten-free by subbing almond flour for all-purpose flour.
These chewy bites are super customizable and can cater to all those sweet cravings!
Complete Nutrition Guide: Know What You're Eating
If you’re like me, you want to know what you're putting in your body. these chewy chocolate bites are about 160 calories per bite, packed with about 2 grams of protein and a delicious amount of sugar.
They do pack a punch, but let’s be honest; they’re made for indulgence.
With that being said, keep portion sizes in mind a serving of about 2 bites is perfect. You still get that sweet fix without overdoing it!
Expert FAQ Solutions: Troubleshooting Tips
Got questions? i’ve got answers! if your bites turn out too dry, try underbaking them a few minutes next time.
Remember, they should be soft in the center when you take them out. if they’re too crumbly, make sure you’re measuring those dry ingredients accurately.
And hey, if you've got kids around, these chewy chocolate bites make for perfect kids’ baking activities . Easy chocolate recipes are always a win get them involved, and it turns into a fun family project!
Now, don’t let the fear of baking hold you back. with just a little love and these tips, you're bound to create something perfect.
Whether you’re indulging after a long day or making edible gifts for occasions , these chocolate delights are sure to impress!
Go on, grab that yellow box, whip up a batch of fudgy brownie texture goodness, and enjoy every single chewy chocolate bite! You got this!
Chewy Chocolate Bites In A Yellow Box