Taco Soup: the Weekday Warriors One-Pot, 30-Minute Dinner

- The Magic of One-Pot Taco Soup: Why It Belongs In Your Rotation
- Achieving Deep Flavor: The Science Behind This Simple Taco Soup
- Pantry Staples & Core Ingredients for Classic Cowboy Taco Soup
- Dump, Simmer, and Serve: Essential Steps for Making Taco Soup
- Troubleshooting Taco Soup: Pro Tips and Avoidable Errors
- Meal Prep Masterclass: Storing and Freezing Your Leftovers
- The Perfect Finish: Garnishes and Side Dish Pairings
- Recipe FAQs
- 📝 Recipe Card
The Magic of One-Pot Taco Soup: Why It Belongs In Your Rotation
When that incredible smell hits you that combination of rich cumin, deep chili, and bright lime you know dinner is going to be good. This isn't your grandma's quiet vegetable potage; this is a Tex-Mex fiesta that starts on the stove and ends in total culinary comfort.
It’s hearty, it’s vibrant, and it is absolutely the easiest bowl of cozy you can make.
Life gets hectic, right? This specific recipe for Taco Soup is my absolute lifesaver because it relies almost entirely on pantry staples and takes less than 35 minutes from start to finish.
It’s ridiculously cheap to make a giant batch, making it the ideal choice for meal prep or feeding a crowd without breaking the bank. Forget slaving over complicated weeknight dinners.
We are diving deep into the Classic Cowboy Taco Soup today, focusing on the simple tricks that turn canned beans and ground beef into something truly spectacular. Trust me, I've made all the watery, bland mistakes, so I'm here to ensure your version is flavor packed and perfectly balanced.
Achieving Deep Flavor: The Science Behind This Simple Taco Soup
Defining the Tex-Mex Classic: What Makes Taco Soup Unique?
Taco soup is really a glorified chili, but with a lighter, more brothy texture and the unmistakable punch of taco seasoning. It embraces the "dump and simmer" philosophy, meaning most of the work is just opening tins.
What makes our version better is the inclusion of one non-negotiable ingredient: dry ranch seasoning mix. This magic packet adds tanginess, richness, and incredible depth without requiring any actual dairy until serving time.
The Power of Minimal Prep and Maximum Yield
The sheer volume you get from combining a pound of ground beef with four cans of beans and corn is amazing. You're leveraging inexpensive ingredients that stretch far, offering incredible satisfaction with minimal chopping effort.
Honestly, if you can dice an onion and push a button on a can opener, you’re practically a pro chef in this scenario.
Culinary History: Tracing the Origins of the Cowboy Classic
While not centuries old, Taco Soup definitely springs from the Tex-Mex tradition of using simple, preserved ingredients for hearty trail food. Think of this as the ultimate resourceful bowl, combining the rich flavor of seasoned ground beef (which traveled well) with accessible canned beans and corn.
It’s a testament to good comfort food born from necessity but evolving into a flavorful staple.
The Maillard Reaction: Browning the Ground Beef Base
We start by browning the ground beef until it’s deeply caramelized. This crucial step creates complex, savory molecules through the Maillard reaction, which forms the bedrock of our soup’s flavor. If you skip this and just boil the meat, the resulting soup will be flat and lifeless.
The Importance of Bloom: Activating Dry Spices in Hot Fat
Before adding a single drop of liquid, we toss the taco and ranch seasonings directly onto the hot ground beef and onion mixture. This is called blooming the spices. The heat releases the spices' volatile oils, making the cumin and chili powder exponentially more fragrant and intense.
Don't rush this minute of stirring; it's the difference between a decent soup and an unforgettable one.
Broth Reduction: Concentrating the Flavors During Simmering
Our final secret is the short, aggressive simmer. Cooking the soup uncovered for at least 15 minutes allows some water to evaporate, concentrating the complex flavors of the stock, tomatoes, and seasoning into a richly satisfying broth. This process is key to preventing a watery outcome.
Pantry Staples & Core Ingredients for Classic Cowboy Taco Soup
The Aromatic Trinity: Onion, Garlic, and Chiles
You need the basics! Onion and garlic are sautéed first to build the aromatic base, followed by the can of diced green chiles for a gentle, tangy warmth. The chiles melt seamlessly into the soup, adding complexity without serious heat.
Drainage vs. Rinsing: Preparing the Canned Beans and Corn
Always drain the corn you want its sweetness, not its starchy liquid. For the black and kidney beans, you must rinse them thoroughly in a colander before adding them to the pot.
Rinsing removes that weird, sludgy packing liquid and about 30% of the surface sodium, resulting in a cleaner flavor and better texture.
Customizing Your Spice Blend: Taco Seasoning vs. Individual Spices
I use packaged taco seasoning and ranch mix because they are fast, reliable, and perfectly balanced. If you prefer to go full homemade, substitute the taco seasoning with a mix of chili powder, smoked paprika, oregano, and extra cumin.
But seriously, don't skimp on the ranch packet it is the signature flavor here.
Essential Swaps: Finding the Right Broth and Tomato Base
| Ingredient | Substitute Option | Notes |
|---|---|---|
| Ground Beef | Ground turkey or vegetarian crumbles | Brown similarly, but turkey may need more oil. |
| Chicken Stock | Beef broth or water + bouillon cube | Use low-sodium if possible to control final saltiness. |
| Fire Roasted Tomatoes | Regular diced tomatoes (plus a pinch of smoked paprika) | Fire roasted adds a layer of smoky depth that is hard to beat. |
| Kidney Beans | Pinto beans or canned chili beans | Any hearty bean works brilliantly here. |
Dump, Simmer, and Serve: Essential Steps for Making Taco Soup

Step 1: Building the Foundation (Browning and seasoning the meat)
Heat your oil in a large stockpot over medium high heat. Add the ground beef and break it up vigorously, cooking until it's completely browned, about five minutes. Drain off all that excess grease leaving it makes for a slimy soup then return the beef to the pot.
Next, toss in the diced onion and sauté for three minutes until softened, followed by the garlic for 60 seconds until fragrant. Do not let that garlic burn!
Step 2: The Dump and Stir Method (Combining all liquid and canned goods)
Reduce the heat to medium low. Now, sprinkle in both packets of seasoning (taco and ranch) and stir constantly for one minute to bloom those spices. Next, it’s time for the famous dump: Pour in the chicken stock, the undrained diced tomatoes, the rinsed beans, the drained corn, and the can of green chiles.
Give everything a robust stir to ensure the spices are fully incorporated.
Step 3: Low and Slow Simmering for Optimal Blend
Increase the heat and bring the soup to a gentle boil, then immediately reduce the heat to maintain a steady, low simmer. Loosely cover the pot and let the soup do its thing for 15 to 20 minutes.
This simmering time is critical because it allows the tough flavors of the canned goods to relax and mingle with the rich spices.
Step 4: The Final Flavor Check Before Serving
Once the soup has simmered and thickened slightly, it's time for the final taste test. Add salt and pepper very carefully; remember, you have canned ingredients and packaged seasonings, both of which are high in sodium. If it tastes dull, a squeeze of fresh lime juice can surprisingly brighten the whole bowl. Ladle it up and get ready for the best part the toppings! This soup pairs beautifully with a big platter of crunchy sides, maybe even alongside a small portion of my Taco Dip Recipe: The Proper Cheesy Seven Layer Fiesta Dip for dipping tortilla chips.
Troubleshooting Taco Soup: Pro Tips and Avoidable Errors
How to Thicken Taco Soup Without Adding Flour
If your soup is too watery after simmering, don't reach for flour or cornstarch immediately. Instead, ladle out about 1 cup of the soup (mostly beans and tomatoes) and mash it with a fork or blitz it briefly with an immersion blender.
Stir the mashed mixture back into the pot; the released starch from the beans will naturally thicken the soup beautifully without altering the flavor.
The Salty Trap: Adjusting Seasoning After Canned Goods Are Added
My biggest mistake when I first started was seasoning the meat and then adding salty stock and canned items. Big mistake. Wait until the very end to add extra salt. Taste first!
If you accidentally overshoot the salt, stir in a splash of water or, better yet, a can of low-sodium, unseasoned diced tomatoes to dilute the brine.
Maximizing Depth: Deglazing the Pot After Browning the Ground Beef
Before adding your aromatics, pour a tiny splash of stock (about 1/4 cup) into the hot pot after draining the fat. Scrape up all those beautiful brown bits stuck to the bottom (the fond ) with your spoon. This process, called deglazing, incorporates those deep Maillard flavors directly into your base.
It adds complexity you simply can't achieve otherwise.
Chef’s Note: Don’t panic if you feel the soup is too simple. The dried ranch seasoning provides that essential layer of creamy, complex flavor that fools everyone into thinking you spent hours cooking.
Meal Prep Masterclass: Storing and Freezing Your Leftovers
Airtight Secrets: Refrigerating Taco Soup Safely
Taco Soup is truly magical the day after it’s made; the spices hydrate fully, and the flavor deepens considerably. Allow it to cool completely before transferring it to an airtight container. It will keep safely in the refrigerator for 3 to 4 days. It makes such a fast lunch, especially compared to something like a big bowl of OldFashioned Vegetable Beef Soup Recipe: The Ultimate Comfort Bowl which requires a bit more forethought.
Long Term Solution: Best Practices for Freezing Large Batches
Does Taco Soup freeze well? You bet it does! Just make sure you freeze it before adding any dairy toppings like sour cream or cheese. Freeze cooled soup in sturdy, freezer safe containers or heavy duty zip-top bags (laid flat) for up to three months.
Leave about an inch of headspace at the top, as liquid expands when frozen.
Reheating Guide: Maintaining Texture and Consistency
Thaw the soup overnight in the fridge if possible. Reheat gently on the stove over medium low heat, stirring occasionally until warmed through. If the consistency is too thick which can happen because of the starchiness of the beans simply add a splash of stock or water to loosen it back up.
Avoid high, rolling boils, which can cause the beans to break down completely.
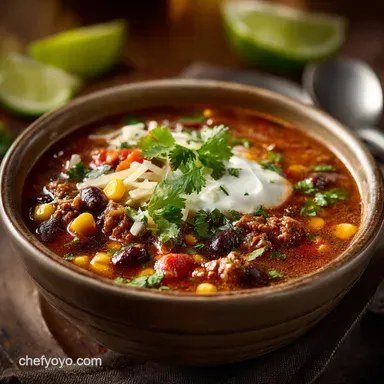
The Perfect Finish: Garnishes and Side Dish Pairings
You simply cannot serve Taco Soup naked; the toppings are the best part!
- Creamy: A dollop of sour cream or plain Greek yogurt.
- Crunchy: Crushed tortilla chips, broken corn chips, or tortilla strips.
- Cheesy: Shredded Monterey Jack or Sharp Cheddar cheese.
- Fresh: Finely chopped cilantro, sliced green onions, or diced avocado.
- Heat: A few dashes of your favorite hot sauce.
This bowl is seriously hearty and filling. Because it is so rich, I usually keep the sides super simple, maybe a few slices of fresh bread or just a light salad with a lime dressing. Save the complex side dishes for when you are tackling a project like Chicken Taco Poblano Rice Bowls: Vibrant and Creamy Arroz Poblano .

Recipe FAQs
Can I use chicken or turkey instead of ground beef?
Absolutely. Ground chicken or turkey are leaner alternatives and work beautifully for Taco Soup, offering a slightly lighter flavor profile. Ensure you cook and crumble them thoroughly, and consider adding a touch more oil during browning as they tend to release less natural fat than beef.
Why does my Taco Soup taste bland or under seasoned?
Blandness often stems from an insufficient amount of salt or acid, especially when using pre-seasoned taco mix. Taste and adjust the salt level aggressively at the end of cooking, and if needed, brighten the flavor by stirring in a tablespoon of fresh lime juice or a dash of hot sauce right before serving.
How long can I store leftover Taco Soup, and does it freeze well?
Taco Soup stores wonderfully in an airtight container for 3 to 4 days in the refrigerator, making it perfect for meal prep. It is also an excellent candidate for freezing; cool it completely, transfer it to freezer safe bags or containers, and it will keep for up to 3 months.
My soup is too thick/thin. How do I adjust the consistency?
If the soup is too thick, simply stir in 1/2 cup increments of extra broth (chicken or vegetable) until the desired consistency is achieved. If it is too thin, you can simmer it uncovered for 10-15 minutes to reduce, or mash a small portion of the beans against the side of the pot to thicken the liquid naturally with starch.
How can I make this classic recipe vegetarian or vegan?
To make it vegetarian or vegan, omit the ground beef entirely and use a high-quality vegetable broth as the base. Increase the volume of beans (black, pinto, and kidney) and add a bag of crumbled plant based ground product for texture, ensuring all seasoning packets used are dairy-free.
Can I prepare this Taco Soup in a slow cooker or instant pot?
Yes, this recipe excels in both slow cooker and Instant Pot preparation methods. For a slow cooker, brown the meat first, then dump all ingredients and cook on low for 6-8 hours; for the Instant Pot, use the Sauté function for the meat, then set the Manual/Pressure Cook function for 10 minutes.
Should I add the sour cream or cheese directly into the pot?
No, dairy toppings like sour cream, shredded cheese, or cream cheese should always be added individually to each serving bowl upon plating. Stirring dairy directly into the main pot of hot soup can cause the mixture to separate or curdle when you attempt to reheat the leftovers later.
Classic Ranch Taco Soup Recipe
Ingredients:
Instructions:
Nutrition Facts:
| Calories | 320 kcal |
|---|---|
| Fat | 10 g |
| Fiber | 8 g |
