Delicious Chocolate Covered Pretzels: a Sweet and Salty Treat
- Craving a Sweet Treat? Let’s Talk Chocolate-Covered Pretzels!
- A Quick Peek at History
- Why You’ll Love This Recipe
- Moving On to Ingredients: Get Ready to Mix and Melt!
- Your Guide to Must-Have Ingredients in the Kitchen
- Mastering the Art of Cooking: A Professional’s Take
- Unlocking the Secrets of Chocolate Covered Pretzels
- Frequently Asked Questions
- 📝 Recipe Card
Craving a Sweet Treat? Let’s Talk Chocolate Covered Pretzels!
Oh my gosh, let me tell you about the first time i tried chocolate covered pretzels . picture this: i’m chilling at a friend’s house party, and the snack table is set up like a magical feast.
I grab one of those pretzels, and the moment i bite into it, the crunch, the sweetness, and that hint of salt just takes me to flavor town! seriously, it was love at first crunch.
Ever since, i’ve made it my mission to perfect how to make chocolate covered pretzels, and guess what? it’s a lot easier than you might think.
Let’s dive in!
A Quick Peek at History
Chocolate covered pretzels are not just some fly-by-night snack; they actually have roots that trace back to europe, where hand twisted pretzels first emerged.
Fast forward a century or two, and voilà someone thought, "hey, how about i dip these bad boys in chocolate?" and honestly, it was a genius moment.
They're super popular now, especially during holidays and parties. who doesn’t love a good sweet and salty combo?
The Lowdown: Time and Difficulty
Now, let’s talk about the nitty gritty. making chocolate covered pretzels is about as easy as pie. seriously, if you can melt chocolate and dip things, you’re golden.
The whole process takes about 50 minutes , including 15 minutes of active prep and some chilling time to let the chocolate set.
And here’s the kicker: you can whip up about 24 pretzels with minimal cost. a bag of pretzels and some chocolate chips won’t break the bank!
Why You’ll Love This Recipe
Let’s get into the good stuff! these little treats aren’t just tasty; they come with a few health perks too.
Pretzels are a low-calorie snack choice, and when you dip them in dark chocolate, you’re adding antioxidants without going overboard on the guilt.
Score! plus, they’re perfect for special occasions think party platters, movie nights, or just a netflix binge. who wouldn’t want to snack on these beauties while catching up on the latest series?
They definitely stand out against other snacks. i mean, have you ever tried serving plain chips at a gathering? snooze fest.
But pull out a tray of chocolate covered pretzels, and watch the crowd go wild. they have that “wow” factor that will make you the star of the snack table!
Moving On to Ingredients: Get Ready to Mix and Melt!
So, are you ready to dive into the world of chocolate covered goodness? before we jump into the actual recipe, let’s make sure you have all the ingredients.
Grab some pretzel rods or twists, semi sweet chocolate chips, and maybe a tablespoon of coconut oil if you want that smooth finish.
Optional toppings include sprinkles or crushed nuts for a little extra flair.
Trust me, you won’t regret trying this out. get your pals involved, turn on some tunes, and make a fun evening out of it! i promise you will end up with some nice food pictures to show off on social media too.
So grab your apron, and let’s get ready to make some magic happen in the kitchen! Now, let’s check out that ingredient list so you can start your own DIY snack extravaganza !
Your Guide to Must Have Ingredients in the Kitchen
Alright, friends! let’s talk about the ingredients you absolutely need to keep stocked in your kitchen. think of this as your cheat sheet for whipping up everything from sweet treats to dinner marvels.
Having a solid pantry can make your life so much easier, whether you're crafting the perfect pot roast or figuring out how to make chocolate covered pretzels that’ll wow your friends at your next get-together.
Premium Core Components
First up, essential ingredients . We’re talking about the staples that let you bring your culinary visions to life.
Measurements : grab your measuring cups! for the us, think cups and tablespoons. and, if you're smart, have a kitchen scale on hand for those metric measurements.
Start with 1 cup of flour and 2 tablespoons of sugar . simple, right?
Quality Indicators : Know what to look for! Fresh herbs should smell fragrant, and spices should have that vibrant color. If they’re dull? Toss 'em! They’ve lost their mojo.
Storage Guidelines : Keep your stuff fresh! Most spices last about 1-3 years in airtight containers. Your pantry should be cool, dark, and dry think vampire vibes.
Freshness Tips : When picking veggies, always go for those without blemishes. And for your fruits? A tiny bit of give is good. If it feels like a rock…freshness is questionable.
Signature Seasoning Blend
Now, let’s spice things up! Your signature seasoning blend can make your meals sing.
Essential Spice Combinations : Think cumin, paprika, and garlic powder . This trio's a crowd pleaser! You can’t go wrong with that.
Herb Selections : Pair basil with tomatoes or thyme with chicken. These combos are classic for a reason they just work.
Flavor Enhancers : Use soy sauce, balsamic reduction, or even good ol’ garlic. They’ll elevate your everyday dishes.
Regional Variations : Want to take a trip with your taste buds? Try using Cajun spices for a Southern kick or Italian herbs for that Tuscan flair .
Smart Substitutions
Okay, let’s chat about smart substitutions because we all know that life happens, and sometimes you’re just out of something.
Common Alternatives : For that out-of-stock garlic powder? Try garlic salt. Just remember to adjust the other sodium in your dish.
Dietary Modifications : Going dairy-free? Swap in coconut milk for regular milk without missing a beat.
Emergency Replacements : No brown sugar? Use granulated sugar with a bit of molasses you're welcome!
Seasonal Options : Use fresh, in-season veggies like squash in the fall or tomatoes in the summer. Not only better for your wallet but also yummier!
Kitchen Equipment Essentials
Now, let's wind down to must have kitchen gear that'll make you feel like a culinary rock star!
Must Have Tools : You need a good knife and a reliable cutting board. Seriously make sure they’re in good shape!
Alternative Equipment : Don’t stress if you don’t have a melon baller; use a spoon instead! You’ll survive.
Preparation Tips : Before you start cooking, lay everything out. It’s called mise en place, and it’ll save you from running around like a headless chicken.
Storage Solutions : Invest in airtight containers for your dry goods. Trust me, no one wants stale flour.
In closing, if you're eager to dive into something delicious, our next set is all about making those fantastic chocolate covered pretzels .
These puppies are perfect for easy food ideas for parties that'll impress your guests without any hassle. whether you invite pals over or just want a snack for yourself, these bites will definitely become favorites.
So, gear up; i can't wait to share the step-by-step instructions!
Happy cooking, and let’s get this flavor party started!
Mastering the Art of Cooking: A Professional’s Take
When we think of professional cooking, it can feel a bit intimidating, right? but honestly, it’s all about putting in the right prep and technique.
Whether you're dreaming of whipping up crispy french fries or learning how to make chocolate covered pretzels , knowing the professional cooking methods can elevate your game.
Let’s dive in, shall we?
Essential Preparation Steps
First up? Mise en place . Fancy words for "everything in its place." Gather all your ingredients before you start. It makes cooking smoother than a buttered biscuit.
Next, time management is key. think about how long each part will take. for instance, if you plan to make those delightful chocolate covered pretzels, setting aside around 50 minutes total is smart.
Don’t forget about organization strategies ! Keep your station clean and tidy. It’ll help you focus. Plus, who wants flour everywhere? Not this gal.
And let’s keep it real: safety considerations are non-negotiable. use oven mitts, watch for hot surfaces, and never leave boiling oil unattended.
Seriously, it’s not worth the risk we want to enjoy our food, not call 911!
Step-by-step Process to Get It Right
Alright, here comes the fun part the actual cooking! Here’s a clear roadmap with steps you can follow:
- Start with prepping your ingredients .
- Control temperature! For melting chocolate, aim for about 110° F to 115° F . That sweet spot gets you that glorious smoothness.
- Timing is everything! For frying those golden easy French fries , you’ll want to keep an eye clocking in around 5- 6 minutes per batch .
- Look for visual cues, like that lovely golden brown shade on your fries they're calling your name!
Expert Techniques That Will Make You Shine
Let’s get into some expert tips. first, ensure your oil for frying is heated to about 350° f for the crispiest fries.
If it’s too cool, you’ll end up with soggy potatoes no thanks!
Pay attention to critical steps, like coating your pretzels evenly and letting them drip. You’ll want that chocolate to have a nice shine. Nothing worse than a dull looking snack, am I right?
If things go sideways, like your chocolate seizing up, don’t sweat it! Just add a teaspoon of oil to smooth things out.
Success Strategies to Avoid Kitchen Fails
Now, let’s address common mistakes. like, don’t rush your cooling time after dipping those pretzels. they need about 30 minutes in the fridge to harden up.
Rushing this step usually ends up in a messy situation.
For quality assurance, taste test along the way. When you’re making those meals with fries , make sure they’re seasoned just right. You can never go wrong with a sprinkle of salt!
Got a get-together? Make those chocolate covered pretzels ahead of time! They store like champs in an airtight container, so you’ll look fancy without the last minute panic.
Wrapping It All Up
Professional cooking isn't just for top chefs. with the right prep, timing, and techniques, you can nail it like a pro, whether you're frying up crispy fries or indulging in sweet treats.
So, remember to keep your kitchen fun and stress free! cooking should be a joyous experience, rather than a ticking clock.
Now that you’re equipped with these tips and tricks, why not dive into creating some delicious goodies? the world of cooking is waiting for your touch, my friend! and as we transition into the next section, i can’t wait to share even more insights to help you shine in the kitchen.
Unlocking the Secrets of Chocolate Covered Pretzels
Making chocolate covered pretzels can feel like a simple task, but trust me, there are pro tips and little secrets that can elevate your snack game to the next level.
Let’s dive into the tasty world of these sweet and salty delights, okay?
Pro Tips & Secrets
First off, time saving techniques are essential. when you’re set to melt the chocolate, use a microwave safe bowl. it’s super convenient! just pop your chocolate chips and a splash of coconut oil in the microwave and melt it in 30-second bursts .
Just stir in between. this way, you won’t have a chocolate disaster on your hands!
When it comes to flavor enhancement , don’t be shy about adding a teaspoon of your favorite extract. vanilla or almond flavor? yes, please! it adds a little flair that will wow your friends at parties.
And let’s be real, who doesn’t want to serve nice food pictures on a platter?
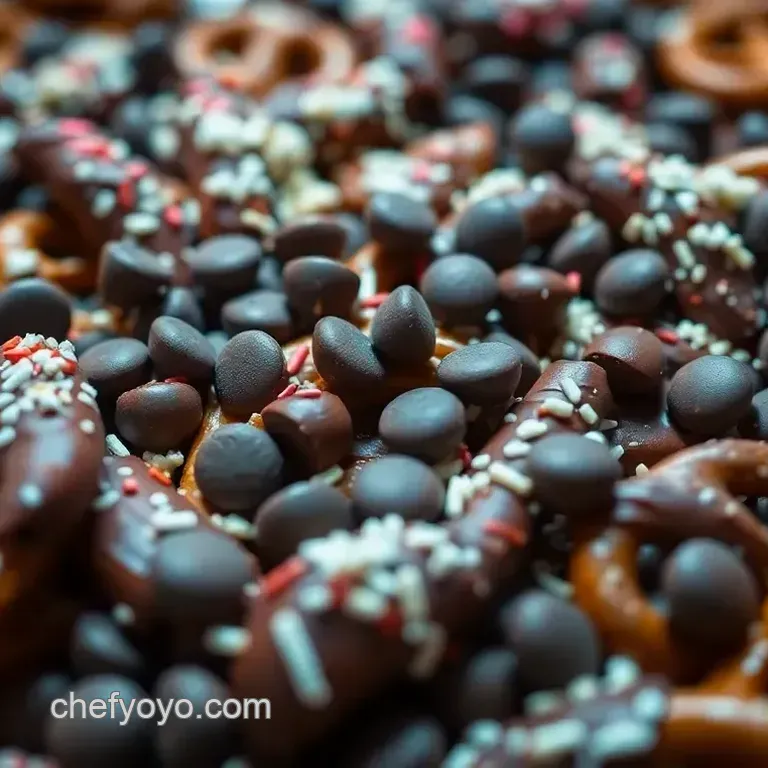
Oh, and presentation matters! after dipping, sprinkle those pretzels with colorful sprinkles , crushed nuts, or sea salt while the chocolate is still wet.
It’s like dressing up for a party the snazzier, the better!
Perfect Presentation: Making It Pop
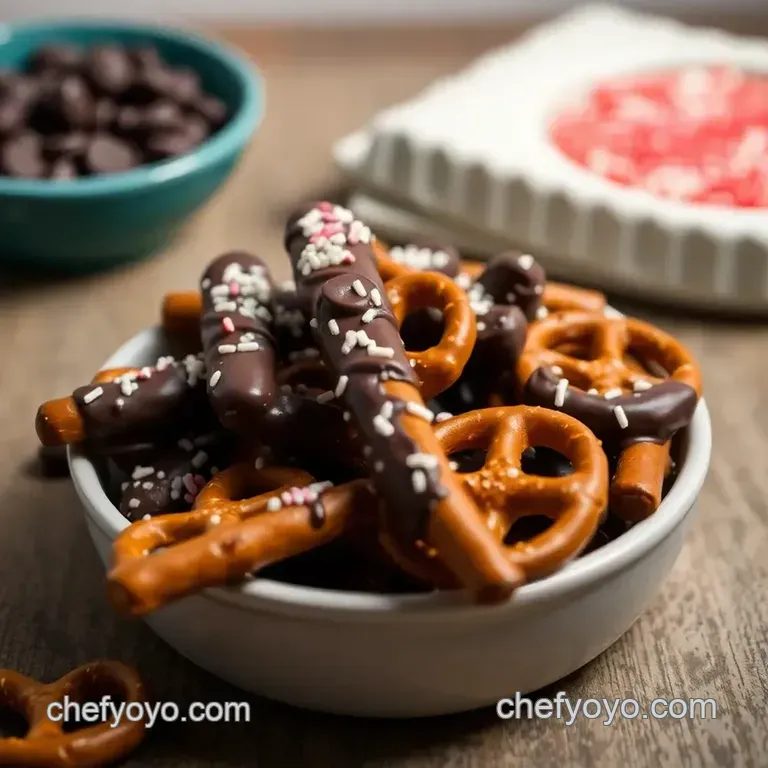
Now that you've got your pretzels all dressed up, you need to think about plating techniques . arrange them on a vibrant plate with a nice color contrast.
A white plate will let those chocolates shine!
Think beyond just taste; color combinations can enhance the appeal. White chocolate on dark pretzels? Gorgeous. Dark chocolate with a sprinkle of pink sea salt? Absolutely stunning!
To grab the attention of your guests, gather a few your chocolate covered pretzels and stand them upright in a jar. It’s like making a sweet centerpiece that invites people to indulge!
Storage & make-ahead Strategies
If you’re making these treats ahead of time, don’t fret! you can store your chocolate covered pretzels in an airtight container .
Just keep them in a cool, dry place. they stay fresh for about two weeks if you can resist eating them all sooner!
For reheating , just leave them out at room temperature. if they lost their shine after a few days, you can quickly warm them up in the microwave for a second or two to revive that glossy finish.
Creative Variations: Mix It Up
So, you wanna switch it up a bit? you can totally get creative with every batch. here’s a thought: what about seasonal twists ? you can add pumpkin spice in the fall or peppermint extract in winter for a festive vibe.
Dietary modifications are also super easy swap out regular pretzels for gluten-free ones or use dairy-free chocolate. totally inclusive for your crew!
And let’s not forget about those regional variations . Imagine using local flavors like jalapeño or spices reflective of your area. Why not let your taste buds take a little trip?
Complete Nutrition Guide
Before you dive into these chocolatey goodies, knowing what’s in your treats is key. each chocolate covered pretzel has about 100 calories .
If you’re trying to keep it light, feel free to limit yourself to a few it’s all about balance, right?
These pretzels also pack some health benefits , especially when using dark chocolate. it's got antioxidants, and when combined with those salty pretzels, they give you a little boost of energy.
Portion guidance can help too; maybe just stick to two or three pretzels per snack.
Wrapping It Up With a Bow
So there you have it! how to make chocolate covered pretzels that are not only easy but also look and taste fabulous.
Whether you're throwing together easy food ideas for parties or just treating yourself after a long day, these bites are a win.
Don’t stress about perfection; cooking is all about having fun and maybe making a mess or two. now it’s your turn grab those ingredients, put on some tunes, and enjoy the process.
Happy snacking, friends!
Frequently Asked Questions
How do I make chocolate covered pretzels with no mess?
To keep things tidy while making chocolate covered pretzels, try using a fork to dip the pretzels into the melted chocolate. This allows you to have better control and reduces the number of chocolate drips. Also, make sure to let the excess chocolate drip off before placing them on your lined baking sheet!
Can I use different types of chocolate for dipping?
Absolutely! You can use white chocolate, dark chocolate, or even flavored chocolate (like mint or raspberry) to create unique chocolate covered pretzels. Just remember to adjust the melting process as different chocolates can have varying melting points.
How to make chocolate covered pretzels look more festive?
For a bit of flair, sprinkle your chocolate pretzels with colourful sprinkles, nuts, or even a drizzle of contrasting chocolate once the main coat has set. This not only adds a pop of colour but can also elevate the flavour profile for special occasions!
How do I store chocolate covered pretzels?
To keep your chocolate covered pretzels fresh, store them in an airtight container in a cool, dry place. They can last for about 1-2 weeks at room temperature. If you’re in a particularly warm climate, consider keeping them in the fridge to prevent the chocolate from melting.
Can I make chocolate covered pretzels ahead of time?
Yes, you can definitely make chocolate covered pretzels ahead of time! They’re perfect for prepping in advance. Just remember to let them cool completely before storing them in an airtight container to maintain their crunch and chocolate integrity.
Are chocolate covered pretzels healthy?
While chocolate covered pretzels are a delicious treat, they are definitely considered a snack rather than a health food. They provide a nice combo of sweet and salty tastes, but it's best to enjoy them in moderation.
You can also consider using dark chocolate for a healthier twist, as it usually contains more antioxidants.
Delicious Chocolate Covered Pretzels A Sweet And

