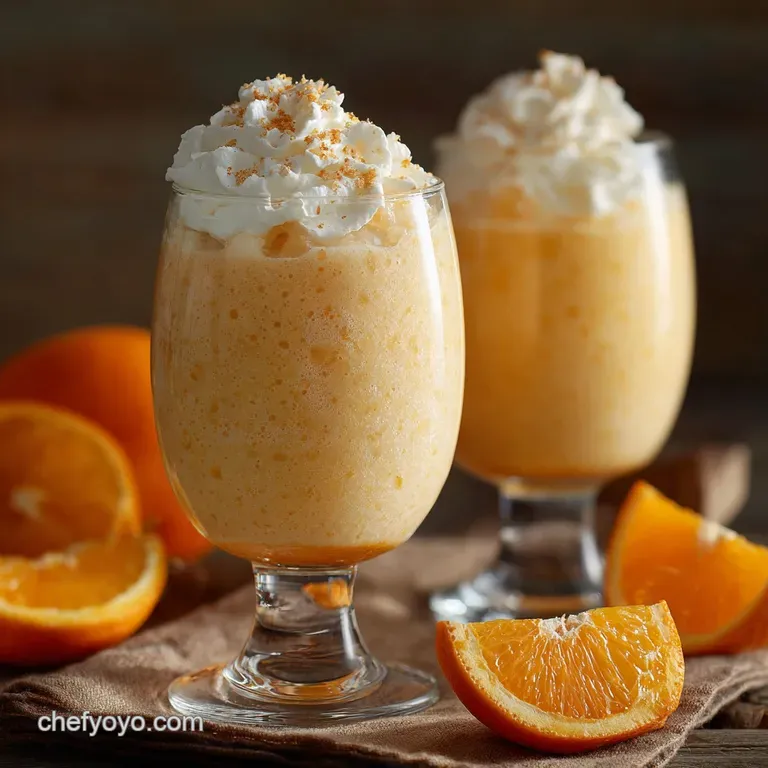
Orange Creamsicle Smoothie the Easiest 5Minute Highprotein Treat
- Recapturing Childhood Magic: The Ultimate Orange Creamsicle Smoothie
- Sourcing Your Sunshine: Essential Components and Preparation Tips
- Gear Check: The Only Piece of Equipment You Truly Need
- The Two and Minute Mix: Whipping Up This Nostalgia and Kick Treat
- Customizing Your Creamsicle Dream: Hacks and Swaps
- Decoding the Deliciousness: Nutrition Snapshot of the Orange Creamsicle Smoothie
- Recipe FAQs
- 📝 Recipe Card
Recapturing Childhood Magic: The Ultimate Orange Creamsicle Smoothie
I’m going to level with you. I spent far too long chasing that perfect, velvety orange flavor from my childhood you know, that iconic stick treat only to end up with sad, chunky, and vaguely bitter sludge every time I tried to turn it into a smoothie. It was depressing.
My kitchen looked like a tropical crime scene.
But then, I cracked the code. And I’m telling you, this isn't just a good smoothie. This is a nostalgic kick in the pants. It’s thick. It’s vibrant. It is the definitive Orange Creamsicle Smoothie Recipe . Forget buying the overpriced ones from the juice bar.
We can do this better, faster, and cheaper right here.
Why This Isn't Your Average Watery Blend
The difference between a thick, creamy smoothie and a watery disaster comes down to three things: fat, coldness, and zero liquid overload. We're not making watered down orange juice here. We are aiming for something so thick and frosty that you almost need a spoon to eat it.
The magic lies in using fully frozen orange segments and Greek yogurt. The combination gives you serious viscosity and keeps that ice crystal count low, preventing the grainy texture you get from simply dumping in a cup of ice. Trust me on this one.
The Secret Ingredient That Boosts the 'Creamsicle' Factor
Okay, what truly makes a dreamsicle different from just an orange juice drink? It’s the vanilla, obviously, but there's a second hero: the zest. I know, peeling an orange is annoying.
But that finely grated orange zest, mixed with a decent splash of pure vanilla extract, is what transforms the bright citrus into that sweet, rounded, almost candy and like flavor we remember. If you skip the zest, you lose the power. Go ahead, make this Orange Dreamsicle Smoothie aromatic!
Who Needs This Smoothie (and When to Drink It)
I rely on this recipe anytime I feel run down, or frankly, just lazy. It’s perfect if you need a speedy, high and protein breakfast that still feels like a treat. This is the ultimate grab and go meal replacement.
Plus, it’s loaded with natural Vitamin C, so if you’re fighting off the office crud, drinking a Tangerine Creamsicle Vitamin C Smoothie (even if you used Navel oranges!) feels both decadent and responsible.
Sourcing Your Sunshine: Essential Components and Preparation Tips
The most important prep step is freezing the fruit. It’s a total pain when you remember at 7 AM that you forgot to do it the night before. But without frozen fruit, you’re just pouring milk over ice, and we agreed we weren't doing that, right?
I recommend peeling and segmenting two or three oranges at a time, keeping them in a Ziploc bag in the freezer. That way, you’re always ready to whip up an Orange Creamsicle Smoothie Easy style.
Gear Check: The Only Piece of Equipment You Truly Need

Let’s be honest. When you're dealing with hard, frozen ingredients (like those rock and solid orange segments), a high and powered blender is absolutely non negotiable. You can try this in a cheap immersion blender, but you’ll probably burn out the motor, or worse, end up with chunks of frozen citrus that refuse to blend.
If you make smoothies regularly, invest in something robust. It saves time, energy, and your sanity.
Stripping the Pith: Ensuring a Sweet, Not Bitter, Orange Base
The white stuff under the peel the pith is the enemy of a perfect smoothie. It tastes bitter, and that bitterness will ruin the whole vibe. You need to be meticulous about peeling your oranges before freezing them.
Use a sharp paring knife if you have to, or simply choose easy and to-peel oranges like Navel varieties.
CRUCIAL WARNING: When grating the orange zest for the recipe, use a Microplane and only take the bright orange skin. As soon as you hit the white pith layer, stop. If you grate even a tiny bit of pith, your final smoothie will have a noticeably sharp, unpleasant aftertaste.
The Power of Freeze: Why Frozen Fruit Is Non and Negotiable
Frozen fruit does two jobs: it chills the smoothie without diluting the flavor (like ice cubes do), and it adds bulk and structure. This is how you achieve that coveted, thick, creamy milkshake texture without needing to add tons of heavy cream. Seriously, make sure your orange and banana pieces are frozen solid.
Achieving the Velvety Texture: Choosing Your Creamy Base (Yogurt/Milk)
I call for full and fat Greek yogurt here. Why? Because the fat molecules encapsulate the air pockets created during blending, resulting in a significantly smoother and more velvety texture. low-fat or fat free yogurt tends to yield a slightly icier texture.
For the liquid, I usually use unsweetened almond milk, but whole dairy milk or oat milk works beautifully too.
Related Recipes Worth Trying
- Raspberry Green Tea Smoothie The Healthy Morning Power Drink — Our Raspberry Green Tea Smoothie is the ultimate healthy morning smoothie Get the delicate earthy boost of green tea paired with vibrant raspberries in this...
- Creamy Peach Green Tea Smoothie The 5Minute Antioxidant Kickstart — This antioxidantrich Peach Green Tea Smoothie is the ultimate healthy shake for summer We use a special trick to lock in the flavour and achieve that thick...
- Ultimate Orange Creamsicle Smoothie The 5Minute Nostalgia Dream — This easy healthy Orange Creamsicle Smoothie tastes like a childhood throwback Thick dreamy and packed with protein thanks to Greek yogurt Ready in a real...
The Two and Minute Mix: Whipping Up This Nostalgia and Kick Treat
This process needs to be efficient. The longer the frozen ingredients sit in the blender, the softer they get, and the faster the resulting smoothie melts. We're going for speed.
Step 1: Loading the Blender for Optimal Flow and Results
Always, always layer your blender correctly. It’s an easy mistake to just chuck everything in. But liquids must go first!
- Pour the milk, yogurt, vanilla, and sweetener (if using) into the bottom of the blender.
- Add the orange zest on top of the liquid.
- Pile the frozen oranges and frozen banana on top. This ensures the blade catches the liquid immediately and pulls the hard, frozen stuff down efficiently.
Step 2: Starting Slow and Achieving the Perfect Consistency
Secure the lid. Start on the lowest setting for about five seconds to give the blade a chance to crush the bottom layer. Then, immediately ramp up to high speed. If you have a tamper, use it to push the frozen contents toward the blade until the mix begins to circulate smoothly and looks like a creamy vortex.
It should take about 60 to 90 seconds. Stop when you can no longer see any visible chunks of frozen fruit.
Step 3: Troubleshooting a Too and Thick or Too and Thin Mix
- Too Thick (Blade is Stuck): If the blender blades are just spinning in place, that’s called cavitation. Stop the machine, scrape down the sides, and add one tablespoon of liquid (milk or water) at a time. Seriously, one tablespoon. You don't need much.
- Too Thin (Runny): You probably added too much milk, or maybe your orange wasn't fully frozen. To salvage it, add 2 3 extra ice cubes or, even better, a spoonful of frozen Greek yogurt (if you keep some on hand). Blend quickly until thick again.
Customizing Your Creamsicle Dream: Hacks and Swaps
This Orange Creamsicle Smoothie base is a fantastic starting point. You can easily adapt it based on what you have and what your body needs.
- For the "No Banana" Crowd: I include 1/2 banana for optimal texture, but if you truly hate bananas, replace the half banana with an extra 1/2 cup of frozen cauliflower florets and 1 tablespoon of extra Greek yogurt. The texture will be slightly different, but the flavor remains clean.
- Adding Fibre: Toss in 1 tablespoon of chia seeds or ground flax seeds. They absorb liquid and actually help thicken the smoothie slightly as it sits.
- Make it Punchier: A squeeze of fresh lemon juice brightens up the citrus profile beautifully, making it even more refreshing.
Decoding the Deliciousness: Nutrition Snapshot of the Orange Creamsicle Smoothie
I love that this feels like a treat but packs a genuine nutritional punch. Because we use real fruit and high and quality yogurt, you’re getting natural sugars balanced out by plenty of protein and fiber. It’s the definition of a healthy indulgence.
Boosting the Breakfast Factor: Adding Protein and Supplements
If you want this to carry you all the way to lunch, make it a true Orange Creamsicle Smoothie Protein powerhouse. I always add unflavored collagen powder or vanilla whey protein powder.
Just be aware that protein powders soak up liquid fast, so you might need to add an extra 1/4 cup of milk to keep the consistency manageable.
Turning It Dairy and Free: Alternatives for a Vegan Orange Creamsicle Smoothie
Totally doable! Swap the dairy milk for any plant milk (oat milk is super creamy). The Greek yogurt is the main hurdle.
- Vegan Creamy Swap: Use an equivalent amount of frozen, plain coconut yogurt (full fat recommended) or silken tofu. Tofu is virtually flavourless and gives a massive protein boost, making it a great base for a Coconut Citrus Sunshine Smoothie .
Can You Prep This Ahead? Storage Guidelines for Smoothies
Here's the harsh truth: Smoothies are best consumed immediately. Once the cell walls of the fruit break down, the enzymes start working, and the flavor and texture change quickly. If you absolutely must prep ahead, pour the smoothie into an airtight mason jar, fill it right up to the top to minimize air contact, and store it in the fridge for no more than 12 hours.
It will separate, but a quick shake will usually bring it back.
Flavor Variations: From Mango Swirl to Lime Zest Boost
Want to mix things up? Try these simple tweaks:
- Mango Creamsicle: Replace half the frozen orange with frozen mango chunks.
- Ginger Zing: Add a 1/2 inch knob of fresh, peeled ginger to the mix for a surprisingly warming flavor kick.
- Coconut Cream: Add 1 tablespoon of coconut cream (the thick stuff from a can of coconut milk) for an extra rich, tropical finish.

Recipe FAQs
Right, how do I make sure this Orange Creamsicle Smoothie is thick and velvety, rather than a watery mess?
The secret weapon here is thoroughly freezing your oranges and bananas solid beforehand; this eliminates the need for excess ice, which often dilutes the flavour and texture. Always start with the minimum liquid required (just 1/4 cup of milk) and only add more if your blender blades are struggling to move the mixture.
I’m rushed in the mornings can I prep this smoothie the night before?
While blending it fully the night before will cause it to separate and lose its thick, beautiful texture, you can be sorted by pre-measuring all your frozen ingredients into a freezer safe bag.
Come morning, just chuck the bag’s contents, plus the liquids, straight into the blender for a rapid five minute breakfast.
I'm looking for a dairy-free version. What are the best swaps for the Greek yogurt?
For that essential creamy texture, swap the Greek yogurt for an equal amount of full fat coconut cream (chilled) or a thick, plain non-dairy yogurt alternative like oat or cashew yogurt. If you still want the protein punch, blended silken tofu is surprisingly effective and completely neutral in flavour.
What’s the actual trick to achieving that iconic nostalgic 'creamsicle' flavour?
It’s the beautiful marriage of rich vanilla and highly concentrated orange flavour; make sure you don't skip the pure vanilla extract, and crucially, add the tiny bit of orange zest, as the oils in the zest provide the powerful aromatic lift that frozen fruit can sometimes lack.
I want to use this as a full meal replacement. How can I easily boost the protein and fibre?
For a proper protein kick, simply stir in one scoop of unflavoured or vanilla protein powder after the main blend, making sure to add a tablespoon or two of extra liquid to compensate for the powder’s bulk. Alternatively, blend in a tablespoon of chia seeds or flax meal for a powerful fibre boost.
Orange Creamsicle Dream Smoothie

Ingredients:
Instructions:
Nutrition Facts:
| Calories | 340 calories |
|---|---|
| Fat | 8 g |
| Fiber | 5.5 g |
