Perfect Fluffy Sushi Rice Shari the Masterclass Guide
- Elevating Your Rolls: Why Sushi Rice is the True Star of Japanese Cuisine
- Sourcing the Essential Components for Superior Sushi Rice
- The Critical First Step: Rinsing Rice Until Clarity is Achieved
- The Art of Incorporating the Sumezu and Cooling Process
- Troubleshooting Common Sushi Rice Failures
- Recipe FAQs
- 📝 Recipe Card
Elevating Your Rolls: Why Sushi Rice is the True Star of Japanese Cuisine
The difference between a passable amateur hand roll and a truly exceptional piece of nigiri does not lie solely in the quality of the fish; it rests entirely on the quality of the rice beneath it.
This carefully prepared foundation, known as shari , is the bedrock of Japanese cuisine and the most crucial element in achieving a successful, restaurant quality Homemade Sushi Night .
Mastering the art of Perfect Sushi Rice requires patience and precision, but the result is a gloriously glossy, slightly sticky grain that elevates every flavor it accompanies.
Defining Shari: The Perfect Balance of Acidity and Sweetness
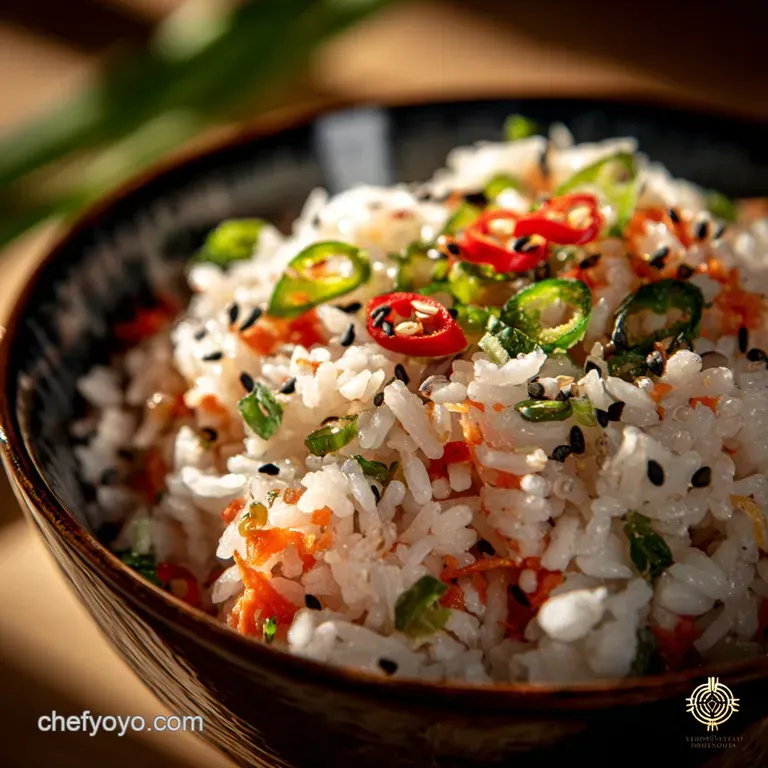
Shari is simply the term for cooked and seasoned Japanese Rice. Unlike plain steamed rice, shari boasts a delicate harmony of flavors tangy from the vinegar, sweet from the sugar, and subtly savory due to the salt.
This balance is critical because the seasoning cuts through the richness of oily fish while complementing delicate white fish, ensuring the palate never grows tired. Without this essential flavoring, even the freshest ingredients fall flat.
The Master's Secret: Achieving Grains That Cling, But Don't Clump
The defining characteristic of professional grade Sushi Rice is its texture. It must be sticky enough to bind together when compressed a requirement for holding its shape in a roll or as a base for nigiri yet simultaneously, the individual grains must remain distinct and pliable.
If the rice is overly sticky or mushy, it is impossible to work with; if it is too dry, it will crumble. Achieving this perfect "cling, don't clump" texture demands meticulous technique, especially when washing and seasoning the rice.
Why Texture Makes This Sushi Rice Method Non-Negotiable
While the steps themselves are straightforward, this detailed Sushi Rice Recipe is categorized as medium difficulty because achieving the required glossy finish and individual grain structure relies heavily on non-negotiable technique.
Any deviation in the preparatory stages particularly the rigorous rinsing and the specialized folding will release excess starch, resulting in a gluey mess rather than distinct, manageable grains. Precision in timing, temperature, and mixing is key to unlocking the true potential of the finished product.
Sourcing the Essential Components for Superior Sushi Rice
The quality of your shari begins long before the cooking process, starting with selecting the finest raw ingredients and the right tools.
Selecting the Correct Grain: Nishiki vs. Koshihikari Varieties
To create the Best Sushi Rice , you must use short grain Japanese varieties. Medium or long grain rice lacks the necessary starch content to achieve the desired stickiness. Look for premium grades like Koshihikari, Tamaki Gold, or even Nishiki.
These grains are characterized by their plump, rounded shape and their ability to absorb moisture effectively without bursting or becoming overly starchy when handled correctly. Three cups (570 g) of high-quality short grain rice are required for this recipe, yielding approximately five cups of finished shari.
The Miraculous Marinade: Crafting the Perfect Seasoning Vinegar (Sumezu)
The soul of the seasoning is the Sumezu or Sushi-zu , the slightly heated marinade that transforms plain steamed rice into glossy, flavorful shari .
To make this essential blend, combine ½ cup (120 ml) of unseasoned rice vinegar with 3 tablespoons (45 g) of granulated sugar and 1 teaspoon (5 g) of fine sea salt. Gently heat this mixture in a small saucepan over low heat, stirring until the sugar and salt are completely dissolved.
It is absolutely crucial that you do not allow the mixture to boil; simply warming it slightly ensures perfect dissolution. This straightforward Sushi Rice Seasoning Recipe is the key flavor driver.
Necessary Equipment Checklist: From Hangiri to Damp Cloth
Certain tools maximize the chance of success. While any heavy bottomed pot with a tight fitting lid or a reliable Sushi Rice In Rice Cooker will handle the cooking phase, the mixing phase requires specific equipment.
You will need a wide, shallow, non-metallic mixing bowl ideally a traditional wooden hangiri , which naturally absorbs excess moisture. If a hangiri is unavailable, use a large glass or stainless steel bowl, as vinegar can react with lesser metals.
Finally, you will need a wooden rice paddle or rubber spatula for mixing and a clean, slightly damp cloth for covering the finished rice.
Related Recipes Worth Trying
- Perfectly Cooked Brown Rice Preparation Tips Fluffy Stovetop Secret — Stop eating dry rice Follow these Brown Rice Preparation Tips for Perfectly Cooked Brown Rice Our Stovetop absorption method guarantees fluffy nutty grains...
- Ultimate Nigerian Jollof Rice Recipe Achieve the Party Smoke Flavour — The authentic Nigerian Jollof Rice recipe for perfectly separate smoky grains This classic West African onepot meal is the ideal showstopper for Sunday dinner
- The Monday Classic Proper Louisiana Red Beans and Rice Recipe — Forget the tinned stuff Our traditional Louisiana Red Beans and Rice recipe is slowcooked for rich smoky depth and that essential creamy texture Pure...
The Critical First Step: Rinsing Rice Until Clarity is Achieved
The foundation of firm, distinct grains is the removal of excess surface starch. This process, often underestimated, is arguably the most crucial step. Place the measured rice into a large bowl and cover it with cold water.
Vigorously churn the rice with your hand, immediately pouring off the resulting cloudy, milky water. This rinsing process must be repeated rigorously eight to ten times until the water that drains away is almost completely clear, like thin milk rather than heavy starch soup.
Do not skip or rush this step; inadequate rinsing guarantees mushy, overly gluey rice. Once rinsed, drain the rice in a fine mesh sieve for 15 minutes to allow residual water to drip away.
The Art of Incorporating the Sumezu and Cooling Process
With the starch removed, we now move into the stages of cooking, resting, and seasoning.
Hydration Protocol: Timing and Soaking for Optimal Softness
After draining, transfer the 3 cups of rinsed rice to your chosen cooking vessel. Add precisely 3 cups (710 ml) of cold, filtered water. This exact 1:1 Sushi Rice Water Ratio is standard for short grain rice.
If you wish to deepen the umami flavor, place one small 5 cm x 5 cm piece of kombu seaweed atop the rice before soaking. Allow the rice to soak for a full 30 minutes.
This essential hydration protocol ensures that the grains swell evenly before heat is applied, leading to uniform cooking and optimal softness.
Precision Cooking: Stove Top Versus Rice Cooker Methods
If utilizing the stovetop method, bring the rice and water to a rolling boil over high heat, uncovered. As soon as it boils, reduce the heat to the absolute lowest setting, cover the pot tightly, and simmer for exactly 15 minutes.
Under no circumstances should you lift the lid during this time. If using the Sushi Rice Instant Pot or a dedicated rice cooker, follow the manufacturer's specific instructions for Japanese short grain rice.
Once the cooking time is up (or the cooker signals completion), remove the pot from the heat and allow it to rest, still covered, for an additional 10 minutes of steaming. This residual steam finishes the cooking beautifully. Discard the kombu, if used, before transferring the hot rice.
Gentle Folding: Integrating Seasoning Without Crushing the Grains
Immediately scoop the steaming hot rice into your wide, shallow mixing bowl. Pour the prepared room temperature sushi-zu evenly over the hot rice. This temperature difference is key, allowing the vinegar to penetrate effectively.
Now, employing a crucial technique, begin the cutting and folding motion using your wooden paddle. Hold the paddle horizontally and "slice" straight down through the rice to break up clumps, then gently turn and fold the rice over itself. Do not stir or mash.
Stirring is the fastest way to crush the now-soft grains, resulting in a paste. The folding action integrates the seasoning while maintaining the structure of the individual grains.
Cooling Quickly and Evenly: Preparing the Sushi Rice for Rolling
The final stage is rapid cooling, which is essential for achieving the hallmark glossy finish. Continue the gentle folding motion while simultaneously cooling the rice quickly. Ideally, have an assistant use a fan (or use a hairdryer set to the cool setting) to gently waft air over the rice as you fold.
This rapid cooling evaporates excess moisture, creating that characteristic sheen. Continue this process until the rice cools to body temperature (around 90°F / 32°C). Once cooled, cover the bowl with a clean, slightly damp cloth or plastic wrap and hold it at room temperature.
The finished shari is ready to use immediately and should not be refrigerated.
Troubleshooting Common Sushi Rice Failures
Even seasoned home cooks occasionally run into texture issues. Knowing how to mitigate these problems can save your Homemade Sushi Night .
Fixing Mushy Rice and Overly Dry Batches
If your rice is truly mushy, it is often a result of insufficient rinsing or lifting the lid during the crucial steaming phase. Sadly, severely mushy rice is usually unsalvageable for rolling, but it can be repurposed into fried rice or croquettes.
If your batch is only slightly sticky, continue the fanning process, which helps dry the exterior. Conversely, if your rice is too dry or crumbly after cooling, gently spritz it with a small amount of water or a diluted mix of rice vinegar and water while you fold it, being careful not to soak the grains.
Storing Leftover Sushi Rice: Maintaining Texture and Freshness
One of the most important rules when handling Sushi Rice is: Never refrigerate it. The cold temperature hardens the starch, making the rice dry, brittle, and unusable for sushi.
Once seasoned, the rice can be safely stored at room temperature, covered with a damp cloth to prevent drying, for up to four hours. If you have leftovers, they are best enjoyed within 24 hours (still at room temperature, ideally) or gently repurposed into warm dishes.
Adjusting Acidity: Flavor Variations for Different Cuisines
While the classic Sushi Rice Seasoning Recipe detailed here provides the essential sweet and sour balance, the flavoring can be subtly adjusted to suit various preferences.
For a brighter, more citrus forward flavor profile, consider substituting one to two tablespoons of the standard rice vinegar with high-quality Yuzu vinegar. For those monitoring sugar intake, you can successfully substitute up to half of the granulated sugar with a monk fruit or stevia alternative, though the sugar provides necessary bulk and gloss, so complete elimination is not recommended.
Nutrition Facts at a Glance
Based on a standard serving size of approximately 1/2 cup of cooked and seasoned Sushi Rice (before fillings are added), the estimated nutritional values are: Calories: 200 220 kcal, Carbohydrates: 45 g, Protein: 3 g, Fat: <1 g, and Sodium: 250 mg.
This information provides a general estimate for the perfect, sticky base of your rolls.

Recipe FAQs
My rice looks like a sticky mess, not those lovely individual grains. Where did I go wrong?
Ah, the classic sticky rice conundrum! Most likely, you’ve skimped on the rinsing stage. The rice must be washed 8 10 times until the water runs almost completely clear, removing excess surface starch that turns cooked rice into a gluey disaster.
Also, remember the cardinal rule during seasoning: use a gentle cutting and folding motion, like trying to delicately slice a cake, or you’ll mash the delicate grains and ruin the essential structure.
Can I prep a big batch of Sushi Rice ahead of time, or is it a 'use it or lose it' situation?
Sushi Rice is famously best consumed fresh, ideally within a few hours of seasoning, and should never be refrigerated. Chilling damages the starch structure, making the rice hard, dry, and grainy a real tragedy, like finding your proper cup of tea has gone stone cold.
If you must store it briefly, keep it covered at room temperature with a clean, damp cloth for up to four hours maximum. This keeps it pliable and ready for rolling.
Fanning the rice sounds a bit OTT is that just fancy Japanese theatre, or does it actually serve a purpose?
It’s far from theatre; it’s an essential technique! Rapid cooling via fanning helps evaporate excess surface moisture while simultaneously allowing the rice to absorb the vinegar quickly, sealing the moisture inside the grains.
This process is the secret sauce for achieving that desirable glossy, almost pearlescent appearance on your finished Sushi Rice, ensuring the individual grains hold their shape beautifully without being wet or sticky.
I only have bog-standard basmati/long grain rice in the cupboard. Can I just use that for making sushi?
I'm afraid not, mate! This is one area where substitution simply won’t cut the mustard. Long grain rice, like Basmati, contains a high amount of amylose, a type of starch that keeps the grains separate and fluffy.
For sushi, you need short grain rice, which is high in amylopectin the sticky starch that provides the necessary tackiness and elasticity required to hold a roll together without it disintegrating into a heap of sadness.
Is there a way to make this amazing Sushi Rice without all the sugar? I'm trying to watch the calories!
While the sugar is key to the traditional flavour balance and assists in achieving that glossy finish, you can certainly reduce it. Try substituting up to half of the granulated sugar with a zero calorie sweetener like monk fruit or stevia, adjusting for potency.
Just be mindful that drastic reductions may slightly lessen the characteristic shine and subtle sweetness. If going low-sugar, ensure your vinegar still fully dissolves the salt before mixing it into the rice.
Perfect Japanese Sushi Rice Recipe

Ingredients:
Instructions:
Nutrition Facts:
| Calories | 185 kcal |
|---|---|
| Protein | 1.2 g |
| Fat | 0.1 g |
| Carbs | 32.4 g |
| Fiber | 0.4 g |
| Sodium | 6671 mg |
