Fried Pickles: Pub-Style Crispy Tangy Bites

- Welcome to the Ultimate Pub Grub: Crispy Fried Pickles Done Right
- The Science of Crisp: Achieving the Perfect Fried Texture
- Essential Components for the Best Homemade Fried Pickles
- Step-by-Step Guide to Frying Your Pickles to Golden Perfection
- Expert Frying Tips and Troubleshooting Common Issues
- Handling Leftovers: Reheating and Storing Your Crispy Snack
- Pairing Suggestions for Crispy Fried Dill Pickles
- Recipe FAQs
- 📝 Recipe Card
Welcome to the Ultimate Pub Grub: Crispy Fried Pickles Done Right
That shatteringly crisp shell. The salty, sour burst of vinegary dill pickle beneath. When done right, there is simply no better appetizer or late night snack than golden Fried Pickles . This isn't just pub food; it’s a culinary experience.
Trust me, the aroma alone when these hit the oil is enough to make you weak at the knees.
You don't need a fancy industrial fryer or a culinary degree to achieve this level of perfection. This homemade version is faster, cheaper, and honestly tastes way better than anything you’ll get from a chain restaurant. It’s the perfect, cheap thrill for game day.
I've waded through the greasy disasters and the soggy breading fails so you don't have to. We are going to nail the texture and flavor, resulting in the most addictive, crunchy Fried Pickles you’ve ever tasted. Let's dive in and learn the secret to that magnificent crisp.
The Science of Crisp: Achieving the Perfect Fried Texture
What Makes the Pub-Style Difference?
When you order Fried Pickles at a great pub, you notice two things: they aren’t soggy, and the coating doesn't slide off. That professional texture comes down to specific steps many home cooks skip.
We are going beyond just flour and egg; we’re using cornmeal and a crucial resting period.
Overview of the Recipe Process and Timing
This recipe is simple: dry the pickle, dunk it in a spicy buttermilk wash, and then dredge it heavily in a seasoned flour cornmeal mixture. The process takes about 60 minutes total, but nearly half of that time is passive just waiting for the pickles to dry out and the coating to set.
Don't rush the process, especially the drying!
Why These Golden Bites Are Addictively Good
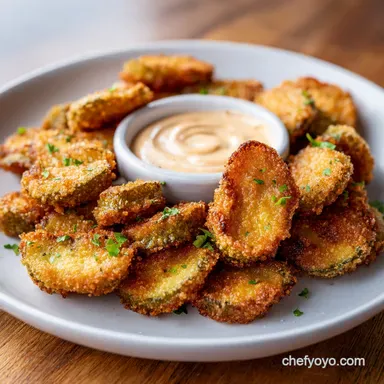
It’s the perfect storm of flavor profiles, really. You have the high acidity and cooling temperature of the dill pickle contrasting with the hot, salty, robustly seasoned, crispy shell. Pair that with a zesty Cajun mayonnaise, and honestly, you might forget you even had other snacks planned.
These truly are the best Fried Pickles .
The Magic of Buttermilk (Acidity and Adhesion)
Buttermilk is your secret weapon, just like it is in my famous [Oven Fried Chicken: Crispy Buttermilk Recipe (No Deep Frying)]. The lactic acid in the buttermilk breaks down the surface proteins on the pickle slightly, allowing the dry flour and cornmeal mix to adhere better. Plus, it gives a lovely subtle tang.
Critical Step: Eliminating Pickle Moisture
This cannot be stressed enough: moisture is the enemy of crisp. Dill pickles are essentially little sponges soaked in brine. If you skip aggressively patting and draining them, the coating will steam, become mushy, and slide off into the oil. We need those pickle chips bone dry.
This is the difference between great Fried Pickles and a crumbly mess.
Blending the Robust Seasoning Mix
I don’t believe in bland breading. Ever. The seasoning mix for these Fried Pickles needs punch that's where the smoked paprika, cayenne, and garlic powder come in. We are seasoning the coating , not just relying on the saltiness of the pickle itself.
Essential Components for the Best Homemade Fried Pickles
Choosing the Right Dill Pickles (Chips vs. Spears)
You can absolutely use spears if you prefer, especially for dipping. However, I am a chip person for Fried Pickles . The chips (or slices) offer a better ratio of crispy coating to pickle, and they cook more uniformly. Just make sure whatever you choose, they are firm, not soft.
Detailed List of Frying and Coating Ingredients
Here is exactly what you need to create this crispy masterpiece. I love the addition of cornmeal; it guarantees that pub-style grit and crunch.
- 16 oz jar of Dill Pickle Chips (drained)
- 1 cup All-Purpose Flour
- 1/2 cup Fine Yellow Cornmeal (essential!)
- 1 cup Buttermilk
- 1 large Egg
- 1 tsp Cayenne Pepper (adjust to taste)
- 1 tsp Smoked Paprika
- 1 tsp Garlic Powder
- Neutral Oil for frying (Peanut, Canola, or Vegetable)
Making the Zingy Cajun Mayonnaise Dip Base
Every good deep fried item needs a killer sauce, and these Fried Pickles are no exception. This zingy dip is ready in 30 seconds and adds a much needed cooling creaminess.
- 1/2 cup Quality Mayonnaise
- 1 tsp Cajun Seasoning (or Old Bay)
- 1 tbsp Fresh Lemon Juice
- 1/2 tsp Worcestershire Sauce
- Hot Sauce (optional, for extra heat)
Chef’s Note: Make the dip first! Let it chill in the fridge while you prepare and fry the pickles. The flavor develops nicely when given 30 minutes to marry up.
Flour and Spice Substitutions for gluten-free Options
If you need a gluten-free option, don't worry, you can still achieve beautifully crispy Fried Pickles . The substitution is simple and effective.
| Ingredient | Standard Substitution | gluten-free Alternative |
|---|---|---|
| Buttermilk | Milk + Vinegar (let sit 5 mins) | Plant Milk + Lemon Juice |
| All-Purpose Flour | N/A | Rice Flour + Potato Starch (equal parts) |
| Cornmeal | Fine Semolina | Fine gluten-free Breadcrumbs |
step-by-step Guide to Frying Your Pickles to Golden Perfection

Draining and Drying the Pickle Slices (Moisture Control)
Empty the jar and spread your pickles out on a wire rack set over a baking sheet. Blot them vigorously with paper towels. You want to get out as much brine as possible. Let them air-dry for at least 15 minutes while you mix your coating.
Seriously, the success of your Fried Pickles depends on this step.
The Triple Dip Coating Method
Set up your dredging station. Bowl 1: Whisk together buttermilk and egg. Bowl 2: Whisk together flour, cornmeal, and all the spices. Using one hand for wet ingredients and one hand for dry, dip each pickle slice into the buttermilk mix, letting excess drip off.
Then, move it immediately to the dry mix, pressing down firmly to ensure every inch is covered in that delicious seasoning.
Achieving the Optimal Frying Temperature
Pour your oil into a Dutch oven or heavy pot, filling it no more than halfway. Heat it slowly to 365°F (185° C) . You absolutely must use a thermometer! If the oil is too cold (below 350°F), the pickles absorb oil and become greasy.
If it’s too hot (above 375°F), the coating burns before the pickle is fully heated.
Draining and Seasoning Post Fry
Carefully drop 8 10 coated Fried Pickles into the hot oil. Fry them for about 2- 3 minutes until they are a deep, beautiful golden brown. Remove them immediately with a spider strainer. Transfer them to a clean wire rack set over a pan, not paper towels!
Immediately sprinkle them with a pinch of flaky salt. Serve these magnificent Fried Dill Pickles instantly with the Cajun Mayo.
Expert Frying Tips and Troubleshooting Common Issues
Preventing the Coating from Sliding Off
The single biggest mistake people make is frying immediately after coating. The secret is the 10 minute rest period . Once the pickles are coated, let them sit on the wire rack for 10- 15 minutes.
This rest allows the moisture from the buttermilk to hydrate the starch and gluten in the flour/cornmeal, creating a sturdy crust that adheres beautifully during frying.
Temperature Control: Keeping Oil Consistent
Every time you add food to the oil, the temperature drops. This is why using a thermometer is non-negotiable for excellent Fried Pickles . Always check the temperature between batches and allow it to come back up to 365°F before adding more. This ensures uniform crispness.
Why You Should Fry in Small Batches
If you overcrowd the pot, the temperature plummets instantly. Suddenly, you aren't frying; you are stewing your pickles in warm oil, making them greasy and heavy. Fry small batches (8 10 pieces max), and you will guarantee maximum crispness every single time.
Maximizing the Seasoning Layer
When coating the pickles in the dry mix, really give them a good, firm press. Don't be shy! That layer of seasoned flour and cornmeal is where all the wonderful texture comes from. Think of it like giving the pickle a tiny, aggressive back rub until it’s perfectly dusty.
Handling Leftovers: Reheating and Storing Your Crispy Snack
Best Practices for Reheating Day-Old Bites
Can you reheat Fried Pickles ? Yes, but never in the microwave! That guarantees a steamed, floppy mess. The key is dry heat. Reheat day-old leftovers on a foil lined baking sheet at 375°F (190°C) for 8- 10 minutes, or even better, in an air fryer at 350°F (175°C) for 4- 6 minutes.
They come out nearly as crispy as the day you made them.
Can You Prep Coated Pickles Ahead of Time?
This one is tricky. While the 10 minute rest is essential, I don't recommend coating them hours ahead. The pickles are wet on the inside; they will eventually seep moisture into the coating, making it damp and prone to sliding off.
If you must prep ahead, drain and dry the pickles aggressively, make the coating mix, and store them separately. Do the coating process immediately before frying.
Pairing Suggestions for Crispy Fried Dill Pickles
These rich, salty, tangy snacks need partners that can cut through the richness.
Dips (Beyond the Cajun Mayo)
- Creamy Dill Ranch Dressing
- Tangy Blue Cheese Dip (for a proper pub feel)
- Sweet Chili Sauce (if you want something sticky and sweet)
Complementary Sides
Serve these alongside a sharp, simple vinegar based coleslaw or a light green salad with a tart vinaigrette. The acidity balances the frying oil perfectly.
If you’re hosting a full fried food feast, don’t stop here! You have to check out my tutorial on [Fried Oreos: The Ultimate Fairground Dessert Recipe at Home] they use a very similar frying technique and are the perfect sweet cap to a savory round of Homemade Fried Pickles .
You deserve that fairground feeling at home.

Recipe FAQs
Why is my fried pickle coating soggy or falling off during cooking?
The main cause is usually excess moisture. Ensure you thoroughly pat the pickle slices bone dry with paper towels before beginning the buttermilk soak, as any residual liquid will weaken the batter.
Additionally, do not overcrowd your frying vessel; this drastically lowers the oil temperature, which results in steaming and leads to a soft, greasy crust.
What is the ideal oil temperature for deep frying the pickles?
The optimal oil temperature for achieving a golden, crisp crust is 350°F (175°C). Using a thermometer to maintain this heat is crucial, as temperatures dropping below 325°F (160°C) will cause the coating to absorb excessive fat, making them heavy and oily.
If the oil is too hot, the crust will burn before the pickles are heated through.
Can I make these fried pickles dairy-free or vegan?
Yes, you can easily substitute the buttermilk to make this recipe dairy-free. Use plain unsweetened plant based milk (like almond or soy) and mix in 1 tablespoon of apple cider vinegar or lemon juice, allowing it to sit for five minutes until curdled.
For vegan preparation, ensure your mayonnaise component in the dipping sauce is a vegan substitute.
Is it possible to air fry or bake these instead of deep frying?
Absolutely; air frying or baking are excellent alternatives for a lighter version, though the texture will be slightly different. After breading, spray the pickles generously with cooking oil spray, then air fry at 400°F (200°C) for 8-10 minutes, flipping halfway until they are golden brown and crisp.
Baking requires a slightly longer time, often 15-20 minutes, at the same temperature.
What kind of pickle works best: chips or spears?
Dill pickle chips (slices) are traditionally preferred as they offer the highest batter-to-pickle ratio, ensuring maximum crunch in every bite. If you choose to use spears, ensure they are small, uniform, and thoroughly dried before coating, as they retain much more moisture than the thinner chips.
How far in advance can I prepare the coated pickles?
You can prepare the pickles up to the final breading step about an hour ahead of time, but no longer, or the coating will start to weep. Place the fully coated pickles on a wire rack set over a baking sheet and refrigerate or lightly freeze them for 10-15 minutes immediately before frying.
This chilling process helps the coating set and adhere firmly to the pickle.
How should I store and reheat leftover fried pickles to maintain crispiness?
Store any leftovers in an airtight container in the refrigerator for up to three days, though they are best eaten fresh. To restore their crisp texture when reheating, use an air fryer at 350°F (175°C) for 3-5 minutes, or spread them in a single layer on a baking sheet and toast them in a conventional oven until heated through.
Pub Style Crispy Fried Pickles
Ingredients:
Instructions:
Nutrition Facts:
| Calories | 480 kcal |
|---|---|
| Fat | 35 g |
| Fiber | 2 g |
