Fried Oreos: the Ultimate Golden Fairground Favourites Recipe
- The Magic of Deep-Fried Oreos: Why We Love This Fairground Treat
- Mastering the Batter: The Science Behind the Perfect Fluffy Coating
- Gathering Your Supplies: Essential Ingredients and Smart Swaps
- How to Make Ultimate Golden Fried Oreos: The Preparation and Frying Method
- Troubleshooting and Pro Tips for Perfect Results
- Holding the Gold: Storage and Reheating Guidelines
- Fairground Flair: Creative Toppings and Dessert Pairings
- Recipe FAQs
- 📝 Recipe Card
The Magic of Deep Fried Oreos: Why We Love This Fairground Treat
Remember that glorious, sweet smell drifting through the fairground air? That is pure, unadulterated nostalgia, wrapped up in a slightly greasy paper napkin. These aren't just cookies anymore; they are warm, glorious, cake like miracles with a gooey, melted center and a stunningly crispy, golden shell.
Seriously, the contrast in texture here is absolutely everything, providing the ultimate hit of comfort food joy.
You might assume that making a proper [fried oreos recipe] at home is complicated or messy, requiring tons of fancy equipment. Nope, not even close! This is truly one of my favorite "fairground favorites" because it uses simple pantry ingredients and takes less than 40 minutes start to finish.
It’s the perfect, cheap, and fast showstopper when you need a serious sugar fix and want to truly indulge.
I’ve spent years perfecting the exact right batter consistency not too thin, not too thick so you get that beautiful golden puff every single time, transforming the humble chocolate cookie into a sophisticated dessert.
Stop dreaming about the state fair treats; let's crack on and make the ultimate Golden Fried Oreos right now.
Mastering the Batter: The Science Behind the Perfect Fluffy Coating
The true genius of this recipe isn't the cookie itself, of course. It’s the secret lies entirely within the light, slightly sweet batter. We use baking powder for massive lift, instantly transforming a simple pancake style mix into something light and airy that puffs up beautifully the second it hits the hot oil.
The Transformation: From Cookie to Cake Like Delight
When you dunk that cold Oreo into the hot oil, the cookie’s sugar and cream filling begin to melt almost immediately, creating a lovely molten core. The surrounding batter cooks quickly and acts as an insulating layer, trapping the heat and steam, which gives you that marvelous cake like dessert texture.
If your batter is too heavy, you end up with a dense, sad coating that just absorbs oil, but this specific ratio ensures optimal fluffiness.
Necessary Equipment Checklist (Beyond the Basics)
You actually don't need a dedicated deep fryer, thankfully. What you do need are a few crucial safety and accuracy tools.
- A heavy bottomed pot or Dutch oven (cast iron works best for retaining heat).
- A deep fry thermometer. This is non-negotiable; guessing the temperature is how you end up with either a burnt exterior or a greasy, uncooked interior.
- A wire spider or slotted spoon, which is essential for safely transferring the slippery, battered treats.
Safety First: Handling Hot Oil Like a Pro
Handling hot oil always requires respect and attention. Never leave the pot unattended while it is heating or cooking, even for a moment. Keep your oil depth reasonable you only need enough oil to cover the Oreos completely, about 2 3 inches.
Also, always keep a tight fitting lid next to the pot; if the oil starts smoking or catches fire, slide the lid over the pot immediately and turn off the heat. If you’re nervous about deep frying entirely, I have plenty of crispier options, like my guide to [Oven Fried Chicken: Crispy Buttermilk Recipe (No Deep Frying)], that keep the oven door safely closed!
The Ideal Consistency: Achieving a Smooth, Dunkable Mix
The batter should coat the back of a spoon thickly but still run off easily. Think slightly thinner than commercial pancake batter, but much thicker than crepe batter. This allows it to stick to the cookie without running off completely when you transfer it to the fryer.
If your batter looks watery, add a tablespoon of flour at a time until it tightens up.
Temperature Matters: Why Cold Batter is Crucial
This is the non-negotiable step that separates the pros from the amateurs: Chill the batter. The sudden temperature difference when the cold batter meets the 350°F (175°C) oil creates an immediate, massive burst of steam, locking the crust instantly.
This ensures minimal oil absorption and maximum internal fluffiness. Let it rest for at least 10 minutes before use.
Texture Breakdown: Fluffy Exterior vs. Gooey Interior
The goal here is a perfectly golden, dry, and crunchy exterior that gives way immediately to a warm, soft Oreo cookie that now tastes almost like a brownie. The cream center should be entirely molten, creating a delightful gooey contrast to the crunchy shell. This truly is a textural masterpiece!
Gathering Your Supplies: Essential Ingredients and Smart Swaps
We are keeping this super simple, using pantry staples for the best [fried Oreos at home].
The Core Trio: Cookies, Batter Mix, and Frying Oil Selection
| Ingredient | My Recommendation | Smart Swap/Substitute |
|---|---|---|
| All-Purpose Flour | Standard AP Flour (Sifted) | 1:1 gluten-free Blend or Oat Flour |
| Whole Milk | Full Fat Dairy Milk | Buttermilk or Plant Based Oat/Soy Milk |
| Vegetable Oil | Canola, Peanut, or Safflower Oil | Solid Shortening or Lard (Higher Smoke Point) |
| Oreo Cookies | Standard Original (Crucial!) | Nutter Butter Cookies or Cream Filled Shortbread |
Dairy Alternatives for a Lighter Batter
If you’re trying to go dairy-free, oat milk or high-quality soy milk works beautifully in this batter without altering the texture too much. Alternatively, if you only have regular milk but want the slightly tangy complexity of buttermilk, simply mix 3/4 cup milk with 1 teaspoon of white vinegar and let it sit for five minutes before mixing the batter.
Choosing the Right Cooking Oil Smoke Point
You absolutely need a high smoke point oil for deep frying; oils like extra virgin olive oil are out! Canola, vegetable, peanut, or sunflower oil are your best friends here because they can withstand the required 350°F (175°C) heat without breaking down, ensuring a clean, non-greasy flavour.
I prefer canola oil for its neutral taste.
Flavor Variations: Which Oreo Flavour Works Best?
Stick with the classics for your first attempt! The standard Original Oreo is the perfect size and has the right amount of cream. Do NOT use Double Stuf! Trust me, the extra cream filling often melts too quickly and violently, causing the cookie to burst open in the oil and make a giant mess.
However, once you nail the basic technique, feel free to branch out to Golden or Mint Oreos for a fun twist. If you’re looking for a slightly less indulgent dessert, maybe check out something lighter like [Top Skinnytaste Recipes List: Un-Fried Chicken Parm Casserole (Lightened)] (wait, that's savoury, but the spirit of lightening up is there!).
How to Make Ultimate Golden Fried Oreos: The Preparation and Frying Method
Here is the step-by-step guide to achieving perfection. Remember, timing and temperature are everything!
Step 1: Preparing the Wet and Dry Ingredients
In your first bowl, whisk together all the dry ingredients: flour, sugar, baking powder, and salt. In your second, combine the egg, milk, and vanilla extract. Then, pour the wet ingredients into the dry ingredients.
Whisk them until they are just combined a few small lumps are actually okay and will yield a better, fluffier result. Let this batter rest for 10 minutes while you heat the oil.
Step 2: Dipping Technique for Even Coating
While the oil heats, place your cookies next to the batter bowl. Working quickly, take one cookie and drop it completely into the batter. Use a fork or wooden skewer to flip it over, ensuring every inch is coated evenly. Lift the cookie out and let the excess batter drip back into the bowl for a few seconds.
This slight drain prevents too much heavy batter from pooling in the hot oil.
Step 3: Frying Temperature Control
Pour 6 cups of high smoke point oil into your heavy pot and clip your thermometer to the side. Heat the oil slowly over medium heat until it registers a precise 350°F (175° C) . This is the sweet spot. Carefully lower 3 4 battered Oreos into the oil using the fork.
Do not overcrowd the pot , as this drastically drops the oil temperature, leading to heavy, sodden Oreos. Fry for 90 seconds per side, turning them once, until they are beautifully golden brown and puffed up.
Step 4: Draining and Finishing the Cookies
Use your wire spider or slotted spoon to scoop the finished cookies out of the oil. Place them immediately onto a cooling rack that is lined with paper towels underneath to wick away any excess fat. Allow the oil temperature to return to 350°F (175°C) before dropping the next batch.
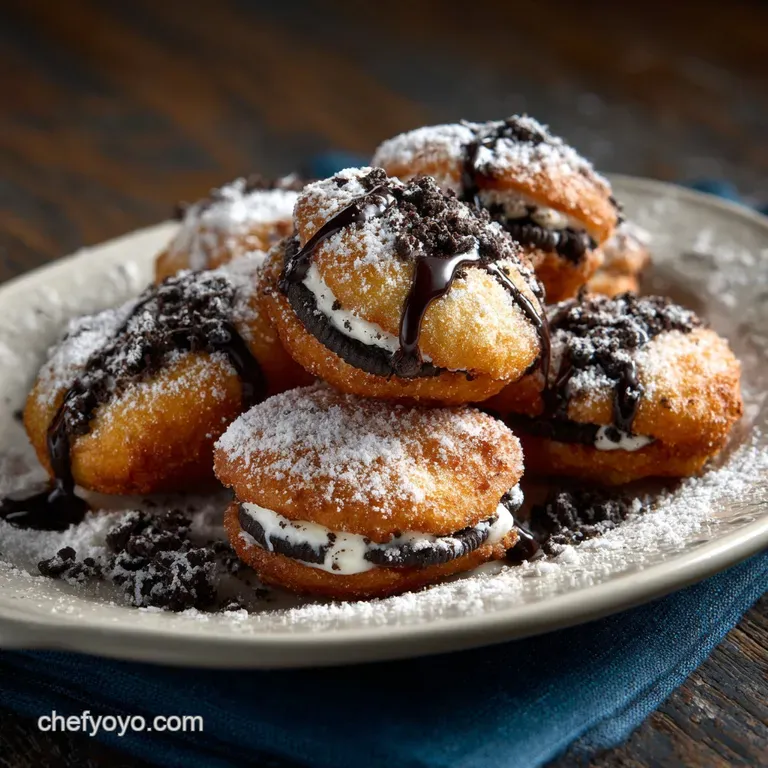
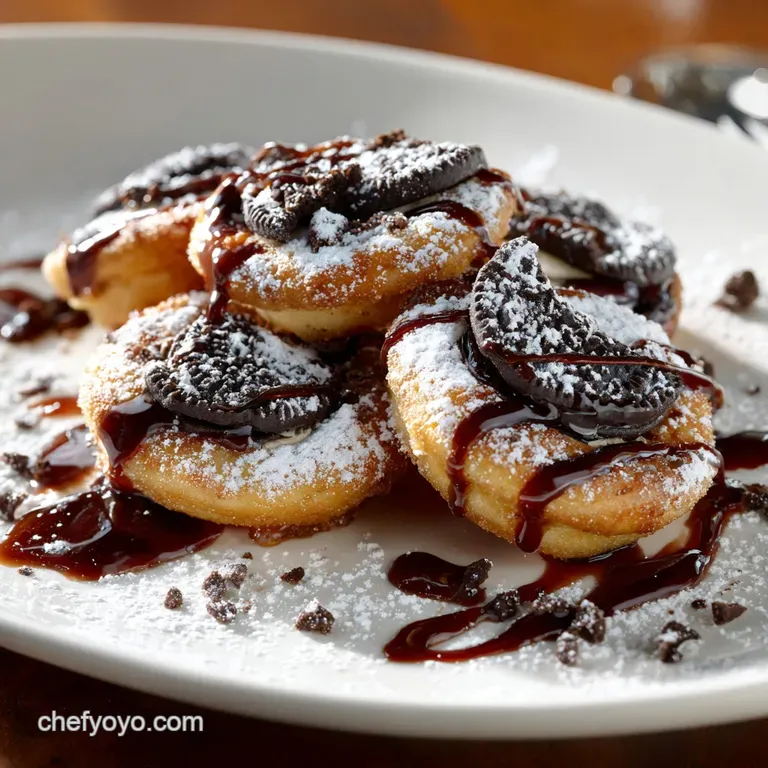
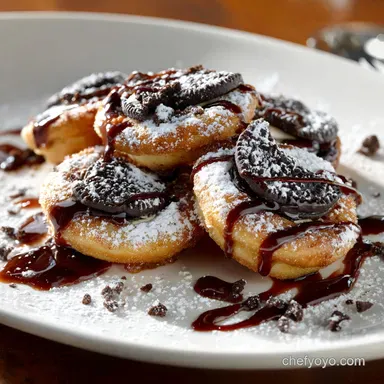
Once slightly cooled but still very warm, transfer them to a serving plate and dust generously with powdered sugar.
Troubleshooting and Pro Tips for Perfect Results
Chef's Note: The single biggest mistake home cooks make with deep frying is rushing the oil. If it’s too cold, you get grease. If it’s too hot, you get a raw center and a burnt crust. Be patient; 350°F is your best friend.
Problem Solving: Why is My Batter Falling Off?
If your beautiful batter is slipping right off the cookie and making a mess in the oil, there are two primary culprits. First, your batter is likely too thin; try whisking in a tablespoon of extra flour to thicken it up immediately.
Second, the batter wasn't cold enough, meaning it didn't set fast enough in the hot oil.
Achieving a Non-Greasy Fried Finish
A non-greasy finish requires that 350°F (175°C) oil temperature and quick draining. If the oil is too cool, the batter spends too long in the fat, acting like a sponge. Always place the finished Oreos on a wire rack over paper towels, not directly on a plate, as this allows air circulation and prevents them from steaming and softening.
Holding the Gold: Storage and Reheating Guidelines
Short Term Storage (Room Temp vs. Fridge)
Look, these are best served immediately honestly, within five minutes of leaving the oil. But if you have leftovers, they will keep at room temperature for about 4– 6 hours before the crispness starts to fade dramatically.
Store them in an airtight container in the refrigerator for up to 3 days, but be warned: they lose all structural integrity and crispness when chilled.
Can You Freeze Unfried or Cooked Fried Oreos?
Freezing Cooked: Surprisingly, yes! Once fully cooled, flash freeze the fried Oreos on a sheet pan for an hour, then transfer them to a freezer bag or container. They can be frozen for up to 2 months.
Freezing Unfried: This is tricky. You can flash freeze the battered, unfried cookies, but they must be completely frozen before bagging, otherwise they will stick horribly. Cook them straight from frozen, adding an extra minute or two to the cook time.
Best Methods for Reheating to Crispness
Never microwave these; they turn into sad, soggy blobs. The key is to reintroduce dry heat quickly.
- Oven Method: Preheat your oven to 350°F (175°C). Place the Oreos on a baking sheet and heat for 5- 8 minutes until warmed through and the exterior is crisp again.
- Air Fryer Method: This is the absolute best way to reheat them. Set your air fryer to 330°F (165°C) and reheat for 3– 5 minutes. They come out almost as good as fresh! The air fryer is a lifesaver for achieving maximum crispness without oil, much like my technique in the [air-fried Chicken Sandwich UltraCrispy Juicy Healthy LowFuss Recipe].
Fairground Flair: Creative Toppings and Dessert Pairings
Classic Dustings: Powdered Sugar and Cinnamon Sugar
The traditional dusting of powdered sugar (icing sugar) is essential and cuts through the richness beautifully. For a cozy twist, mix 1/4 cup granulated sugar with 1 teaspoon of ground cinnamon and toss the warm Oreos in the mixture immediately after draining.
Sauce Drizzle Ideas (Caramel, Chocolate Ganache)
Drizzling is mandatory, right? Try melting down some creamy peanut butter, heating some classic chocolate syrup, or spooning over a thick salted caramel sauce. A bright raspberry coulis also works brilliantly to provide necessary tartness.
Ice Cream and Whipped Cream Complements
Because these are served hot, you need a chilling contrast. A large scoop of high-quality vanilla bean ice cream or a dollop of fresh, cold whipped cream melts delightfully over the top, making the entire experience intensely satisfying.

Recipe FAQs
Why is my fried Oreo batter soggy or excessively greasy?
This is typically a temperature issue. If the oil is not hot enough (ideally 350°F to 375°F), the batter absorbs the oil instead of forming an immediate, crisp crust. Ensure you use a reliable thermometer and avoid overcrowding the pot, which instantly drops the oil temperature below the necessary frying point.
What is the ideal oil temperature for deep frying these?
The optimal temperature range is 350°F (175°C) to 375°F (190°C). This allows the exterior batter to cook quickly and achieve a beautiful golden crispness before the Oreo cookie itself burns or disintegrates. Maintaining this temperature throughout the process is crucial for a light, fluffy result.
My batter keeps sliding off the Oreos. What should I do?
The batter might be too thin; try adding an extra tablespoon of flour to increase the viscosity, aiming for a consistency similar to thin pancake batter. Also, ensure your Oreos are completely dry before dipping, as any residual moisture prevents the batter from properly adhering to the cookie surface.
Can I make Fried Oreos gluten-free or vegan?
Absolutely. For gluten-free, substitute standard all-purpose flour with a 1:1 gluten-free baking blend that contains xanthan gum. For vegan preparation, ensure you use certified vegan Oreos and replace the milk and egg in the batter with non-dairy milk and a flax egg or commercial egg replacer.
Which type of Oreo cookie works best for frying?
Classic Oreos work perfectly, but many cooks prefer using Double Stuf Oreos because the extra cream filling melts into a wonderfully gooey, almost marshmallow like interior when heated. Avoid using specialty thin cookies, as they often become overly soft and lose their structure during frying.
Can I use an Air Fryer instead of deep frying?
While you can use an air fryer, the results will differ significantly from the classic deep fried texture; they will be less pillowy and rich. To approximate the deep fried texture, coat the battered Oreos heavily with cooking spray or oil and air fry at 375°F (190°C) until golden brown, ensuring you flip them halfway through.
How should I store and reheat leftover Fried Oreos?
Fried Oreos are best enjoyed immediately after cooking, but leftovers can be stored in an airtight container for up to 2 days at room temperature. To reheat, use a conventional oven or a toaster oven set to 350°F for about 5 to 8 minutes; this method helps recrisp the batter without making it chewy like microwave heating would.
Ultimate Golden Fried Oreos Recipe
Ingredients:
Instructions:
Nutrition Facts:
| Calories | 650 kcal |
|---|---|
| Fat | 40 g |
| Fiber | 1 g |
