The Proper Glaze Master Homemade Teriyaki Sauce 15Minute Umami Bomb
- Ditching the Bottle: Reclaiming Authentic Teriyaki Sauce
- Sourcing the Essentials: The Four Core Elements of the Glaze
- Achieving the Perfect Viscosity: Step-by-Step Glazing Technique
- Beyond the Chicken: Maximizing Your Homemade Teriyaki Sauce Yield
- Troubleshooting and Customization: Adapting the Base Recipe
- Recipe FAQs
- 📝 Recipe Card
Ditching the Bottle: Reclaiming Authentic Teriyaki Sauce
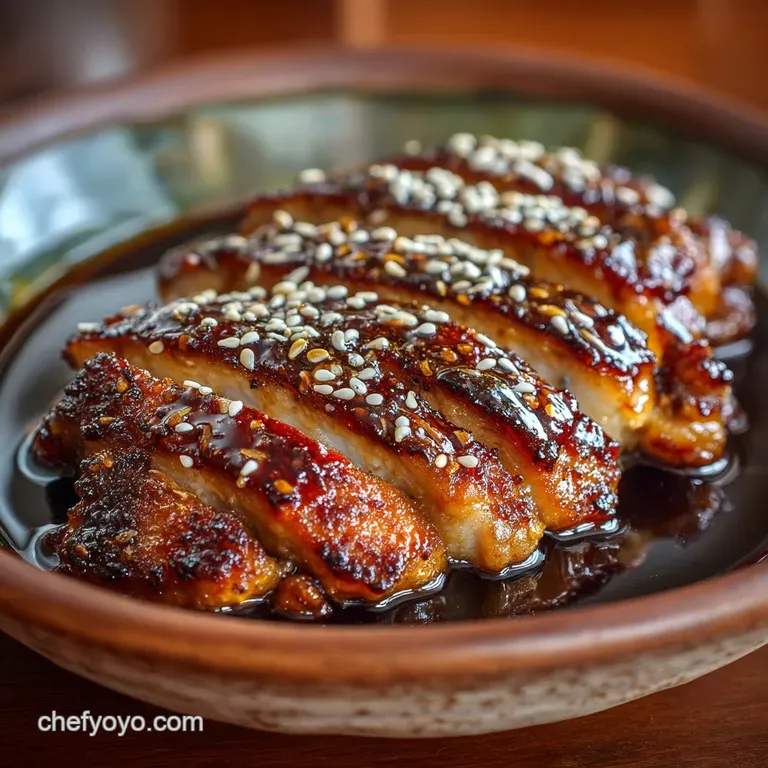
If your experience with Teriyaki Sauce is defined by the sticky, cloyingly sweet bottled version from the supermarket shelf, prepare for a revelation. Authentic, high-quality teriyaki is not merely a sugary syrup, but a sophisticated, balanced glaze that serves as the perfect complement to savory proteins.
Our Homemade Teriyaki Sauce Recipe focuses on achieving this depth and complexity in just about 15 minutes of active cooking time, proving that the best flavor is always the quickest path.
Decoding the Umami: What 'Teri' and 'Yaki' Actually Mean
Understanding the name unlocks the sauce’s true purpose. "Teri" translates directly to "glaze" or "shine," while "yaki" refers to the method of "grilling" or "broiling." Therefore, teriyaki is fundamentally a technique involving the application of a rich, glossy finish during the cooking process.
It’s designed to coat, caramelize, and shine not drown the dish which is the hallmark of a successful Quick and Easy Teriyaki Sauce.
The Teriyaki Triad: Why Soy, Mirin, and Sake Are Non-Negotiable
The backbone of true Teriyaki Sauce is the precise ratio of three essential Japanese liquid ingredients. The depth of flavor begins with soy sauce, providing the fundamental umami and salinity.
Mirin, the sweet rice wine, contributes both sweetness and the necessary viscosity and gloss that gives the "teri" its signature shine. Finally, Sake, whether cooking or drinking grade, adds an essential alcoholic depth that tenderizes proteins and allows the flavors to penetrate thoroughly.
Skipping any part of this triad fundamentally changes the character and potential of the final glaze.
The Problem with Corn Syrup: Identifying Sickly Sweet Imitations
Many commercially produced sauces rely heavily on high fructose corn syrup and thickeners that result in a texture that is heavy and unbalanced. This overload of sweetness masks the subtle fermented flavors of the rice wines and soy.
A proper Sweet Teriyaki Sauce Recipe achieves its desired sugar content using a minimal amount of granulated sugar (about 1/4 cup / 50g in our recipe) combined with the natural sweetness of Mirin, allowing the umami of the Teriyaki Soy Sauce to remain central to the profile.
Sourcing the Essentials: The Four Core Elements of the Glaze
Creating an exceptional glaze starts with sourcing high-quality Teriyaki Sauce Ingredients. This is a remarkably simple recipe it only requires four core elements plus a thickener so the quality of each component is magnified.
Choosing Your Soy: Shoyu vs. Tamari for Depth of Flavor
For the best results, you need a high-quality fermented soy base. We specify 1 cup (240 ml) of low-sodium Shoyu (traditional Japanese soy sauce) for this recipe. Using low-sodium ensures that the concentrated glaze doesn't become overwhelmingly salty after reduction.
If you require a gluten-free option, Tamari is a perfect substitute; it offers a deeper, more rounded flavor profile, though you might find it marginally less salty than standard Shoyu.
The Sweetener Spectrum: Brown Sugar vs. Traditional Granulated
While some recipes call for light brown sugar to introduce a hint of molasses, we utilize 1/4 cup (50g) of standard granulated sugar. This maintains a clean, traditional flavor that highlights the rice wines rather than overpowering them.
The beauty of this recipe is its flexibility; you can substitute light brown sugar if you prefer a deeper, slightly earthier Sweet Teriyaki Sauce Recipe.
Essential Prep Tools: Setting Up Your 15-Minute Kitchen Station
This truly is a Quick and Easy Teriyaki Sauce, with only five minutes dedicated to preparation. To achieve that speed, ensure your station is ready. You will need a medium non-stick saucepan, a sturdy whisk, and a very small bowl or ramekin.
The ramekin is non-negotiable, as it is used exclusively to prepare the cornstarch slurry, preventing the dreaded lumps that ruin a perfect glaze.
Flavor Multipliers: Integrating Fresh Ginger and Garlic
While classic Japanese teriyaki is often just the triad of liquids and sugar, fresh aromatics add complexity beloved by Western palates. We integrate 1 teaspoon (5g) of finely grated fresh ginger directly into the initial simmer. This subtle warmth elevates the glaze beautifully.
For those who love a robust flavor, adding two minced cloves of fresh garlic along with the ginger is a phenomenal variation. Remember that these solids should be strained out before serving if you desire a perfectly clear glaze.
Related Recipes Worth Trying
- Forget the Jar Proper 10Minute Homemade Teriyaki Sauce Recipe — Achieve a deeply savoury glossy homemade Teriyaki Sauce in just 13 minutes This best Teriyaki Sauce recipe is foolproof perfect for chicken salmon or...
- The Best Simple Italian Marinara Sauce Recipe Slow Simmered — Skip the shopbought jar Learn how to make Marinara Sauce the authentic way This simple Italian recipe uses quality San Marzano tomatoes and a long gentle...
- Tender Beef and Broccoli Stir Fry The Secret to Silky Glossy Takeaway Sauce — Forget soggy takeaway This Beef and Broccoli recipe uses the velveting secret for truly Tender Beef Get a rich glossy Homemade Sauce in 15 minutes A proper...
Achieving the Perfect Viscosity: step-by-step Glazing Technique
The difference between a thin sauce and a perfect Teriyaki glaze lies entirely in the thickening process. Mastery here ensures that the glaze adheres beautifully, whether you are preparing Teriyaki Sauce for Salmon or basting Teriyaki Sauce Recipe Chicken.
The Initial Simmer: Dissolving and Combining Aromatic Liquids
Begin by combining the core Teriyaki Sauce Ingredients the soy, mirin, sake, and sugar, along with the grated ginger in your medium saucepan. Place this mixture over medium high heat. Whisk continuously until you confirm the sugar has completely dissolved, which typically takes about two minutes.
This initial heat ensures the solution is homogenous before the reduction phase begins.
Monitoring the Reduction: When to Pull the Sauce from the Heat
Once the liquid reaches a gentle boil, reduce the heat to a low simmer. This reduction stage is vital; allowing the liquid to simmer gently for 5– 7 minutes, uncovered, permits the alcohol in the sake and mirin to cook off and the flavors to concentrate (or "marry").
You should notice a slight reduction in volume, usually around 10 15%, and a richer, more profound aroma. Do not over reduce, as that will make the final glaze too salty and syrupy.
Creating the Slurry: Tips for a Lump Free Teriyaki Thickener
The cornstarch slurry is where many home cooks fail, but the technique is simple: always use cold liquid. In a separate small bowl, vigorously whisk 1 tablespoon of cornstarch with 2 tablespoons of cold water until all lumps vanish.
As soon as you prepare it, slowly pour this slurry into the simmering Teriyaki base in a steady stream, whisking constantly within the saucepan. This even distribution prevents the starch molecules from clumping instantly upon contact with the heat.
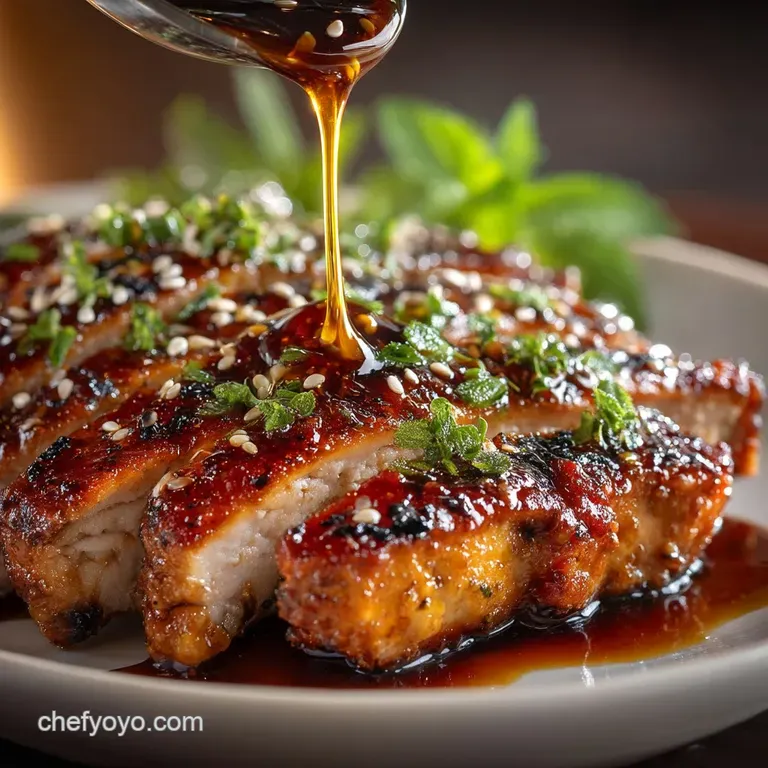
The Final Test: Checking the Glaze Consistency (Nappé Method)
After adding the slurry, continue whisking over very low heat for 1– 2 minutes. The sauce will rapidly transform from thin and translucent to opaque, thick, and wonderfully glossy.
To confirm perfect viscosity, employ the classic "nappé" method: dip the back of a spoon into the sauce, then run your finger across the coated spoon. If the line holds clean without the sauce running back together, the glaze is ready.
Immediately remove the saucepan from the heat, as the sauce will continue to thicken substantially as it cools (a process that takes about 20 minutes).
Beyond the Chicken: Maximizing Your Homemade Teriyaki Sauce Yield
This recipe yields a generous 1.5 cups (360 ml) of perfectly balanced glaze, far more than you typically get in a single bottle, ensuring you have enough for multiple applications throughout the week. While it is undoubtedly perfect for a classic Teriyaki Sauce Recipe Chicken dish, its applications are vast.
Use the glaze liberally on seared Teriyaki Sauce for Salmon, where the sweetness caramelizes beautifully, or integrate it directly as a robust and flavorful Stir Fry Teriyaki Sauce base alongside vegetables and noodles.
Troubleshooting and Customization: Adapting the Base Recipe
Mastery of this sauce means knowing how to adapt it. Because the Teriyaki Soy Sauce flavor is so potent, minor adjustments can significantly change the outcome based on the dish you are preparing.
Meal Prep Applications: Safe Storage, Freezing, and Reheating
This Homemade Teriyaki Sauce Recipe is excellent for meal prep. Once fully cooled during which time it sets to a thick, spoonable consistency transfer it to an airtight, sterilized jar. Stored in the refrigerator, the glaze remains perfectly fresh and vibrant for up to 2-3 weeks.
If you need longer storage, the sauce freezes well for up to three months, though note that rapid thawing might cause a slight change in texture. Simply reheat gently on the stovetop and whisk well to regain the smooth consistency.
The Ultimate Upgrade: Using This Glaze as a Marinade Base
Thanks to the inclusion of sake, this glaze serves double duty as a magnificent marinade. The alcohol acts as a solvent, helping the sugars and umami penetrate deeply into proteins like flank steak or pork tenderloin.
For intense flavor, marinate thinly sliced proteins for 30 minutes before grilling or broiling. Save any unused marinade, bring it to a boil for one minute to ensure food safety, and use it as a finishing glaze.
Adjusting the Acidity: Quick Fixes for Overly Salty or Sweet Batches
If, after the reduction and before the slurry addition, you find the mixture too concentrated, simple corrections are easy. If the sauce is overly salty (often due to the brand of Teriyaki Soy Sauce used), whisk in a tablespoon of water to dilute the sodium content.
Conversely, if the glaze tastes too sweet, a simple teaspoon of rice vinegar added before thickening provides the necessary acidity to balance the flavors.
Nutritional Breakdown: Calories, Sugar Content, and Sodium Considerations
When cooking at home, you maintain control over the nutritional profile, especially sodium. Based on the ingredients specified, one tablespoon (15 ml) of this finished Teriyaki Sauce contains approximately 28 kcal and around 5 grams of added sugar.
Using low-sodium soy sauce is key to managing the sodium content, keeping it estimated between 250 300 mg per serving, which is dramatically lower than many store-bought alternatives that rely on sodium to boost flavor lost by skipping the proper rice wines.

Recipe FAQs
Once I’ve made a big batch, how long can I keep this homemade Teriyaki Sauce in the fridge?
That’s a cracking question! Because this recipe involves simmering and uses a good amount of sugar and salt, it keeps incredibly well. Simply decant the cooled sauce into a sterilised, airtight jar and keep it tucked away in the fridge.
It should keep its quality for a solid 2 to 3 weeks, no bother. Just give it a good shake or stir before using, as the ingredients sometimes settle or separate when chilled.
I'm fresh out of Mirin or Sake can I really skip the rice wines, or is it a complete disaster?
While Mirin and Sake are the bee's knees for achieving that authentic Japanese depth and complexity, don't panic if you’re caught short! If you skip them entirely, the sauce will be thin and overly sweet, which is a bit rubbish.
For a reliable stand-in, use a dry white wine like Pinot Grigio or a good dry sherry for the Sake, and ensure you add the extra teaspoon of sugar to compensate for the lost sweetness from the Mirin. It won’t be the real McCoy, but it will certainly do in a pinch!
Should I use this Teriyaki Sauce as a marinade or just a finishing glaze on my chicken?
The beauty of a proper homemade Teriyaki Sauce is that it works brilliantly for both! It is traditionally used as a marinade for about 30 minutes to penetrate the meat, followed by basting during cooking to build up that signature sticky, shiny glaze (the "teri").
However, because of the sugar content, be cautious when using it as a glaze during high heat grilling wait until the last 5 10 minutes of cooking to brush it on, otherwise, the sugars will burn and go bitter. Baste little and often for best results.
My sauce looks a bit like wallpaper paste. How can I fix lumpy or overly thick Teriyaki?
Oh dear, sounds like the cornstarch slurry went rogue! Lumps usually happen if the cornstarch is added directly to hot liquid, or if the water used wasn't cold enough.
The easiest fix is to pour the hot sauce through a fine mesh sieve, using the back of a spoon to press the lumps through. If it’s too thick overall, put it back on a low heat and whisk in a tablespoon of hot water or stock until it reaches your preferred silky consistency.
This recipe uses a lot of soy sauce. Are there any good tips for making a lower sodium version?
Absolutely, that’s easily managed. The best starting point is to strictly use low-sodium soy sauce, which already drastically reduces the salt without sacrificing umami.
For even lower sodium content, you can substitute up to half of the soy sauce with Tamari (which is also gluten-free) or Coconut Aminos, though the latter is sweeter, so you might need to slightly cut back on the added granulated sugar. It’s all about balance, isn't it?
Authentic 15minute Teriyaki Sauce Glaze
Ingredients:
Instructions:
Nutrition Facts:
| Calories | 155 kcal |
|---|---|
| Protein | 0.9 g |
| Fat | 6.3 g |
| Carbs | 13.7 g |
| Fiber | 0.2 g |
| Sodium | 262 mg |
