Basil and Garlic No Knead Bread: the Ultimate Easy Artisan Loaf
- Why This Basil and Garlic No Knead Bread Is a True Artisan Game and Changer
- The Culinary Magic of Slow and Fermentation Baking
- Essential Ingredients for Your Rustic No and Knead Loaf
- Required Tools: Setting Up Your Kitchen for Hands and Off Bread
- Step and by-Step Method for Baking Your Perfect Basil and Garlic No Knead Bread
- Mastering the Critical Phases of Fermentation and Proofing
- Troubleshooting Common Issues When Making Basil and Garlic No Knead Bread
- Recipe FAQs
- 📝 Recipe Card
Why This Basil and Garlic No Knead Bread Is a True Artisan Game and Changer
Right then, let’s talk bread. I know what you’re thinking. Making a proper, crusty loaf feels like a weekend project reserved only for the deeply committed, often ending in a flat, sad disappointment. Been there, bought the T-shirt.
But listen up, because the Basil and Garlic No Knead Bread recipe is the one that changed everything for me. It’s brilliant.
This isn’t just easy bread; this is artisan bread that only knows the word "easy." It has that incredible open, airy crumb we bakers call it the alveoli —and a crust that shatters perfectly when you cut it.
You get all the hallmarks of a professional bake, but your biceps remain completely unstressed. Seriously, we’re talking about maybe 15 minutes of actual work spread across two days. The secret?
Patience, a tiny bit of yeast, and the glorious, complex flavour of slow and fermentation baking.
The Culinary Magic of Slow and Fermentation Baking
Why do we bother waiting 18 hours when we could whip up a quick loaf in two? Because time is the primary ingredient here, mate. When you rush bread, you get a quick, bready taste.
When you let the dough rest and slowly bubble away, the yeast gets busy breaking down the starches into sugars, which creates incredibly complex, almost sourdough and style flavours. We’re using this no and knead garlic bread method to unlock huge flavour potential without a starter.
It’s chemistry, honestly.
Debunking the Myth: Achieving Artisan Crust Without the Effort
Everyone thinks you need to knead dough violently for 15 minutes to develop the gluten. That’s a myth, particularly for high and hydration doughs like this one. Remember that time I nearly threw my stand mixer through the window because the dough wouldn’t cooperate? Never again.
In this no knead garlic bread recipe, we add a lot of water (about 85% hydration), which allows the gluten strands to literally rearrange themselves and strengthen on their own. The longer it sits, the stronger the structure becomes. You mix it until it’s shaggy, cover it up, and let time do the heavy lifting.
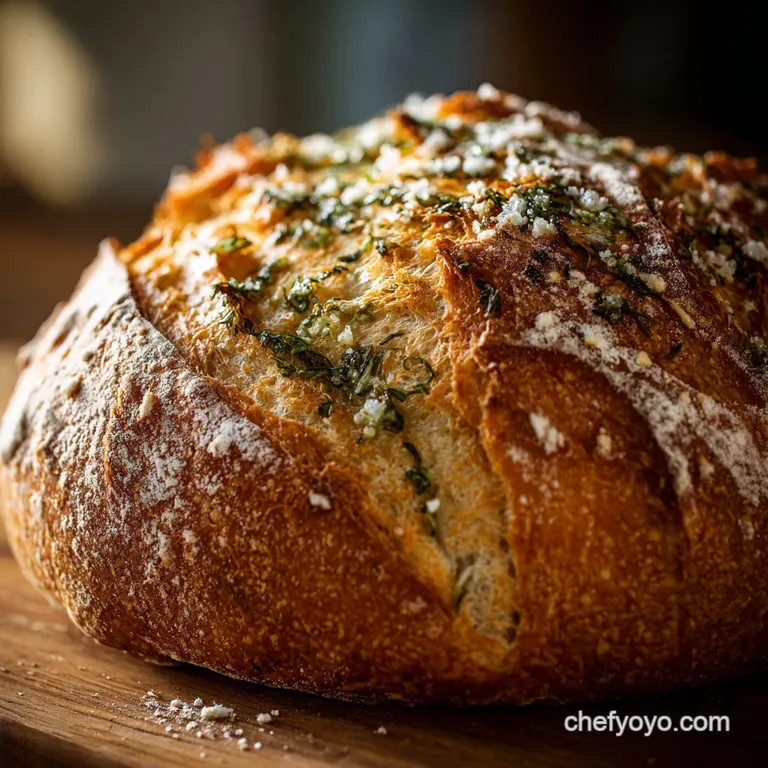
The Distinct Flavor Profile: Fresh Basil Meets Roasted Garlic
We aren't just chucking raw, potent garlic into this dough. That would kill the yeast and give you a harsh flavour. We’re using roasted garlic, which transforms the flavour profile entirely. Roasting mellows the garlic, bringing out a nutty sweetness that melts into the crumb.
The dried basil, meanwhile, provides that essential herbaceous lift. I specifically use dried basil here because fresh basil tends to oxidize during the long, slow proof, turning green bits into sad, brown mush. Dried holds its colour and fragrance better during the long fermentation.
Understanding the Science Behind the Long Proof
The goal of the long proof (the bulk fermentation) is not just to make the dough double in size. That’s what commercial baking wants. Our goal is flavour development and gluten conditioning. Yeast produces carbon dioxide (the bubbles) and various organic acids.
These acids are what give the resulting Artisan Bread Recipes that characteristic tangy flavour and also help condition the gluten, making the dough stronger and easier to handle despite its stickiness. It’s like a marathon runner warming up for hours before the race.
What Makes the No and Knead Technique So Revolutionary?
It comes down to accessibility. For centuries, good bread required strength, skill, and patience. Jim Lahey, the genius who popularized this technique, realized you could replace strength (kneading) with time (long fermentation) and skill (shaping) with steam (the Dutch oven).
If you can measure flour accurately, you can make this bread. It takes the terrifying technicality out of bread making and hands you back a truly stunning loaf.
Essential Ingredients for Your Rustic No and Knead Loaf
This Basil and Garlic No Knead Bread needs the basics, but the quality of a couple of ingredients really matters. If you skimp on the flour, you might as well just make muffins.
| Ingredient | Why I Love It | Warning/Tip |
|---|---|---|
| Strong Bread Flour | High protein (12 14%) is crucial for the structure of this high and hydration dough. | All and purpose flour yields a flatter, denser crumb. Don't risk it. |
| Lukewarm Water | Helps kickstart the yeast without shocking it. | Too hot, and you kill the yeast. Too cold, and the rise takes forever. |
| Fine Sea Salt | Essential for flavour and controlling the yeast's activity. | Do not use iodized salt. It can inhibit yeast growth. |
| Instant Yeast | Doesn't need activation; just mix it in with the dry goods. | Use instant/rapid and rise yeast for best results in this method. |
Remember, this Best Bread Recipe relies on the ratio being perfect. That’s why we’re going to be evangelical about using a scale.
Related Recipes Worth Trying
- Twice Baked Butternut Squash with Goat Cheese and Crispy Sage — Twice Baked Butternut Squash with Goat Cheese and is the ultimate autumn side dish. This Best Butternut Squash Recipe features creamy chèvre, nutty brown...
- Sweet Potato and Black Bean Quinoa Bowls The Creamy Avocado Lime Dressing Recipe — Sweet Potato and Black Bean Quinoa Bowls are hearty, healthy, and perfect for meal prep! Get this easy sweet potato black bean quinoa bowl recipe featuring...
- Cheesy Chicken and Broccoli Stuffed Potatoes Creamy Twice Baked Comfort — Cheesy Chicken and Broccoli Stuffed Potatoes are the definitive comfort food dinner recipes. These creamy, decadent twice baked potatoes feature crisp skins...
Required Tools: Setting Up Your Kitchen for Hands and Off Bread
You don't need a huge amount of equipment for the no and knead method, which is why I love it. But there is one piece of kit that is non and negotiable for that professional crust.
Selecting the Optimal Flour for Maximum Gluten Structure
I mentioned strong bread flour, but let me stress this again. Look for anything labeled "high and protein" or "bread flour" specifically. It contains more gluten, which is what traps those beautiful fermentation bubbles.
Since we aren’t manually developing the gluten by kneading, we rely on the flour's inherent strength and the long rest period. Think of it as pre and ordering a loaf with great structure.
Preparing the Star Flavor Boost: Roasting the Garlic Just Right
Before you even start the dough, get your garlic ready. Cut the top off a head of garlic, drizzle it with olive oil, wrap it in foil, and roast it at about 400°F (200°C) until it’s soft and caramelized maybe 30 to 40 minutes.
Squeeze the cloves out, mash them into a paste, and let them cool completely. That mellow, sweet flavour is what sets this no and knead garlic bread apart. If you add hot garlic, you kill the yeast.
Ensuring Proper Measurement: Why Weight is Better Than Volume
This is my biggest soapbox moment. Forget cups for flour. Just toss them out. When baking bread, especially high and hydration Dutch Oven Recipes, measuring by volume (cups) is incredibly unreliable. Scoop the flour, and you might have 150 grams; spoon it in, and you might only have 120 grams.
That difference of 30 grams is the difference between a beautiful, manageable dough and a sticky, sloppy mess. Invest in a digital scale. They are cheap, and they guarantee success.
Must and Have Equipment for Perfect Oven Spring (Dutch Oven vs. Baking Stone)
If you only buy one piece of equipment this year, make it a 5 6 quart heavy cast iron Dutch oven. Why? Because the Dutch oven acts like a miniature, professional steam injection oven.
CRUCIAL NOTE: The moisture that evaporates from the dough during the first stage of baking (lid on) gets trapped inside the pot. This steam keeps the crust soft long enough for the loaf to achieve maximum oven spring before the crust sets. No steam = hard crust too early = flat bread.
Baking stones are okay, but you'll have to manually create steam using a tray of water, and frankly, the Dutch oven method is foolproof.
Step and by-Step Method for Baking Your Perfect Basil and Garlic No Knead Bread
- Prep the Flavors: Roast and mash your garlic first, ensuring it’s cool.
- Combine Dry: In a large, non and metal bowl, whisk together the flour, salt, dried basil, and instant yeast.
- Mix Wet: Add the water and the mashed roasted garlic. Use a wooden spoon or spatula.
- The Shaggy Mix: Mix just until all the flour is incorporated and you have a very wet, shaggy dough. Do not knead.
- Long Wait: Cover tightly with plastic wrap and let it sit at cool room temperature (68 72°F / 20 22°C) for 12 to 18 hours.
Mastering the Critical Phases of Fermentation and Proofing
The Initial Mix: Combining Wet and Dry Until Shaggy
When you look at the dough after combining everything, it should look really sticky and almost rough like wet cement that hasn't been smoothed out. Resist the urge to keep mixing! We want a "shaggy" texture. The moisture and time will smooth it out later.
If you overmix now, you’ll start developing gluten manually, which defeats the purpose.
The Critical First Proof: Time and Temperature Considerations
This is the big wait. If your kitchen is cold (like mine in the winter), it might take 18 hours or more. If it’s summer and warm, it might be done in 12.
You are looking for visual cues: the dough should have doubled in volume, the surface will be covered in tiny bubbles, and when you poke the side of the bowl, you’ll see the dough jiggle and wobble. It should smell slightly tangy, but not vinegary.
Gently Folding and Shaping Your Dough (The Pre and Shape Stage)
After the long rest, lightly flour your countertop. Gently scrape the very sticky dough onto the surface. This is where you develop the surface tension that creates a tall, round loaf. Do a few simple folds grab an edge and fold it towards the center, turn the dough 90 degrees, and repeat 3 or 4 times.
You're creating a tight 'package' while preserving the gas bubbles inside. Place it seam and side down onto a piece of parchment paper to prevent sticking during the final proof.
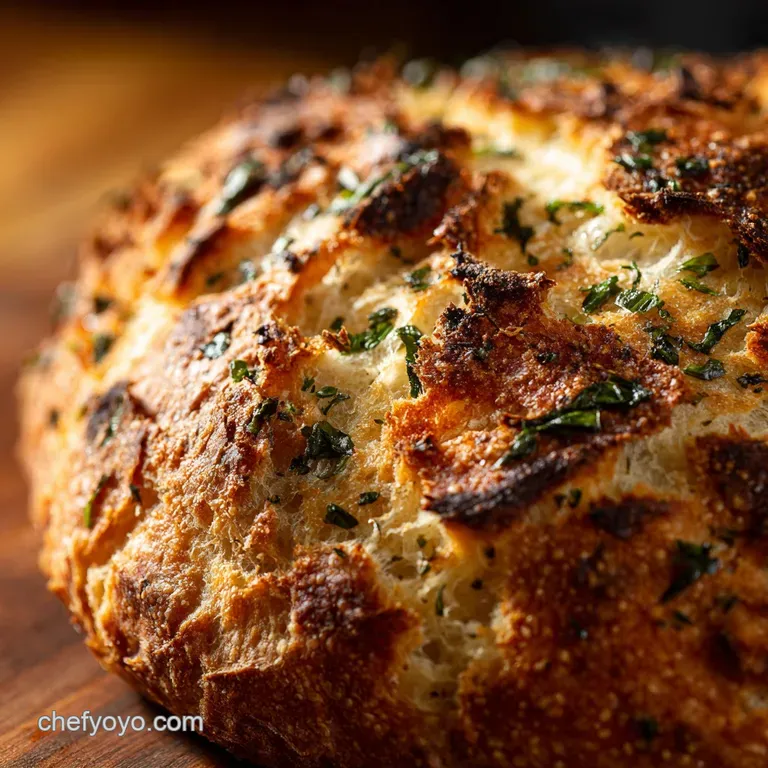
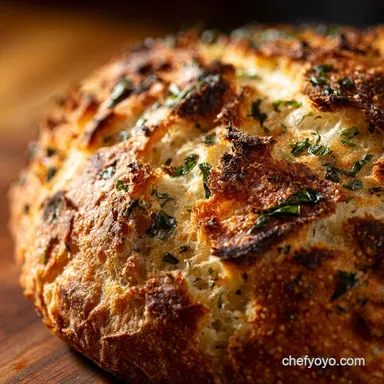
Achieving the Ultimate Crust: The Hot Dutch Oven Technique
This is the climax! You must preheat the Dutch oven inside the oven at 450°F (230°C) for a minimum of 30 minutes. Don't rush this part. When the oven is ready, carefully lift the dough (using the parchment paper sling) and drop it into the blistering hot pot. Lid on.
Bake for 30 minutes. Then, remove the lid, drop the temp slightly to 425°F (220°C), and bake uncovered for another 15- 20 minutes until it’s deep golden brown. That’s how you get the perfect Dutch Oven Bread crust.
Troubleshooting Common Issues When Making Basil and Garlic No Knead Bread
How to Fix Dough That Is Too Wet or Won’t Rise
If your dough looks like soup after the long rest, it means your hydration might be too high (maybe you measured the flour incorrectly, or your ambient humidity is high). Don't panic. When you scrape the dough onto the counter, sprinkle a tablespoon of extra flour onto it as you do the shaping folds.
A little extra flour on the outside helps make it manageable.
If it won’t rise at all, your yeast might be dead (check the expiration date!) or your kitchen might be too cold. Try moving the bowl to a warmer spot, maybe near a pilot light or on top of a warm oven, for a few hours.
Best Practices for Storing and Reviving Leftover Bread
Once the loaf is completely cool (seriously, wait 90 minutes before slicing), slice it and store it cut and side down on a cutting board, or wrap it tightly in a clean linen towel. Never put fresh bread in the fridge; it goes stale faster than if you left it on the counter.
If your leftover bread is slightly stale, you can revive it: quickly run the entire loaf under cold water, then put it back into a 350°F (175°C) oven for about 5 minutes. The absorbed water turns to steam, reviving the crust and crumb beautifully.
Pairings That Complement the Savory Basil and Garlic Notes
This bread is fantastic on its own, but it sings when paired correctly. Because of the savory garlic and basil notes, stick with strong, simple flavors.
- Dip it in a good quality olive oil with a splash of balsamic vinegar.
- Use it to soak up the juices from a slow and cooked Italian beef stew.
- Make thick slices and top with fresh, creamy burrata cheese and sun and dried tomatoes.
Adapting This Recipe for Different Flavors (Olives, Sun and Dried Tomatoes, etc.)
The beauty of the basic no and knead technique is its adaptability. You can swap out the Basil and Garlic for all sorts of great things. Just keep the total amount of "mix and ins" to around 1/2 cup so you don't compromise the structure too much.
- Cheesy Option: Add 1/4 cup of finely grated Pecorino Romano and 1 tsp of dried oregano.
- Mediterranean Kick: Try 1/2 cup of coarsely chopped Kalamata olives (drained well) and a teaspoon of lemon zest.
- Spicy Heat: Mix in 1 Tbsp of smoked paprika and 1/2 tsp of red pepper flakes for a subtle warmth.
Trust me on this Basil and Garlic No Knead Bread. You will never buy a crusty supermarket loaf again. Happy baking!

Recipe FAQs
I’m chuffed about the no-knead method, but the dough feels incredibly sticky and wet. Have I messed up the water ratio?
Absolutely not! The high hydration (around 85% water) is precisely what gives this bread its wonderfully open, artisan crumb and chewy texture. Resist the urge to add extra flour; simply ensure you handle the dough lightly and use a well floured surface during the brief shaping stage to prevent sticking.
Crikey, do I absolutely need a Dutch oven to bake this Basil and Garlic No Knead Bread?
While the Dutch oven is the gold standard it traps steam and guarantees that cracking, crisp crust you can manage without it. The key is simulating steam: bake the loaf on a hot pizza stone or sheet, and place a shallow pan of boiling water on the lowest rack of your oven for the first 20 minutes of cooking.
Bob's your uncle!
I only had fresh basil on hand. Can I use fresh instead of dried basil for flavour?
We use dried basil because it maintains its flavour stability during the long, slow fermentation without going rancid or brown. If you must use fresh basil, chop it finely and fold it in during the final shaping stage, or better yet, brush the finished, cooling loaf with a fresh basil and olive oil mixture for a fantastic, aromatic lift.
My kitchen is quite cool. What happens if the bulk fermentation takes longer than the suggested 18 hours?
That’s perfectly fine; fermentation time is dictated by temperature, so a cooler kitchen just means things move at a leisurely pace. As long as the dough has doubled in volume and looks puffy and bubbly (the visual cue), it’s ready to proceed to the final proofing stage, regardless of whether it took 12 hours or 22 hours.
This loaf is spot on! How should I store the leftover bread to keep it fresh for longer?
Store the completely cooled loaf at room temperature, ideally wrapped tightly in a linen bag or a tea towel, and then placed in a plastic bag or bread box. Crucially, never refrigerate bread, as this quickly makes the starch stale; if you need long term storage, slice the loaf and freeze the pieces in an airtight container for up to three months.
Basil Garlic No Knead Artisan Bread
Ingredients:
Instructions:
Nutrition Facts:
| Calories | 329 kcal |
|---|---|
| Protein | 5.0 g |
| Fat | 14.0 g |
| Carbs | 43.0 g |
