Cake in a Cake Recipe with Hidden Heart

- Time: Active 45 minutes, Passive 1 hour 10 mins, Total 1 hour 55 mins
- Flavor/Texture Hook: Velvety dark chocolate shell with a buttery, dense vanilla heart
- Perfect for: Surprise birthday parties, holiday reveals, or contemporary dessert tables
- Perfecting This Fun Cake in a Cake Recipe
- Crucial Recipe Specs and Timing Details
- Gathering Essential Components and Science Roles
- Top Equipment for a Perfect Reveal
- Steps for a Flawless Hidden Design
- Fixing Common Internal Baking Failures
- Creative Variations and Smart Ingredient Swaps
- Preservation Secrets and Zero Waste Tips
- Serving Slices for Maximum Visual Impact
- Recipe FAQs
- 📝 Recipe Card
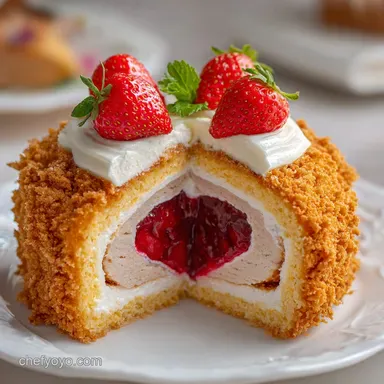
Imagine the look on your friends' faces when you set down a seemingly normal chocolate loaf, only for the first slice to reveal a perfectly crisp, pink heart hiding inside. It's the kind of kitchen magic that looks like it took a degree in engineering, but I promise it's all about timing and temperature.
I first tried this for a friend’s engagement party and, honestly, I was terrified the heart would just melt into a pink blob, but it stayed perfectly sharp.
This "hidden cake" or "surprise inside" method is one of my favorite contemporary ways to play with dessert presentation. We aren't just making a cake, we are building a narrative that only reveals itself once the knife hits the board.
It's fusion baking at its best, mixing classic pound cake stability with a rich, modern chocolate velvet.
If you’ve ever felt like your baking has hit a plateau, this is the project to reignite that spark. We are going to walk through the "double bake" method, which is the secret to getting those clean lines.
You'll get that hit of aromatic vanilla from the center followed by the deep, roasted scent of the coffee chocolate exterior. Let’s get into the weeds of how to actually pull this off without the shapes falling over or getting soggy.
Perfecting This Fun Cake in a Cake Recipe
Getting a clean "surprise" requires a bit of structural logic that most recipes skip over. You see, the inner cake has to be slightly denser than the outer cake so it holds its shape during the second round in the oven.
I've found that using 170g of softened unsalted butter in the inner vanilla batter provides the necessary "fat frame" to keep our pink hearts from migrating or blurring.
Guaranteed Structural Reveal
The secret is all in the crumb density. If the internal cake is too airy, it will absorb the moisture from the second batter and lose its sharp edges. By using room temperature eggs (3 large ones for the center) and beating them thoroughly with 150g of sugar, we create a stable emulsion that stands up to being baked twice.
It’s like creating a solid foundation before you build the rest of the house.
Maintain a Moisture Rich Crumb
While the inner cake needs to be sturdy, we don't want it to be a brick. The 15ml of whole milk in the vanilla base keeps things tender while the 120ml of buttermilk in the chocolate exterior provides that classic tangy moisture. If you’ve ever tried my Hummingbird Cake recipe, you know I'm obsessed with a moist crumb, and this surprise version is no different.
Perfect Color Contrast
Visual impact relies on the dark cocoa powder (45g) in the outer layer acting as a shadow box for the pink gel colored interior. Use a "super black" or dark Dutch processed cocoa for the most contemporary look.
I made the mistake once of using a light natural cocoa, and the heart looked more like a faded smudge than a deliberate design.
- Internal Temperature Checkpoint: 200°F (93°C) for the inner cake to ensure it’s fully set.
- Cooling Time: Minimum 1 hour before cutting shapes.
- Freezer Flash: 20 minutes for cut outs to prevent "bleeding" into the chocolate batter.
The Science of Why it WorksProtein Coagulation: The proteins in the eggs and flour of the inner cake fully set during the first bake, creating a heat resistant barrier.
Maillard Reaction: The hot coffee (120ml) added to the chocolate batter blooms the cocoa solids, creating a deep aromatic profile and a dark hue that won't fade.
Crucial Recipe Specs and Timing Details
| Method | Texture Outcome | Visual Sharpness |
|---|---|---|
| Oven Baking (Standard) | Velvety, even crumb with clear lines | High: Precise heat control prevents shape shifting |
| Stovetop "Dutch Oven" | Dense, slightly gummy bottom | Low: Uneven heat can cause the shape to tilt |
Timing is your best friend here. If you rush the second bake while the chocolate batter is too thin, your shapes will float to the top. I’ve found that letting the chocolate batter sit for just 5 minutes after mixing allows the 1 tsp of baking soda to begin reacting with the buttermilk, thickening the batter just enough to hold the vanilla shapes in place.
Gathering Essential Components and Science Roles
Selecting the right ingredients isn't just about flavor, it's about the chemistry of a "cake in a cake recipe". For the chocolate exterior, using 60ml of vegetable oil instead of more butter ensures the cake stays soft even when the inner vanilla heart is cold.
| Component | Science Role | Pro Secret |
|---|---|---|
| Unsalted Butter (170g) | Fat based structure | Use European style butter for higher fat content and sharper shapes. |
| Hot Coffee (120ml) | Cocoa blooming | The heat dissolves cocoa lumps and activates the "dark" aroma profile. |
| Buttermilk (120ml) | Acidic leavening | Reacts with baking soda for a contemporary, airy chocolate texture. |
| Gel Food Color | Pigment stability | Liquid color thins the batter; gel keeps the "pink" vivid after two bakes. |
Top Equipment for a Perfect Reveal
You don't need a lab, but a few specific tools make this "surprise inside cake recipe" a lot less stressful.
- Lodge Cast Iron Loaf Pan (or standard 9x5): Provides even heat distribution so the chocolate doesn't burn before the center is done.
- KitchenAid Stand Mixer: Essential for creaming the 170g of butter and 150g of sugar into a pale, fluffy cloud.
- 2 inch Cookie Cutter: Keep your shape simple (hearts, stars, or circles) for the cleanest "hidden cake recipe" look.
- Wire Cooling Rack: Crucial for letting the first cake cool completely before you start the "layered cake surprise recipe" assembly.
Chef's Note: If you don't have a 2 inch cutter, a small juice glass can work for a "polka dot" look. Just ensure the shape isn't taller than 2/3 of your loaf pan height.
Steps for a Flawless Hidden Design

Internal Surprise Shape Construction
Start by preheating your oven to 350°F. Cream the 170g of butter and 150g of sugar until the mixture smells like sweet cream and looks almost white. Add the 3 eggs one-by-one, then fold in 210g of all purpose flour, 1 tsp baking powder, and 1/4 tsp salt.
Mix in the 15ml milk, 2 tsp vanilla, and that 1/2 tsp of pink gel color.
Creating the Internal Silhouette
Bake this pink batter in a lined loaf pan for about 50 minutes until the kitchen smells like a bakery and a toothpick comes out clean. Let it cool completely. This is the hardest part because you'll want to snack on it, but resist! This technique is similar to how layers shift in my How to Make recipe, where structural integrity is everything.
Precision Cut Out Techniques
Slice the cooled pink cake into 1 inch thick slabs. Use your 2 inch cutter to punch out shapes from the center of each slab. - Check: Are your shapes the same thickness? They need to fit tightly together later. - Tip: Freeze these pink shapes on a tray for 20 minutes.
This prevents the edges from softening when the warm chocolate batter hits them.
The Outer Enclosure Batter
Whisk together 200g sugar, 125g flour, 45g cocoa powder, 1 tsp baking soda, and 1/2 tsp salt. Add the 1 egg, 120ml buttermilk, and 60ml vegetable oil. Finally, pour in the 120ml of hot coffee. The batter will be thin and smell intensely of dark chocolate and roasted beans.
Assembling the Hidden Surprise
Pour about 1/2 inch of the chocolate batter into the bottom of your cleaned and re lined loaf pan. Bake this for just 8 minutes. This creates a "shelf" for your pink shapes to sit on so they don't sink to the bottom.
The Final Reveal Bake
Line your frozen pink shapes up in a tight row down the center of the pan, touching each other like a long pink tunnel. Carefully pour the remaining chocolate batter over and around them.
Bake for another 45-50 minutes until the top is crackly and a skewer inserted (into the chocolate part!) comes out clean.
Fixing Common Internal Baking Failures
| Problem | Root Cause | Solution | Pro Tip |
|---|---|---|---|
| Shape Sinks | Base layer too thin | Pre bake the bottom 1/2 inch of batter for 8 mins. | Use a spoon to "anchor" the shapes. |
| Blurry Edges | Inner cake was warm | Freeze shapes for 20 mins before embedding. | Use gel, not liquid, food coloring. |
| Cake Crumbles | Over mixed flour | Fold flour by hand until just combined. | Use "Bleached" flour for a tighter crumb. |
Hidden Shapes Falling Over
If your hearts are tilting, it’s usually because the chocolate batter was too liquid or the shapes weren't packed tightly enough. Ensure each shape is snug against the next one. They should support each other like a row of books on a shelf.
Boxed Mix Success Tips
Can you use a boxed mix for this? Yes, but add an extra egg to the "inner" cake mix to make it sturdier. Without that extra protein, the box cake will likely disintegrate during the second bake. It's the same logic I use when someone asks about my How to Make recipe for Jello cake structure is key!
Creative Variations and Smart Ingredient Swaps
| Original Ingredient | Substitute | Why It Works |
|---|---|---|
| Whole Milk (15ml) | Coconut Milk (full fat) | Adds a tropical aroma; keeps the same fat ratio. |
| Buttermilk (120ml) | Yogurt + Water (50/50) | Similar acidity for the baking soda to react. |
| All Purpose Flour | 1:1 gluten-free Blend | Works well but creates a slightly grittier "shatter" in the crust. |
Birthday Polka Dot Design
Instead of a single shape, use a small melon baller to scoop spheres out of the vanilla cake. Drop them randomly into the chocolate batter for a "polka dot" surprise. It’s one of those fun birthday cake designs that kids absolutely lose their minds over.
Vegan Novelty Cake Options
To make this vegan, use flax eggs (1 tbsp meal + 3 tbsp water per egg) and vegan butter. Note that the "surprise" might be slightly softer, so freezing the shapes for 40 minutes instead of 20 is mandatory.
Preservation Secrets and Zero Waste Tips
Storage: This cake stays "velvety" for 3-4 days in an airtight container at room temperature. Because of the oil in the chocolate batter, it won't dry out as fast as an all-butter cake. Freezing: You can freeze individual slices for up to 3 months.
Wrap them tightly in plastic wrap so they don't pick up that "freezer smell."
- - Cake Pops
- Crumble the pink scraps with a tablespoon of frosting to make "surprise" cake pops.
- - Trifle
- Layer the chocolate and pink scraps with whipped cream and berries.
- - Ice Cream Topping
- Toast the scraps in a 300°F oven until crispy and sprinkle over vanilla bean ice cream.
Serving Slices for Maximum Visual Impact
Cleanest Visual Slicing Method
To get that "edible surprise cake" reveal to look perfect, you need a sharp serrated knife. Dip the knife in hot water, wipe it dry, and make one clean sawing motion. If you push down too hard, you’ll squash the chocolate crust into the pink center.
The Perfect Pairing Ideas
A simple dusting of powdered sugar is contemporary and clean. However, if you want to go all out, a dollop of barely sweetened whipped cream balances the richness of the 45g of dark cocoa. For a festive look, you could even drizzle a bit of the strawberry glaze from my How to Make recipe over the top.
Kitchen Myth: "You have to use special pans for a cake inside cake tutorial." The Truth: Totally false. A standard loaf pan and a cheap cookie cutter are all you need. The "secret" is the double bake timing, not expensive gadgets.
Searing meat doesn't "seal in juices" and fancy pans don't "seal in shapes" your technique does!
By the way, if you’re looking for something savory to serve before this showstopper, my How to Make recipe for crab cakes is a family legendary starter. It's all about that contrast salty, crispy starters followed by a sweet, hidden heart reveal. Happy baking, and don't forget to take a video when you cut that first slice!

Recipe FAQs
How to make a cake in a cake?
Yes, this is called the "surprise inside" or hidden cake technique. You fully bake a smaller, dense cake, cut it into shapes, freeze those shapes, and then embed them tightly into a liquid outer batter before the final bake. If you enjoyed mastering the structural stability needed here, see how the same principle of internal support works when building layers in my Classic Tres Leches Cake Recipes: My Family's Favorite Milky Delight.
How to make cake in a mug with cake mix?
Yes, it is highly recommended for speed and ease. Mix about 1/4 cup of dry cake mix with 2-3 tablespoons of milk or water until smooth, avoiding overmixing. Microwave on high for 60 90 seconds, checking frequently to prevent overflow and rubbery texture.
How to make cake with a cake mix?
Yes, always follow the package directions first for guaranteed results. For an enhanced flavor or texture boost, try substituting the liquid called for with buttermilk or sour cream, which adds moisture and tanginess.
For a richer flavor profile resembling scratch baking, consider adding an extra egg yolk.
How to make cake without a cake mix?
Yes, you must combine flour, sugar, fat, leavener, liquid, and eggs from scratch. Whisk the dry ingredients separately from the wet, then combine them just until incorporated to prevent gluten overdevelopment.
Achieving a flaky, non-dense result relies on proper emulsification, a technique shared with making great pastry.
How to make cake cake pops?
Yes, you crumble fully baked cake and mix it with frosting. Once the crumbled cake is the consistency of wet sand, roll it into balls, chill them until firm, then dip them into melted candy wafers or chocolate. You must chill the balls thoroughly to ensure they don't collapse when dipped.
What is the ideal inner cake density for the surprise reveal?
The inner cake must be denser than the outer batter to maintain sharp edges. This density is usually achieved by using slightly less leavener or adding an extra binder like a full egg or extra butter in the initial small cake.
If you want a dense, sturdy base for another project, review the fat ratios in my Classic St. Louis Gooey Butter Cake Recipe Easy & Irresistibly Gooey.
Do I need to pre-bake the bottom layer of the outer batter?
Yes, a very short pre-bake creates a stable "shelf" for the inner shapes. Pour about half an inch of the outer batter into the pan and bake it for 5 10 minutes before placing your frozen inner shapes on top.
This prevents the dense shapes from sinking straight through the liquid batter to the bottom of the pan.
Cake In A Cake Recipe
Ingredients:
Instructions:
Nutrition Facts:
| Calories | 394 kcal |
|---|---|
| Protein | 6.3g |
| Fat | 18.6g |
| Carbs | 53.2g |
| Fiber | 1.8g |
| Sugar | 29.4g |
| Sodium | 245mg |
