The 30Minute Wonder Chewy Cake Mix Cookie Bars
- Decoding the 30-Minute Baking Marvel
- What Makes These Cake Mix Cookie Bars Unstoppable?
- Gathering Your Minimalist Baking Toolkit
- The Role of Melted Butter and the Golden Egg
- The Swift Assembly: Mixing and Pressing the Dough
- Baking to Perfection: Timing Your Cake Mix Cookie Bars
- Expert Tips for Flawless Cookie Bar Results
- Flavor Adventures: Creative Variations and Topping Ideas
- Recipe FAQs
- 📝 Recipe Card
Decoding the 30-Minute Baking Marvel
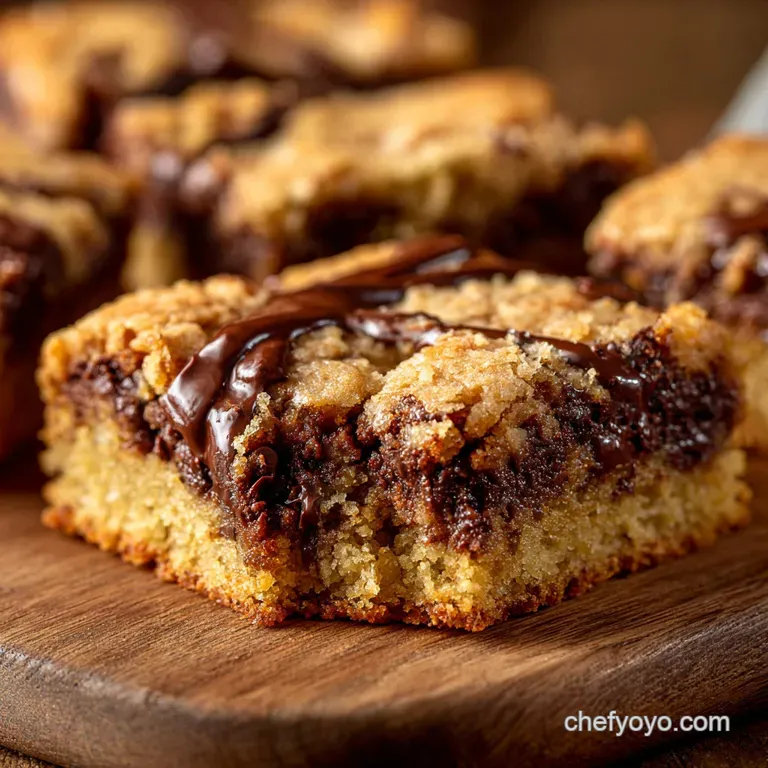
If you need a reliable, high impact treat with maximum flavor and minimal effort, these phenomenal Cake Mix Cookie Bars are the answer. This is the ultimate kitchen hack for busy schedules, transforming a humble boxed mix into a rich, dense, and perfectly chewy dessert in just under an hour, including crucial cooling time.
The active preparation for this superb cake mix cookie bars recipe takes mere minutes, requiring no fancy equipment or advanced pastry skills. We eliminate all unnecessary steps to deliver a buttery dessert that rivals anything baked from scratch.
What Makes These Cake Mix Cookie Bars Unstoppable?
The genius of this method lies in its elegant simplicity, guaranteeing consistent results every single time. Unlike many fussy baking projects, these magnificent Cake Mix Bars leverage the reliable composition of pre-mixed dry goods for structural perfection.
They bake into a substantial slab that holds its texture beautifully, making them ideal for gatherings, school lunches, or quick weeknight indulgence. This approach is revolutionizing the world of easy Cake Mix Desserts, proving that convenience does not have to sacrifice quality or taste.
Why Boxed Cake Mix is Your Chewy Secret Weapon
Boxed cake mix contains a precise, balanced blend of flour, leaveners, and sugar that is incredibly consistent. When paired with melted butter and eggs, this mixture shifts from light cake batter to a robust, cookie like dough.
This inherent stability ensures your finished bars are always tender and chewy, never crumbly or dry. Using this shortcut is a brilliant way to achieve that highly sought after, professional grade texture without measuring a dozen different powders.
Bar vs. Drop: The Superiority of Sheet Pan Sweets
Baking in a sheet pan streamlines the process compared to rolling out and shaping individual cookies. The dough is simply pressed into a single 9x13 inch vessel, eliminating multiple batches and endless trips to the oven.
This sheet pan approach guarantees uniformity; every square is equally thick and chewy, maximizing efficiency and minimizing active kitchen time. The resulting square shape also makes them incredibly easy to store and stack once they have cooled completely.
Texture Talk: Achieving That Perfect Dense and Buttery Chew
The secret to their exceptional density lies in the use of melted butter instead of creamed, room temperature butter. Melted fat inhibits excessive gluten development while introducing moisture that results in a wonderfully rich, buttery flavor and a soft interior.
We also intentionally underbake the center slightly, ensuring the bars remain moist and develop that signature chewy edge once cooled and set. This strategic technique elevates these simple bars far beyond standard boxed treats.
The Ultra Minimalist Cleanup Promise
One of the great joys of baking these Cake Mix Cookie Bars is the truly minimal cleanup required afterward. Since the recipe specifically calls for melted butter, you can skip the stand mixer entirely and use a single large mixing bowl and a simple spatula.
Utilizing parchment paper also means the 9x13 baking pan stays perfectly clean, reducing your dishwashing obligations to just two main items. This quick cleaning routine makes the entire 30-minute baking marvel even more appealing for everyday enjoyment.
Gathering Your Minimalist Baking Toolkit
The preparation for this recipe relies on combining just five essential ingredients with a foundational yellow cake mix. We are aiming for the simplest possible setup that still delivers extraordinary results.
Preparing your workspace efficiently is critical, focusing first on lining the pan and then ensuring your few required wet ingredients are ready to be combined with the dry mix. This initial organization makes the assembly process incredibly swift and mistake proof.
The Role of Melted Butter and the Golden Egg

The foundation of the chewiness in this specific cake mix cookie bars recipe depends entirely on the condition of the wet ingredients. We must use three quarters of a cup of melted butter to introduce intense richness and moisture, which is key to preventing a dry, crumbly texture.
The two large eggs act as the primary binding agent, providing structure and emulsifying the fat and the dry mix into a thick, cohesive dough base. Remember to let the butter cool slightly after melting to avoid scrambling the eggs upon contact.
Essential Equipment for Stress Free Bar Baking
A reliable 9x13 inch metal baking pan is the ideal vessel for achieving the optimal thickness and portion size. Crucially, you must line this pan completely with parchment paper, allowing a generous overhang on the longer sides.
This parchment "sling" is indispensable for lifting the entire baked slab out cleanly, ensuring picture perfect squares without any sticking. A sturdy rubber spatula is the only tool needed for mixing the thick dough, as electric mixers often lead to overdevelopment of gluten.
Detailed List of Pantry Staples (The Cake Mix is Key!)
The base of the dough requires one standard 15.25-ounce box of yellow cake mix, which provides the necessary flour and leavening components. You will combine this with three quarters of a cup of melted unsalted butter, two large eggs, and a teaspoon of vanilla extract for flavor depth.
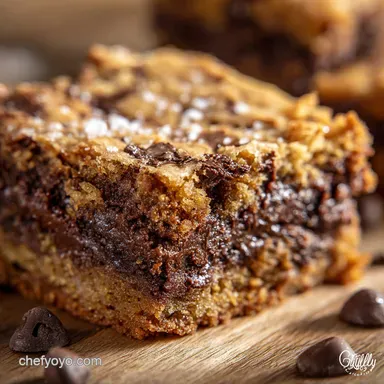
A small addition of sea salt, only a quarter teaspoon, is necessary to perfectly balance the inherent sweetness of the cake mix. Finally, one cup of semi sweet chocolate chips is folded in for texture and traditional flavor.
Ingredient Alternatives for Dietary Needs
If dairy is a concern, you can easily substitute the melted butter with an equal amount of neutral flavored vegetable oil, such as canola or sunflower oil. For a simple vegan adaptation, replace the two large eggs with flax eggs, utilizing two tablespoons of ground flaxseed mixed with six tablespoons of water, allowed to rest.
Many excellent certified gluten-free boxed cake mixes are available today, which work beautifully in this recipe without needing further adjustments to the wet ingredients.
Flavor Boosting Add-Ins for Extra Richness
While the simple chocolate chip iteration is divine, introducing extra elements greatly enhances the overall richness and complexity. Try folding in a half cup of toasted chopped pecans or walnuts for a pleasant textural crunch.
For a double dose of butter and sugar, you could also swirl in a quarter cup of melted dulce de leche or a spoonful of cream cheese frosting spread before baking. These tiny additions make every bite a little more luxurious.
Related Recipes Worth Trying
- The Best Quick Easy Cake Mix Cookies Recipe Perfectly Soft — Stop faffing about This quick Cake Mix Cookies Easy recipe delivers the softest chewiest biscuits using just three main ingredients A foolproof baking shortcut
- Chewy Carrot Cake Oatmeal Cookies Recipe with Crème Fraîche Glaze — These Carrot Cake Oatmeal Cookies are a proper hug Get our foolproof healthy carrot oatmeal cookies recipe for thick chewy bakes finished with an optional...
- Perfect BakeryStyle Starbucks Cake Pops Copycat Recipe — Right then nail the iconic dense texture of the Starbucks Cake Pop at home This easy birthday cake pop recipe uses a creamy binder for that fudgy perfection...
The Swift Assembly: Mixing and Pressing the Dough
The speed of assembling this dough is perhaps its most compelling feature, requiring focused attention to texture rather than tedious whipping. Since the boxed mix already contains leaveners and sugars, our primary goal is simply incorporating the fat and eggs quickly and gently.
Resist the urge to overwork the dough; excessive mixing promotes tough bars, and we are aiming squarely for supreme chewiness. The result should be a very thick, somewhat sticky dough that holds its shape.
Baking to Perfection: Timing Your Cake Mix Cookie Bars
Precision timing in the oven is vital for achieving the correct, slightly underdone consistency that sets up into a chewy bar. The typical bake time ranges from 25 to 30 minutes in the preheated 350°F oven, but visual cues are always more reliable than the clock alone.
The bars must cool fully in the pan after baking; this critical step locks in the moisture and structure, ensuring clean, sharp edges when you finally slice the Cake Mix Cookie Bars.
Combining the Wet and Dry: Creating a Homogenous Dough Base
Begin by thoroughly whisking the slightly cooled melted butter with the eggs and vanilla extract in your large mixing bowl. Once combined, introduce the entire box of cake mix and the salt, folding gently with your spatula.
Continue mixing only until no dry streaks of powder remain visible, ensuring the structure remains tender and avoids developing elasticity. This light touch prevents the bars from becoming overly dense or cake like.
The Critical Step of Evenly Pressing Into the Pan
Transfer the thick, slightly sticky dough into your prepared 9x13 inch pan lined with parchment paper. Use the back of your rubber spatula or lightly floured fingertips to press the dough into an even layer, ensuring it reaches all the corners.
Uniform thickness across the pan is crucial for even baking, preventing the edges from drying out before the center has fully cooked. A smooth, flat surface also allows for perfect topping distribution if you decide to add reserved chocolate chips or sprinkles.
Identifying the Exact Moment They Are Perfectly Done
Look for visual confirmation that the edges of the bars have turned a light golden brown and appear fully set. The true test is the center, which should still look slightly pale, puffed, and perhaps a touch glossy.
If the center looks completely dry and matte, you have likely gone too long and risked sacrificing the interior chewiness. Removing them promptly at the 25 to 30-minute mark allows the residual heat to finish the baking process beautifully as they cool.
The Cooling Conundrum: Slicing the Perfect Bar
Attempting to slice the bars while they are still warm will result in a crumbly, messy outcome because the structure has not fully set. The bars need at least 30 minutes on a wire rack to transition from soft dough to firm, sliceable squares.
Ideally, allow them to cool completely in the pan for an hour before using the parchment overhang to lift the slab onto a cutting board. For ultra clean edges, try chilling the slab briefly before cutting with a sharp knife.
Expert Tips for Flawless Cookie Bar Results
Always ensure the melted butter is slightly cooled before introducing the eggs to prevent any unwanted cooking or curdling. Never skip the step of lining your baking pan with parchment paper and leaving the crucial overhang.
This small preparation effort guarantees easy removal and pristine presentation of your finished squares. Remember the golden rule of baking these Cake Mix Desserts: when in doubt, pull them out of the oven slightly early to preserve that wonderful, chewy consistency.
Flavor Adventures: Creative Variations and Topping Ideas
The foundational yellow cake mix cookie bars recipe serves as an incredible blank canvas, ready to adapt to any flavor profile you can imagine. This versatile base is perfect for replicating beloved bakery treats, from brightly colored seasonal bars to rich, layered holiday desserts.
Experimenting with different mix-ins can transform the bars entirely, offering a new delightful experience every time you bake them. We recommend trying combinations championed by sources like the resourceful cake mix cookie bars pioneer woman recipes.
Troubleshooting Common Issues (Why Is My Dough Sticky?)
If your dough seems excessively sticky and hard to handle, it usually indicates that your melted butter was too warm when combined with the dry mix, affecting the initial binding. Simply chill the dough in the mixing bowl for ten minutes; this brief rest will solidify the fat slightly, making the dough much more manageable for pressing into the pan.
If the finished bars turn out crumbly, it is often a sign of overmixing or baking them for too long in the oven.
Optimizing the Thickness: Adjusting Pan Size
Using the recommended 9x13 inch pan yields a generous, medium thick bar that cooks through evenly within the standard time frame. Should you opt for a smaller 8x8 inch pan, you will achieve much thicker bars, but you must increase the baking time by five to ten minutes.
Conversely, a larger half sheet pan will produce thinner bars that require less cooking time, so adjust your oven watch accordingly. Always check the center for doneness based on the visual cues, regardless of the pan size.
Swapping Cake Mixes: From Red Velvet to Lemon Zing
Explore the exciting world of flavor by swapping the yellow mix for other varieties to create unique Cake Mix Bars. Use a Devil’s Food mix for a rich, dark base perfect for pairing with white chocolate chips or marshmallows.
For a truly decadent treat, substitute the yellow mix for a red velvet mix, which forms the perfect base for rich cake mix cookie bars with cream cheese frosting swirls. You could also use white mix, substituting the chocolate chips with sprinkles and extra vanilla to create vibrant cake mix cookie bars funfetti.
Storage Secrets: Keeping Them Fresh and Chewy
These bars maintain their supreme chewiness and freshness wonderfully when stored correctly at room temperature. Place the completely cooled bars in an airtight container, layered between sheets of parchment paper if necessary to prevent sticking. They will stay fresh and delicious for up to four days.
If you wish to freeze them, wrap individual bars tightly in plastic wrap before placing them in a freezer safe bag, where they will keep well for about three months.
Serving Suggestions: Elevating the Humble Bar
These bars are substantial enough to be served on their own, but a quick addition can elevate them to true dessert status. Serve them slightly warm alongside a scoop of high-quality vanilla bean ice cream and a dusting of cinnamon sugar for an excellent classic pairing.
For a seasonal twist, pair a chocolate based bar, perhaps one loaded with colorful cake mix cookie bars m&m candies, with a drizzle of salted caramel sauce. If you used a mix designed for a moist crumb, like the cake mix cookie bars with pudding variations, a simple glass of cold milk is the only accompaniment required.

Recipe FAQs
I'm worried about getting that perfect chewy texture. How do I stop my Cake Mix Cookie Bars from turning out dry and crumbly?
The trick is not to overbake them; whip them out of the oven when the edges are golden but the centre still looks slightly soft they'll firm up perfectly as they cool on the rack, Bob's your uncle.
Can I use any flavour of boxed cake mix for these marvelous Cake Mix Cookie Bars, or is yellow the only way to go?
Absolutely! This is where the fun begins; feel free to swap yellow for chocolate, lemon, spice, or even red velvet, just ensure you keep the standard 15.25 oz quantity the same, easy peasy.
If I’m baking these ahead for a proper gathering, how long will they stay fresh?
Stored in an airtight container at room temperature, these bars are generally top-notch for 3 to 4 days; if you need them to last longer, they freeze beautifully for up to three months.
Honestly, waiting an hour for them to cool feels like torture. Can't I just cut them hot?
While the smell is tempting, cutting them hot is a recipe for a sticky, messy disaster! Patience is a virtue here; cooling them fully ensures they set properly, giving you those clean, structural squares without sticking to the knife.
I'm looking for a different topping than just chocolate chips. Any brilliant ideas for a variation?
Go wild! Swap the chips for white chocolate chunks and pecans, or for a British twist, try mixing in chopped digestives and a handful of shredded coconut for a more substantial texture.
My niece has a dairy intolerance. Can I swap the butter for oil or a dairy-free alternative?
You certainly can; swapping the melted butter for the same quantity of a neutral vegetable oil (like canola or sunflower) works brilliantly, though a dairy-free baking stick will maintain a richer, buttery flavour profile.
Chewy Cake Mix Cookie Bars
Ingredients:
Instructions:
Nutrition Facts:
| Calories | 156 kcal |
|---|---|
| Protein | 1.4 g |
| Fat | 7.7 g |
| Carbs | 9.9 g |
| Fiber | 0.1 g |
| Sodium | 2555 mg |
