Spooky Chocolate Mummy Cupcakes Recipe
- Spooky & Decadent: The Ultimate Chocolate Mummy Cupcakes Recipe
- The Science Behind the Spook: Achieving Rich Flavor and Moist Texture
- Ingredients Breakdown and Essential Substitutions
- Step-by-Step Guide to Baking Perfect Chocolate Mummy Cupcakes
- Troubleshooting & Pro Tips for Perfect Cupcake Results
- Storing, Freezing, and Making Chocolate Mummy Cupcakes Ahead of Time
- Creative Ways to Serve These Spooky Treats
- Nutrition Information
- Recipe FAQs
- 📝 Recipe Card
Spooky & Decadent: The Ultimate Chocolate Mummy Cupcakes Recipe
You know that scent, right? That deep, comforting cloud of rich cocoa that billows out of the oven, signaling that pure baking magic is happening. That’s the feeling I chase every October, and that’s exactly what these Chocolate Mummy Cupcakes deliver.
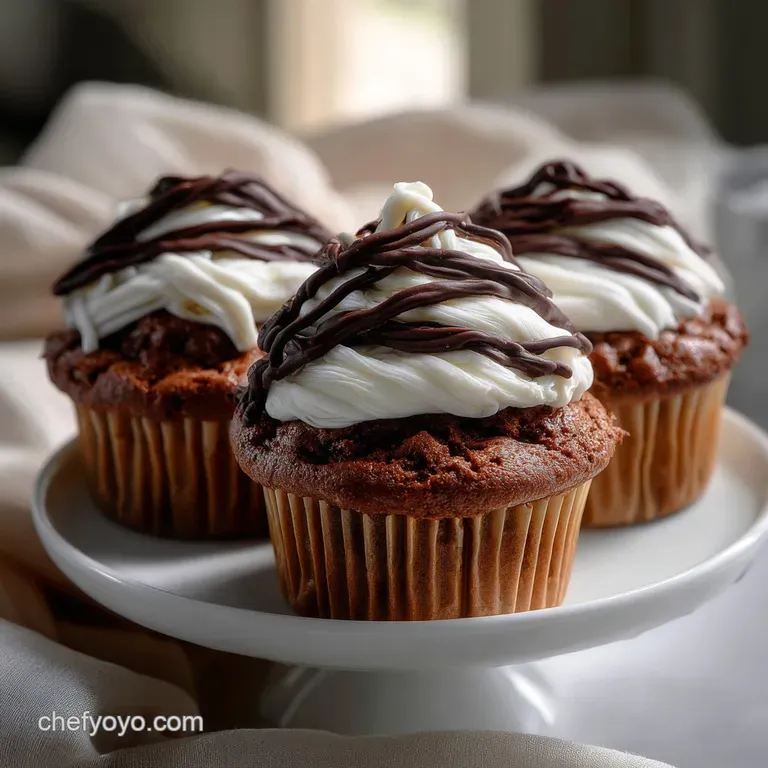
I’m talking about a cupcake base that is impossibly dark, moist, and almost fudgy thanks to a trick I stole from the pastry chefs (using hot coffee!). Then, we top it with the fluffiest, dreamiest vanilla buttercream, piped perfectly to mimic spooky, adorable mummy bandages.
These aren't just great Halloween cupcakes ; they’re showstoppers that taste incredible.
If you’ve been burned by dry cake or runny frosting before, don't worry. I’ve refined this recipe so it’s quick ( 50 minutes total!) and foolproof. Get ready to bake the absolute best Chocolate Mummy Cupcakes for your next monster mash.
| Recipe Summary | Details |
|---|---|
| Yield | 12 cupcakes |
| Prep Time | 30 minutes |
| Cook Time | 20 minutes |
| Total Time | 50 minutes |
| Category | Dessert |
| Cuisine | American |
| Calories | 292 kcal |
The Science Behind the Spook: Achieving Rich Flavor and Moist Texture
Baking seems like alchemy, but it’s really just chemistry, and understanding the "why" is the key to perfect results every time.
Why Buttermilk is Essential for Moist Cupcakes
Buttermilk isn't just for pancakes! It's slightly acidic, and when combined with baking soda, it kickstarts a powerful leavening reaction, creating lots of airy bubbles. More importantly, that acidity breaks down tough gluten strands, which prevents the cake from becoming dense or rubbery. The result?
A velvety crumb that stays moist for days.
The Role of Coffee in Intensifying Chocolate Flavor
This is my secret weapon. Adding hot, brewed coffee to the cocoa powder doesn't make the cupcakes taste like coffee (unless you use a ton!), but it acts as a flavor enhancer. The heat dissolves the cocoa powder completely, releasing the bitter tannins and intensifying the chocolate notes dramatically. It makes your chocolate taste more like chocolate deep, dark, and rich. For another decadent treat, especially if you love that intense chocolate depth, you must try my recipe for Crinkle Cookies: The Classic Fudgy Chocolate Christmas Cracker .
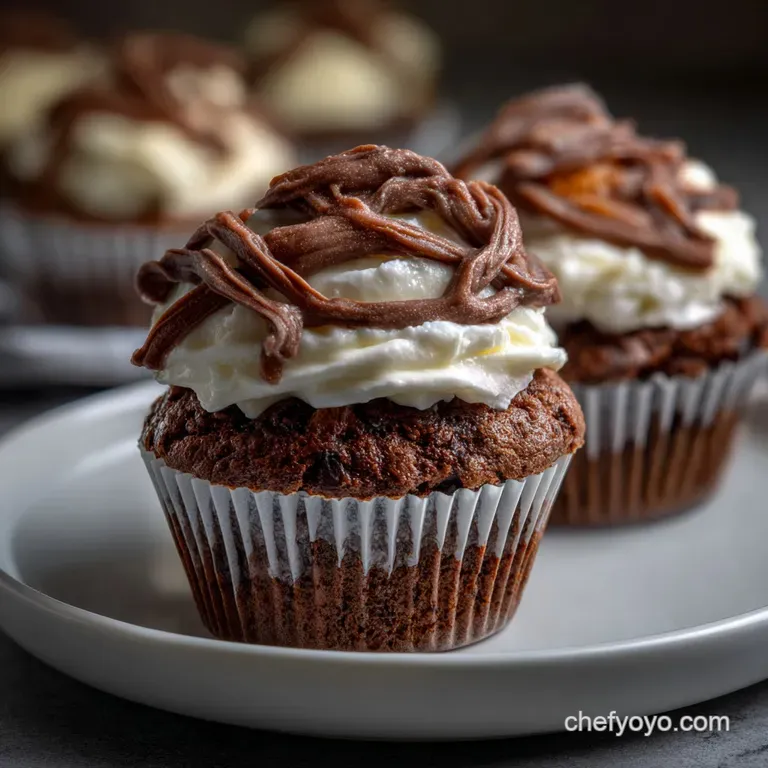
Decoding the Perfect Mummy Design (And How to Wrap the Bandages)
The secret to fluffy, defined mummy bandages is a stable American buttercream. We start by piping a slight mound on the cooled cupcake this gives the mummy a "head." Then, using a small, plain round tip (or just snipping the end of a piping bag), you pipe overlapping, slightly messy horizontal lines.
They shouldn't be perfect! Messy lines look more like tattered gauze, which is perfect for these spooky Chocolate Mummy Cupcakes .
Ingredients Breakdown and Essential Substitutions
You only need about 13 ingredients for these classic chocolate cupcakes ! Here’s what you need and how to swap things if you’re running low.
Key Equipment Checklist for Baking Success
- 12 cup muffin tin
- Paper liners
- Electric mixer (handheld or stand mixer)
- Piping bag fitted with a star tip (for the base)
- Piping bag fitted with a small round tip (for the bandages)
Ingredients for the Cupcakes
- All-Purpose Flour
- Unsweetened Cocoa Powder (Dutch process preferred for color)
- Baking Soda & Baking Powder
- Salt
- Granulated Sugar
- Eggs
- Vegetable Oil (or melted butter)
- Buttermilk
- Vanilla Extract
- Hot Coffee (freshly brewed)
Ingredients for the Vanilla Buttercream
- Unsalted Butter (softened)
- Powdered Sugar
- Vanilla Extract
- Milk (for thinning)
- Candy Eyes (small, edible)
| The Star Ingredient | The Best Swap | The Science/Trade Off |
|---|---|---|
| Buttermilk | Milk + 1 tsp White Vinegar or Lemon Juice | The acid is necessary to activate the baking soda and tenderize the gluten. Trade Off: The texture will be slightly less tender than true buttermilk. Let sit for 5 minutes before using. |
| Vegetable Oil | Melted Unsalted Butter (cooled slightly) | Oil keeps the cupcake structure moist by staying liquid at room temp. Butter provides incredible flavor but may lead to a slightly denser crumb once cooled. |
| Hot Coffee | Hot Water | Coffee enhances the cocoa flavor through thermal activation. Hot water still helps dissolve the cocoa for a smoother texture, but the chocolate flavor will be noticeably less intense . |
| All-Purpose Flour | 1:1 gluten-free Flour Blend (with xanthan gum) | The binding agents mimic gluten. Honest Trade Off: Cupcakes may be a little more fragile or slightly heavier. Do not overmix! |
step-by-step Guide to Baking Perfect Chocolate Mummy Cupcakes
This method ensures a delicate, moist crumb every time. Remember, prep time is about 30 minutes, and we’re aiming for a 20 minute cook time.
Stage 1: Mixing the Wet and Dry Ingredients Properly (Cupcakes)
- Preheat and Prep: Preheat your oven to 350°F (175°C). Line a standard muffin tin with paper liners.
- Whisk Dry Ingredients: In a large bowl, whisk together the flour, cocoa powder, baking soda, baking powder, salt, and sugar. Make sure there are no clumps of cocoa it should look like smooth, dark earth.
- Mix Wet Ingredients: In a separate medium bowl, whisk together the eggs, vegetable oil, buttermilk, and vanilla extract until just combined.
- Combine: Gradually add the wet mixture to the dry mixture, mixing on low speed until just incorporated. Stop the mixer immediately when no streaks of flour remain.
- The Coffee Boost: Slowly pour the hot coffee into the batter while mixing on low speed. The batter will become thin, which is exactly what we want! (Thin batter creates steam pockets, resulting in a lighter crumb.)
- Fill Pans: Divide the batter evenly among the 12 prepared cupcake liners. Fill them about 2/3 full.
Stage 2: Optimal Baking Times and Cooling Protocols
- Bake: Bake for 18 to 20 minutes. You’ll know they are done when the tops spring back lightly when touched, or a toothpick inserted into the center comes out with moist crumbs attached (not wet batter). The whole kitchen should now smell like heaven!
- Cooling: Let the cupcakes cool in the pan for about 5 minutes, then transfer them immediately to a wire rack to cool completely. Do not attempt to frost warm cupcakes!
Stage 3: Piping the Buttercream Base (The Mound)
- Make Buttercream: Beat the softened butter until light and fluffy (about 3 minutes). Gradually add the powdered sugar, mixing slowly until incorporated, then beat on high until light and creamy. Add vanilla and a splash of milk if needed for a velvety texture.
- Pipe the Base: Fit a piping bag with a large star tip (or just a large round tip). Pipe a dome or mound of frosting on top of each cooled cupcake. This gives the Mummy Cupcakes some height.
Stage 4: Assembling the Mummy Bandages and Eyes
- Bandage Prep: Switch to a piping bag fitted with a very small round tip (or simply snip a tiny corner off the end of the piping bag). Fill this bag with the remaining buttercream.
- Wrap the Mummies: Start piping thin, overlapping lines horizontally across the cupcake mound. Leave a small gap near the top center for the eyes. Don't worry about keeping the lines straight; the ragged, crisscrossed look is what makes these Chocolate Mummy Cupcakes look authentically spooky!
- Add the Eyes: Gently press two candy eyes into the small gap left in the frosting on each mummy.
Troubleshooting & Pro Tips for Perfect Cupcake Results
If you’ve ever opened the oven to sad, deflated cakes, this section is for you. We’re fixing common Dessert Halloween mistakes right now.
| Common Mistake | The Root Cause | The Quick Fix |
|---|---|---|
| Cupcakes are Dry/Dense | Overmixing the batter after adding flour; mixing creates too much tough gluten. | As soon as you add the flour, switch to mixing only until just combined. Finish the last few stirs by hand. |
| Cupcakes Sunk in the Middle | Oven door opened too early, releasing trapped heat; or the cupcakes weren't fully baked. | Avoid opening the oven door before the 15 minute mark. Always test for doneness (toothpick check) before removing. |
| Frosting is Too Runny | Butter was too warm or you added too much milk/liquid. | Add 1/4 cup of additional powdered sugar and beat again. If still soft, chill the frosting in the mixing bowl for 10 minutes, then re-whip. |
Preventing Dryness: Avoiding Overmixing the Batter
This is the biggest mistake home bakers make. When flour mixes with liquid, gluten starts to form. If you beat it vigorously for too long, those gluten strands become strong and elastic, resulting in a tough, chewy cake. We want a tender cake, so mix until the flour just disappears, and then stop.
Storing, Freezing, and Making Chocolate Mummy Cupcakes Ahead of Time
These Chocolate Mummy Cupcakes are a fantastic make-ahead Halloween recipe because the rich chocolate base stays moist.
How Long Do Decorated Cupcakes Last?
- Room Temperature: If decorated with stable buttercream, they can sit out in an airtight container for 1 2 days. Keep them away from direct heat.
- Refrigerator: The cake base can dry out in the fridge, but if you must store them longer, place the decorated cupcakes in an airtight container. They will last 3 4 days. Allow them to come back to room temperature (about 30 minutes) before serving for the best flavor and texture.
Freezing Undecorated Cupcake Bases
Baking the bases ahead of time is a lifesaver.
- Bake and cool the Chocolate Cupcakes completely.
- Wrap each cupcake tightly in plastic wrap, then place them in a freezer safe zip-top bag or container.
- Freeze for up to 3 months.
- To Thaw: Unwrap the frozen cupcakes and let them thaw completely on the counter (1- 2 hours) before frosting.
Creative Ways to Serve These Spooky Treats
These adorable Chocolate Mummy Cupcakes are perfect centerpiece material, but you can always change things up!
Customizing the Mummy Design (Zombie Hues)
If you want truly terrifying mummies, use a small amount of green or yellow food coloring in your buttercream to create a sickly, zombie flesh tone before piping the bandages. For extra drama, try adding a tiny drop of red food coloring to some corn syrup and lightly "splatter" it onto the bandages for a bloody effect.
It takes the Halloween monster cake decorating ideas to the next level!
Pairing Suggestions: Drinks and Halloween Cocktails
These rich chocolatey treats pair wonderfully with cold milk, or for the adults, a dark roast coffee or a creamy Irish coffee. If you're hosting a party, serve them alongside some easy no-bake options like Oreo Balls: Easy No-Bake Recipe for Creamy Chocolate Truffles to round out your Pasteles Halloween dessert table.
There you have it a seriously delicious, impossibly moist cake base wrapped up in the cutest, spookiest Chocolate Mummy Cupcakes ever. Happy baking!
Nutrition Information
| Nutrient | Amount |
|---|---|
| Calories | 305 kcal |
| Protein | 4.3 g |
| Fat | 14.0 g |
| Carbs | 44.8 g |
| Fiber | 2.0 g |
| Sugar | 28.9 g |
| Sodium | 233 mg |

Recipe FAQs
Why does the recipe call for hot coffee instead of hot water?
Yes, using hot coffee dramatically enhances the chocolate flavor profile; the heat blooms the cocoa powder, releasing its deeper aromatic compounds. The coffee flavor itself is undetectable in the final product, much like how we deepen flavors in other desserts like our No Bake Chocolate Cheesecake: Easy, Silky Smooth, Dark Chocolate Recipe.
Can I make these cupcakes ahead of time for a party?
Yes, the unfrosted cupcakes can be baked and stored tightly wrapped at room temperature for up to two days. Ensure they are completely cooled before wrapping to prevent moisture buildup, as condensation will make the cake soggy.
My mummy wrappings look sloppy; how do I get clean icing strips?
The best technique involves using a piping bag fitted with a small round tip (like a Wilton #3) or cutting a very small corner off a Ziploc bag for a makeshift tip. Apply slow, even pressure while crisscrossing the strips, mimicking bandages.
What is the best way to store the finished, decorated mummy cupcakes?
Store the fully decorated cupcakes in an airtight container at cool room temperature for up to 24 hours. If your frosting contains cream cheese, refrigeration is necessary, but allow them to temper at room temperature for 30 minutes before serving for the best texture.
Can I substitute the buttermilk for regular milk?
No, buttermilk is highly recommended because its acidity reacts with the baking soda to create a lighter crumb structure, which helps keep the fudgy texture moist. Substituting with regular milk will result in a slightly denser cupcake unless you add a teaspoon of vinegar or lemon juice to mimic the acidity.
My cupcakes seem too dark; can I use a lighter chocolate base?
While this recipe specifically aims for an "impossibly dark" base, you could adjust the darkness by substituting some of the dark cocoa powder with a lighter, natural cocoa powder, similar to the lighter profile found in our Skinny Chocolate Raspberry Cheesecake: The Guilt Free Light Cheesecake Recipe. Be aware this will slightly change the required liquid ratios.
How can I ensure my chocolate frosting is fluffy and not greasy?
The key is temperature control during the creaming stage; ensure your butter and powdered sugar are beaten long enough until they become light and pale before adding liquids. Over beating after the liquid is added can sometimes incorporate too much air, leading to a greasy separation if the mixture gets warm.
Chocolate Mummy Cupcakes Recipe
Ingredients:
Instructions:
Nutrition Facts:
| Calories | 305 kcal |
|---|---|
| Protein | 4.3 g |
| Fat | 14.0 g |
| Carbs | 44.8 g |
| Fiber | 2.0 g |
| Sugar | 28.9 g |
| Sodium | 233 mg |
