Crisp & Zesty Refrigerator Pickles
- Crunching into Refrigerator Pickles: A Fresh Taste of Summer
- Essential Ingredients Guide for Homemade Pickles
- A Quick Guide to Professional Cooking Method: Making Crisp & Zesty Refrigerator Pickles
- Pro Tips & Secrets for Making Refrigerator Pickles
- Perfect Presentation for Your Homemade Pickles
- Storage & Make-Ahead Tips
- Creative Variations for Your Pickles
- Complete Nutrition Guide
- Conclusion: Embrace the Pickle Adventure!
- Frequently Asked Questions
- 📝 Recipe Card
Crunching into Refrigerator Pickles: A Fresh Taste of Summer
Oh my gosh, let me take you back to a summer barbecue a couple of years ago. the sun was shining, the grill was hot, and i was trying to find something to jazz up those hot dogs on the table.
That’s when i spotted my aunt’s mason jar filled with refrigerator pickles . i had seen her make them countless times, but it wasn’t until that moment that i realized how easy , quick , and downright delicious they could be.
Trust me, if you're looking for a way to elevate your meals, you need to learn how to make refrigerator pickles .
A Little History with a Crunch
So, what’s the deal with refrigerator pickles? they actually have their roots in traditional pickling methods. folks have been preserving food for ages, and these quick pickles evolved as a way to enjoy crisp cucumbers without the whole canning process.
Now, they’re gaining popularity for their convenience and flavor . honestly, in today’s fast paced world, who has time for long canning sessions? plus, because they’re made without cooking, you keep all the fresh summer vibes alive.
Quick and Easy - Just Perfect
Here’s the kicker: making refrigerator pickles is super easy ! you need about 15 minutes of prep time and then just let them chill in the fridge.
You can whip up a batch while dinner is cooking, and they’ll be ready to enjoy in about an hour.
If you’re like me, that’s a huge win with minimal fuss. and the best part? you don’t need a ton of fancy equipment.
Just grab a clean mason jar (or any airtight container) and a few simple ingredients.
Cost wise, we're talking a budget friendly snack here. a couple of cucumbers, some vinegar, sugar, and spices won’t break the bank.
Plus, you’ll get a whole pint of goodness that’ll last about two weeks.
Why You’ll Love Them
Now, let’s get into the fun stuff the benefits ! first up, these bad boys are way healthier than you might think.
With cucumbers as the star, you're getting a good dose of hydration and fiber. they’re low in calories about 60 for a serving so you can munch away without any guilt.
What i really love about refrigerator pickles is their versatility. they can jazz up sandwiches, serve as a stunning side dish, or even be a star in a cheese board.
Plus, they’re perfect for special occasions. summer picnics, holiday spreads these tangy little bites can take any dish from basic to wow .
Another point? unlike some pickle recipes that require you to immerse them in boiling water or worry about the canning process, refrigerator pickles are all about ease.
They’re made for those moments when you just don’t want the hassle!
A Perfect Transition: What You Need
Excited to dive in? great! let’s jump into what you need to make your very own crisp & zesty refrigerator pickles .
Whether you’re craving that classic dill flavor or the sweet tang of bread and butter pickles , you can customize this recipe to fit your taste buds.
Get ready to slice, brine, and crunch your way into pickle perfection!
Stay tuned for a fun list of ingredients that’ll get you started on this pickle making adventure. Trust me; your taste buds are in for a treat!
Essential Ingredients Guide for Homemade Pickles
If you've ever found yourself in the pickle aisle, drooling over the countless varieties, let me say this: making pickles homemade is so much fun and incredibly satisfying! plus, when you learn how to make refrigerator pickles, you'll never go back to store-bought.
Seriously, why go for the soggy store pickles when you can create your very own tangy masterpieces? so, let’s dig into the essential ingredients that’ll make your pickles the talk of the town.
Premium Core Components
First things first, let's talk about the premium core components to set you up right. For refreshing refrigerator pickles, you're gonna need some key ingredients.
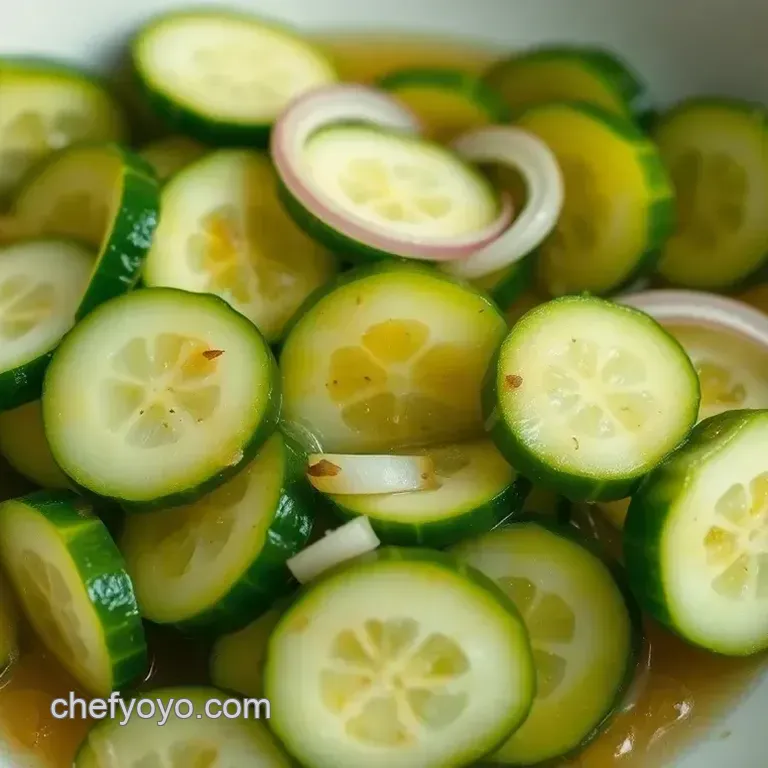
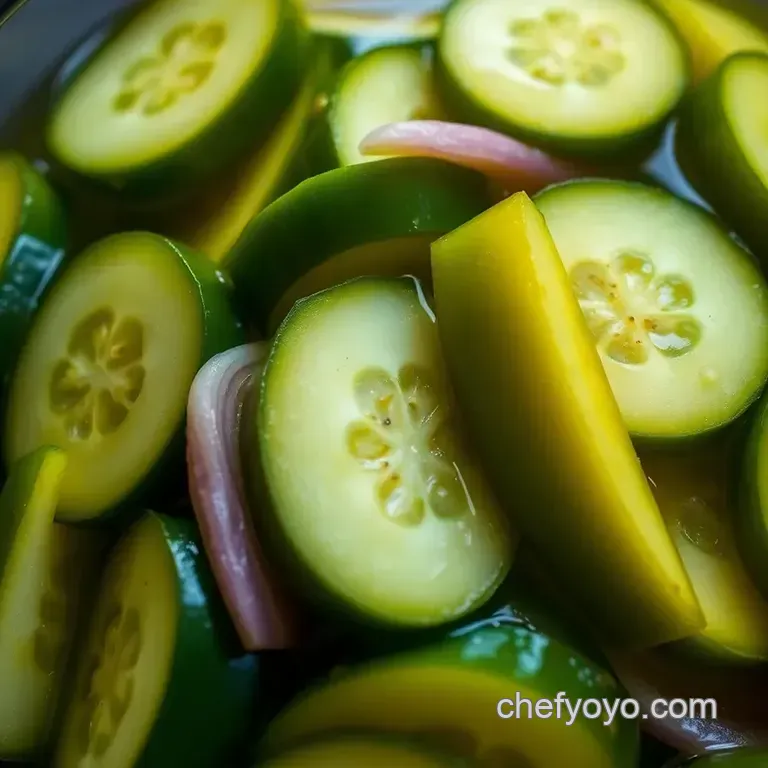
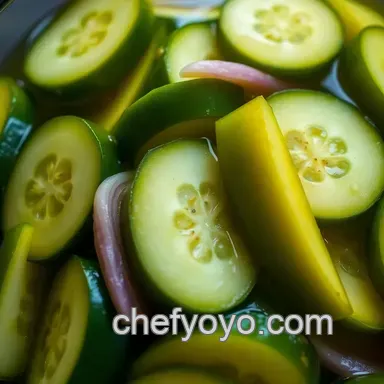
- Cucumbers : Freshness is everything. Aim for about 2 medium cucumbers or about 1 pound (450 grams) . You want crisp, firm ones look for shiny skin.
- Vinegar : Go for 1 cup of distilled white vinegar (240 ml). It’s the magic potion that brings that zing.
- Water : Just as important, you'll need 1 cup of water (240 ml) to dilute the brine.
- Sugar and Salt : ½ cup granulated sugar (100 g) and 2 tablespoons kosher salt (30 g) balance out that tartness with a bit of sweetness.
- Spices : Mustard seeds, black peppercorns, and red pepper flakes are game changers. They give your pickles that extra kick!
Now, when it comes to storage guidelines and shelf life , don’t worry too much. Your homemade pickles if kept in the fridge will last about two weeks , although let’s be honest, they’ll probably be gone in a week if your friends get ahold of them!
Signature Seasoning Blend
Let’s spice things up, shall we? Your signature seasoning blend will truly set your pickles apart. Think beyond the basics!
- Essential Spice Combinations : Using a combo of mustard seeds and black peppercorns is pretty classic.
- Herb Selections : Dill is king add it in there if you love that classic dill pickle recipe flavor. You can also toss in some garlic for good measure!
- Flavor Enhancers : A touch of red pepper flakes adds that zing. Adjust it according to your spice level.
- Regional Variations : Give a nod to Southern styles with a bread and butter pickle recipe variation by adding a bit of sweetness with more sugar. Yum!
Smart Substitutions
Now, there will be times when life throws curveballs. Smart substitutions come in handy:
- Common Alternatives : If you’re out of sugar, feel free to use honey or less of agave nectar.
- Dietary Modifications : For you vinegar ensoiasts, consider using apple cider vinegar it gives a milder flavor, and let’s be honest, it’s a health fad!
- Emergency Replacements : If you can’t find a certain spice, skip it! You can get creative. Just remember not to overthink it; it’s all about finding what flavors you enjoy.
- Seasonal Options : Fresh herbs can be swapped in depending on the season. Basil in summer? Why not!
Kitchen Equipment Essentials
Okay, let’s chat about the gear. You don’t need fancy gadgets; just the essentials to whip up your pickle adventure:
- Must Have Tools : A clean 1-pint mason jar or a small airtight container is your pickling buddy. Seriously, you NEED this.
- Alternative Equipment Options : No jars? No problem! Any container with a tight lid will do.
- Preparation Tips : Use a cutting board and a sharp knife to slice your cucumbers evenly. It helps them soak up the brine better!
- Storage Solutions : Your pickles should chill in the fridge, and by keeping them sealed, they will stay crunchier, longer.
So, whether you're looking to brighten up your summer cookouts or impress friends at a backyard bbq, these crisp and zesty refrigerator pickles are undeniably your go-to.
Nothing matches the enlivening crunch and flavor of a homemade pickle. check back soon for the next section, where i’ll dive right into the step-by-step instructions on how to make these fabulous refrigerator pickles.
Trust me you’ll be in pickle paradise! happy pickling!
A Quick Guide to Professional Cooking Method: Making Crisp & Zesty Refrigerator Pickles
Hey there, pickle ensoiasts! if you've ever wondered how to make refrigerator pickles , you're in for a treat. these little gems are a game changer in the world of quick and easy snacks.
Perfect for sandwiches, salads, or even just munching straight from the jar, these pickles homemade easy will brighten up your meals with a zesty crunch.
So, grab your apron, and let's dive into this delicious adventure!
Essential Prep Steps
First off, let’s talk about some of the essential preparation steps you’ll need to master.
Mise en place is your best friend when you're cooking. it means setting everything up before you start cooking. chop your cucumbers and slice any onions first trust me, it makes the process smoother.
When it comes to time management , remember: pickling is quick, but waiting for flavors to meld is key. plan on having at least one hour (but overnight is best!) of chilling time.
As for organization strategies , keep your ingredients in one spot on the countertop. It’s a simple trick that saves you time and hassle.
Don’t forget about safety considerations ! Always wash your hands before handling food, and make sure your cutting board is clean. Nothing puts a damper on pickling like foodborne illness!
step-by-step Process to Pickle Perfection
Now, it’s time to break down the step-by-step process for your delightful fridge pickles.
Prepare the Cucumbers: Start by washing your cucumbers and slicing them thin. You want them to soak up all that brine goodness.
Make the brine: here’s where the magic happens! in a mixing bowl, combine 1 cup distilled white vinegar , 1 cup water , ½ cup sugar , 2 tablespoons kosher salt , mustard seeds, black peppercorns, and red pepper flakes.
Whisk until everything is dissolved.
Combine ingredients: layer those lovely cucumber slices and optional onion into your clean mason jar. pour your brine over the veggies until they’re entirely submerged.
This is super satisfying like, who doesn’t love a well layered pickle jar?
Seal & chill: seal that jar tight! give it a gentle shake and toss it in the fridge. you’re going to want to let them chill for at least 1 hour (though, honestly, overnight is where the true flavor impact happens).
Serve! You can enjoy them within two weeks for the best taste. Seriously, you’ll want to stock up!
Expert Techniques for the Perfect Crunch
Let’s talk about expert techniques you can use to elevate your pickle game.
A crucial step is using fresh cucumbers to ensure that crunch factor. also, always taste your brine before sealing! you might want to add a bit more sweetness or salt.
Get adventurous! swap out spices or add some crushed garlic to switch things up.
As for quality checkpoints , check the brine for taste and ensure everything is nicely submerged. You want a pickle that’s evenly flavored.
And hey, if you find your pickles aren't as zesty as you'd like, or maybe a jar's flavor fades faster than others, don't sweat it. Just tweak your brine next time!
Avoiding Common Mistakes: Success Strategies You Need
So, what are the common mistakes to avoid ? Well, one biggie is not letting your pickles chill long enough. Trust me; flavor melding is key!
For quality assurance tips , I often test my brine flavor it's super important. And if you want perfect results , try different kinds of cucumbers. Pickle recipes are about discovery!
Lastly, if you want to be ahead of the game, consider make-ahead options! you can easily double the recipe for a big batch.
They make for great snacks during those summer bbqs, don't you think?
Additional Information
So there you have it: your roadmap to making crisp & zesty refrigerator pickles that dance on your taste buds.
Pickling at home is way simpler than you might think! whether you're pulling them apart for a sandwich or enjoying them straight from the jar, you’re not just making homemade pickles ; you’re creating memories.
Now that you're equipped with this pickling knowledge, why not experiment with some exciting variations? you could try a bread and butter pickles style or even dive into spicy territory with jalapeños! embrace those flavors proudly and let your culinary creations shine.
Happy pickling, my friends!
Pro Tips & Secrets for Making Refrigerator Pickles
Oh my gosh, if you’re diving into making refrigerator pickles , you’re in for a crunchy treat! let me share some pro tips to help you nail this recipe and make your homemade pickles just out of this world.
First off, use the freshest cucumbers you can find. farmers' markets are gold mines for this! fresh cucumbers really pack that satisfying crunch.
And don’t forget the brine keeping it balanced is key. test it before sealing. if it’s a tad bland, add more salt or sugar! trust me; taste as you go makes all the difference.
For all you busy bees out there, time saving techniques work wonders. slice those cucumbers while you’re waiting for the brine to cool down.
It’s like multitasking but in a delicious way! and if you can, let those pickles chill overnight in the fridge.
The longer they sit, the more intense the flavor like a flavor party in your mouth!
Perfect Presentation for Your Homemade Pickles
You wanna wow your friends, right? plating techniques are super important when you serve your refrigerator pickles. grab a cute jar, layer those pickle slices, and tuck in some onion.
It looks soooo pretty, especially with those vibrant colors!
Garnish ideas? how about a sprig of fresh dill or even a few slices of jalapeño on top? color combinations are key here bright greens from the cucumbers, pops of yellow from mustard seeds, and that lovely spice of red pepper flakes.
The visual appeal? Don’t underestimate it! When you open the fridge and see that cute jar of crunchiness, it just makes you smile, doesn’t it?
Storage & make-ahead Tips
Now, let’s talk storage and make-ahead life! your refrigerator pickles are gonna taste best in the first two weeks after making them.
That being said, keep ‘em in a tight sealing jar and always in the fridge. if you want them to last a bit longer think about canning pickles !
If you’re planning a gathering, whip these puppies up a couple of days in advance. they’ll have time to soak up all the flavors.
Perfect for backyard barbecues! and when it comes to reheating , there’s no need for that with pickles just dig right in!
Creative Variations for Your Pickles
Feeling adventurous? let’s explore some creative variations ! you can totally toy with the flavors. try a bread and butter pickle recipe by adding more sugar and some spices.
Ever wanted dill pickles ? toss in some fresh dill for that classic taste.
How about a seasonal spin? try adding pumpkin spice in the fall for a fun twist! and for all my vegan friends, fear not.
Just a few simple swaps, and you’ll have a killer batch that fits your lifestyle.
Complete Nutrition Guide
So, let’s break it down with a quick nutrition guide . per serving, these bad boys roll in at around 60 calories .
They’re not just tasty; you’re also getting a bit of fiber and flavor perfect for snacking guilt free.
You also get a chance to play around with dietary considerations. Want fewer calories? Skip some sugar and enjoy that natural cucumber crunch! Portion guidance? A couple of pickle slices are usually all you need for a flavor kick!
Finally, remember that pickles aren’t just a side they can totally steal the show. use them as a tangy topping for burgers or sandwiches or just snatch a few whenever you hit that snack craving.
Conclusion: Embrace the Pickle Adventure!
So there you have it, friends! making refrigerator pickles is all about simplicity and fun. grab those cucumbers, channel your inner chef, and get to experimenting! you might just discover your fave pickle recipes homemade .
Ain’t that the beauty of cooking? so go on, embrace your crunchy journey, and let every jar bring you a taste of summer.
Happy pickling!
Frequently Asked Questions
What are refrigerator pickles and how to make refrigerator pickles at home?
Refrigerator pickles, sometimes called quick pickles, are a method of preserving cucumbers without the need for canning. You simply combine fresh cucumbers with a vinegary brine and let them sit in the fridge to develop their flavor. It's a super easy process, perfect for beginners!
How long do refrigerator pickles last?
When stored properly in the refrigerator, your refrigerator pickles will typically last for about two weeks. After that, they can start to lose their crunch and flavor, but they'll usually still be safe to eat for a short while longer if they’re kept sealed.
Can I customize the brine for my pickles?
Absolutely! The beauty of refrigerator pickles is that you can tweak the brine to suit your taste. Consider adding spices like dill for that classic taste, or if you're feeling adventurous, try a splash of soy sauce for a unique Asian twist.
Just remember it’s all about balancing the vinegar, sugar, and salt!
What should I do if my pickles are too salty or sweet?
If you find that your pickles are too salty or sweet, you can always adjust these elements in the brine for future batches. Before sealing the jar, do a taste test of the brine mixture and tweak it as needed. If you've already sealed them, you can thin the brine with a little water to mellow the flavor.
What’s the best way to store refrigerator pickles?
Store your refrigerator pickles in a clean, airtight jar or container in the fridge. Keeping them sealed ensures they stay fresh and crunchy. Just make sure to use clean utensils when grabbing your pickles to keep bacteria at bay!
Are refrigerator pickles healthy?
Refrigerator pickles can be a healthy addition to your diet when consumed in moderation. They’re low in calories but sometimes high in sodium due to the brine. If you're watching your sodium intake, consider reducing the salt in your brine or enjoying them as an occasional treat.
Crisp Zesty Refrigerator Pickles
Ingredients:
Instructions:
Nutrition Facts:
| Calories | 60 |
|---|---|
| Fat | 0g |
| Fiber | 1g |
