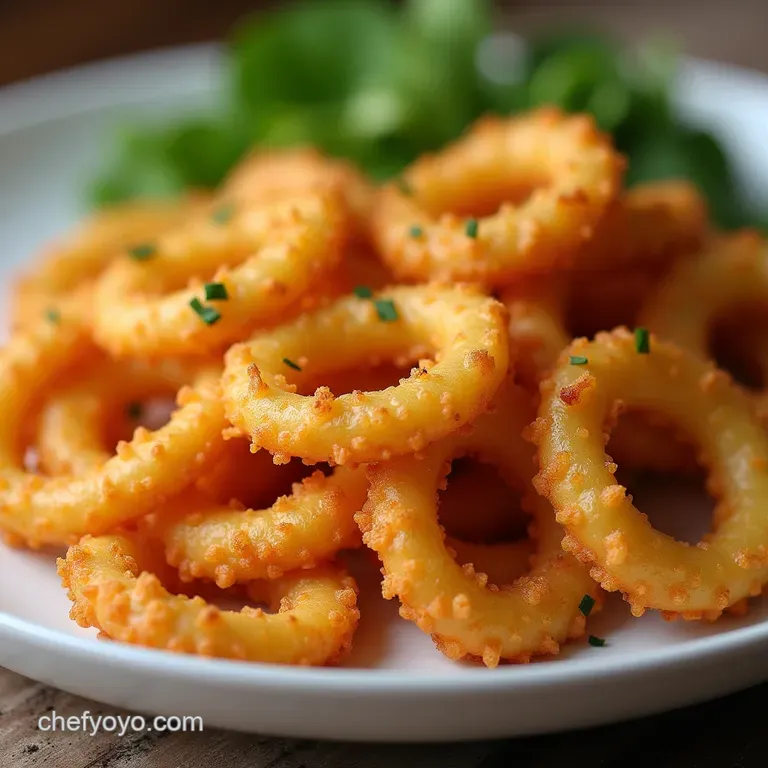
The Ultimate Crispy Fried Calamari Light Golden and Never Chewy
- Shattering Success: Why This Calamari Recipe Ends Rubbery Disappointments
- The Secret to Mediterranean-Inspired Lightness in Your Crispy Fried Calamari
- Gathering Your Arsenal: Components for Supreme Crunch
- Essential Equipment for the Perfect Golden Fry
- The Step-by-Step Journey to Perfect Texture
- Mastering the Deep Fry for Golden Perfection
- Elevating the Experience: Accompaniments and Variations
- Recipe FAQs
- 📝 Recipe Card
Shattering Success: Why This Calamari Recipe Ends Rubbery Disappointments
There is a universal tragedy associated with ordering Crispy Fried Calamari at a restaurant: the chewy, dense rings that suggest they’ve been sitting under a heat lamp or, worse, were tragically overcooked.
My goal with this Fried Calamari Recipe is to eliminate that disappointment entirely. We are moving beyond the soggy, heavy batter typical of lesser versions and striving for a lightness that truly honors this delicate seafood.
The difference between a superb appetizer and a mediocre one often boils down to timing and technique specifically, how we treat the squid before it ever meets the hot oil. Follow these steps, and you will master the art of the perfect crunch, securing your spot as the go-to provider of top-tier Seafood Appetizers .
The Secret to Mediterranean Inspired Lightness in Your Crispy Fried Calamari
The foundation of any excellent Crispy Calamari lies in balancing two critical factors: tenderness of the squid and crispness of the coating. We achieve this balance by borrowing time honoured methods that ensure maximum flavour transfer without toughening the protein.
Forget heavy, beer battered coatings; our approach leans into a light dusting that adheres perfectly but fries instantaneously.
Bidding Farewell to Seaside Skepticism
Most store-bought or quick fry versions skip the crucial pre-treatment phase. Squid, when cooked too long, tightens up into rubber bands. To prevent this, we must coax the muscle fibres into relaxing before cooking.
This preparation is key to ensuring that every single bite of your Calamari Rings Recipe is pleasantly yielding.
Our Signature Technique for Tender Results
The non-negotiable step for tenderness in this Easy Calamari Recipe is a quick brine. We are submerging the cleaned squid tubes sliced into uniform ¼-inch rings and separated tentacles in a bath of buttermilk seasoned with a teaspoon of Kosher Salt for a minimum of 30 minutes, though two hours in the refrigerator works wonders.
The mild acidity in the buttermilk gently denatures the proteins, making the squid remarkably tender before the heat even touches it.
Setting the Stage: What Makes This Preparation Different
While the buttermilk tenderizes, the coating mixture is designed for aeration. We use a precise combination of all-purpose flour and fine cornstarch. The cornstarch is crucial; it lowers the gluten development and dramatically increases the final crunch factor.
On top of that,, the inclusion of baking powder is our little secret weapon it creates microscopic bubbles during the fry, resulting in that coveted airy, shatter resistant shell we crave in exceptional Classic Appetizers .
Gathering Your Arsenal: Components for Supreme Crunch
To build the best Crispy Fried Calamari , we must assemble our Crispy Fried Calamari Ingredients with precision. The quality of your initial components will directly influence the final outcome.
Ensure your squid is fresh or, if frozen, completely thawed and thoroughly patted dry before beginning the buttermilk soak.
Related Recipes Worth Trying
- The Best Crispy Air Fryer Chicken Parmesan Recipe — Ditch the deep fryer This 30minute Air Fryer Chicken Parmesan recipe delivers ultimate crunch without the oil A guaranteed weeknight hero
- The Best Crispy Chicken Parmesan with Homemade Marinara — Achieve impossibly juicy chicken and a shatteringly crisp crust with this Homemade Marinara Recipe Get the technique for the best Chicken Parmesan tonight
- Properly Posh Marmite Roast Potatoes Ultimate Crispy Recipe — Transform your Sunday Lunch with these Proper Marmite Roast Potatoes Get intensely savoury flavour and that essential crispy exterior See the simple steps now
Essential Equipment for the Perfect Golden Fry
Achieving that professional golden brown exterior relies heavily on equipment control. While you might be tempted to eyeball the heat, resist that urge.
The Squid and the Subtle Salt Soak
For the prep stage, alongside your 1 lb of cleaned calamari, you will need 1 cup of buttermilk and 1 teaspoon of Kosher Salt for the aforementioned soak. This step should be completed first, allowing the flavours and tenderizing agents to work their magic while you ready your dry ingredients and oil.
Crafting the Featherlight Coating Mixture
In a wide, shallow dish perfect for dredging, combine 1 cup of All-Purpose Flour, ½ cup of Fine Cornstarch, 1 tablespoon of Smoked Paprika for a beautiful hue, 1 teaspoon of Baking Powder (don't skip this!), 1 teaspoon of Kosher Salt, and ½ teaspoon of freshly ground Black Pepper.
Whisk these thoroughly to ensure the leavening agent and seasoning are evenly distributed throughout the flour matrix.
Oils and Temperature Benchmarks
You will require approximately 4 cups of a high smoke point oil, such as Canola, Peanut, or Vegetable oil. The absolute most vital piece of gear here is a reliable deep fry or candy thermometer.
We are aiming for a strict target temperature of 375° F ( 190° C) for frying; without this tool, the risk of greasy calamari skyrockets.
The step-by-step Journey to Perfect Texture
Once your squid has had its mandatory time in the buttermilk bath ( 30 minutes minimum), the process moves quickly. Drain the calamari well, allowing excess buttermilk to drip off. Now, it’s time to coat. Toss the pieces into the flour mixture until lightly dusted.
The key here is the subsequent step: lift the coated calamari and vigorously shake off any loose, excess flour clinging to the surface. This prevents the 'flour dust' from burning prematurely in the fryer and ensures only a thin, effective crust remains.
Mastering the Deep Fry for Golden Perfection
This is where precision cooking separates the crisp from the chewy. Deep frying is a rapid process, designed to cook the thin squid almost instantly while creating a crust that locks in moisture.
Prepping the Rings: From Clean to Coated
Ensure your drained, buttermilk treated calamari is thoroughly shaken of excess flour before introducing it to the hot environment. Have your wire rack set over a baking sheet ready nearby this setup is crucial for allowing air circulation around the fried pieces, preventing steam from building up and softening the crisp exterior.
Achieving Optimal Oil Heat for Immediate Crisp
Gently heat your oil in a heavy bottomed Dutch oven until your thermometer registers precisely 375° F ( 190° C). If the oil is too cool, the coating absorbs fat before it crisps, leading to a greasy texture.
If it’s too hot, the outside burns instantly, leaving the inside raw.
The Rapid Fry Protocol
Working in small, uncrowded batches (no more than a quarter of your total batch at a time), carefully lower the dredged calamari into the oil. Immediately check your thermometer; the oil temperature will likely drop slightly.
You must keep the heat consistent, allowing the calamari to fry undisturbed for about 1.5 to 2. 5 minutes. They are done when they achieve a pale, uniform golden colour. Cooking them past this point guarantees rubberiness.
Draining and Seasoning Immediately Post Frying
Using a spider strainer or slotted spoon, remove the golden pieces and place them directly onto the waiting wire rack. This is the moment for immediate flavour infusion: while still piping hot, sprinkle them generously with finishing sea salt and the finely grated zest of one small lemon.
The residual heat helps the salt and zest adhere beautifully. Allow the oil to return to 375° F before starting the next batch, ensuring consistent results for your entire serving.
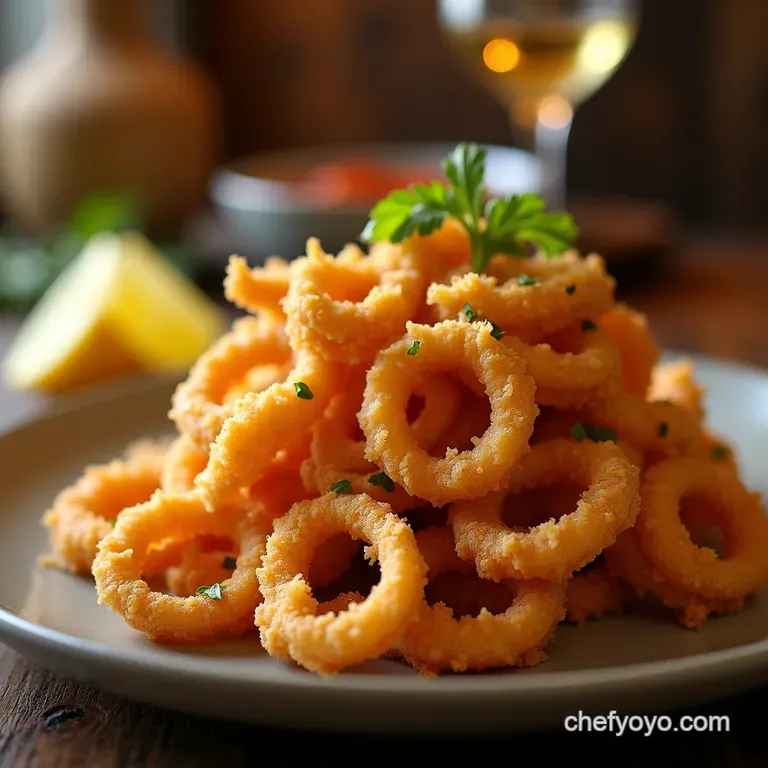
Elevating the Experience: Accompaniments and Variations
While perfectly executed Crispy Fried Calamari stands tall on its own, the right accompaniments enhance the overall culinary journey. The light, salty crunch begs for something bright and creamy to cut through the richness.
Beyond the Lemon Wedge: Recommended Dipping Sauces
While a fresh lemon wedge is traditional, consider developing a signature dipping sauce. A zesty homemade Lemon Garlic Aioli is divine, offering coolness and complexity. Alternatively, serving it alongside a vibrant, chunky, slightly spicy Marinara sauce provides a classic contrast.
For those who prefer herbaceous notes, a light drizzle of a chimichurri style sauce can also work wonders.
Spice Swaps: Customizing the Coating Blend
If you find the standard seasoning a bit tame, experimentation is welcome in the dry dredge. To enhance the profile of your Crispy Calamari , consider adding a teaspoon of cayenne pepper for heat, or perhaps a half teaspoon of finely ground fennel seed for a subtle, anise tinged flavour reminiscent of Italian street food.
Strategies to Maintain Peak Crispiness After Serving
Once fried, calamari begins to lose its texture relatively fast due to steam trapped beneath the cooling crust. The best strategy is the wire rack drainage, which promotes airflow.
If you must hold a batch, place the rack over a very low oven (around 200° F or 95° C) for no more than 15 minutes. Never stack the calamari, as this instantly steams the bottom layer soft.
Is Storing Leftover Crispy Fried Calamari Advisable?
Honestly, for the best experience, no. This food is designed to be eaten immediately. If you do have leftovers, storing them in the refrigerator in an airtight container is possible, but reheating fried foods in the microwave will never yield satisfying results.
If you insist on reviving them, spread them in a single layer on a baking sheet and reheat them in a hot oven ( 400° F/ 200° C) for about 8- 10 minutes until the exterior crisps up again.

Recipe FAQs
How do I stop my Crispy Fried Calamari from turning out rubbery?
The secret to tender squid lies in two quick steps: first, the buttermilk brine we use helps tenderise the muscle fibres before cooking. Secondly, the actual cooking time must be swift squid cooks very quickly, so aim for no more than 2.5 minutes in hot oil to keep it beautifully tender.
My coating always seems soggy; what’s the trick to getting that light, shatteringly crisp result?
Achieving that desirable crispness hinges on two factors: temperature and dryness. Ensure your oil is exactly 375°F (190°C) before dropping the calamari in. Furthermore, after coating, give the pieces a good, aggressive shake to remove all excess flour; you want a dusting, not a heavy cloak.
Can I make this Crispy Fried Calamari ahead of time, or does it need to be eaten immediately?
Unfortunately, fried food doesn't like to wait! Calamari is best enjoyed fresh from the fryer, usually within about five minutes of draining. If you must store leftovers, place them on a paper towel lined plate and reheat them quickly in a hot oven or air fryer never the microwave, or you'll be left with chewy sadness.
I don't have buttermilk; what’s the best substitute for the calamari soak?
If you’ve run out of buttermilk, don’t despair! You can easily whip up a substitute by adding one teaspoon of lemon juice or white vinegar to a cup of regular milk and letting it curdle slightly for five minutes. This acidic liquid still provides the necessary tenderising effect before dredging.
Is frying in deep oil the only way to cook this recipe, or can I use an air fryer?
While traditional deep frying yields the absolute best, most authentic results, you can adapt this recipe for an air fryer. After dredging, spray the coated calamari generously with oil spray and air fry at 400°F (200°C) for about 8-10 minutes, shaking halfway through.
It won't be quite as perfectly crisp, but it’s a decent, lighter alternative.
Crispy Fried Calamari Recipe
Ingredients:
Instructions:
Nutrition Facts:
| Calories | 1022 kcal |
|---|---|
| Protein | 17.9 g |
| Fat | 18.1 g |
| Carbs | 89.1 g |
| Fiber | 18.1 g |
| Sodium | 717 mg |
