Crispy Homemade Fries: the Ultimate Comfort Food
So, picture this: it’s a chill saturday night, the movie's queued up, and my stomach is growling like a bear! i mean, what’s the perfect snack to join me in my binge watching adventure? yep, you guessed it!
i’m talking about homemade fries those beautiful, crispy little guys you can’t say no to.
Seriously, how to make homemade fries is one of those life skills everyone should have under their belt. who doesn't love a fresh batch of fries? trust me; you'll thank me later!
Let’s dive into a little history, shall we? believe it or not, fries trace their roots back to belgium, where they were dubbed "frites.
" nowadays, they’ve taken over the fast food scene and your kitchen! fries are incredibly popular, from classic fish and chips to loaded nacho fries.
Don’t let their simplicity fool you; they’re incredibly versatile and perfect for any occasion. and good news they're super affordable to make and yield enough to share with the family (or keep all to yourself; i won't judge!).
Recipe Overview
Now, before we get our hands dirty, let’s talk a bit about what we're diving into. this ain't some fancy michelin star dish.
It's a straightforward easy french fries recipe that even a newbie can tackle. prep time’s about 15 minutes , and after a little soaking time , you’ll be ready to fry these babies up in 30 minutes or so .
All in all, you’re looking at about an hour or so to have glorious fries in front of you, which is totally worth it!
But wait! let's break it down. you’ll need around four large russet potatoes , some water, optional vinegar, oil for frying, salt, and any other seasonings your little heart desires.
So budget wise, you're easily under $5, depending on your pantry staples. what's not to love about that?
Key Benefits
Now, you might be wondering, "are homemade fries healthy?" well, let's just say there are definitely some perks! first off, you control the ingredients.
So, whether you're going for classic salt or looking to jazz things up with garlic powder or even fresh herbs, the power is yours.
Bonus! you can avoid those dreaded unhealthy additives and preservatives from the drive thru.
Another sweet spot for homemade fries? they're perfect for gatherings! whether it’s a cozy movie night, a summer barbecue, or even a casual get-together with friends, fries can fit in anywhere.
You can whip up easy food ideas for parties by creating a fries meal idea bar, with toppings galore. how fun is that?
And guess what? making fries at home is a totally unique experience. you can twist this classic recipe to match your tastes sweet potato fries, loaded fries, or even baked versions to charm the health conscious crowd.
You won’t find the same level of customization at your local diner, that's for sure.
Honestly, embracing how to make French fries at home opens up a whole new world of flavor and creativity. You can tailor them to your mood whether you want it spicy, cheesy, or with a fresh herb twist!
Now that you’re drooling and ready to dive in, let’s check out the ingredients you’ll need for this crispy adventure. Get those potatoes ready, and let’s make some fry magic happen!
Essential Ingredients Guide for Homemade Fries
Premium Core Components
Alright, fry lovers! If you want to whip up the best homemade fries , knowing your ingredients inside and out is crucial. Let’s break this down, shall we?
First off, potatoes . russet potatoes are the gold standard. you need about 4 large russet potatoes , roughly 1.5 kilograms.
These beauties have the perfect starch content for that crispy outer layer and fluffy inside. and always check for quality indicators: they should be firm and smooth, no weird soft spots or blemishes, please!
When it comes to measuring , stick with about 4 cups (950 ml) of cold water for soaking those fries.
And don’t forget the optional 2 tablespoons (30 ml) of white vinegar ! soaking in vinegar water isn’t just a cooking tip; it’s a game changer for crispy fries.
Keep those fries in cold water for at least 30 minutes to get rid of excess starch. this little step transforms "meh" fries into crispy goodness.
Storage tips ? if you've got leftovers, place them in an airtight container and pop them in the fridge for up to 3 days .
But let’s be real, they probably won’t last that long!
Signature Seasoning Blend
So, how do we make these fries sing? seasoning! while sea salt is a must (about 1 teaspoon or 5 g ), don't stop there.
Feeling adventurous? try garlic powder or paprika for that flavor kick. seasonal herbs like fresh parsley can make a world of difference too.
Honestly, play around with what you like!
Local variations can give your fries a fun twist. How about some Cajun seasoning if you’re feeling sassy? Or go classic with Italian herbs . The world is your oyster here!
Smart Substitutions
Now, let’s chat about substitutions. maybe you’re out of russets or feeling adventurous? yukon golds are a great stand-in. want less oil? baking those puppies at 425° f ( 220° c) with a drizzle of oil can still satisfy that fry craving.
If you’re gluten-free or have a food intolerance, consider zucchini or sweet potatoes for a healthier spin! also, if you’re all out of a certain seasoning, no worries.
Just improvise! as i like to say, "cooking is about intuition, not just instructions."
Kitchen Equipment Essentials
Now, let's get into the nitty gritty of equipment. you’ll need a sharp knife and a cutting board to prep those potatoes.
A large bowl for soaking is key, and don't forget a frying pan or deep fryer . honestly, i love my deep fryer; it just makes frying so much mess free!
Consider investing in a slotted spoon or spider strainer . trust me, trying to fish those fries out without one is like trying to get gum off your shoe.
And a baking sheet for draining is a must have i can’t stress this enough. paper towels will help absorb extra oil.
Wrapping It Up
So there you have it! a sneak peek into the essential ingredients and tools you’ll need for making fries. by mastering the basics, you’re already on your way to knowing how to make homemade fries that will impress.
Now that you’ve got your shopping list in hand, how about we dive into that easy french fries recipe? i promise, once you start frying, you won’t stop! honestly, there’s just something about serving up that perfect batch of crispy fries that makes you feel like a kitchen rockstar.
Let’s roll up those sleeves and get to the juicy details of frying!
Mastering the Art of Homemade Fries
Oh my gosh, who doesn’t love a hot plate of crispy homemade fries ? seriously, there’s just something magical about those golden, crunchy sticks.
You know, they’re like the perfect sidekick to any meal. whether you're chowing down on a burger or just indulging in a tv marathon of that show everyone’s talking about, fries are always there for you.
Today, we’re diving into the professional cooking methods for achieving fry perfection right in your own kitchen!
Essential Preparation Steps
Let’s kick things off with mise en place (fancy french for “everything in its place”). before you even think about cooking, gather all your ingredients and tools.
It makes every step feel less chaotic, trust me!
Tip: Your workspace should be tidy. A messy kitchen can cause accidents, and that’s the last thing you want. Safety first, am I right?
Next up, time management . soak your potatoes for at least 30 minutes . this removes excess starch and is crucial for that crispy finish.
Set a timer, grab a drink, and relax. while they soak, you can clean up or prep your dipping sauces.
step-by-step Process
Prep Potatoes: Wash and peel those russet beauties. Cut them into sticks about 1/4 inch thick. Even sizing is key!
Soak Potatoes: Place your fries in cold water (you can add vinegar for an extra crunch) and let them chill out for 30 minutes .
Drain and Dry: After soaking, drain and thoroughly dry your fries. Excess moisture will make them soggy, and nobody wants a sad fry!
Heat Oil: Heat oil in a deep fryer or a large pan to 325° F ( 160° C) . Use enough oil so the fries are submerged about 4 cups should do it.
First Fry: Fry in small batches for 5- 7 minutes . Don't rush this part; you want them soft but not browned.
Cool: Let those fries cool on paper towels for at least 10 minutes . This is the secret to double frying for extra crispiness.
Second fry: crank up the heat to 375° f ( 190° c) and fry them again for 3- 5 minutes until golden brown.
Seriously, you’ll want to watch them closely nobody likes burnt fries!
Season and Serve: Sprinkle some sea salt on top and serve hot. You can experiment with toppings later garlic powder or parmesan, anyone?
Expert Techniques
Okay, now let’s talk a little more “pro” here. Double frying is non-negotiable if you really want those perfect fries.
Timing is everything! Make sure to stick to the temperature control points . Not hot enough? Soggy fries. Too hot? You’ll be left with burnt bits. Yikes!
Visual cues for doneness : You want a rich golden color before pulling them out of the oil.
Success Strategies
So, what are the common mistakes to avoid ? First off, don’t skip that soaking step. It’s like the underdog of the fry world, and it makes a world of difference.
Quality checkpoints : Taste and texture are key. If something feels off, adjust your fry time!
And don’t forget about your make-ahead options! You can always soak them ahead of time and do the frying the next day.
Wrapping It Up
By following these pro strategies, you'll be on your way to knowing how to make homemade fries that will make everyone drool.
Easy food ideas for parties? you got it! imagine a big platter of fries, with sauces lined up everyone will rave about your cooking skills.
Now that you’ve mastered the perfect fry, let’s transition to some additional information on quick meal ideas to pair with your homemade fries! Whether you're looking for dips or sides, we’ve got you covered! Stay tuned!
Extra Recipe Insights for Crispy Homemade Fries
So, you’re ready to dive into the world of how to make homemade fries awesome! but wait, there’s more to fries than just slicing a potato and tossing it in hot oil.
Let’s chat about some pro tips to elevate your fry game and make those spuds shine.
Pro Tips & Secrets
Chef's personal insights:
when it comes to fries, my biggest tip is to always soak your potatoes . i can't stress this enough! soaking helps to remove some of the starch, which is key for that coveted crispy texture.
I usually soak 'em while i’m cleaning up the kitchen multitasking, baby!
Time saving techniques:
if you’re in a hurry, you can always batch fry your homemade fries. just fry them once to get them soft, then cool and store them.
When you’re ready to serve, pop them back into the oil at a higher temperature for that gorgeous, golden color.
Flavor enhancement tips:
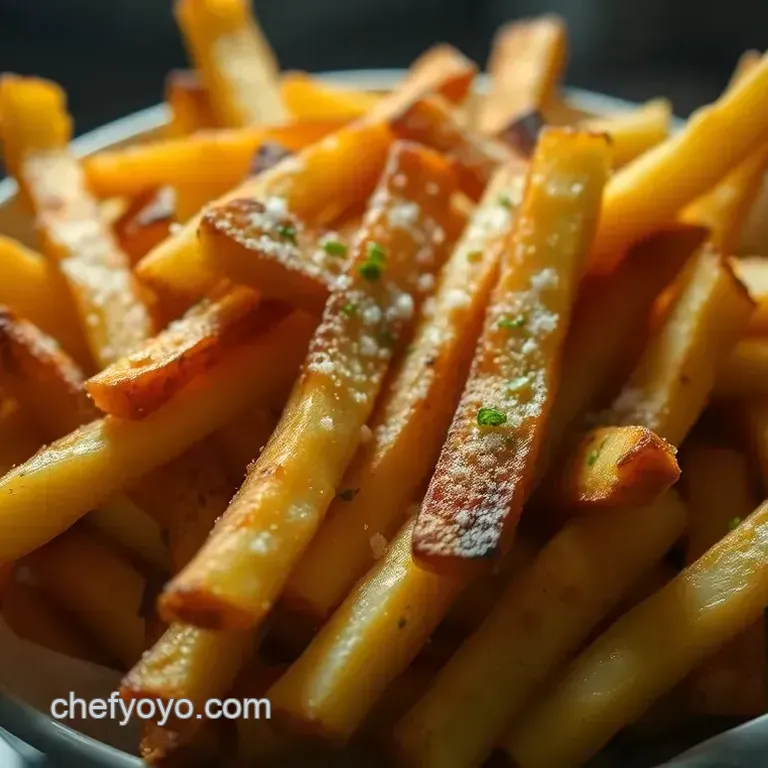
don’t just settle for salt! experiment a bit. i love tossing my fries with some garlic powder and smoked paprika.
It adds a unique kick that really jazzes things up!
Presentation advice:
you eat with your eyes first, right? to really impress, serve your fries in a cute little basket lined with parchment paper.
Add a sprinkle of fresh herbs on top, and bam you’ve made a fast food staple look gourmet!
Perfect Presentation
Speaking of presentations, you wanna make those fries pop!
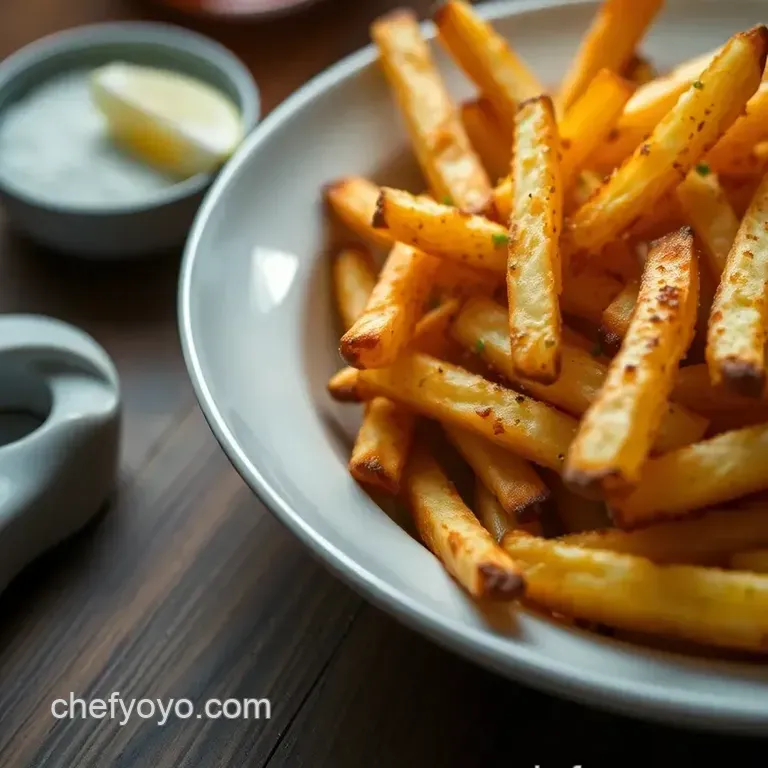
Plating Techniques:
Start with a clean plate and stack your fries for a casual yet appealing look. You could also do a fry cone it’s fun and a little quirky, kind of like a food truck vibe!
Garnish Ideas:
Chopped chives or a light sprinkle of cheese can really elevate your fries. A drizzle of truffle oil is like adding gold dust seriously fancy!
Color Combinations:
Use red ketchup, green herbs, and yellow fries for that eye-catching contrast. Color matters, especially when you’re taking those nice food pictures!
Visual appeal tips:
arrange your fries in an inviting way. don’t just toss them on a plate! a little effort goes a long way in making those meals with fries truly instagrammable.
Storage & make-ahead
Now, let’s talk about how to keep those fries fresh.
Storage guidelines:
if you have leftovers (though i seriously doubt that!), let them cool entirely and store them in an airtight container.
They'll be good for about 3-4 days in the fridge.
Preservation Methods:
For longer storage, try freezing them after the first fry. Then, fry them a second time right from the freezer! It’s an easy food idea for parties who doesn’t love fries at a gathering?
Reheating instructions:
when it's time to eat them again, pop those bad boys in the oven at 400° f ( 204° c) for about 10- 15 minutes.
It’ll help them regain their crispiness!
Freshness Duration:
If you're trying to keep that fry joy alive longer, eat them within a couple of days for the best taste and texture.
Creative Variations
It’s fun to mix things up a bit!
Flavor Adaptations:
Why not try cajun spices for a south-of-the-border vibe? Or go classic with some Italian herbs.
Dietary Modifications:
Need them gluten-free? You’re golden just season and fry those taters as is!
Seasonal Twists:
In fall, sprinkle on some ground cinnamon and sugar for a sweet twist. Talk about a fun treat, right?
Regional Variations:
Take a hint from Canadian poutine and smother them in cheese curds and gravy. You'll be the hit of any gathering!
Complete Nutrition Guide
Alright, let’s break it down.
A serving of these homemade fries contains about 365 calories . they’re a good source of carbs, but you might want to balance them out with some veggies or protein for a more complete meal.
Health Benefits:
Potatoes are a decent source of potassium and vitamin C. So, in moderation, they’re not the worst choice!
Dietary Considerations:
Keep an eye on those added oils and toppings, though! If you’re looking for something lighter, consider baking those fries instead of frying.
Portion Guidance:
Stick to one serving if you're looking to maintain a balance!
So there you have it, folks! you’re all set to master how to make crispy french fries at home. just remember, fries are about having fun in the kitchen.
Enjoy experimenting, and don’t hold back. you might just whip up the ultimate crispy homemade fries to impress at your next party or family movie night.
Now, let’s get frying and cheers to those golden, crispy bites! ✌️
Frequently Asked Questions
How to make homemade fries crispy?
To ensure your homemade fries turn out wonderfully crispy, don't skip the soaking step! Soak the cut fries in cold water for at least 30 minutes to remove excess starch, which helps them crisp up better when fried.
Additionally, the double frying technique is essential; the first fry cooks them through while the second fry gives that golden, crunchy exterior.
Can I make homemade fries in the oven?
Absolutely! If you prefer a healthier option, you can bake your homemade fries. Toss the cut and soaked potato sticks with oil, seasonings, and spread them out on a baking sheet. Bake at 425°F (220°C) for about 25-30 minutes, flipping halfway through, until golden and crispy.
They may not be quite as crispy as fried fries, but they’ll still be delicious!
What's the best type of potato to use for homemade fries?
The best potatoes for fries are starchy varieties, like russet potatoes, due to their high starch content and low moisture. This helps achieve that fluffy interior with a crispy skin. Yukon Gold potatoes are also a good alternative if you want a creamier texture.
How long can I store homemade fries?
Homemade fries are best enjoyed fresh, but if you have leftovers, store them in an airtight container in the fridge for up to 3 days. To reheat, pop them in an oven at 375°F (190°C) for about 10-15 minutes to restore their crispiness. Avoid microwaving as it will make them soggy!
Can I use oil other than vegetable for frying homemade fries?
Yes, you can! While vegetable oil is commonly used, you can also use peanut oil or canola oil, both of which have high smoke points suitable for frying. Each oil brings its own subtle flavor, so feel free to experiment with what you have on hand!
How to make homemade fries healthier?
You can make your homemade fries healthier by opting for baking instead of frying, as mentioned earlier. Also, try using minimal oil or consider air frying them if you have an air fryer. Finally, seasoning with herbs and spices instead of salt can add flavor without the extra sodium!
Crispy Homemade Fries The Ultimate Comfort Food

Ingredients:
Instructions:
Nutrition Facts:
| Calories | 365 |
|---|---|
| Fat | 17g |
| Fiber | 4g |
