Dutch Oven Bread the Effortless Noknead Artisan Loaf
- The Crusty Crown: Why This No and Knead Dutch Oven Bread Works
- Mastering the Artisan Loaf With Minimal Effort
- Essential Provisions for Your Perfect Loaf
- Required Equipment Checklist
- Step and by-Step: From Shaggy Dough to Golden Crust
- The Baking Timeline: Proofing and over High heat Transformation
- Troubleshooting and Advanced Baker Tips
- Making This Recipe Your Own: Variations and Storage
- Recipe FAQs
- 📝 Recipe Card
The Crusty Crown: Why This No and Knead Dutch Oven Bread Works
Okay, friend, let’s be real. If you told me five years ago I could make a legitimate, crackly and crusted, bakery and quality loaf of Artisan Dutch Oven Bread with literally five minutes of actual work, I would have laughed.
Bread baking felt like an ancient, complicated skill requiring strong wrists and a lot of cursing.
Wrong. I was so wrong.
This recipe changed everything. It’s the definition of minimal effort, maximum return. It bypasses the trauma of kneading by using time (the long ferment) and water (high hydration) to do the gluten development for you. It’s totally passive.
You mix it up tonight, you bake it tomorrow, and suddenly your kitchen smells like the best place on earth. If you want to make bread in a Dutch oven , this is the only starting point you need. Seriously.
Mastering the Artisan Loaf With Minimal Effort
The magic of this no and knead Dutch Oven Bread is simple chemistry combined with equipment efficiency. It’s not a fancy trick; it’s just respecting the process. We’re outsourcing the hard work to time and heat.
Think of your kitchen counter as the kneading machine, running silently overnight.
The Magic of Hydration: Understanding High and Water Dough
A normal, kneaded dough might hover around 60% hydration (water relative to flour). This recipe pushes us closer to 85% hydration (350ml water to 400g flour). The high water content is essential because it allows the flour proteins (gluten) to swell and connect into a strong network without physical manipulation.
The result is a very sticky, shaggy dough. Don't panic if it looks too wet. It should look too wet. That hydration is what gives you that glorious, open, airy texture, known as the crumb.
Steam Power: How the Dutch Oven Mimics a Bakery
Why the heavy pot? That Dutch Oven Loaf requires serious heat, and more importantly, serious steam. Professional bakeries inject steam into their giant ovens during the initial bake. Why?
Steam keeps the crust soft initially, allowing the dough to expand rapidly (oven spring) before the crust hardens. When you drop that dough into a searing hot, lidded Dutch oven, the trapped moisture released by the dough itself acts as that perfect steam chamber. It’s brilliant.
No need for ice cubes or spray bottles or any other messy home steam hack.
Simple Steps to Complex Flavor: The Long Fermentation Benefit
We use a tiny bit of yeast and let it rest for 12 to 18 hours. This slow, cool rest is where the flavor develops. It’s not just about the rise; it’s about the yeast producing those wonderful, nuanced organic acids.
That slightly sour, deep, comforting flavor you taste in true Artisan Dutch Oven Bread comes from patience. A quick bread rises fast but tastes flat. A slow and fermented bread tastes rich, deep, and complex.
Essential Provisions for Your Perfect Loaf
I’ve learned the hard way that when you only have four ingredients, they all need to be top and notch and, critically, measured right.
| Ingredient | My Quick Tip |
|---|---|
| Flour | Use unbleached All and Purpose or Bread Flour. Quality matters here. |
| Water | Warm, not hot (around 105°F). Too hot kills the yeast. |
| Salt | Fine sea salt mixes evenly. Don't skip it, or the bread will taste hollow. |
| Instant Yeast | ½ teaspoon is all you need. Don't overdo it unless you want beer and flavored bread. |
Required Equipment Checklist
You don't need a stand mixer or a proofing basket, but you absolutely need these things.
Must and Have Tools for Baking Dutch Oven Bread
The main player is the Dutch oven itself. I use a 5 quart enamel and coated cast iron pot. It’s heavy, holds heat like a champ, and has a tight and fitting lid. If you try to do this in a thin stock pot, it just won’t work. The heat retention isn't there.
Crucial Warning: Ensure your Dutch oven knob (on the lid) is metal or safe for temperatures up to 450°F (232°C). Many plastic knobs melt or off and gas at high heat. If yours is plastic, swap it for a metal bolt or handle.
The other truly essential tool? Parchment paper. It lets you safely and easily drop the shaggy dough into that scorching hot pot without burning yourself or collapsing the dough.
The Importance of Weighing Ingredients (Not Scooping)
Listen up, because this is my biggest baker confession: I spent years just scooping flour, wondering why my bread was sometimes rock and hard and sometimes gluey. The truth is, scooping compresses flour hugely. You might be adding 20% more flour than you intend. Get a digital kitchen scale.
They are cheap, and they are non and negotiable for easy round bread recipe consistency. Using grams (metric) eliminates all guesswork.
Selecting the Right Yeast: Active Dry vs. Instant
The recipe calls for Instant Dry Yeast because you can just throw it right into the dry ingredients. Easy. If you only have Active Dry Yeast, no worries, but you have to wake it up first. Mix it with the warm water (and maybe a pinch of sugar) and wait five minutes until it’s foamy.
This is called "blooming" and proves your yeast is alive and ready to rock.
Water Temperature Matters: Getting the Hydration Right
The water should feel warm, but not painfully hot. If you can’t comfortably hold your finger in it for ten seconds, it's too hot. Around 105°F (40°C) is the sweet spot. This encourages the yeast just enough to start working without accelerating the fermentation so fast that you lose flavor.
Related Recipes Worth Trying
- Christmas Macarons Mastering Gingerbread Shells White Chocolate Filling — Christmas Macarons are the true crown jewels of the holidays Follow our precise recipe to achieve perfect festive macaron flavors like spiced gingerbread...
- BaconWrapped Stuffed Jalapeño Peppers UltraCrispy Oven Recipe — BaconWrapped Stuffed Jalapeño Peppers are the ultimate Game Day Finger Food Recipe Learn how to make these perfect ovenbaked Cream Cheese Stuffed Jalapeños...
- FailProof Royal Icing Recipe for Sugar Cookies and Gingerbread — The ultimate Royal Icing recipe using stable meringue powder Get that pristine rockhard finish perfect for biscuit decorating and cake detailing Achieve any...
Step and by-Step: From Shaggy Dough to Golden Crust
Right then, let's crack on with the process. This isn't just about mixing; it’s about timing and heat.
The Baking Timeline: Proofing and over High heat Transformation
Initial Mix: Combining Ingredients for the First Rise
Whisk the dry stuff flour, salt, instant yeast together thoroughly. Pour in the warm water. I use a rubber spatula here because it handles the sticky dough better than a spoon. Mix until just combined.
You shouldn’t see any dry patches of flour, but you absolutely shouldn't be stirring for five minutes. It should look lumpy and messy. Cover it tightly (plastic wrap is best) and walk away. Seriously. The kitchen counter is fine for the next 12– 18 hours.
The Slow Ferment: Achieving Deep Flavor Overnight
If your kitchen is warm (75°F or higher), check the dough after about 12 hours. If it’s colder, aim for 18 hours. Visual cues are key: the dough should look double in size, covered in tiny bubbles, and when you poke it gently, you should see web and like strands inside.
This is the flavor building stage. Don’t rush this.
Preheating Protocol: Getting the Dutch Oven Searing Hot
This is the most critical step for getting the perfect shape and crust. Set your oven to 450°F (232°C). Place the empty Dutch Oven (lid on!) inside. Preheat for a minimum of 30 minutes. That cast iron needs to absorb the maximum amount of heat possible.
It should be blistering hot when the dough goes in.
The Covered Bake: Creating the Steam Chamber
Gently scrape the dough onto a floured surface. Fold it over itself just a few times to create a tight ball we are building surface tension, not deflating it fully. Place the dough onto parchment paper. Remove the screaming hot Dutch Oven (use serious oven gloves!).
Lower the dough and the parchment paper straight into the pot. Score the top (a quick shallow slice) and slam the lid back on. Bake covered for 30 minutes.
Uncovered Finish: Achieving the Deep Golden Crust
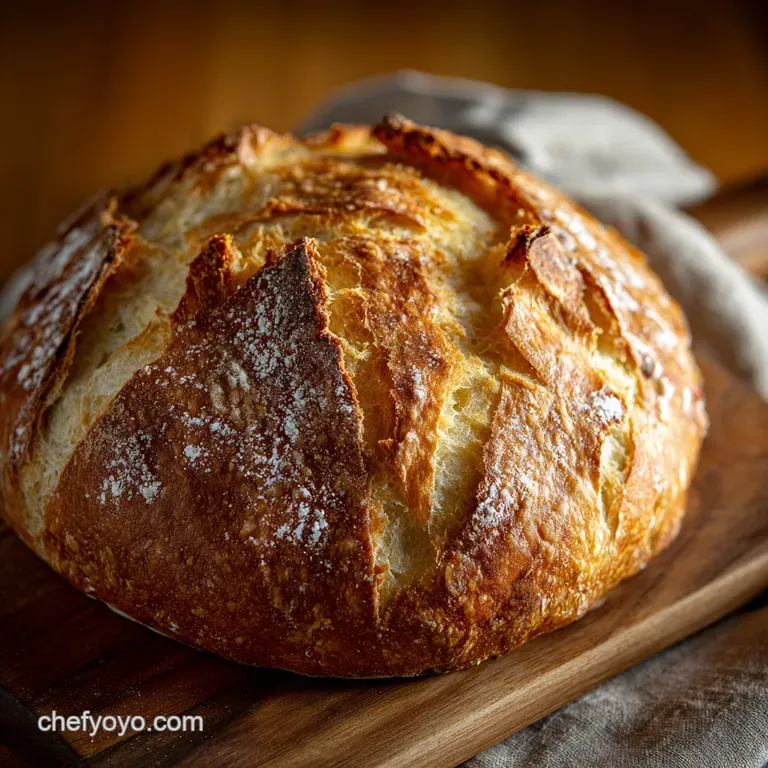
After 30 minutes, carefully pull the lid off. Whoa, steam! The loaf should look pale but huge. The rapid expansion (oven spring) is done. Now we focus on color and texture. Bake uncovered for another 15 to 25 minutes. You’re looking for a deep, rich mahogany color.
If it looks pale, it will taste soft. Get it golden!
Troubleshooting and Advanced Baker Tips
I’ve had pale crusts, gummy interiors, and loaves that looked more like pancakes. Here’s how to skip my learning curve.
- Pale Crust: You didn't leave the lid off long enough, or your oven temperature is inaccurate (invest in an oven thermometer!). Also, check your salt. Too much salt inhibits yeast activity, resulting in less rise and poor browning.
- Gummy Interior (Dense Crumb): You cut it too soon. I know, it smells amazing, but cutting hot bread messes up the internal structure. It’s like slicing a soufflé too early. Wait the full hour on the cooling rack.
- Dough didn't rise: Your kitchen was too cold, or your water was too hot and killed the yeast. Try to keep the first proof in a consistently warm spot, away from drafts.
Making This Recipe Your Own: Variations and Storage
This is a great blank canvas. Once you nail the classic Easy Round Bread Recipe , you can start adding fun stuff.
Troubleshooting Common Bread Pitfalls (Dense Crumb, Pale Crust)
| Issue | Likely Cause | Quick Fix |
|---|---|---|
| Dense Crumb | Cut too early/Too much flour/Not enough rise. | Wait 60 minutes to cool. Use a scale next time! |
| Pale Crust | Not hot enough/Lid left on too long. | Turn up the heat 25 degrees for the last 15 mins. |
| Too Spread Out | Dough too wet or over and proofed. | Add 1 2 tbsp flour during the final shaping. |
Creative Twists: Adding Seeds, Herbs, or Cheeses
When should you add extra ingredients? During the initial mix, right after the water goes in.
- If you're making a yeast bread in Dutch oven for dipping, try sun and dried tomatoes and dried oregano.
- For breakfast toast, mix in ¼ cup of mixed seeds (flax, chia, sunflower) for extra fiber and texture.
- Want cheese? Shredded Parmesan or Gruyere mixed in tastes phenomenal. Just know the cheesy bits against the parchment paper might brown fast.
Nutritional Breakdown (Per Slice Estimate)
This is based on dividing the final Dutch Oven Loaf into 10 reasonable slices. It’s mostly just flour, water, and magic.
- Calories: ~160 kcal
- Protein: 5 g
- Carbohydrates: 33 g
- Fiber: 1 g
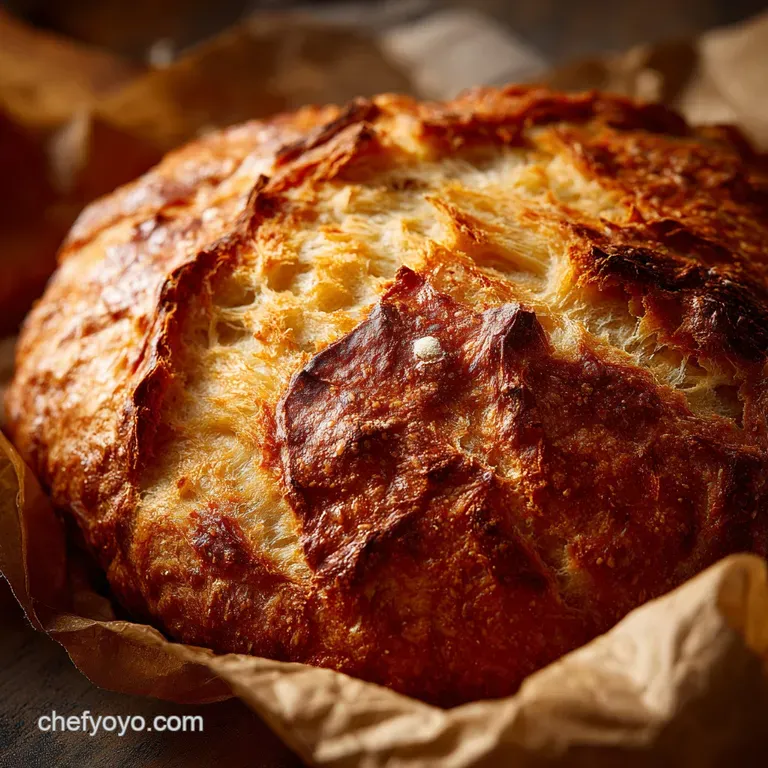
Storing Your Loaf: Keeping the Crust Crisp
The best part of this bread is that crust! To keep it crisp, you must avoid wrapping it in airtight plastic wrap, which traps moisture and turns the crust soft.
- Store the loaf cut and side down on the counter.
- For longer storage (more than 2 days), wrap it loosely in a paper bag or a clean tea towel.
- If it goes slightly stale, slice it thick, toast it, and serve it with butter. Nothing is wasted.

Recipe FAQs
I followed the recipe exactly, but my loaf of Dutch Oven Bread is dense and gummy inside. What went wrong?
That’s a classic baker's affliction! The main culprit is usually slicing the bread before it has fully cooled you must wait the full hour for the starches to set, otherwise, the inside remains doughy and gummy.
Secondly, ensure your dough felt very wet and loose before baking; if it was too stiff, the resulting crumb will be heavy.
How should I store this amazing bread to keep that crisp, professional crust?
Treat that crackling crust like the crown jewels: avoid plastic wrap at all costs, as it’s the enemy of crispiness and will make your loaf sweat. Store the loaf cut-side down on a wooden board or loosely wrapped in a paper bag at room temperature, which should keep it fresh for 2 3 days.
My kitchen is absolutely freezing. Will a cold room ruin the 12-to-18-hour proofing time?
The cold definitely puts the brakes on the yeast activity, so you might need to stretch the proof to the full 18 hours or even 20; remember, the bubbles are more important than the clock.
If you’re truly desperate for warmth, put the covered bowl inside a cold oven with just the light on that usually offers a cosy 75°F (24°C) environment.
I don't own a Dutch oven. Is there a proper substitute I can use to get that fantastic crust?
You can certainly manage without, though the result might not be quite as spectacular; use a baking stone or heavy metal tray that is preheated, and then generate steam by placing an empty roasting tray on the bottom rack with boiling water poured into it just before baking.
I fancy jazzing up the flavour. Can I add things like seeds, cheese, or herbs to the recipe?
Absolutely, go wild! Mix dry inclusions like seeds, herbs, or dried fruit into the flour at Stage 1, but if you want to add cheese, do it during the shaping stage (Stage 2) so that it doesn't interfere too much with the initial long fermentation.
Easy Noknead Dutch Oven Bread
Ingredients:
Instructions:
Nutrition Facts:
| Calories | 160 kcal |
|---|---|
| Fat | 0.5 g |
| Fiber | 1 g |
