Basil Oil: the Chefs Secret to Vibrant Emerald Oil in 25 Minutes

- Mastering Emerald Basil Oil: Why Color Matters
- The Science Behind Vibrant Basil Oil: Blanching vs. Infusing
- Essential Ingredients and Selecting the Perfect Carrier Oil
- Step-by-Step: Crafting Your Signature Basil Oil
- Advanced Techniques and Troubleshooting Your Basil Oil
- Longevity and Preservation: Maximizing the Shelf Life
- Vibrant Basil Oil: Versatile Serving Suggestions
- Recipe FAQs
- 📝 Recipe Card
Mastering Emerald Basil Oil: Why Color Matters
Have you ever opened a jar of homemade herb oil only to find it’s faded into a dull, muddy olive green? It’s heartbreaking. I know that sad feeling all too well. We aren’t aiming for slightly green cooking oil here.
We are aiming for emerald perfection —an intense, unbelievably vibrant oil that tastes exactly like fresh summer basil smells.
This vibrant oil is pure culinary magic. It’s a total game changer for those last minute dinners and instantly elevates a simple bowl of pasta or a slice of fresh mozzarella. If your garden is currently exploding with basil (mine always is by July), this recipe is ridiculously easy and affordable.
It's the best way to preserve that incredible fresh flavour long after the season ends.
This isn’t just about blending things in a machine; it's about technique. We are going to use a simple trick involving temperature extremes to lock in that gorgeous color and potent flavour forever. Trust me, once you master this basic technique, you'll never buy store-bought basil oil again.
The Science Behind Vibrant Basil Oil: Blanching vs. Infusing
The Culinary Power of a Simple Infusion
Basil oil is one of the quickest ways to add depth to nearly anything you cook, making it one of my secret kitchen weapons. It’s far more versatile than heavy pesto because it’s a pure, clean extract of the herb's flavour suspended in fat.
You can use this Basil Oil for cooking, drizzling, or whisking into delicate vinaigrettes where heavy solids just wouldn't work.
Identifying the Best Basil for Peak Flavor
You absolutely must start with the best ingredients. For the most intense flavour in your Basil Oil Recipe , use fresh, bright green sweet basil (Genovese).
Pick leaves that are firm, healthy, and blemish free; avoid any that are yellowing or bruised, as they won't lend themselves to that beautiful emerald hue.
Ditching the Dull: Achieving Spectacular Green Hue
The secret to preventing your oil from turning that sad, oxidized brown color is managing the enzymes. When basil leaves are damaged by blending, tearing, or heating enzymes called polyphenol oxidases get active, rapidly turning the plant’s chlorophyll brown.
Standard cold infusion methods always result in a duller color, even if the flavor is still good. We want both!
Chlorophyll Preservation: Locking in the Emerald Green
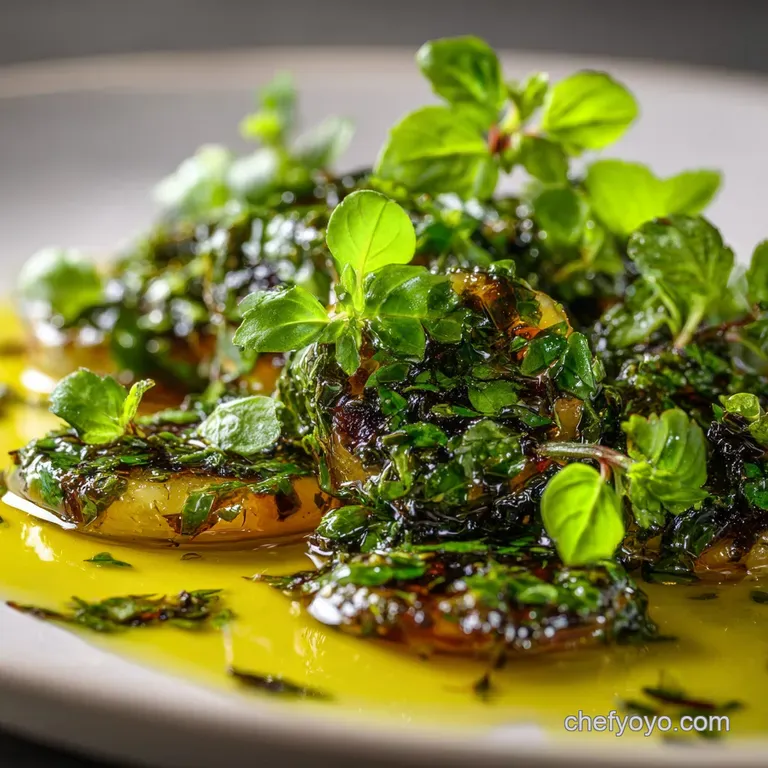
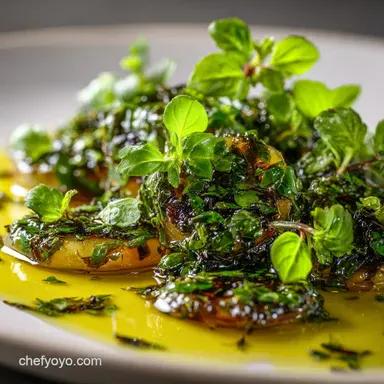
We use blanching, which is a swift dip into boiling water. This quick heat shock completely deactivates those pesky browning enzymes before they can do any damage. The heat also brightens the chlorophyll temporarily, resulting in that unbelievably intense, glowing color we are looking for.
This 30 second step is the entire difference between boring oil and Instagram worthy oil.
Thermal Shock: Stopping Enzyme Breakdown
After the boiling bath, the basil must be plunged immediately into an ice bath we call this "shocking." This thermal shock halts the cooking process dead in its tracks, ensuring the basil doesn't continue to heat up internally.
This critical step locks the bright green color in permanently and prepares the leaves for blending without excessive wilting.
Achieving a Silky Smooth Texture
Once the color is set, blending is all about friction and force. We use a high speed blender to completely pulverize the basil cells into the oil, creating a temporary, slightly warm emulsion.
The final straining step then removes the solid pulp, leaving behind only the clear, intense, silky smooth Basil Olive Oil .
Essential Ingredients and Selecting the Perfect Carrier Oil
We are keeping this simple; you only need three things plus ice, so make sure they are high-quality. The less fuss, the higher the focus on technique and flavour.
Basil Varietals: Sweet Basil vs. Other Options
The gold standard is definitely sweet Genovese basil because it offers the most classic, potent aroma. I’ve experimented with Thai basil, but its anise notes can be overpowering in delicate dishes.
If you are feeling adventurous, you could substitute up to half of the total weight with baby arugula for a peppery kick, or maybe even some fresh parsley to bulk up the yield without changing the taste too drastically.
Oil Selection: Neutral Flavor Profiles that Shine
You need a carrier oil that complements the basil, not one that competes with it. While Extra Virgin Olive Oil is classic, make sure it is a mild, non-peppery variety that won’t overwhelm the basil's delicate taste.
| Carrier Oil | Flavor Profile | Substitution Note |
|---|---|---|
| Mild EVOO | Fruity, grassy notes | Choose light, late harvest varieties. |
| Grapeseed Oil | Highly neutral | Excellent if you want only basil flavor. |
| Avocado Oil | Buttery, neutral | Good over high heat option for cooking. |
Chef's Note: I once used a heavy, intensely peppery Sicilian olive oil for this, and it totally masked the basil. Stick to mild oils when making fresh herb infusions!
Optional Additions: A Pinch of Salt and Lemon Notes
We add a small amount of fine sea salt directly into the blender. Salt isn't just for seasoning; it helps draw out the final bits of flavour from the leaves during processing. You can also toss in the zest of half a lemon if you want a subtle, bright lift just be sure you don't include the bitter white pith.
step-by-step: Crafting Your Signature Basil Oil
Prep Stage: Washing, Drying, and Ice Bath Setup
First things first: set yourself up for success. Wash your 4 ounces of basil leaves well, picking off all stems and discarding any bruised spots. Bring your large pot of water to a fast boil and immediately set up that ice bath beside the stove.
The Quick Dip: Precisely Blanching the Basil Leaves
Drop the basil into the boiling water and push it down gently with a spider strainer. You are looking for a rapid color change, usually 15 to 30 seconds, maximum. Do not exceed 30 seconds , or you risk cooking the basil down into mush.
Immediately scoop it out and plunge it straight into the ice bath to halt the cooking process.
Blending to Perfection: Heat Control in the Processor
This is the moment of truth. You must remove the basil from the ice bath and dry it completely . Squeeze it firmly in a clean tea towel to get rid of every drop of excess water; water is the enemy of shelf life.
Put the dried basil, your 1 ½ cups of oil, and the salt into a high speed blender. Blend on high for 2– 3 minutes until the oil looks completely uniform and slightly warm to the touch.
The Final Polish: Straining for Clarity
Line a fine mesh sieve with two layers of clean cheesecloth and set it over a measuring jug. Pour the entire basil mixture into the cloth and let it drip, undisturbed, for about 10 minutes. This slow process results in crystal clear oil.
Once most of the oil has drained, you can gently twist the cheesecloth bundle, but never aggressively squeeze the pulp. That cloudy residue will quickly settle and cause browning later.
Advanced Techniques and Troubleshooting Your Basil Oil
Why Your Oil Turned Brown (Oxidation Fixes)
If your oil came out looking dull, you likely missed the thermal shock step or you let the basil sit too long before blending. The fix? Make sure your water is boiling fiercely, your ice bath is frigid, and you blend the shocked basil immediately.
Once oxidized, you can't restore the color, but the flavour will still be usable for cooking where color doesn't matter, like mixing into a hearty tomato sauce.
Eliminating Excess Water: Crucial Drying Techniques
I once thought "damp" was "dry." I was wrong, and my oil developed mold spots within days. After the ice bath, use a salad spinner lined with a paper towel, or press the leaves gently between two clean linen towels until they stop releasing moisture.
Bone dry basil is mandatory for safe, long lasting oil.
The Difference Between Cold Press and Heat Infusion Methods
The method we use blanching and blending is often referred to as a "hot-blend" or "blanched oil" method, distinct from traditional cold press infusions. Traditional cold infusions involve steeping the herb over time, resulting in less vibrant color but a cleaner, raw flavor.
Our method sacrifices a tiny bit of raw complexity for maximum color, intensity, and safety (by deactivating enzymes).
Longevity and Preservation: Maximizing the Shelf Life
Refrigeration vs. Countertop Safety Notes
Because this recipe incorporates fresh herbs and residual water (even if you dry it perfectly, some microscopic water remains), this Basil Oil must be treated like a fresh product.
Never store homemade herb oils at room temperature ; doing so creates a perfect low-acid, anaerobic environment for botulism spores. Always refrigerate immediately in a sterile, airtight container.
Freezing for Extended Freshness (Ice Cube Tray Method)
But does it freeze well? You bet it does! Freezing is hands down the best way to extend the freshness of your How To Make Basil Oil . Pour the strained oil into standard ice cube trays and freeze until solid.
Once frozen, transfer the cubes to a zip-top bag; they will last perfectly for three months or more. Just toss a frozen cube directly into a warm pan to melt and finish your dish.
Recognizing Rancidity: When to Discard the Oil
When stored properly in the refrigerator, this vibrant oil is best used within 5 to 7 days. Rancidity means the oil has gone bad and will smell faintly metallic, sour, or like old crayons. If you see any cloudiness, visible mold (often near the oil-air surface), or discoloration, discard it immediately.
Vibrant Basil Oil: Versatile Serving Suggestions
This isn't just a fancy garnish, it's a flavour powerhouse. I love using Basil Oil Uses as the finishing touch on simple appetizers and rustic breads.
- Dipping: Drizzle a generous amount over a freshly baked loaf, maybe even my Basil and Garlic No Knead Bread: The Rustic Dutch Oven Artisan Loaf for a super aromatic bite.
- Tomato Perfection: Use it to finish any simple tomato and mozzarella dish. It makes the world of difference when preparing Bruschetta with Tomato and Basil: The Essential Classic Italian Antipasto or a simple platter of garden heirlooms.
- Pasta Finish: Toss a spoonful through warm pasta right before serving. It adds a rush of freshness to heavier sauces or works beautifully in simple dishes like my fresh Tomato Basil Pasta with Balsamic Grilled Chicken: Fresh Summer Meal .
- Soup and Dips: Swirl it dramatically over hummus, creamy white bean soup, or a cold bowl of gazpacho for that intense visual contrast.

Recipe FAQs
Why did my basil oil turn dull olive green or brown after blending?
The primary reason for discoloration is oxidation, often caused by skipping the initial blanching and ice bath steps, or overheating the oil during the high speed blending process. Blanching stabilizes the chlorophyll, while the ice bath immediately halts cooking.
To prevent heat buildup, blend in short, 30-second bursts, allowing the machine to rest briefly between cycles.
What type of oil is best for basil oil, and can I use standard Extra Virgin Olive Oil (EVOO)?
A neutral, high-quality oil like refined avocado, grapeseed, or sunflower oil is generally recommended, as they allow the vibrant basil flavor to truly shine. While you can use EVOO, its strong, sometimes peppery flavor profile may compete with or overwhelm the delicate fresh basil notes.
If you must use EVOO, select a lighter, fruitier variety.
How long does homemade basil oil last, and what is the best storage method?
Properly strained basil oil can be stored in an airtight container in the refrigerator for up to 2 3 weeks. Due to the inherent risk of botulism spores present in fresh herbs stored in oil at room temperature, refrigeration or freezing is strongly advised after 48 hours.
Always keep it away from direct sunlight and heat.
Can I freeze the basil oil for extended long term preservation?
Yes, freezing is the best method for maintaining both the quality and the emerald color of the oil for several months. Pour the fully strained oil into clean ice cube trays and allow them to freeze solid overnight. Once frozen, transfer the cubes to a freezer safe bag, where they can last reliably for 6 to 8 months.
How can I achieve that perfectly smooth, professional, and clear texture?
Achieving absolute clarity relies on meticulous straining using a setup beyond a simple fine mesh sieve. Line your sieve with several layers of cheesecloth, or, ideally, use a paper coffee filter set inside a funnel to slowly catch all the minuscule particles of basil.
Be patient and allow the oil to drip through naturally without pressing the solids.
Why is my oil very thick or gritty after the initial straining?
If your oil is thick or opaque, it often means that too much basil sediment or residual water remains in the mixture. Avoid pressing or squeezing the solids during the straining process, as this releases starchy materials that cloud the oil.
If it is still too thick, allow the oil to sit refrigerated for a day, then carefully spoon the clear oil off the settled sludge.
Can I use this blanching technique for other soft herbs, such as mint or parsley?
Absolutely, this blanching and oil infusion method works wonderfully for nearly all soft herbs, including parsley, cilantro, mint, and tarragon. The quick blanching step ensures the vibrant green hue is locked in, regardless of the herb.
Ensure the substitute herbs are thoroughly spun or patted dry after the ice bath before blending to prevent water contamination.
Emerald Basil Oil Recipe
Ingredients:
Instructions:
Nutrition Facts:
| Calories | 754 kcal |
|---|---|
| Protein | 0.9 g |
| Fat | 83.1 g |
| Carbs | 1.2 g |
