Bone Broth: the Foundation of Great Cooking
- The Essential "Liquid Gold" Bone Broth: A Foundation for Great Cooking
- The Culinary Foundation: Why Every Kitchen Needs This Broth
- Achieving the Gelatinous Standard: The Science of "Liquid Gold"
- Concentrated Flavor: Essential Components for Your Stock Pot
- Crafting Your Essential Bone Broth: The Method
- Maximizing Yield and Flavor: Pro Tips & Troubleshooting
- Beyond the Sip: Versatile Ways to Use Your Concentrated Broth
- Recipe FAQs
- 📝 Recipe Card
The Essential "Liquid Gold" Bone Broth: A Foundation for Great Cooking
The Culinary Foundation: Why Every Kitchen Needs This Broth
The moment that deeply savory aroma starts wafting through your kitchen, you know you’re doing something right. It's the scent of nourishment, the scent of comfort, and the undeniable proof that you are currently perfecting a batch of genuine Bone Broth .
This isn't just soup starter; it’s an elixir that fundamentally changes the way your food tastes.
Seriously, if I could give one piece of advice to level up your home cooking, it would be to ditch the cardboard carton forever and learn to make bone broth from scratch.
It’s cheap, it requires zero active cooking skill (just patience!), and the Bone Broth benefits you get from that long, slow extraction are incomparable.
We are not just making stock here; we are building concentrated flavor, the kind that will solidify and wobble in the fridge. This foundational recipe shows you exactly how to achieve that gelatinous standard every single time. Let’s crack on and transform some humble ingredients into true liquid gold.
More Than Hydration: The Concentrated Flavor Profile
Think of store-bought broth like weak tea, then think of this homemade potion like an espresso shot of savory goodness. The reason we spend 12 to 24 hours simmering is to extract every bit of collagen, mineral, and amino acid from the core of the bones.
This creates a dense, viscous liquid that acts as a pure concentrated flavour shot in every dish you use it in.
This deep complexity is what makes a great gravy or a luxurious risotto. When the flavor is this intense, you don't need much else. I use this rich base in everything, from weekday soups to my ultimate [BoneIn Rib Roast: Reverse Sear for Juicy, Crispy Crust!].
Ditching the Carton: The Depth of Homemade Stock
A good, homemade Bone Broth is the unsung hero of the kitchen, the ultimate culinary scaffolding upon which all your best meals are built. You simply cannot replicate the silky mouthfeel or the nutritional density with powdered bouillon or low-sodium packaged stock.
The secret is the texture that glorious, jiggly consistency when it’s chilled.
That gelatin factor is what elevates your pan sauces from thin and watery to glossy and rich. It’s what gives stews body and depth without adding extra thickeners. This is kitchen alchemy, pure and simple.
The Time Commitment vs. Reward Ratio
Yes, the time estimate says 17 to 21 hours. But let’s be honest, 95% of that time is passive! You are simply allowing the pot to whisper quietly on the back burner.
If you can handle 30 minutes of oven roasting and an hour of active skimming, you can master making delicious Bone Broth .
The real reward isn't just the delicious result; it's having a freezer full of ready-to-use flavor bombs. That accessibility makes weeknight cooking faster, not slower.
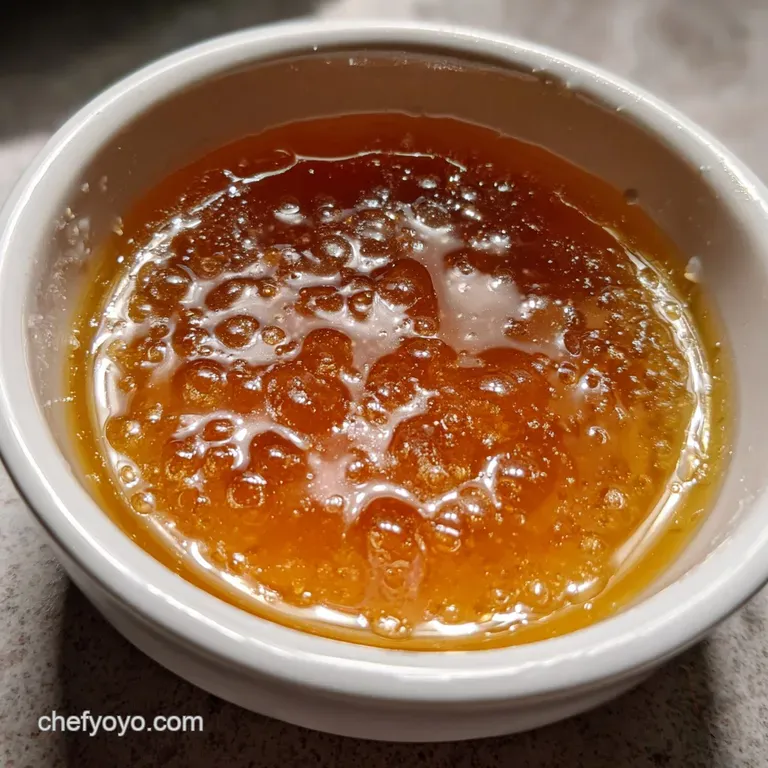
Achieving the Gelatinous Standard: The Science of "Liquid Gold"
The holy grail of a homemade Bone Broth is achieving that signature gelatinous texture when it cools. If yours comes out watery, you need more joint material! Collagen, which is the main protein in connective tissue, breaks down into gelatin when heated for long periods.
Knuckles, joints, and feet are collagen factories, so load up on those if you want serious wobble.
This gelatin not only provides an incredible mouthfeel but is also the reason people talk so much about the Bone Broth diet and its potential benefits. Getting that jiggly texture is your visual confirmation that you have successfully extracted maximum goodness.
Concentrated Flavor: Essential Components for Your Stock Pot
Making a truly great Bone Broth requires a few intentional choices about your ingredients and prep. Remember, we are aiming for maximum extraction and flavor layering.
The Maillard Reaction: Roasting for Depth
This step is non-negotiable. Throwing raw bones into water is a mistake I made exactly once. Roasting the marrow and knuckle bones in a hot oven until they are deeply browned and caramelized that is the Maillard Reaction at its best is what gives your Bone Broth that deep, complex, savory flavor, rather than a thin, one-note taste.
You want dark amber color, not burnt blackness.
The Role of Acid in Releasing Minerals
Don’t skip the vinegar! Adding a couple of tablespoons of Apple Cider Vinegar (ACV) to the cold water mixture before heating is crucial. The acid won't flavor the broth, but it helps break down the tough structure of the bones, allowing those vital minerals and precious bone broth protein to leach into the simmering water.
If you don't have ACV, white wine vinegar works in a pinch, but ACV is my preference.
Selecting Quality Marrow and Knuckle Bones
The quality of your final product hinges entirely on the quality and type of bones you select. Ask your butcher for marrow bones, knuckle bones, and joints these are the high collagen heavy hitters.
When you make bone broth , you’re essentially extracting the good stuff from the parts most recipes discard.
The Aromatic Trinity: Onion, Celery, and Carrot Prep
For the classic flavor profile, we rely on the Mirepoix foundation: onions, celery, and carrots. Pro Tip: Keep the onion skins on! They add a beautiful, natural amber color to the broth.
Unlike traditional stock, we are adding the aromatics later, or at least only slightly roasting them, so they don't turn bitter over the exceptionally long simmer time.
Chef's Note: I learned the hard way that adding fresh herbs (like parsley) too early makes the broth taste dusty and flat. Stick to hardy stems and bay leaves until the last quarter of the simmer time.
Crafting Your Essential Bone Broth: The Method
This Bone Broth preparation is all about low and slow extraction. Do not rush any step, especially the simmering and skimming.
Phase 1: over High heat Roasting and Deglazing
- Roast the Bones: Preheat your oven to 400°F (200°C). Spread the bones out on a sheet pan and roast them until they are deeply browned, about 30 minutes. You want to smell that rich, nutty scent of roasted bone.
- Slightly Soften Veggies: Add the roughly chopped onions, carrots, and celery to the pan for the last 10 minutes of roasting. We want them soft and slightly caramelized.
- Deglaze the Flavor: Transfer the roasted contents to your large stockpot. Place the sheet pan over medium high heat on the stove, pour in about 1 cup of water, and scrape vigorously with a spatula. That sticky, brown residue ( fond ) is pure, concentrated flavor! Pour every last drop into the stockpot.
Phase 2: Gentle Simmering and Skimming
- The Cold Start: Add the ACV and cover the roasted bones and vegetables completely with cold, filtered water (about 1 gallon). Let it sit for 30 minutes if you have the patience this helps the acid work its mineral leaching magic.
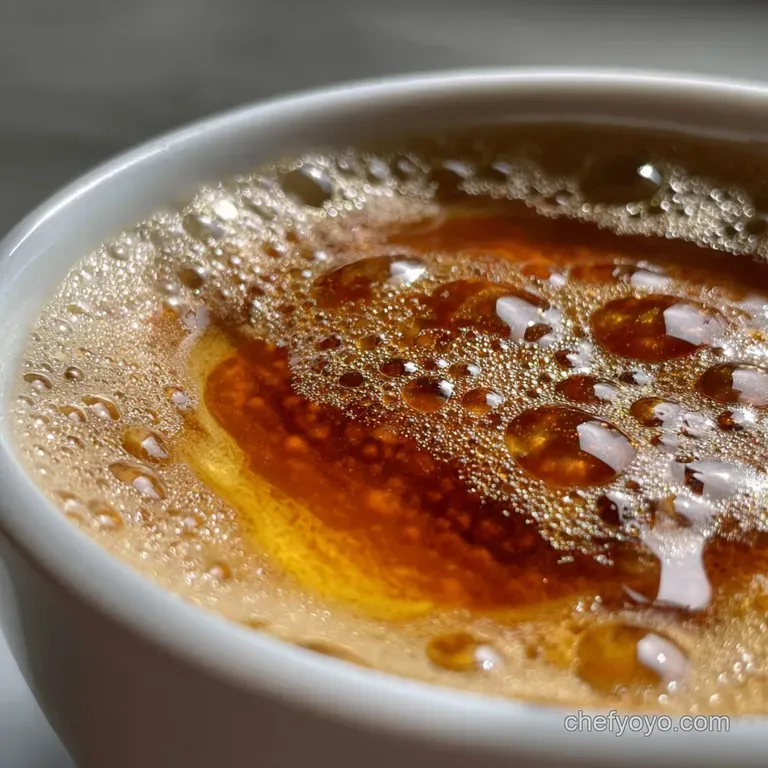
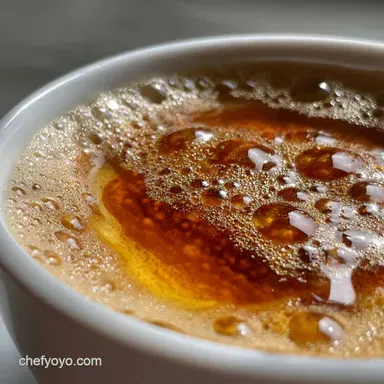
- Achieving the Shimmer: Place the pot over high heat until it just begins to bubble, then immediately drop the heat to the lowest setting. The liquid should barely move. We want a gentle shimmer , not a rolling gallop.
- Skim Religiously: As the broth warms, gray, foamy impurities will rise. Skimming this foam off frequently during the first hour is absolutely essential for a clean, clear final Bone Broth . If you skip this, the fat emulsifies and you get a cloudy, muddy flavor.
- Add Final Aromatics: After that initial skimming hour, drop in your bay leaves, peppercorns, and fresh thyme sprigs. Partially cover the pot to reduce some evaporation but allow steam release.
- The Long Simmer: Simmer gently for 12 to 16 hours. Check every few hours and top up with hot water if the bones start sticking out of the surface.
Phase 3: Final Straining and Clarification
- Strain: Once the bones are soft and crumbly (a sign they've given up all their goodness), remove the pot from the heat. Carefully strain the liquid through a fine mesh sieve into a clean container. If you want ultra clarity for that gorgeous liquid gold cooking color, line the sieve with a layer of cheesecloth.
- Chill and Defat: Allow the strained broth to cool on the counter for about an hour before moving it into the fridge. Once completely chilled (4+ hours), the fat will solidify into a protective cap on top. Scoop this off and discard it before storing.
Extending the Simmer: Extraction vs. Evaporation
Is 16 hours always enough? Honestly, for a mixed bone batch, 12- 16 hours is usually perfect you’ve extracted the collagen and flavor without reducing the volume too aggressively.
Going much longer than 24 hours can start to result in evaporation outpacing extraction, leading to a diminished return and sometimes an overly savory, bitter taste. Stick to the sweet spot.
Maximizing Yield and Flavor: Pro Tips & Troubleshooting
Preventing a Cloudy Broth
The number one reason people fail to get beautiful, clear broth is heat control. A rolling boil is the enemy of clarity. It violently agitates the fat and tiny bone particles, emulsifying them into the water.
Keep the temperature low enough that you see only the occasional small bubble rising, and make sure you skim that initial scum efficiently.
The Dangers of a Rolling Boil
Beyond cloudiness, a hard, fast boil can lead to bitterness. The volatile compounds in the herbs and vegetables are released too quickly, making the whole batch taste stale. A gentle simmer ensures smooth, subtle extraction over time. This Bone Broth is a labor of love, not a sprint.
Optimal Freezing Techniques (Ice Cube vs. Container)
Once chilled and defatted, you need to store this gold. I love freezing Bone Broth in silicone muffin trays or ice cube trays first; once frozen, pop them out and transfer them to a freezer bag labeled with the date. This creates perfect little one-ounce flavor bombs for pan sauces.
For larger quantities, use freezer safe containers, leaving an inch of headspace for expansion.
Handling the Fat Cap Layer
That solid layer of fat that forms when the broth cools isn't just easy to remove; it’s a natural seal! Many people leave it on top of the broth they store in the fridge, as it acts as an air-tight barrier, extending the refrigerated shelf life up to a week.
If you plan to freeze it immediately, you should remove the fat first to save space.
Beyond the Sip: Versatile Ways to Use Your Concentrated Broth
This nutrient dense Bone Broth shouldn’t just be saved for sickness or sipping it’s meant to be your everyday cooking liquid.
As a Flavor Base for Grain Cooking
Forget water when cooking rice, quinoa, or farro. Using cold broth instead adds depth and a subtle richness that enhances the flavor profile of the entire meal. Imagine the difference between plain boiled rice and rice cooked in your homemade liquid gold it’s night and day.
Enhancing Pan Sauces and Gravies
This is where the gelatin really shines! When deglazing a pan after searing meat, using this concentrated broth especially if you’ve reduced it a bit more adds body and shine naturally.
If you follow up a delicious main course, like my recipe for [OvenBaked Boneless Skinless Chicken Thighs Juicy Easy Recipe], with a pan sauce built on this broth, your guests will be raving. Just remember to add salt only after reduction, because this intensely flavored base will concentrate quickly.

Recipe FAQs
How do I ensure my bone broth becomes beautifully gelatinous?
Gelatinization relies heavily on collagen extraction, so prioritize bones rich in connective tissue like knuckle joints, chicken feet, or marrow bones. Crucially, maintain a very gentle simmer and avoid rapid boiling, as high heat can denature the collagen and prevent proper setting.
Is roasting the bones absolutely necessary, or can I skip that step?
Roasting is highly recommended and often considered non-negotiable for true "Liquid Gold." The roasting process utilizes the Maillard reaction, caramelizing the proteins and fats to develop a deep, rich, savoury complexity that raw bones cannot achieve.
Why do I need to add apple cider vinegar (ACV) or another acid to the broth?
The mild acid, such as ACV, plays a crucial role in improving the extraction process. Its slight acidity helps break down the dense connective tissues and minerals, encouraging valuable nutrients like calcium and collagen to leach out of the bones and into the cooking liquid.
How long is the optimal cooking time for maximum extraction and flavor?
The optimal time varies by bone size; poultry bones generally require 12 to 24 hours, while denser beef or pork bones benefit from 24 to 48 hours. The key is maintaining a consistent, low simmer throughout the entire duration to ensure thorough extraction without causing rapid evaporation or bitterness.
My finished broth looks cloudy. How can I prevent this result?
Cloudiness is almost always caused by boiling the broth too vigorously, which emulsifies fat and proteins into the liquid. To ensure clarity, carefully skim any foam that rises during the first hour, and keep the broth at the barest simmer just a few gentle bubbles.
What is the best way to store or freeze the finished bone broth?
Once cooled and strained, the broth will keep safely in the refrigerator for up to 5 days. For long term storage, freeze the broth in airtight containers, ensuring you leave at least one inch of headspace to accommodate liquid expansion.
Can I reuse the bones for a second batch of broth?
While you can reuse bones, the second batch will be significantly less concentrated, flavourful, and gelatinous than the first because most of the collagen and marrow have been fully extracted. If reusing, consider shortening the cooking time and combining them with fresh ingredients for flavour.
Essential Liquid Gold Bone Broth
Ingredients:
Instructions:
Nutrition Facts:
| Calories | 50 calories |
|---|---|
| Fat | 1 g |
| Fiber | 0 g |
