Ultra Smashed Cheeseburger Recipe Food Lab
- Time: Active 10 minutes, Passive 5 minutes, Total 15 minutes
- Flavor/Texture Hook: Shattering lacy edges with a velvety, melted finish
- Perfect for: High energy game days or a 15 minute weeknight flavor hit
- Science Behind This Ultra Smashed Cheeseburger Recipe Food Lab
- The Physics of the Maillard Crust
- Molecule Breakdown of Key Components
- Innovative Elements and Flavor Swaps
- Heavy Metal for Superior Searing
- Executing the Perfect High Heat Smash
- Avoiding Smashed Patty Disaster Zones
- Expanding the Fusion for Crowds
- Debunking the Low Heat Fallacy
- Preserving the Balance of Flavor
- Visual Cues for the Drip
- Critical in Sodium
- Recipe FAQs
- 📝 Recipe Card
Science Behind This Ultra Smashed Cheeseburger Recipe Food Lab
You know that specific, intoxicating smell when cold beef hits a ripping hot cast iron? It’s not just "cooking" - it's a chemical transformation. I remember the first time I tried this; the kitchen filled with a deep, nutty aroma that made my neighbors knock on the door just to see what was happening.
It’s a sensory overload of browning protein and rendered fat that tells your brain something special is about to happen.
The secret isn't in fancy seasonings or hidden sauces. It’s about total surface area. When we use this ultra smashed cheeseburger recipe food lab technique, we're maximizing the contact between the beef and the metal.
Instead of a thick, gray center, you get a patty that is almost entirely "crust." It's an innovative way to eat a burger where the texture provides the excitement.
The Physics of the Maillard Crust
- Maximized Surface Area: Smashing creates a jagged, thin profile that increases the area available for browning by nearly 300%.
- Conductive Heat Transfer: Heavy pressure forces the beef into every microscopic crevice of the pan, ensuring a uniform, shattering sear.
- Fat Emulsification: The high heat rapidly renders the fat, which then fries the edges of the meat in its own juices for a crisp finish.
Right then, let's look at how the cooking environment changes the outcome. While most people reach for a grill, this recipe lives and breathes on a flat, solid surface. A grill lets all that precious fat and flavor fall through the grates, which is exactly what we want to avoid.
| Method | Time | Texture | Best For |
|---|---|---|---|
| Cast Iron Pan | 5 minutes | Shattering, lacy edges | Achieving the Food Lab crust |
| Outdoor Griddle | 5 minutes | Even browning | Feeding a large crowd fast |
| Standard Grill | 8 minutes | Charred but lacks crust | Not recommended for smashing |
If you really want to dive into the world of dairy to top these off, learning the basics of milk chemistry helps, much like the process in this How to Make Cheese recipe. It gives you a much better appreciation for why American cheese melts the way it does.
Molecule Breakdown of Key Components
| Ingredient | Science Role | Pro Secret |
|---|---|---|
| Ground Chuck (80/20) | Fat provides the "fry" medium | Keep it ice cold until it hits the pan |
| Shaved Onion | Releases moisture to steam the meat | Slice them paper thin so they fuse to the beef |
| American Cheese | Sodium citrate ensures a smooth melt | Use chilled slices for a controlled "drip" |
Building a burger is all about the balance between the heavy, savory notes of the beef and the sharp, vibrant acidity of the toppings. You don't need a dozen ingredients to make this work; you just need the right ones used at the right time.
Innovative Elements and Flavor Swaps
- 1 lb (450g) Fresh Ground Chuck (80% lean / 20% fat) Why this? The 20% fat is non negotiable for the lacy edges.
- 4 Soft Potato Rolls Why this? They compress without tearing, cradling the patty perfectly.
- 1 tbsp Unsalted Butter Why this? For toasting buns to create a moisture barrier.
- 4 Slices American Cheese Why this? It has the specific melting salts needed for a velvety finish.
- 1 Small Yellow Onion, shaved paper thin
- 0.5 tsp Kosher Salt
- 0.25 tsp Freshly Cracked Black Pepper
- 12 Dill Pickle Chips
| Original Ingredient | Substitute | Why It Works |
|---|---|---|
| Ground Chuck | Ground Brisket | Higher fat content; deeper, funkier beef flavor |
| Potato Rolls | Brioche Buns | Same soft texture but adds a richer, buttery note |
| American Cheese | Mild Cheddar | Note: Won't melt as smoothly; may become oily |
Heavy Metal for Superior Searing
To get that authentic "shatter" on your patty, your equipment matters more than your spatula. You need something with thermal mass meaning it holds onto heat even when a cold ball of meat hits it. A heavy cast iron skillet or a carbon steel pan is your best friend here.
Avoid non stick pans at all costs. They can't handle the high temperatures required, and you won't get that "stick and scrape" action that defines a great smash burger. You also need a sturdy, stiff spatula with no slots. If your spatula bends when you push down, you aren't smashing hard enough.
Executing the Perfect High Heat Smash
- Divide the beef. Portion the 1 lb Ground Chuck into four 4 ounce balls. Note: Don't pack them tightly; keep the strands loose.
- Toast the buns. Spread the 1 tbsp Unsalted Butter on the potato rolls and toast in a skillet until golden and fragrant.
- Heat the pan. Set your cast iron over high heat until a drop of water dances and evaporates instantly.
- Place and smash. Put a beef ball in the dry pan and use a heavy spatula to press it flat until it is less than half an inch thick.
- Season the meat. Sprinkle a portion of the 0.5 tsp Kosher Salt and 0.25 tsp Black Pepper over the raw side.
- Apply the onions. Press the shaved yellow onion directly into the raw, upper side of the patty.
- Develop the crust. Cook for 2 minutes until the edges are dark brown and crispy.
- Scrape and flip. Use a sharp edge to scrape the patty off the pan, ensuring all the crust stays attached.
- Add the cheese. Place one slice of American cheese on the patty and cook for 1 minute until the cheese is completely molten.
- Assemble the burger. Stack the patty on the bun and top with 3 dill pickle chips.
The smell during step 8 is the peak of the experience. It's that sweet, charred onion scent mixing with the salty beef. If you're looking for a side that matches this level of comfort, this Homemade Mac and recipe is the ultimate companion for a full on feast.
Avoiding Smashed Patty Disaster Zones
One mistake I once made was using a pan that wasn't hot enough. Instead of searing, the meat just leaked liquid and boiled in its own juices. It was gray, sad, and had zero crunch. Trust me, wait for the wisps of smoke before you even think about putting the beef down.
### To Avoid Steamed Meat
If your patties are coming out gray rather than brown, it's usually a crowd issue. When you put too many patties in a small pan, the temperature drops too fast. The moisture from the meat can't evaporate quickly enough, so it turns into steam. Work in batches of two if you're using a standard skillet.
| Problem | Root Cause | Solution |
|---|---|---|
| Meat sticks to spatula | Protein bonding | Use a piece of parchment paper between the spatula and meat |
| No lacy edges | Not enough pressure | Use a second heavy pan to press down on your spatula |
| Bun gets soggy | No barrier | Toast the buns heavily with butter to seal the bread |
### Common Mistakes Checklist
- ✓ Never use lean beef (90/10); the patty will be dry and crumbly.
- ✓ Don't salt the beef before forming balls; it changes the texture to sausage like.
- ✓ Ensure the onions are shaved paper thin; thick slices won't soften in time.
- ✓ Always use a stiff spatula; flexible ones won't give you the leverage needed for a true smash.
- ✓ Let the pan reheat for 60 seconds between batches to maintain that searing heat.
Expanding the Fusion for Crowds
Scaling this recipe is actually quite simple because the cook time is so fast. If you're doubling the recipe to feed eight people, don't just throw more meat in the pan. You need to maintain the heat. I recommend using two separate skillets or a large outdoor griddle.
When moving to a 2x or 4x batch, you don't need to quadruple the butter. Use just enough to coat the buns. For the salt and pepper, keep the ratio the same, but season each patty individually rather than mixing it into a big bowl of meat. This keeps the protein structure intact so the burger stays tender.
Debunking the Low Heat Fallacy
Some people think a slower cook makes for a juicier burger. While that might be true for a thick steak, it’s a myth for the smash burger. High heat is mandatory. The "juiciness" in this recipe doesn't come from internal moisture; it comes from the rendered fat and the contrast between the crispy exterior and the soft bun.
Another myth is that you should flip the burger multiple times. Honestly, don't even bother. You want one side to develop that massive crust, and the second side just needs enough time to melt the cheese and soften the onions. Flipping too much just breaks the patty apart.
Preserving the Balance of Flavor
Smash burgers are definitely best eaten the second they come off the heat. However, if you find yourself with extras, you can store the patties in the fridge for up to 3 days. Just keep the buns and pickles separate to avoid a soggy mess.
- Fridge: Store cooked patties in an airtight container for 3 days.
- Freezer: You can freeze the raw beef balls for up to 2 months. Thaw completely in the fridge before smashing.
- Reheating: Use a dry skillet over medium heat. Don't microwave them, or you'll lose that "shatter" texture we worked so hard for.
- Zero Waste: If you have leftover shaved onions, toss them in a bit of vinegar and sugar for a quick pickle to use on sandwiches the next day.
Visual Cues for the Drip
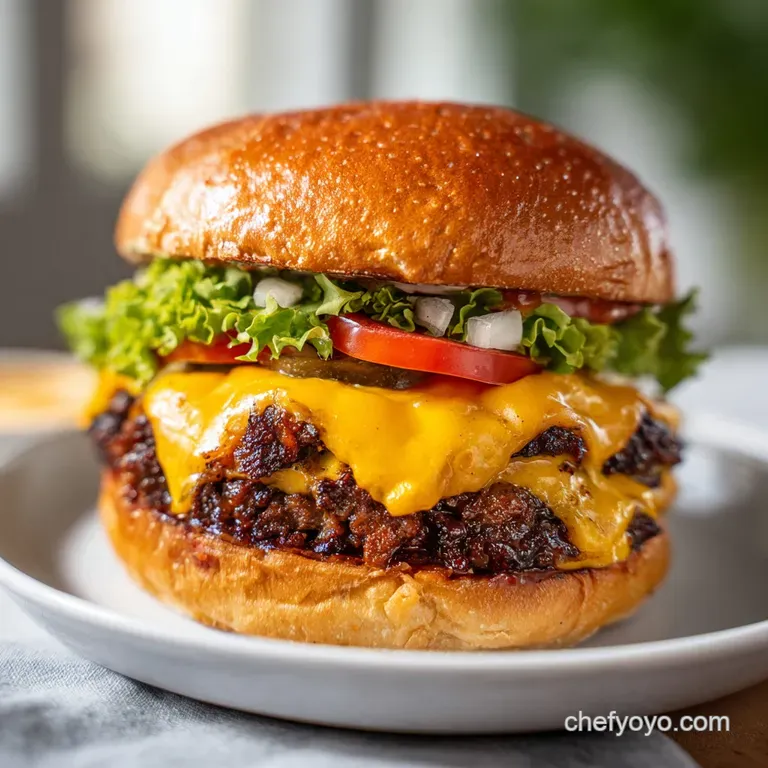
Presentation is all about that "diner aesthetic." When you place the cheese on the patty, don't just let it sit there. If you want that professional drip, put a lid or a metal bowl over the patty for the last 30 seconds. This traps the steam from the onions and forces the cheese to drape over the sides of the beef.
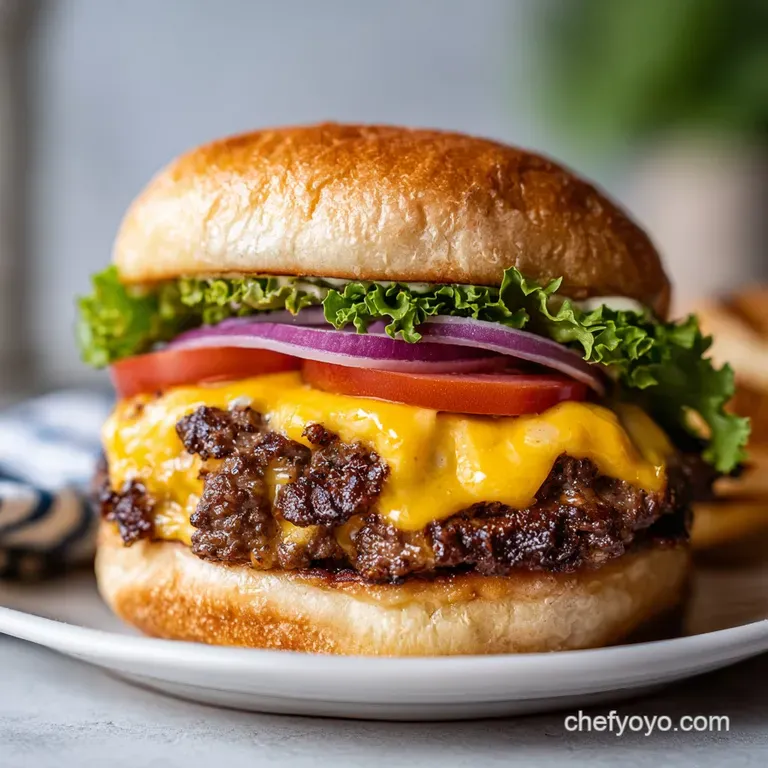
Serve these on a plain piece of parchment paper or a simple white plate. The vibrant green of the pickles against the mahogany crust of the meat is all the decoration you need. It’s a bold, innovative look that screams "eat me right now." When you pull that burger apart and see the lacy edges peeking out from under the melted cheese, you'll know you've nailed the food lab technique.

Critical in Sodium
1172 mg mg of sodium per serving (51% % of daily value)
The American Heart Association recommends limiting sodium intake to about 2,300mg per day. This recipe exceeds 50% of that recommendation per serving.
Tips to Reduce Sodium in Your Burger
-
Swap Cheese-15%
American cheese is high in sodium. Substitute it with a naturally lower sodium cheese like Swiss or Monterey Jack. This simple swap can significantly reduce the overall sodium content of your burger by approximately 15%.
-
Reduce Added Salt-10%
This recipe includes 0.5 tsp of kosher salt. Reduce the amount of salt added to the ground chuck by half or eliminate it altogether. You can compensate for the reduced salt by using more herbs and spices. This could reduce the sodium content by approximately 10%.
-
Pickle Prudence-5%
Dill pickle chips are a source of sodium. Reduce the amount of pickle chips used on each burger, or choose a lower sodium pickle variety. This adjustment could reduce the sodium by approximately 5%.
-
Portion Control-3%
Consider reducing the size of the burger patty slightly. Smaller portions lead to less of all ingredients, including sodium. This might only reduce the overall sodium by a small amount, approximately 3%, but it is combined with other factors can have significant impact.
-
Spice It Up
Use fresh or dried herbs and spices to enhance the flavor of your burger without adding sodium. Try garlic powder, onion powder, smoked paprika, or a blend of Italian herbs for a flavorful and sodium free boost.
Recipe FAQs
What is the trick to making smash burgers?
Maximizing surface area contact. Use a heavy, ripping hot cast iron or carbon steel pan to force the cold beef ball against the surface for maximum Maillard reaction.
What is the 5 6 7 burger rule?
This rule does not apply here. That specific ratio usually refers to patty thickness (e.g., 5/8 inch) for standard thick burgers, which is the opposite goal of the smash technique.
How to make the perfect smashed burger set up?
Heat your heavy skillet until water instantly evaporates. Portion the meat into loose balls, place one on the hot surface, and immediately press down firmly until very thin, scraping up the crust before flipping.
Is 80/20 or 90/10 better for smash burgers?
80/20 is significantly better. The 20% fat content is essential because it melts rapidly at high heat, creating the steam and frying medium necessary for those signature lacy, crispy edges.
Why do my smashed patties stick to the pan when I try to scrape them?
The pan wasn't hot enough, or you used the wrong tool. You need screaming high heat for the protein to instantly sear and release; use a stiff, flat spatula to aggressively scrape the crust off in one motion.
Should I salt the ground beef before forming the balls?
No, salt the beef only after it hits the pan. Salting raw ground beef before forming changes the protein structure, leading to a tougher, sausage like texture instead of a tender smash patty.
Is using American cheese necessary for the best melt?
Yes, for the classic texture. American cheese contains sodium citrate, an emulsifying salt that guarantees a creamy, velvety drape over the beef, unlike natural cheddars which might break or turn oily.
Food Lab Smashed Cheeseburger

Ingredients:
Instructions:
Nutrition Facts:
| Calories | 543 kcal |
|---|---|
| Protein | 27.6 g |
| Fat | 28.1 g |
| Carbs | 29.8 g |
| Fiber | 1.4 g |
| Sugar | 5.2 g |
| Sodium | 1172 mg |
