The Masterpiece Prime Rib Roast: Reverse-Seared Perfection
- Setting the Standard: Why Reverse-Seared Prime Rib is the Best Method
- The Science of Perfection: Flavor and Texture Deep Dive
- Building the Flavor Base: Ingredients and Prep Notes
- The Master Method: Reverse-Searing Your Prime Rib
- Troubleshooting and Expert Roasting Techniques
- Post-Cook Handling: Storage and Reheating
- Completing the Feast: Pairings and Sauces
- Recipe FAQs
- 📝 Recipe Card
Setting the Standard: Why Reverse Seared Prime Rib is the Best Method
The moment that fat cap starts sizzling and you smell garlic, rosemary, and slow roasting meat? That’s pure celebration, my friend. We’re not talking about a quick weeknight dinner; this is the majestic, show stopping Prime Rib Roast .
If you want a perfectly cooked, edge-to-edge medium rare centre and a shattering, savory crust, you need to abandon the over high heat first methods of yesteryear. They are a one-way ticket to a dry, grey tragedy.
This reverse sear technique is a total game changer, and honestly, it’s the only way I make a Prime Rib Roast now. It’s mostly passive cooking, meaning your hands-on time is minimal, but the precision is high.
Trust me, learning how to cook a Prime Rib Roast correctly will save you huge amounts of stress, especially if you’re hosting for a crowd. Let’s crack on and make something amazing.
The Science of Perfection: Flavor and Texture Deep Dive
Defining the Reverse Sear Advantage
The traditional way is to blast the roast with high heat, which causes the outside to cook quickly while the centre remains cold. By the time the middle catches up, you’ve got a massive band of overcooked, dry meat surrounding the pink centre. Ugh, the worst. Reverse searing flips that script entirely.
We cook the standing rib roast recipe very gently and slowly at a low temperature, allowing the heat to penetrate the dense muscle fibers evenly. This slow process ensures almost every slice is perfectly medium rare, right up to the crust.
Selecting Your Roast: Bone-In vs. Boneless
Always, always go bone-in if you can. The bones act as natural insulation for the bottom of the roast, helping the meat cook evenly, and they make a fantastic natural roasting rack. Plus, the bones themselves add massive flavor to your drippings, which are vital for a killer au jus.
If you absolutely must use a boneless roast, ensure it is tied tightly by your butcher, otherwise it might splay during cooking. The key to the best Prime Rib Roast starts at the butcher shop.
Essential Equipment Checklist for Success
If you take nothing else away from this guide, remember this: Buy a decent thermometer. I mean it a good instant read probe is non-negotiable for this recipe. You need to know the exact moment your roast hits the temperature sweet spot, down to the degree.
That’s more important than any fancy roasting pan!
Maximizing the Herb Crust (The Maillard Reaction Finish)
This part of the process is purely chemical magic. We dry brine the meat first, pulling moisture out of the surface. Then, we apply that glorious garlic herb prime rib roast butter rub.
When we hit it with 500°F heat during the final sear, that dry, seasoned surface and the buttery rub instantly activate the Maillard reaction. That’s the process that turns pale fat into a deep, mahogany, crackling crust that makes that satisfying sound when you slice it.
Achieving Edge-to-Edge Medium Rare
It’s all about monitoring the internal temperature constantly. Because we cook at a low 250°F (120°C), the internal temperature rises gradually and predictably. This prevents thermal shock and allows the roast to cook consistently from the outside in. We pull it 10 degrees early, then rest it.
This rest is crucial the carryover cooking will raise the temperature another 5 7 degrees before the final sear.
The Critical Role of Resting Time (Carryover Cooking Explained)
You absolutely cannot skip the rest steps. Seriously. When meat heats up, the muscle fibers contract and push all the moisture (the juice!) to the centre. If you slice it right away, those juices explode all over your cutting board instead of staying in the meat.
Resting allows the temperature to stabilize and, crucially, lets those juices slowly reabsorb into the fibers. I once rushed this step because I was ravenous, and the result was dry, sad slices. Don't be like Past Me.
Chef’s Note: We rest the roast twice —once before the over high heat sear, and once more after. This double rest ensures maximum juiciness and temperature stability.
Building the Flavor Base: Ingredients and Prep Notes
The beauty of this method is that the slow cook locks in the flavor, so a simple, robust seasoning is all you need.
The Essential Herb Rub Composition
I am opinionated about the rub. It needs to be fresh, not dried, and it needs a binder. The butter provides richness and helps the herbs actually stick to the roast during the low cooking phase. Fresh rosemary and thyme are non-negotiable for that classic, savoury depth.
Don't be afraid of the garlic; the heat mellows it into something sweet and earthy.
Salt Strategy: Dry Brining the Prime Rib Roast
We don't just "season" this roast; we dry brine it. This means covering the entire surface, including the fat cap, with coarse Kosher salt and leaving it uncovered in the fridge for 12 to 24 hours.
The salt draws moisture out, dissolves in it, and then gets reabsorbed, seasoning the meat deep inside. This process is absolutely key to getting that crispy crust on your finished Prime Rib Roast .
What Can I Use Instead of [Specific Herb]? (Substitution Guide)
| Ingredient | Why it’s Used | Viable Substitute |
|---|---|---|
| Fresh Rosemary | Piney, robust backbone | 1 tsp Dried Rosemary (crushed) or Marjoram |
| Unsalted Butter | Flavor and fat binder | Beef Tallow or over High heat Oil (like Avocado) |
| Dijon Mustard | Acidic binding agent | Worcestershire sauce (use sparingly) or nothing (just use the butter) |
| Kosher Salt | Dry brine/Seasoning | Coarse Sea Salt (use slightly less) |
The Master Method: Reverse Searing Your Prime Rib

This is the easiest easy prime rib recipe if you just stick to the thermometer readings.
- Prep and Chill (24 Hours Prior): Pat the roast aggressively dry. Generously coat every inch with Kosher salt. Place it uncovered on a rack in the fridge for at least 12 hours. The exterior needs to feel tacky and dry.
- Temper: Two hours before cooking, remove the Prime Rib Roast and leave it uncovered on the counter. Preheat your oven to a low 250°F (120°C).
- Rub It Up: Mix the softened butter, minced garlic, pepper, rosemary, thyme, and Dijon. Rub this aromatic paste firmly over the roast's exterior.
- Insert Probe: Place the roast, fat-side up, on the rack. Insert a probe thermometer into the deepest, thickest part of the meat, avoiding any bone.
- Low Roast: Roast until the thermometer hits 120°F (49°C) for medium rare (see chart below). This takes 2.5 to 4 hours, depending on your oven and roast size. Use the prime rib roast cooking time guide as an estimate, but trust the thermometer always.
- First Rest: Remove the roast. Tent it loosely with foil and let it rest for 15 minutes. CRITICAL: Do NOT slice it.
- Crank the Heat: While resting, turn your oven up to a blazing 500°F (260°C).
- The Sear: Return the roast to the hot oven, uncovered. Sear for 6 to 10 minutes. Watch closely! The crust will bubble, darken, and smell incredible. Pull it out when the crust is crackling and mahogany brown.
- Final Rest and Serve: Transfer the glorious hunk of meat to a clean cutting board. Tent loosely and let it rest for a final, non-negotiable 15 minutes. Slice against the grain and serve immediately.
Troubleshooting and Expert Roasting Techniques
Phase I: Low and Slow Internal Cooking
The initial, slow cooking phase is about evenness. If your roast seems to be cooking unevenly, your oven might have hot spots. You can rotate the pan 180 degrees halfway through the cook time to ensure consistency.
If the initial cook takes longer than 4 hours, don't worry just keep monitoring the temperature. That long, gentle heat is what creates a magnificent internal texture for your rib roast recipe .
Phase II: The over High heat Seared Crust
The sear is fast and brutal. You are only seeking external texture here. If you leave it in too long, you risk heating the interior back up and overcooking it. Stay by the oven and pull the roast the moment you achieve that deep, mahogany colour and the fat cap is sizzling and crispy.
Temperature Chart for Ideal Doneness (Target Temps)
Remember, these are the final internal temperatures after resting and searing. Pull the roast out of the low oven 10 degrees before these targets.
| Doneness | Low Roast Pull Temp | Final Internal Temp (After Sear/Rest) |
|---|---|---|
| Rare | 115°F (46°C) | 125°F (52°C) |
| Medium Rare | 120°F (49°C) | 130°F (54°C) |
| Medium | 125°F (52°C) | 135°F (57°C) |
Proper Slicing Technique for Presentation
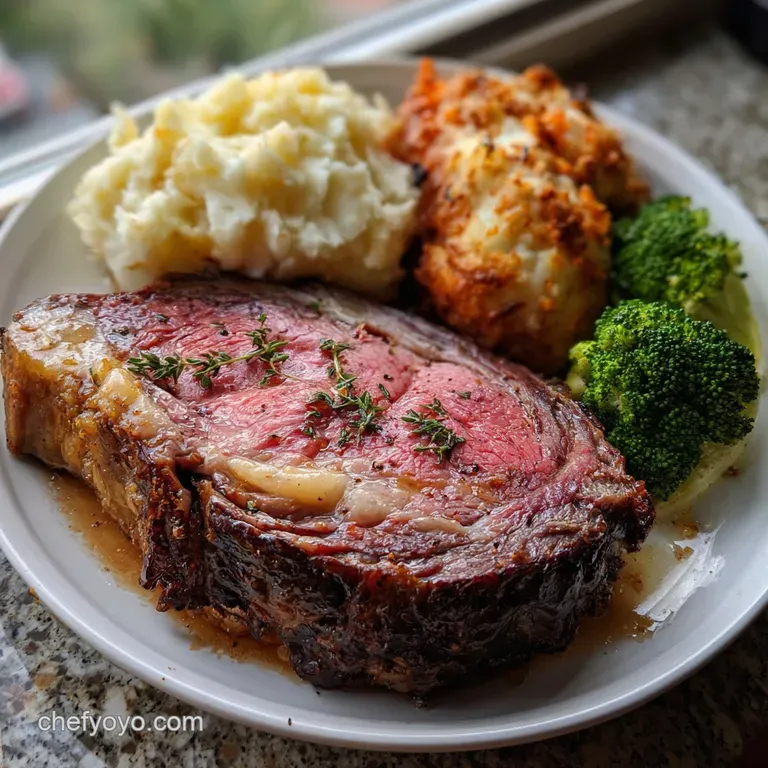
Always slice the meat against the grain. If you look closely at the meat, you'll see lines running across the muscle that’s the grain. Cutting perpendicular to those lines shortens the muscle fibres, making every single bite tender and easy to chew.
Slice away the bones first, then slice the main roast into thick 3/4 inch pieces.
Avoiding the Dreaded Grey Band
The grey band happens when the heat penetrates too quickly and aggressively from the outside, overcooking the proteins near the surface. Our low 250°F oven temperature is your best weapon against this.
It ensures the temperature gradient is small, meaning the difference between the temperature just under the crust and the centre is minimal. This is the whole point of using the reverse sear method on your Prime Rib Roast .
Calibrating Your Thermometer for Accuracy
A cheap, easy check: stick your thermometer in a glass of ice water. It should read 32°F (0°C). Then, stick it in boiling water (at sea level). It should read 212°F (100°C).
If it’s off by more than a couple of degrees, it’s lying to you, and you need a new one or need to account for the difference. This little trick is essential for success!
Post Cook Handling: Storage and Reheating
Best Practices for Storing Leftovers
Leftover rib roast recipe slices are fantastic! Cool the meat quickly, then store it in an airtight container in the fridge. For maximum freshness and moisture retention, store the slices slightly stacked and pour any remaining pan juices (or au jus) over the top.
It should keep well for 3 to 4 days.
How to Reheat Slices Without Drying Them Out
Never microwave prime rib it turns tough and chewy instantly. The best way to reheat is to place the slices in an oven safe dish, drizzle them with a bit of the leftover au jus or Prime Rib Roast drippings, and cover the dish tightly with foil.
Heat in a low oven (300°F / 150°C) until just warmed through, about 10- 15 minutes.
Freezing Cooked Prime Rib
Yes, you can freeze it, though the texture might be slightly compromised upon thawing. Slice the meat thickly, wrap individual portions tightly in plastic wrap, then seal them inside a freezer bag, squeezing out all the air. It will last up to 3 months. Thaw overnight in the refrigerator.
Completing the Feast: Pairings and Sauces
The Perfect Au Jus Companion
You have all those gorgeous pan drippings don’t waste them! Skim off the excess fat and use the rich fond to build a simple au jus. You can even elevate it into a fantastic, deeply flavoured sauce. I always end up making a larger batch of proper gravy, which is perfect for this. If you want a ridiculously rich and silky sauce, check out my recipe for Brown Gravy: The Ultimate Rich and Silky Sunday Roast Recipe .
Recommended Side Dishes for a Celebratory Meal
You need rich, hearty sides that can stand up to this glorious meat. Think Creamy Horseradish mashed potatoes, classic roasted asparagus, or perfect Yorkshire puddings for soaking up the juices. For something slightly different, try a hearty roasted veggie bowl like my Roasted Sweet Potato Black Bean Bowls: The Easy 50 Minute Meal Prep Winner (minus the black beans if you want to keep it simple!).
Wine and Beverage Pairings
This rich meat demands a bold, structured red wine. Think a classic Bordeaux, a sturdy Cabernet Sauvignon, or a deep, peppery Syrah. If you prefer beer, a dark, malty porter or stout stands up beautifully to the richness of the fat and the herb crust.
Enjoy every magnificent slice of your perfectly cooked Prime Rib Roast .

Recipe FAQs
Why did my reverse seared Prime Rib end up dry or overcooked?
Dryness is almost always a result of overcooking, which typically happens if you pulled the roast too late during the initial low-temperature cook. Always rely on a digital thermometer and remove the roast 5-10 degrees F before your target temperature to account for carryover cooking during the resting phase.
Also, ensure the high heat sear is brief no longer than 15 minutes.
Do I absolutely need to rest the Prime Rib after the searing process?
Yes, resting is the most critical, non-negotiable step for a perfectly juicy roast. When the meat is hot, the muscle fibers are tight, forcing the juices to the center; resting allows these fibers to relax and reabsorb those delicious internal liquids.
Skip this step and all the flavor will spill out onto your cutting board.
What is the purpose of the 'reverse sear,' and how does it prevent the grey band?
The reverse sear involves cooking the meat slowly first, allowing the entire roast to reach a uniform temperature internally before hitting it with high heat. This method ensures that only the very exterior is exposed to extreme temperatures, yielding a crispy crust without creating a thick layer of overcooked, grey meat just beneath the surface.
How can I safely store leftover Prime Rib, and can I freeze it?
Refrigerate leftovers in an airtight container within two hours of cooking; they will remain fresh for 3 to 4 days. For longer storage, slice the remaining meat before wrapping tightly in freezer paper or vacuum sealing, which allows the prime rib to be frozen for up to three months.
Can I use this reverse sear method for a smaller cut of beef, like a ribeye steak?
Absolutely, the reverse sear method works wonderfully on thick cut steaks (1.5 inches or more) and smaller roasts. The primary difference is time a steak will reach temperature in 20-40 minutes, so monitor the internal temperature closely to prevent accidental overcooking during the initial low-temperature phase.
My crust wasn't as crunchy as I hoped. What went wrong during the final sear?
A soft crust usually means the roast was not dry enough before searing or the oven temperature wasn't high enough during the final stage. Ensure the roast rests uncovered on a wire rack for at least an hour before the slow cook, and confirm your oven has reached its full 450-500°F temperature for the finishing sear.
I don't have a reliable meat thermometer. Can I cook Prime Rib without one?
While timing charts can offer general estimates, a quality leave-in digital thermometer is essential for a successful Reverse Sear Prime Rib. Cooking by time alone is highly unreliable, especially for varying oven temperatures and roast sizes, and almost guarantees inconsistent internal doneness.
This recipe necessitates precise temperature control.
Masterpiece Reverse Seared Prime Rib Roast

Ingredients:
Instructions:
Nutrition Facts:
| Calories | 438 kcal |
|---|---|
| Protein | 27.1 g |
| Fat | 32.2 g |
| Carbs | 10.7 g |
