Red Velvet Marble Cake: the Crème De La Crème Layer Cake Recipe
- The Showstopper: Mastering the Red Velvet Marble Cake
- The Science of the Perfect Swirl: Why Buttermilk is Key
- Essential Components for Your Marble Cake Layers
- Baking Brilliance: Detailed Directions for Your Cake
- Troubleshooting the Marble Effect and Achieving Tender Crumb
- Maximizing Freshness: Storing Your Finished Red Velvet Marble Cake
- Serving the Red Velvet Marble Cake: Perfect Pairings
- Recipe FAQs
- 📝 Recipe Card
The Showstopper: Mastering the Red Velvet Marble Cake
Oh my gosh, this cake is pure magic. When it's baking, the smell of vanilla and deep cocoa powder just takes over your kitchen, making everything feel instantly festive. That famous, tender, velvety crumb is what we are chasing.
Forget those dry versions you get at the grocery store; this homemade Red Velvet Marble Cake is truly the gold standard.
I know what you’re thinking: two batters, one cake? Sounds like a weekend project, but trust me, this recipe is a lifesaver for busy weeknights or unexpected celebrations. We are starting with a single base batter, which cuts the mixing time in half and guarantees a cohesive texture throughout.
It's maximum impact for minimum effort, honestly.
Ready to ditch those complicated recipes that never deliver on the swirl? Let's stop chatting and get down to the butter and sugar so you can master this stunning Red Velvet Marble Cake. This is how we get it done perfectly, every single time.
The Science of the Perfect Swirl: Why Buttermilk is Key
I used to try to make red velvet and vanilla cakes separately, then painstakingly combine them, which was a disaster. Why waste the time? The magic of this recipe is that it uses a rich, buttermilk base batter that is then divided, ensuring both the red velvet and the vanilla portions share the same luscious texture.
The Allure of the Dual and Flavored Batter
By splitting the base, we achieve perfect uniformity in moisture. The vanilla portion is straightforwardly sweet and buttery, while the red velvet section takes that exact same tenderness and adds depth. It’s elegant simplicity.
Choosing the Right Cocoa for Deep Red Hue
This is critical: you must use natural, unsweetened cocoa powder, not Dutch and process. Why? Natural cocoa is acidic , which reacts perfectly with the buttermilk and the tiny bit of vinegar we add later, helping activate the baking soda.
This reaction also subtly deepens the red colour, giving you that rich hue.
What Makes This Marble Cake Recipe Truly Unique
Most marble cake recipes just dollop two random batters together. We use the acidity inherent in red velvet to structure our marble. We are carefully adjusting the proportions of the batter, ensuring the cocoa powder doesn't overwhelm the vanilla side. This balance is key.
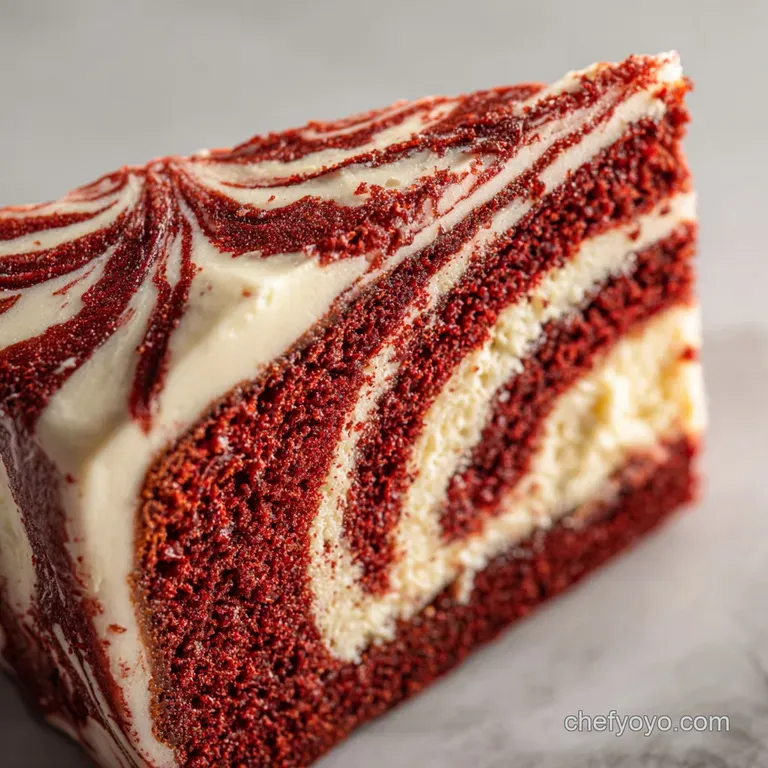
Chef's Note: We are using slightly more vanilla batter than red velvet batter (a 60/40 split). This prevents the cocoa from overpowering the flavour and ensures the gorgeous red streaks truly stand out against the pale background.
Achieving the Signature Tender Crumb
The tenderness comes from using room and temperature fats and liquids. When the butter and sugar are properly creamed until they look nearly white and airy you've incorporated all the air needed for lift. Cold ingredients simply won't emulsify, resulting in a dense, disappointing cake.
Balancing Acidity for Vibrant Color
The white vinegar is non and negotiable in the Red Velvet part. It boosts the acidity, giving you the best chemical reaction with the baking soda and the buttermilk. This, along with a high and quality gel food colouring, yields the deepest, most vibrant red you could hope for.
Texture Contrast: Red Velvet vs. Vanilla Batter
Though they start from the same base, the cocoa powder slightly thickens the red velvet portion. This slight textural difference is actually helpful! It prevents the batters from blending completely when swirled, guaranteeing those distinct, beautiful ribbons.
Essential Components for Your Marble Cake Layers
I can’t stress this enough: measure properly. I know it’s boring, but grab your kitchen scale for the flour and sugar. Precision makes the difference between a good cake and a truly magnificent one.
Wet Ingredients Checklist (Buttermilk, Vinegar, Extracts)
Buttermilk must be full and fat and at room temperature. The same goes for your eggs. If your buttermilk is cold, it will shock your creamed butter, causing it to deflate a disaster!
Dry Ingredients and the Cocoa Powder Split
We only add cocoa powder to one portion of the batter. Make sure to sift your flour and your cocoa powder. Sifting prevents lumps and incorporates more air into the mixture, giving you a lighter cake overall.
Cream Cheese Frosting Ingredient Breakdown
You need good, full and fat block cream cheese, not the spreadable stuff in a tub. The cream cheese should be slightly chilled, but the butter must be fully softened. This temperature difference is what creates a stable, sturdy frosting that holds its shape.
Smart Swaps: Making Substitutions Without Compromise
Seriously, don’t stress if you’re missing one thing. I've been there, mid and bake, staring into an empty fridge.
| Ingredient | Why it's Important | Viable Substitute |
|---|---|---|
| Buttermilk | Provides acidity and moisture | Milk + 1 tsp white vinegar (let sit 5 mins) |
| All and Purpose Flour | Structure | Standard GF baking blend (might need extra liquid) |
| Unsalted Butter | Flavour and creamy texture | High and quality vegan butter sticks |
| Gel Food Colouring | Deep, concentrated color | Beetroot powder (for a milder, earthy red) |
Baking Brilliance: Detailed Directions for Your Cake

Let's crack on with the instructions. This is where patience pays off, especially during the marbling stage.
Preparing and Dividing the Base Buttermilk Batter
Get your oven preheated to 350°F (175°C) and line your pans with parchment paper. Cream the butter and sugar for a full five minutes until they are fluffy and pale don't rush this!
Then, alternate your dry ingredients and your room and temperature buttermilk on low speed until just combined. Now, scoop slightly more than half of that base batter into a separate bowl for the vanilla portion.
Coloring and Flavoring the Red Velvet Portion
To the smaller portion of batter, quickly mix in the sifted cocoa powder, the red gel colouring, and the teaspoon of vinegar. Mix until the colour is rich and uniform. Do not overmix at this stage , or you risk developing too much gluten, which means a tough cake.
The Critical Technique for the Ideal Marble Swirl
Dollop the two batters alternately into the prepared cake pans a scoop of white, then a scoop of red, repeating until the pan is full. Now, take a thin skewer or knife and gently drag it through the batter in a slow, figure and eight or S-shape pattern. I only do this 2 or 3 times max.
You want distinct ribbons, not a muddy pink and brown mess.
Baking Times and Doneness Testing
Bake for 30– 35 minutes. Always check doneness by inserting a toothpick into the very centre; if it comes out clean, the cake is ready. If you see wet batter, give it another two minutes. Remember, over and baking is the number one cause of a dry cake, so be vigilant!
Troubleshooting the Marble Effect and Achieving Tender Crumb
I've messed up so many cakes trying to get the perfect swirl. Learn from my past mistakes! This section will save you heartbreak.
Preventing a Muddled or Muddy Batter Swirl
You are over and swirling the batter, darling. It’s tempting to keep playing with it, but once you make those 2 3 slow, gentle passes with the skewer, stop. The oven heat will continue to move the batter slightly, setting the swirl perfectly. If the batter looks pink before baking, you've gone too far.
Avoiding a Dry Cake: Monitoring Oven Temperature
Two things cause dryness: over and baking and cold ingredients. Ensure your buttermilk and eggs are genuinely room temperature. Next,, invest in an oven thermometer. Your oven might say 350°F, but it could be running 25 degrees hot. This tiny investment prevents cake failure.
Achieving Perfectly Smooth Cream Cheese Frosting
Lumps usually happen because the cream cheese was too cold or the butter wasn't soft enough. Beat the cream cheese and butter alone first until they are completely smooth before adding any powdered sugar.
If the frosting gets too soupy, stop mixing immediately and pop the bowl in the freezer for ten minutes, then beat again.
Maximizing Freshness: Storing Your Finished Red Velvet Marble Cake
But does it freeze well? You bet it does. If you want to make smaller desserts, you might also like my [Cookies n Cream Mini Cheesecakes: The Ultimate No and Fuss Recipe], but for this big, bold marble cake, storage is key.
Short and Term Storage for Frosted Cake
If frosted, the cake should be stored in an airtight container in the refrigerator. It will stay wonderfully moist for up to 4 days. Always bring it out 30– 60 minutes before serving to allow the cream cheese frosting to soften slightly.
Never store the frosted cake uncovered , or the cut edges will dry out rapidly.
Detailed Freezing Instructions for Layers
If you want to bake ahead, cool the cake layers completely. Wrap each layer tightly in two layers of plastic wrap, followed by a layer of aluminum foil. Label and freeze for up to 2 months.
Thawing and Serving Frozen Cake
Thaw the wrapped layers overnight in the refrigerator. Unwrap them while they are still slightly cold, which prevents the cake from sticking or tearing. Frost when fully thawed and enjoy!
For a festive holiday spin, you could even drizzle it with white chocolate like my [No Bake Peppermint White Chocolate Cheesecakes Easy Christmas Mini Desserts]!
Serving the Red Velvet Marble Cake: Perfect Pairings
This cake is already a showstopper, but a few simple additions make it unforgettable.
We are dealing with a rich, tangy, and sweet profile here, so you need a counterpoint. A dollop of fresh whipped cream never hurts, but I prefer fresh, slightly tart raspberries sprinkled over the top. The acidity of the berries perfectly cuts through the richness of the cream cheese frosting.
For drinks, skip the super and sweet sodas. A strong espresso or a bold black tea works beautifully, cleansing the palate between bites. If you want a more luxurious finish, a small glass of Moscato d'Asti is surprisingly brilliant with red velvet.

Recipe FAQs
Why did my Red Velvet Marble Cake turn out dry?
Dryness is most often caused by overmixing the batter or baking for too long. Ensure you measure the flour accurately using the spoon and level method, and always check for doneness a few minutes before the minimum baking time listed.
The cake should spring back lightly when touched, or an internal thermometer should read around 205°F (96°C).
How can I achieve a distinct marble pattern without overmixing the batters?
To get a beautiful, clear swirl, drop large, alternate dollops of the vanilla and red velvet batters into the prepared pans. Once the pan is full, use a knife or skewer to gently cut through the batter in an 'S' shape only 3 or 4 times. Overmixing will cause the colors to blend into a uniform, muddied brown pink.
I don't have buttermilk. Is there a substitute I can use?
Yes, you can easily create a sour milk substitute necessary for the reaction with the baking soda. Add 1 tablespoon of white vinegar or lemon juice to 1 cup of whole milk, stir, and let it sit for 5 to 10 minutes until it slightly thickens and curdles.
This acidity is crucial for the cake's tender crumb and color development.
My red velvet layer wasn't a bright red; it looked more maroon or brown. Why?
The final color is affected by both the type of food coloring and the small amount of cocoa powder, which provides a deeper, traditional maroon shade. For the brightest color, always use high-quality gel or paste food coloring rather than thin liquid coloring.
Also, ensure your baking soda and acid (buttermilk) react properly, as this process deepens the pigment.
Can I freeze the finished cake or the unfrosted layers?
It is best to freeze the layers unfrosted, as cream cheese frosting can sometimes weep when thawed. Once the layers are completely cool, wrap each one tightly in plastic wrap, then a layer of aluminum foil, and freeze for up to three months.
Thaw the wrapped layers overnight in the refrigerator before assembling and frosting.
Can I use American buttercream instead of the traditional Cream Cheese Frosting?
While technically possible, the tangy richness of the cream cheese frosting is the perfect foil for the subtle cocoa flavor of red velvet, balancing the sweetness beautifully. If you must use American buttercream, consider reducing the sugar slightly and adding a pinch of salt and a splash of lemon juice to cut the overwhelming sweetness.
Can I make this cake in a 9x13 pan instead of two round layer pans?
Yes, this batter recipe scales well for a 9x13 inch sheet cake, though you may need to reduce the total amount of frosting needed. The baking time will be significantly different, likely ranging from 30 to 40 minutes. Begin checking for doneness around 30 minutes to prevent overbaking.
Red Velvet Marble Cake Recipe

Ingredients:
Instructions:
Nutrition Facts:
| Calories | 701 kcal |
|---|---|
| Protein | 5.0 g |
| Fat | 22.0 g |
| Carbs | 123.0 g |
