Roasted Garlic Herb Spread a Taste of Italy at Home
Recipe Introduction
Fancy a bit of Italy in your kitchen? Have you ever tried making your own garlic spread ? This recipe is about to become your new obsession.
Honestly, once you taste it, shop bought stuff will never cut it again.
Quick Hook
This ain't your usual spread. This garlic spread is pure magic. Roasting the garlic brings out a mellow sweetness. It will also creates an irresistible flavour.
Brief Overview
This Italian garlic bread topping is rooted in rustic Italian traditions. It's a simple recipe that's ready in about one hour and twenty five minutes.
This recipe yields approximately 1 cup. It's perfect for sharing or keeping all to yourself. (No judgement here!)
Main Benefits
Garlic is a well-known natural immune booster. This spread makes eating your garlic delicious. This is perfect for dinner parties, lazy lunches or even just a cheeky midnight snack.
What makes this Roasted Garlic & Herb Spread special? It's the creamy vegan sauce and fresh herb infusion.
Cracking on with the Ingredients
Time to get started! To make this incredibly simple recipe, you’ll need 2 heads of garlic and 2 tablespoons of olive oil.
You also need 1 cup of softened unsalted butter, 2 tablespoons of chopped parsley, and 1 tablespoon of chopped chives.
A teaspoon of fresh rosemary, half a teaspoon of lemon zest, a quarter teaspoon of sea salt, and one eighth teaspoon of black pepper will complete our core ingredients.
Honestly? I once forgot the rosemary and it was still banging! But don't skip it if you have it. A pinch of red pepper flakes adds a nice warmth and kicks that flavor a little up.
You can use vegan butter or a mix of olive oil and coconut oil to make it into a dairy-free Garlic Sauce .
Feel free to experiment with thyme or basil, as they can also be used to add flavour, or add a tiny squeeze of lemon juice.
Remember to use good quality butter for this. It makes all the difference!
Getting Down to Brass Tacks: Ingredients & Equipment for Killer Garlic Spread
Alright, let's talk shop! This garlic spread isn't just slapping some garlic on bread. We're going for next level flavor here. Ready? Let's dive in!
The Stars of the Show: Main Ingredients
This is where the magic happens. We are making Whipped Garlic , not just garlic mixed with butter. These measurements are crucial for that perfect creamy vegan sauce if you decide to go that route.
- 2 heads of garlic (about 100g each), whole. Go for firm, plump heads. Avoid any with soft spots or sprouts. Honestly, the better the garlic, the better the spread.
- 2 tablespoons olive oil ( 30ml ). Extra virgin is best for flavor!
- 1 cup ( 2 sticks ) unsalted butter, softened ( 227g ). The softer, the better for blending.
- 2 tablespoons fresh parsley , finely chopped ( 10g ). Fresh is key!
- 1 tablespoon fresh chives , finely chopped ( 5g ). Adds a nice oniony kick.
- 1 teaspoon fresh rosemary , finely chopped ( 2g ). Adds a touch of earthy awesomeness.
- 1/2 teaspoon lemon zest , finely grated. A little zest goes a long way!
- 1/4 teaspoon sea salt , or to taste. Don't be afraid to adjust!
- 1/8 teaspoon black pepper , or to taste. Freshly ground is always better!
Seasoning Secrets: The Flavor Boosters
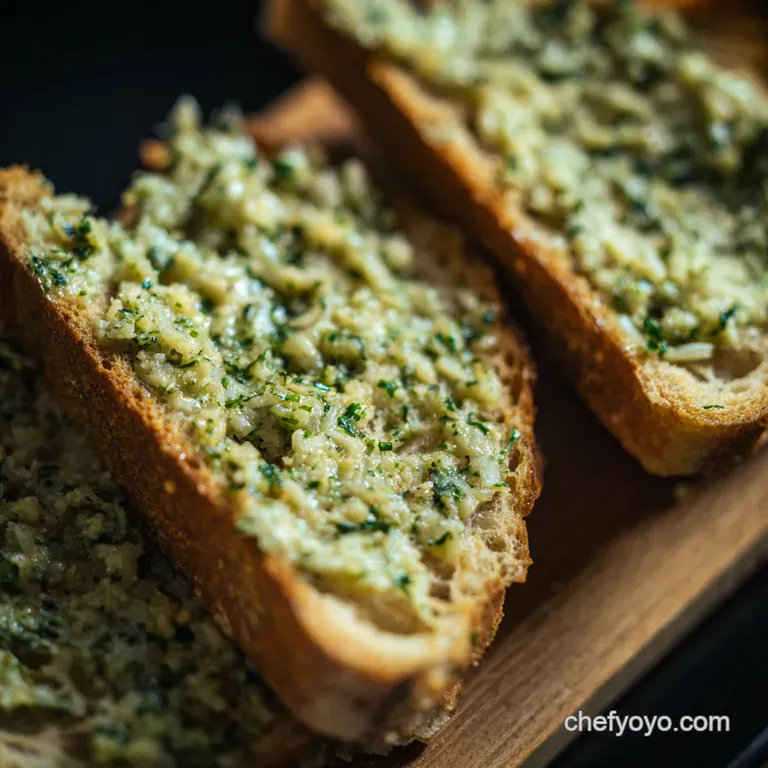
Garlic and herbs? Yes, please! This recipe is all about those classic Italian flavors. It's like Italian garlic bread topping but way more versatile.
You can use this easy garlic sauce recipe on anything!
- Essential Combo: Parsley, chives, and rosemary are the holy trinity. But feel free to experiment!
- Flavor Enhancers: Lemon zest brightens everything up. A pinch of red pepper flakes will wake things up too. You can use Herb infused butter for even more flavour.
- Quick Swaps: No fresh herbs? 1 teaspoon of dried herbs will do in a pinch.
Gear Up: Equipment You'll Need
No fancy gadgets required here. This recipe is about simplicity.
- Oven. Essential for roasting that garlic spread to sweet perfection.
- Baking sheet. To safely hold your garlic heads during roasting.
- Aluminum foil. To wrap the garlic for roasting.
- Small bowl. For squeezing out the roasted garlic goodness.
- Food processor or high powered blender. This is crucial for that smooth, creamy texture . You could try to do it by hand, but honestly, why would you?
- Rubber spatula. For scraping down the sides of the bowl.
- Airtight container or jar. For storing your masterpiece.
- Household Hacks: No food processor? A really powerful blender can work. If you don't have an oven, cook the garlic in a skillet to get a close version to roasted garlic butter
Making your own homemade garlic dip or a quick and delicious garlic spread for vegetables is super easy. It brings a big flavour impact to so many meals.
Now, who's ready to get cooking?
Roasted Garlic & Herb Spread: A Taste of Italy at Home
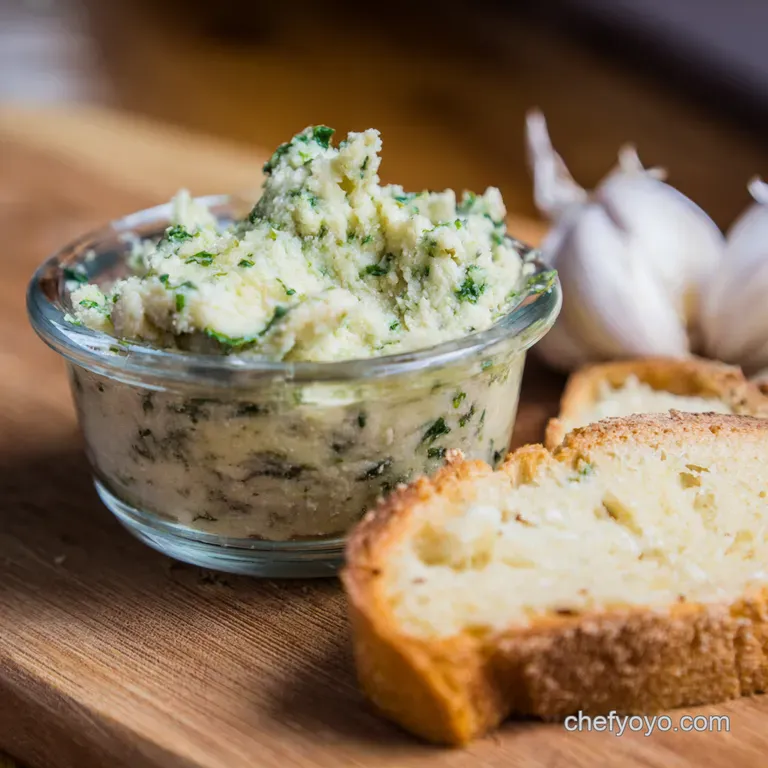
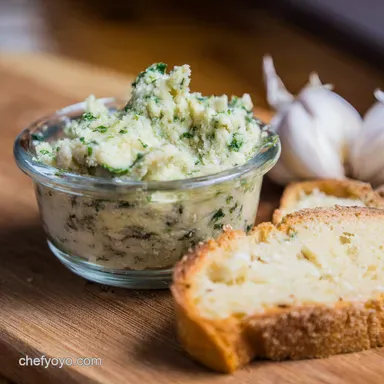
Honestly, you guys, this isn’t just any old garlic spread . This is the garlic spread. I'm talking roasted, herby goodness that will make you want to slather it on everything! We're bringing a little slice of Italy straight to your kitchen.
Plus, it is so easy, anyone can make it! And its uses cases are endless! Did you know that Garlic has been used medicinally for thousands of years and is associated with a range of benefits, including boosting the immune system and promoting heart health? The best part? Prep takes like, ten minutes.
The oven does all the work! Let's do it.
Prep Steps for Garlic Glory
First things first: mise en place . That's fancy French for "get your stuff together." So, soften your butter. Chop your herbs.
Grab those gorgeous garlic heads. For safety, remember to be careful when cutting those garlic heads. We don't want any kitchen mishaps!
Time saving tip? Chop those herbs while the oven's preheating. Organisation is key, innit?
From Raw to Roasted: step-by-step
- Get your oven preheating to 350° F ( 175° C) .
- Chop the tops off your 2 heads of garlic , exposing the cloves.
- Drizzle 2 tablespoons olive oil over those exposed cloves. Wrap the garlic tightly in foil.
- Roast for 1 hour 15 minutes . The garlic should be super soft and smell amazing!
- Let the garlic cool. Then, squeeze out all those lovely, roasted cloves into a bowl.
- Chuck your 1 cup softened butter , the roasted garlic, 2 tablespoons parsley, 1 tablespoon chives, 1 teaspoon rosemary, 1/2 teaspoon lemon zest, 1/4 teaspoon sea salt, and 1/8 teaspoon black pepper into a food processor.
- Whizz it all up until it's smooth like silk. This is your delicious and creamy vegan sauce without the vegan part.
- Store your garlic spread in the fridge. This Easy Garlic Sauce Recipe last for about a week, or you can freeze it.
Pro Tips for the Perfect Spread
Want to take your garlic spread to the next level? Roast extra garlic. Honestly, you'll thank me later. Also, don't burn the garlic! Burnt garlic is nasty.
Make sure that when roasting it, is soft and fragrant, not blackened. Use high-quality ingredients. The better the butter, the better the spread.
Thinking about a dairy-free Garlic Sauce ? Sub the butter out with some vegan butter or a blend of coconut and olive oil.
It still tastes divine.
Avoid over mixing! Don't over process the mixture. It will become greasy. For make-ahead options, you can roast the garlic a day or two in advance.
I sometimes do this! This Italian garlic bread topping can be made a week in advance.
Honestly, this garlic spread is amazing on everything . Slather it on crusty bread , use it as a garlic spread for vegetables , or even mix it into pasta.
This homemade garlic dip will be one you love. And hey, why not try swapping those herbs for other ones? Herb infused butter is a great alternative.
It's your garlic spread now have fun with it! You'll be whipping up Whipped Garlic like a pro in no time!
Recipe Notes for Your Dreamy Garlic Spread
Okay, so you've just made this incredible garlic spread . Now what? Let's chat about how to make the most of it.
Honestly, this easy garlic sauce recipe is so versatile, the possibilities are endless.
Serving Suggestions: Get Creative!
Presentation matters, right? A dollop of this garlic spread on a rustic wooden board, surrounded by warm baguette slices? Chef's kiss! Or, spread it on grilled asparagus for a simple, elegant side.
For drinks? A crisp Pinot Grigio would be divine . You can also create some Italian garlic bread topping using your spread.
Storage Tips: Keep it Fresh
This homemade garlic dip needs to chill! Pop it in an airtight container and it'll be happy in the fridge for up to a week.
Want to keep it longer? Freezing is your friend. Portion it into ice cube trays for easy, single serving use. Reheating? Just let it thaw in the fridge.
I had a friend once who tried to microwave it, and let me tell you...splatter city!
Variations: Make it Your Own
Want a dairy-free garlic sauce ? Easy peasy! Just swap the butter for a good quality vegan butter alternative.
You can also make creamy vegan sauce if you want to have no dairy at all in the garlic spread .
For a seasonal twist, try adding roasted red peppers in the summer, or butternut squash in the fall.
Nutrition Basics: The Good Stuff
Okay, let's be real. This whipped garlic spread isn't exactly a health food. But, garlic is packed with antioxidants! Plus, a little bit goes a long way.
A small serving can add tons of flavor without tons of calories. It could be delicious garlic spread for vegetables .
Listen, this roasted garlic butter is seriously addictive. Don't blame me if you find yourself slathering it on everything. And remember, have fun with it! Cooking should be a joy, not a chore.
Don't be afraid to experiment with different herbs or add a bit of chili for some kick.

Frequently Asked Questions
How long does homemade garlic spread last? I'm trying to meal prep like a boss!
Your homemade roasted garlic spread will keep in the refrigerator for up to a week. Make sure to store it in an airtight container to maintain its freshness and prevent it from absorbing other fridge odors, nobody wants garlic flavored jam!
For longer storage, you can freeze it for up to 2 months, just let it soften a bit before using.
Can I make this garlic spread vegan? I'm ditching the dairy, innit!
Absolutely! To make this recipe vegan, simply substitute the butter with a good quality vegan butter or a blend of olive oil and coconut oil for a creamier texture. Taste and adjust the seasoning accordingly, as vegan butters can vary in salt content.
You can even add a tablespoon of nutritional yeast for a cheesy flavour.
My garlic spread tastes a bit bitter what did I do wrong? Is it a proper Gordon Ramsay disaster?
Bitterness in garlic spread usually comes from over roasting the garlic. Burnt garlic can develop a harsh flavor. Make sure you roast the garlic until it's soft and fragrant, but not blackened. If it still tastes bitter, try adding a touch more lemon zest or a pinch of sugar to balance the flavors.
What are some creative ways to use this roasted garlic spread beyond just spreading it on bread? Need some inspo!
This spread is surprisingly versatile! Slather it on grilled vegetables like courgette or asparagus for a flavour boost, toss it with cooked pasta for a simple sauce, or even use it as a marinade for chicken or fish. For a cheeky twist, mix a spoonful into mashed potatoes for a gourmet side dish!
Can I use pre-minced garlic instead of roasting whole heads for this garlic spread recipe? Time is of the essence, you know!
While you can use pre-minced garlic, roasting whole heads really mellows out the flavour and adds a sweetness that you won't get otherwise. If you're short on time, try roasting the garlic at a higher temperature (around 400°F/200°C) for a shorter period (about 30-40 minutes), checking it frequently to prevent burning.
The flavour will be more pungent, so use it sparingly.
What other herbs can I add to my garlic spread for a twist? I love experimenting in the kitchen, I do!
Get your Heston Blumenthal on! Feel free to experiment with different herbs to create your own signature blend. Thyme, oregano, or basil would all work beautifully. A sprinkle of red pepper flakes can also add a nice kick. Consider adding a touch of smoked paprika to the spread for an amazing flavour.
Roasted Garlic Herb Spread A Taste Of Italy At H
Ingredients:
Instructions:
Nutrition Facts:
| Calories | 220 |
|---|---|
| Fat | 24g |
| Fiber | 2g |
