Pumpkin Pie: the Definitive Recipe for a Silky, Spiced Custard
- The Quest for the Perfect Pumpkin Pie: An Introduction
- The Science of Silken Texture: Why This Pumpkin Pie Recipe Excels
- Essential Components for the Ultimate Filling and Flaky Crust
- Baking Mastery: Step-by-Step Guide to the Definitive Pumpkin Pie
- Troubleshooting and Expert Secrets for Baking Success
- Making Ahead: Storage, Freezing, and Thawing Your Pumpkin Pie
- Recipe FAQs
- 📝 Recipe Card
The Quest for the Perfect Pumpkin Pie: An Introduction
That first breath of cool air mingled with the intense, fragrant spices of a fresh homemade pumpkin pie is pure magic. We are talking about the deep, nutty scent of roasted pumpkin meeting cinnamon and ginger, creating that uniquely warm aroma that instantly signals autumn and the holidays.
The goal here is that ultimate contrast: a flaky, structurally sound crust cradling an unbelievably smooth, almost velvety, filling.
People often treat pumpkin pie from scratch like some huge, overwhelming baking project, but I promise you, it's not. The filling, which is where all the flavor lives, comes together in about ten minutes flat.
This recipe relies on humble pantry staples like evaporated milk and canned purée, making it super cheap and accessible when you're already stressed about the main event. It’s honestly the easiest dessert to nail, provided you know the few critical, non-negotiable steps.
I have personally suffered through every major pumpkin pie failure imaginable, including the infamous "custard valley" crack and the dreaded raw middle. We learned from those dark times.
This guide strips away the fuss and gives you the core techniques that deliver a rich, beautiful, and silky pumpkin pie every single time. Let’s crack on.
The Science of Silken Texture: Why This Pumpkin Pie Recipe Excels
Getting that perfect, jiggly, smooth texture not grainy, not watery is a precise science, but don't worry, it's simple math. We are aiming for a classic pumpkin pie that tastes deeply spiced but also sophisticated, avoiding the overly sweet, gelatinous texture found in cheap diner versions.
The true secret is control: controlling the heat, controlling the dairy, and controlling the sugar blend.
Moving Past the Soggy Bottom: Our Structural Crust Promise
A soggy bottom is a culinary tragedy, an absolute heartbreak when you cut into that first slice. This is why we blind bake the crust. The crust has to be fully set and slightly golden before the wet filling even touches it.
If you skip this critical step, the moisture from the custard immediately soaks into the raw flour, guaranteeing a mushy, undercooked base that has zero structural integrity. We treat our crust with respect, giving it the time it needs.
Defining the “Silken” Standard: How We Achieve Ultimate Smoothness
The silky pumpkin pie texture is all about balancing the proteins and fats. Most recipes rely too heavily on evaporated milk or condensed milk alone, which results in a slightly firmer, sometimes grainy, texture. (Though if you prefer a sweeter, firmer style, you can check out my Traditional Pumpkin Pie With Sweetened Condensed M: The Silky, No-Fail Recipe !) We boost the fat content here with a little heavy cream. This extra cream cushions the egg proteins during baking, preventing them from seizing up or curdling, which results in that beautiful, almost crème brûlée like consistency.
Key Differences from Standard Diner Pies: The Bourbon Vanilla Factor
Most recipes call for standard vanilla extract, which is totally fine, but we are looking for depth here. Using Bourbon Vanilla (aged in bourbon barrels, often without alcohol) or a good quality dark rum extract adds a beautiful, complex layer of dark fruit and wood smoke.
It doesn't make the pie taste boozy, but it elevates the entire autumnal profile of the spices.
Optimizing the Egg-to-Dairy Ratio for Custard Stability
Eggs are the binders; they turn liquid milk into solid custard. If you use too many, the custard sets stiff and cracks upon cooling, tasting distinctly scrambled. We use exactly two large eggs for our 9 inch pie.
This amount provides the necessary structure to set the evaporated milk and cream without making the filling rubbery. It’s the perfect Goldilocks zone.
The Role of Brown Sugar and Molasses Notes in Deepening Flavor
Plain white sugar sweetens, but brown sugar flavors . Dark brown sugar, specifically, contains molasses, which adds rich, dark caramel notes that complement the pumpkin’s earthiness beautifully. We use a blend of both sugars here for balanced sweetness and deep complexity.
This is how you achieve that truly rich pumpkin pie flavor.
Balancing the Autumn Spice Blend (Cinnamon, Ginger, Nutmeg)
Forget using a teaspoon of pre-mixed spice and calling it a day. The trick is hitting the right ratios. We lead heavily with cinnamon and ginger, which are warm and bright, then follow with freshly grated nutmeg and a touch of cloves or allspice for depth and warmth. Under spiced pumpkin pie is flavorless.
Be bold with your blend; the pumpkin purée can handle it.
Essential Components for the Ultimate Filling and Flaky Crust
You simply cannot make a perfect pie without the right components. Quality matters when you only have a few ingredients to work with.
Fresh Purée vs. Canned: Which is Best for Ideal Texture?
This might surprise you: Canned pumpkin purée is superior for pie filling. It’s denser and has a much lower water content than anything you can achieve by roasting and puréeing fresh pumpkin at home.
The consistency is guaranteed, making the measurement of our liquid ingredients far more predictable. CRITICAL WARNING: Always make sure you buy 100% Pure Pumpkin, not pre-spiced pumpkin pie filling.
The Secret to the all-butter Structural Crust
I swear by an all-butter crust for the best flavor, hands down. We keep the butter chunks pea-sized when mixing the dough; these chunks melt in the oven, releasing steam that creates those flaky layers we love.
For extra reliability, I often rely on my mother’s method for a foolproof structure, very similar to this classic Old Fashioned Pumpkin Pie: The Best Velvety Classic Recipe .
Bourbon Vanilla: Enhancing Depth, Not Just Sweetness
As mentioned earlier, Bourbon vanilla is key to the deep flavor profile. But if you're in a pinch, don't sweat it. The flavor depth really is what distinguishes this homemade pumpkin pie from the basic versions.
Essential Dairy Notes (Evaporated Milk and Heavy Cream)
Evaporated milk is crucial because it’s shelf stable and highly concentrated, giving the custard density without adding excess fat. The heavy cream adds luxurious mouthfeel and richness, creating that signature silky pumpkin pie texture we talked about.
| Ingredient | Substitute (Must match texture/function) |
|---|---|
| Canned Pumpkin Purée | Pureed roasted sweet potato or butternut squash. |
| Evaporated Milk | Heavy Cream + 1 Tbsp powdered milk (if you must skip the richness of heavy cream). |
| Heavy Cream | Full fat canned coconut milk (it will add a subtle tropical note). |
| Dark Brown Sugar | A mix of white sugar and 1 tsp molasses. |
| All-Purpose Flour | gluten-free 1:1 baking blend (ensure it contains xanthan gum). |
Baking Mastery: step-by-step Guide to the Definitive Pumpkin Pie
Please read through these steps before starting. Patience and accurate measurements are your best friends here.
Blind Baking Techniques for a Flawless Foundation
- Prep the Dough: Roll out your chilled dough and fit it into the pie plate, crimping the edges nicely. Dock (prick) the bottom crust vigorously with a fork. Then, stick the whole thing in the freezer for 15 minutes. This firm-up phase prevents shrinkage.
- The Weight Check: Preheat your oven to a hot 400°F (200°C). Line the frozen crust with parchment paper and fill it all the way to the brim with pie weights or dried beans. This prevents the sides from collapsing.
- The Two-Step Bake: Bake the weighted crust for 15 minutes. Now, carefully lift the weights and parchment paper out. Return the crust to the oven for another 5– 7 minutes until the base looks dry and slightly set. This is the key to no soggy bottoms. Immediately reduce your oven temperature to 350°F (175°C).
Preparing the Custard Filling: Combining Wet and Dry Ingredients
- The Dry Mix First: In a medium bowl, thoroughly whisk your sugars, salt, and all those beautiful spices (cinnamon, ginger, nutmeg, cloves). Make sure there are absolutely no lumps left.
- The Wet Foundation: In a large bowl, whisk together the pumpkin purée, eggs, evaporated milk, heavy cream, and bourbon vanilla until perfectly smooth.
- Gentle Integration: Add the dry mixture to the wet mixture. Whisk gently until just combined— do not overmix or whip air into it. Excess air can lead to bubbling and eventual cracking during the bake.
The Gentle Bake: Controlling Temperature and Time
- Fill and Start: Place your warm, blind baked pie shell on a baking sheet. Pour the liquid filling straight into the shell.
- Initial Blast: Bake the pie at 350°F (175°C) for 15 minutes. This sets the outside edges quickly.
- Slow and Steady: Reduce the oven temperature to 325°F (160°C) and continue baking for 35– 45 minutes. If your edges are getting too dark, slide a foil crust shield or simple aluminum foil strips around the crimped edge.
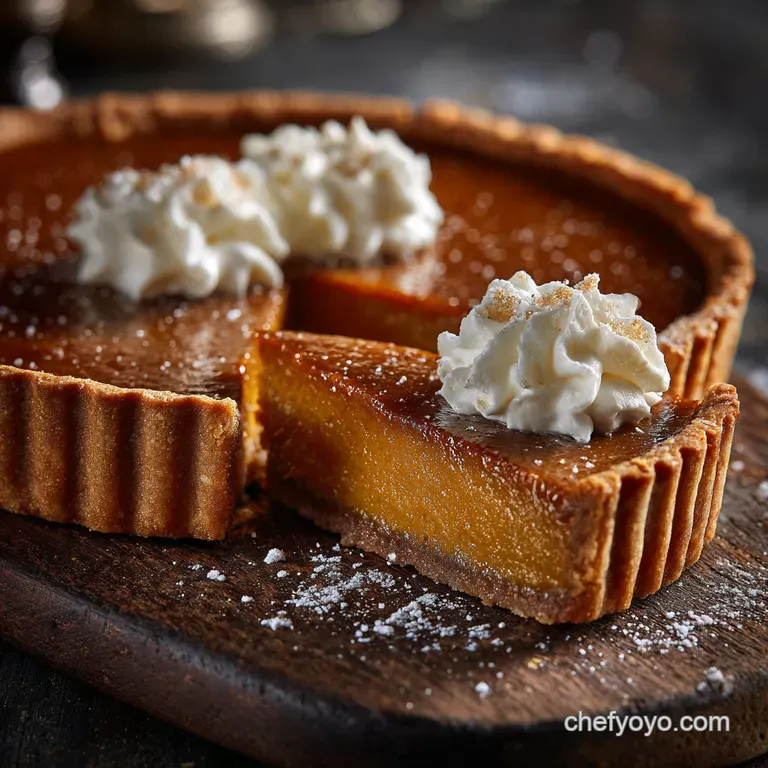
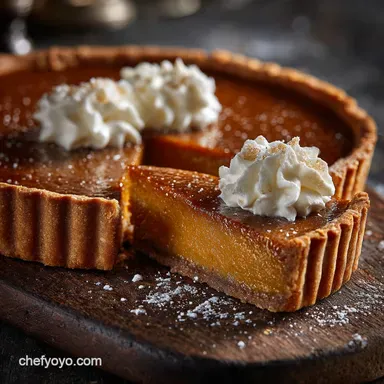
Testing for Doneness: The Center Jiggle Test
The pie is done when the outer 1 to 2 inches are puffed and set, but the very center still has a slight, gentle jiggle like unset gelatin. If you insert a knife one inch from the edge, it should come out clean. Do not wait for the center to stop moving entirely.
It will continue to cook and set beautifully as it cools.
Chef’s Note: My biggest pie mistake was always overbaking it "just to be sure." That is what ruins the texture, turning it granular instead of silken. Trust the wobble!
Troubleshooting and Expert Secrets for Baking Success
Preventing Cracks: Temperature Shock Management
A deep crack down the center is usually caused by two things: overbaking, which dries out the center, or temperature shock. When you remove the pie, do not place it directly into the cold refrigerator or on a cold countertop.
Let it cool on a wire rack at room temperature for a full hour before transferring it to the fridge. This gentle, slow cool down allows the custard to contract slowly and evenly.
Achieving Perfect Crust Edges and Fluting
When you crimp your edges, make them stand up proud and tall. Before you put the pie in the oven for the blind bake, brush the fluting lightly with a little milk or egg wash; this gives it a lovely, golden sheen. If the edges begin to brown too quickly, use that foil shield!
Protecting the edges is non-negotiable for a perfect finish.
What to Do If Your Pumpkin Pie Bottom is Still Damp
If you cut into it and realize the very bottom is still a bit damp (even after blind baking!), don't despair. If you haven't served it yet, place the slices (or the whole pie) back into the oven, set to the lowest temperature possible (around 250°F/120°C), and bake for 10- 15 minutes.
The low heat will gently dry out the crust without curdling the filling.
Making Ahead: Storage, Freezing, and Thawing Your Pumpkin Pie
Refrigerator Shelf Life for Unbaked and Baked Pies
Baked Pie: Once fully cooled and set, a baked pumpkin pie should be covered loosely with plastic wrap and stored in the refrigerator for 3 to 4 days. It actually tastes better the next day once the spices have really married.
Unbaked Pie: You can mix the filling 1 day ahead and keep it tightly sealed in the fridge. Do not pour it into the crust until right before baking, or you will certainly guarantee that soggy bottom!
Best Practices for Long Term Freezing
Pumpkin pie freezes brilliantly, which is ideal for holiday planning! Bake the pie completely and allow it to cool and set fully (in the fridge) before freezing. Wrap the pie tightly in two layers of plastic wrap, then an outer layer of aluminum foil. Label it with the date.
It will stay fantastic in the freezer for up to 1 month.
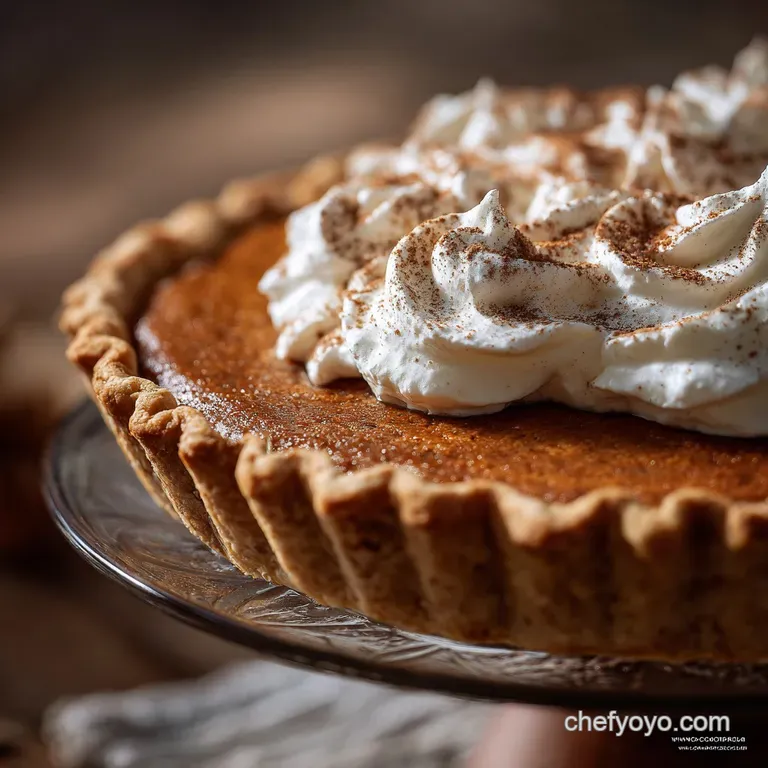
Recommended Toppings: From Whipped Cream to Candied Pecans
When it’s time to serve, always let the pie thaw slowly overnight in the refrigerator never on the counter. Reheating isn't necessary, but if you prefer a warm slice, heat it gently in a 300°F (150°C) oven for about 15 minutes. Top with generous clouds of fresh, lightly sweetened whipped cream, or maybe some candied pecans for crunch. If you're looking for a fun, casual twist, you might even enjoy making my Pumpkin Cheesecake Shooters: Easy No-Bake Mini Desserts for Fall Parties using any leftover purée and spices! It’s a totally different vibe, but equally delicious.

Recipe FAQs
How do I prevent my pumpkin pie crust from getting soggy (the dreaded "soggy bottom")?
The primary defense is blind baking (par-baking) the crust until it is lightly golden before adding the filling. Additionally, for maximum heat transfer, place the pie directly onto a preheated baking steel or the lowest oven rack.
This ensures the bottom cooks quickly and sets before the moisture from the filling penetrates the dough.
Why did my pumpkin filling crack while cooling?
A cracked filling is usually a sign of slight overbaking or cooling too rapidly. Overbaking causes the custard proteins to tighten excessively and shrink, leading to surface tears.
Ensure you remove the pie from the oven when the edges are set but the very center still jiggles lightly, then let it cool slowly at room temperature away from drafts.
Can I use fresh pumpkin purée instead of canned pumpkin?
Yes, but you must ensure the fresh purée is significantly drier than commercial canned pumpkin. Cooked fresh pumpkin should be thoroughly drained and strained through cheesecloth for several hours to remove excess water. If your purée is too moist, the pie will be watery and may not set properly.
What is the best way to tell if the pie is fully baked?
The pie is done when the perimeter, about two inches in from the crust, appears firm and slightly puffed, but the center still has a slight, soft wobble. If you use a thermometer, the internal temperature of the custard should register 175°F (80°C).
Avoid baking until the entire surface is completely motionless, as this indicates overbaking.
Can I make this recipe dairy-free or vegan?
For a dairy-free version, substitute the heavy cream with full fat canned coconut milk, ensuring you use the thick cream layer from the top of the can. Creating a vegan pie requires replacing the eggs, typically done using commercial egg replacers or silken tofu, although this will slightly alter the final texture and density of the custard.
How should I store pumpkin pie, and can I freeze leftovers?
Pumpkin pie must be stored in the refrigerator due to its custard base; cover it loosely and consume it within 3 to 4 days. To freeze, cool the baked pie completely, wrap it tightly in plastic wrap followed by aluminum foil, and it will keep for up to one month. Thaw overnight in the refrigerator before serving.
Should I cover the crust edges with foil while baking?
Yes, it is highly recommended to cover the exposed edges of the pie crust with strips of aluminum foil or a reusable silicone shield for the majority of the baking time. This prevents the edges from burning or getting overly dark before the slow setting custard filling is fully cooked through.
Remove the foil for the last 10 minutes if you prefer a richer golden color.
Silken Pumpkin Pie With Bourbon
Ingredients:
Instructions:
Nutrition Facts:
| Calories | 738 kcal |
|---|---|
| Protein | 13.5 g |
| Fat | 39.9 g |
| Carbs | 85.8 g |
