Turtle Lush: Decadent No-Bake Chocolate Caramel Layer Dessert
- The Ultimate Turtle Lush: A Decadent No-Bake Chocolate, Caramel, and Pecan Delight
- The Four-Layer Secret to the Perfect No-Bake Turtle Lush
- The Science of Indulgence: Why This Layered Dessert Is Irresistible
- Decadent Components: Essential Ingredients for Turtle Lush Bars
- Mastering the Assembly: Step-by-Step Guide to Your Turtle Dream Dessert
- Achieving Flawless Slices: Expert Tips and Troubleshooting
- Maximizing Shelf Life: Storage, Freezing, and Make-Ahead Planning
- Elevating the Experience: The Best Ways to Serve Turtle Lush
- Recipe FAQs
- 📝 Recipe Card
The Ultimate Turtle Lush: A Decadent No-Bake Chocolate, Caramel, and Pecan Delight
That first slice of Turtle Lush, right? The snap of the dense chocolate crust gives way to this ridiculously smooth, cool cream cheese layer, all topped with sticky, rich caramel sauce. Honestly, the aroma of toasted pecans mingling with all that chocolate is pure, comforting heaven; it just screams indulgence.
This recipe is a total lifesaver for company because it takes maybe 20 minutes of active work, tops, and the oven stays off. It’s entirely no-bake, which is a massive win when your kitchen is already hot or when you just don't have the time for complicated baking projects.
You can make it days ahead, and everyone will think you slaved over this showstopper.
I've made all the common mistakes over the years mostly rushing the chill time, which results in a gooey mess, trust me. So, I’m giving you the bulletproof version today, focusing on structural integrity and maximum flavor.
Let's crack on and make the absolute best, most structurally sound Turtle Lush bars you’ve ever had.
The Four Layer Secret to the Perfect No-Bake Turtle Lush
The Science of Indulgence: Why This Layered Dessert Is Irresistible
What Makes a Lush Dessert Different?
A "Lush" dessert is defined by its structure: a compacted crust base supporting alternating layers of cream cheese, pudding, and whipped topping. It’s essentially a throwback American potluck dessert designed for maximum textural contrast.
We are not aiming for cake; we are aiming for cold, creamy density that delivers intense flavor.
The History of the Famous Turtle Flavor Profile
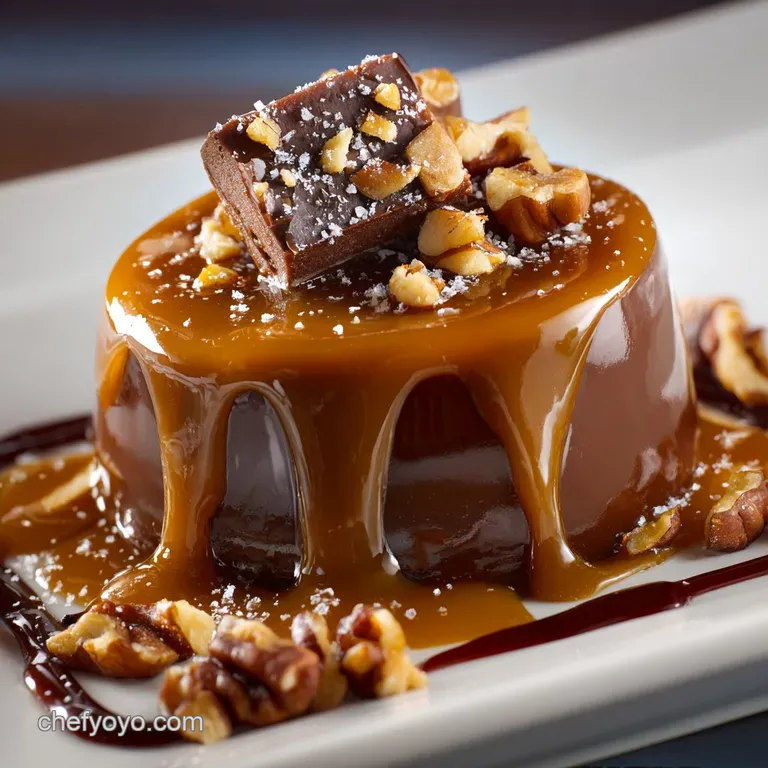
The Turtle flavor profile is classic, named after the famous candies that resemble a turtle pecans form the body, held together by caramel and coated in chocolate. Translating that profile into a layered dessert means focusing on three things: crunch from the nuts, extreme richness from the caramel and chocolate, and a cool, smooth finish.
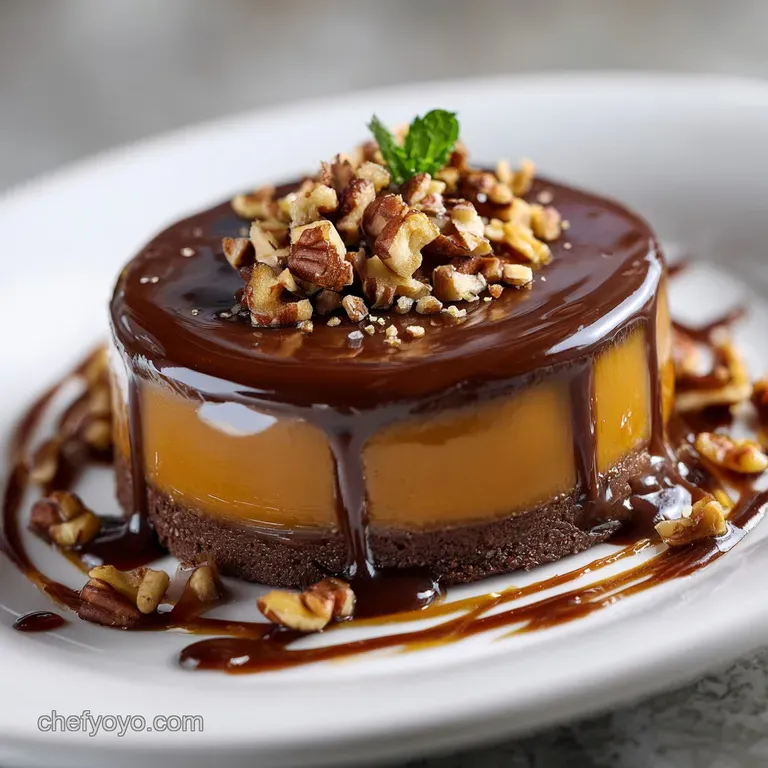
Quick Glance at the Four Structural Layers
This dessert relies on the perfect balance of four distinct layers working together. You have the crunchy, buttery chocolate crust on the bottom, followed by a thick, tangy cream cheese layer.
Next comes the intensely flavored chocolate and caramel pudding, and finally, the fluffy whipped topping crown, drizzled with more sticky sauce.
The Contrast Principle: Crunch vs. Creaminess
The secret sauce here, literally, is the battle between textures. If your cream cheese and pudding layers are velvety smooth, the crunch of the pecans and the density of the crust become even more satisfying. Don't skip toasting your pecans; raw nuts taste flat and ruin the contrast.
Achieving the Optimal Chill Time for Structure
Listen, this is the most critical step, and the one most home cooks ignore. If you rush the chill, the pudding layer is going to slide right off the cream cheese layer, and the slices will weep everywhere.
Four hours is the bare minimum, but chilling overnight is honestly the way to go for guaranteed structural perfection.
The Essential Role of Salted Caramel
Caramel is great, but salted caramel is the star. When you introduce a tiny bit of salt, it cuts through the cloying sweetness of the chocolate and cream cheese layers. Use a quality sauce for the drizzle, and don't be shy about adding a tiny pinch of flaky sea salt to your finished product.
Decadent Components: Essential Ingredients for Turtle Lush Bars
You don't need fancy tools, but you do need the right ingredients treated correctly. Remember, quality ingredients make a no-bake dessert taste incredible, so don't skimp on the good stuff. Here are my non-negotiable notes and substitution tips.
Choosing the Right Chocolate Crumb Base
I absolutely prefer chocolate sandwich cookies (like Oreos) because the cream filling adds a crucial bit of binding fat to the crust. You get a richer, deeper chocolate flavor this way.
| Ingredient | My Recommendation | Viable Substitute |
|---|---|---|
| Crust Base | Chocolate Sandwich Cookies | Graham Crackers + 1 Tbsp Cocoa Powder |
| Butter | Unsalted (you control the salt) | Salted, but reduce added salt elsewhere |
| Milk | Whole Milk, ice cold | 2% Milk (will result in a slightly softer set) |
Non-Dairy Whipped Topping Alternatives
Most recipes call for frozen whipped topping (the classic Cool Whip ). This is because it is incredibly stable and sets beautifully in the fridge. If you want to use fresh whipped cream, it will taste even better, but it won't hold structure quite as long.
Chef’s Note: If you use fresh whipped cream (heavy cream + sugar), whip it until it reaches stiff peaks. If it's too soft, the top layer will compress the layers underneath during storage.
The Perfect Pecan Prep: Toasting or Raw?
Raw pecans taste flat and boring; they belong in the trash, frankly. Always toast your pecans! Toast them quickly in a dry pan over medium heat for about three minutes until you start smelling a beautiful, nutty aroma. This releases their oils and massively amplifies their flavor.
If you don't have pecans, walnuts are a wonderful substitution and work great with the caramel.
Essential Notes on Cream Cheese Temperature
The cream cheese needs to be truly, fully at room temperature. Seriously, pull it out hours ahead. If it’s even slightly cold, you will end up with pesky little cream cheese lumps in your otherwise dreamy layer. We want smooth, creamy perfection, not cottage cheese texture.
Always use full fat cream cheese for the best structure and flavor payoff.
Mastering the Assembly: step-by-step Guide to Your Turtle Dream Dessert
We are talking about four distinct, beautiful layers. The key is spreading gently so you don't drag one layer into the next.
- Crush and Press the Base: Pulse your chocolate cookies in a food processor until fine, then mix with the melted butter until it looks like wet sand. Press this mixture firmly into the bottom of a 9x13 pan. Pack it tight —I use the bottom of a measuring cup to compress it until it feels rock solid.
- Chill the Crust: Pop that crust into the freezer for at least 15 minutes while you prepare the next layer. This quick set is crucial for preventing a crumbly slice later on.
- Whip the Cream Cheese: Beat the softened cream cheese until it's light and fluffy, then blend in the powdered sugar and vanilla. Scrape down the sides and beat until it's totally smooth.
- Fold in the Whipped Topping: Gently fold in just the first cup of thawed whipped topping until just combined. You want to keep as much air in that mixture as possible.
- Spread Layer Two: Carefully dollop the cream cheese mixture over the chilled crust and spread it evenly using an offset spatula. Be gentle; you don't want to disturb the crumb layer underneath.
- Make the Pudding: In a separate bowl, whisk together the instant chocolate and caramel pudding mixes with 4 cups of ice-cold milk. Whisk vigorously for about 3– 5 minutes until it thickens considerably. This must happen fast.
- Spread Layer Three: Gently pour the thickening pudding over the cream cheese layer. I often pour it over the back of a large spoon to slow the flow and prevent mixing.
- The Ultimate Chill: Cover the pan loosely and refrigerate for a minimum of 4 hours. If you’re busy, make this tonight and finish it tomorrow. The longer, the better.
Achieving Flawless Slices: Expert Tips and Troubleshooting
This is where the magic happens and where most people encounter issues. We need structure!
Phase 1: Preparing and Setting the Crust Foundation
Mistake I once made: I pressed the crust too lightly, and the edges just crumbled when I served it. Fix: Use serious force when pressing the crust. It should look perfectly flat and solid before it goes into the freezer.
Phase 2: Whipping the Creamy Dream Cheese Layer
If your cream cheese layer is too thin, the tangy flavor won't balance the sweetness of the pudding. Tip: Don't substitute with low-fat cream cheese; it contains more water and destabilizes the layer.
Phase 3: The Rich Chocolate Pudding Integration
Always, always use instant pudding and cold milk. I once accidentally used warm milk, thinking it would blend better, and it never set it was just liquid chocolate soup.
Crucial Fix: If your pudding hasn't set after five minutes of vigorous whisking with cold milk, you might have old pudding mix. Start over!
Phase 4: Final Layering and Caramel Drizzle Strategy
Wait until the very end, just before serving, to apply the final whipped topping, pecans, and drizzles. If you drizzle the caramel and chocolate hours ahead, the sauces can bleed slightly into the whipped cream, making it look dull.
The Secret to Clean Slices Every Time
You must, must, must use a hot knife. Run a long, sharp knife under hot water, wipe it completely dry, and then make a long, decisive cut. Wipe the knife clean and hot between every single slice. This technique melts a microscopic path through the caramel and chocolate, leaving behind professional looking squares.
Why Your Dessert Is Not Setting (Troubleshooting)
If your finished dessert is still soupy after four hours, the culprit is almost always the pudding. Either the milk wasn't cold enough, or you used "cook and serve" pudding mix instead of instant. There's no fixing a soft pudding layer once assembled, unfortunately, but you can serve it in parfait cups instead!
Maximizing Shelf Life: Storage, Freezing, and make-ahead Planning
Best Practices for Refrigerated Storage
Store any leftovers (if there are any!) in an airtight container in the refrigerator. If you are storing the full pan, cover it tightly with plastic wrap pressed directly against the whipped topping layer to prevent drying out or absorbing fridge odors.
It’s best within 3 5 days, though the crust softens a bit after day three.
Can You Freeze Turtle Lush?
You bet it freezes well! Assemble the Turtle Lush through the pudding layer (Step 10), then cover it tightly in plastic wrap and foil. It will keep for up to two months. Do not freeze the final whipped topping, pecans, or drizzles.
Thaw the dessert overnight in the refrigerator, then top and garnish just before serving.
Prepping the Dessert 24 Hours in Advance
This is the ideal way to handle Turtle Lush. Prepare the entire dessert the day before you plan to serve it, allowing it to chill overnight. The flavors meld perfectly, and the layers achieve maximum stability.
Elevating the Experience: The Best Ways to Serve Turtle Lush
Beverage Pairings: Coffee or Milk?
Given how incredibly rich this layered dessert is, you need something strong to cut through all that caramel and cream. A strong, dark roast coffee or a shot of espresso is perfect. For a fun adult pairing, a slightly acidic, cold drink works wonders we sometimes serve it with a Bourbon Peach Slush The Best Frozen Whiskey Cocktail Recipe to balance the heaviness.
Cutting Techniques for a Beautiful Presentation
Remember the hot knife trick! If you want truly perfect squares, chill the assembled dessert for 30 minutes after the final toppings are applied. This sets the drizzles slightly, preventing them from running when cut.
Essential Garnishes Beyond Pecans
While pecans are traditional, you can kick up the visual appeal. Try adding finely grated dark chocolate over the top or maybe some crushed up pieces of homemade Chocolate Turtles: Decadent Homemade Clusters with Perfect Caramel for an extra decadent crunch. A few fresh raspberries on the side also provide a necessary burst of color and tartness.

Recipe FAQs
How do I prevent the graham cracker crust from becoming soggy?
Soggy crust usually results from moisture seeping down from the layers above. Ensure your crust is firmly pressed and completely chilled before adding the cream cheese layer, and use the specified amount of melted butter to fully coat the crumbs before pressing them down.
Allowing the entire dessert to chill completely overnight also significantly helps maintain crust integrity.
How long does the Turtle Lush truly need to set for the best slices?
While the dessert will seem solid after four hours, for the cleanest slices and best texture, we recommend a minimum of 6 hours or preferably overnight chilling. This dedicated time allows the cream cheese and whipped layers to fully bind and solidify, ensuring they hold their shape beautifully when cut.
Can I use a substitute for pecans, or make this completely nut-free?
Yes, pecans are traditional but can easily be swapped for toasted walnuts or almonds, based on preference. If you require a completely nut-free dessert, use mini chocolate chips or finely crushed toffee bits instead of nuts for the topping, and ensure your crust is made solely of graham crackers or Oreos.
What is the best way to store leftovers, and how long will it last?
Turtle Lush keeps exceptionally well in the refrigerator for 3 to 5 days. Ensure you cover the dish tightly with plastic wrap or transfer leftovers to an airtight container to prevent the top layer from absorbing fridge odors or drying out.
Can I freeze the Turtle Lush dessert?
While technically possible, freezing is not highly recommended as the cream cheese layer and whipped topping tend to change texture, potentially becoming slightly grainy or separated upon thawing.
If you must freeze, slice individual portions first and thaw them slowly in the refrigerator for 24 hours rather than attempting to thaw the entire pan.
I prefer homemade; can I substitute the store-bought whipped topping (Cool Whip)?
Absolutely; you can easily use fresh, stabilized whipped cream for a richer flavor. Simply whip 3 cups of heavy cream until stiff peaks form, sweeten with powdered sugar to taste, and fold it into the cream cheese layer as directed for a beautifully airy, less artificial result.
My caramel sauce is running out the sides when I cut it. What went wrong?
This usually happens if the dessert hasn't been chilled sufficiently, or if the caramel sauce used was too thin. For the best result, use a high-quality, thicker caramel or dulce de leche, and ensure you let the dessert set overnight so the surrounding layers can better contain the sauce.
Turtle Lush No Bake Layer Dessert

Ingredients:
Instructions:
Nutrition Facts:
| Calories | 475 kcal |
|---|---|
| Protein | 6.0 g |
| Fat | 28.0 g |
| Carbs | 53.0 g |
