The Ultimate Cheeseburger Crunch Wraps a Proper Job
- Ditching the Soggy Bun Syndrome: Why We Need the Crunch Wrap Upgrade
- Mastering the Structural Integrity of the Ultimate Cheeseburger Crunch Wrap
- Sourcing Your Components: Essential Elements for the Perfect Diner Flavor
- Gear Up: Necessary Tools for Assembly and Grilling
- The Assembly Line: Step-by-Step Guide to Building the Cheeseburger Crunch Wrap
- Troubleshooting and Refinements for Your Wraps
- Customizing Your Crunch: Variations and Dietary Swaps for the Cheeseburger Crunch Wrap
- Recipe FAQs
- 📝 Recipe Card
Ditching the Soggy Bun Syndrome: Why We Need the Crunch Wrap Upgrade
Classic American cheeseburgers are the definition of comfort food, but their structural limitations often lead to a messy, wet disappointment halfway through eating. The traditional bun absorbs liquid from the meat, sauce, and toppings almost instantly, quickly losing all integrity and becoming compressibly mushy.
This Cheeseburger Crunch Wrap design is a revolutionary upgrade, taking all those essential flavors and locking them into a neat, handheld package. It provides a superior, textural eating experience that is perfect for casual dining or even when preparing Ground Beef Recipes For Dinner for the family.
Mastering the Structural Integrity of the Ultimate Cheeseburger Crunch Wrap
The true genius of this recipe lies in its engineering, creating a sturdy vessel that guarantees every bite delivers savory filling and satisfying crunch. We are solving the fundamental issue of moisture migration by building protective layers inside the wrap.
This technique ensures the finished product is robust enough for transport, offering a genuinely satisfying bite without the dreaded structural collapse.
Why Traditional Burgers Always Fail the Picnic Test
Traditional buns, even high-quality brioche, are fundamentally porous and cannot withstand the internal moisture generated by a hot, juicy patty and wet toppings. This structural failure means all the delicious filling often slides out the sides, turning what should be an easy meal into a messy juggling act.
By using a sealed Tortilla Wrap , we eliminate the weak points and ensure the flavorful components remain exactly where they should be. We are aiming for something sturdy and neat, yet still tasting exactly like a greasy spoon masterpiece.
The Engineering Behind the Perfect Seal
Success hinges entirely on creating internal barriers and an impenetrable external seal, using strategic layers of melted cheese as the 'glue' that holds everything together. The central crisp layer, typically a small, fried tostada, acts as the crucial moisture shield, separating the warm, wet seasoned beef from the fresh, cool toppings.
This critical technique ensures that the heartiest portion of filling is locked securely inside the griddled exterior, yielding a perfect texture contrast in every mouthful.
What Makes This Different from a Taco Bell Knock Off?
While the concept of a crunchy folded wrap is familiar, our Cheeseburger Crunch Wrap Recipe is fundamentally different because it strictly respects the tradition of a proper diner cheeseburger.
We prioritize deeply seasoned, high-quality ground beef and a thick, house made tangy sauce over mass produced speed and bulk ingredients. This recipe focuses on creating robust, nuanced flavor profiles that elevate the dish far beyond a simple convenience food structure.
Sourcing Your Components: Essential Elements for the Perfect Diner Flavor
Achieving the authentic classic diner taste requires precision in component selection, focusing heavily on fat content, seasoning, and crucial acidity. We are building a high impact flavor profile that balances the incredible richness of 80/20 ground beef with the necessary sharpness derived from quality dill pickles and classic American mustard.
This attention to detail elevates the experience from a simple stuffed shell to a genuinely satisfying, complex main course.
Related Recipes Worth Trying
- Crunchy Comfort Speedy Ground Beef Tostadas for a Weeknight Fiesta — Forget soggy takeaway These Speedy Ground Beef Tostadas deliver massive flavour and crunch in 35 minutes flat Perfect weeknight meals that are a doddle to make
- The Great British Christmas Crunch Snack Mix Recipe — Whip up this sophisticated Christmas Snack Mix featuring cranberry and rosemary Its buttery crisp and perfect for Christmas Food Gifts Full recipe inside
- Sunshine on a Tortilla Ultimate California Turkey Club Wraps — Ditch the dry sandwich These vibrant California Turkey Club Wraps upgrade the classic with herby aioli and creamy avocado Perfect healthy turkey wraps for lunch
Gear Up: Necessary Tools for Assembly and Grilling

Although the individual cooking stages for the ingredients are simple, having the correct equipment streamlines the assembly process, which is the most time sensitive phase of the entire operation.
A large non-stick flat griddle or wide skillet is absolutely essential for achieving that perfect, even, golden sear without tearing the delicate wrap structure. On top of that,, a sturdy, heat resistant metal spatula is necessary for applying even pressure to the wrap and flipping it confidently to achieve a tight seal.
Required Tools Checklist:
- Large Non-Stick Skillet or Flat Griddle (crucial for final sear)
- Sturdy Metal Spatula (for pressing and flipping wraps)
- Mixing Bowls (for sauce and seasoning prep)
- Meat Chopper/Masher (great for breaking up the beef finely)
The Patty Mix Blueprint: Ground Beef Selection and Seasoning
For maximum flavor and inherent juiciness, selecting an 80/20 fat-to-lean ratio for your ground beef is highly recommended for this recipe. The higher fat content renders during cooking, which helps evenly distribute the robust seasoning blend of salt, pepper, garlic, and onion powders throughout the filling.
Remember, draining the rendered fat meticulously after browning is critical, as excess grease is the primary cause of internal sogginess and structural failure.
Crispy Layers and Shells: Choosing the Right Tortilla Sizes
The structural success of the finished product depends entirely on using two distinct tortilla sizes in harmony: one large 12 inch burrito sized shell for the exterior fold, and one small 6 inch shell or tostada for the internal crunch layer.
The large exterior tortilla provides ample material needed for the tight, secure folding pattern that holds everything inside. Meanwhile, the rigid, crisp internal tostada delivers the signature snap and prevents the fresh toppings from touching the warm beef.
The Secret Sauce Formula: Replicating Classic Diner Spread
The iconic flavor of a true cheeseburger relies heavily on a perfectly balanced blend of creamy, sweet, and tangy elements in the signature spread. This essential mixture combines mayonnaise, ketchup, yellow mustard, and crucial pickle juice to effectively cut through the overwhelming richness of the seasoned beef.
Adding a small amount of smoked paprika introduces vital depth and complexity, preventing the sauce from tasting flat or one-dimensional.
Essential Cheeses for Optimal Meltdown
We utilize sliced American cheese not only for its classic nostalgic flavor but specifically for its unparalleled melting properties, which are critically important for structural integrity.
A slice is strategically placed directly beneath the beef layer to create a moisture proof barrier that functions as a fantastic internal 'glue.' This technique ensures optimal gooey texture and helps bind the entire structure firmly together during the final high heat searing stage.
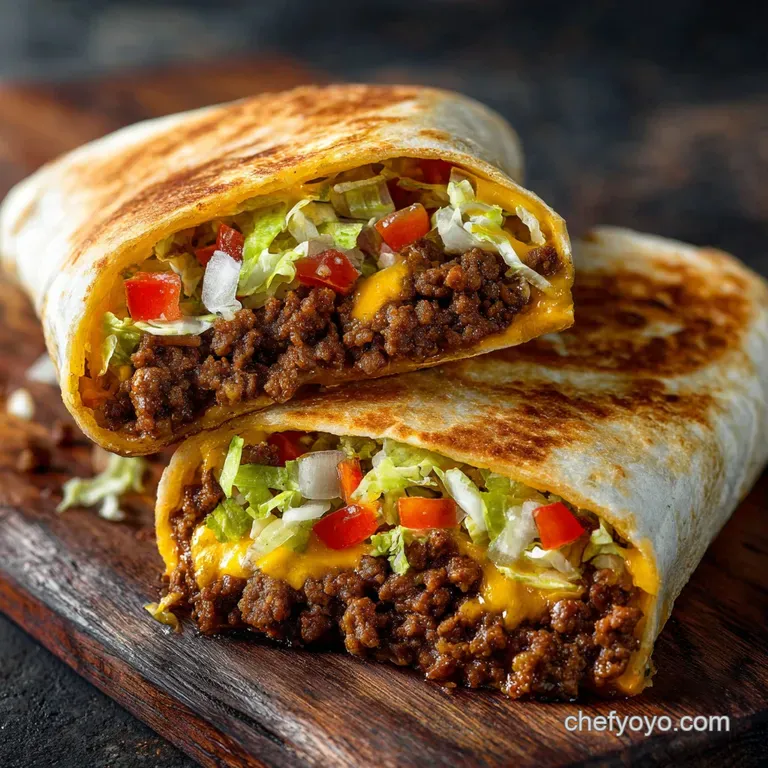
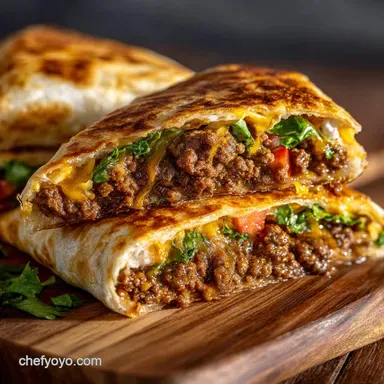
The Assembly Line: step-by-step Guide to Building the Cheeseburger Crunch Wrap
Successful wrap construction requires speed and precision, so ensure all components cooked beef, sauce, and fresh toppings are prepped and ready before you begin the layering process. Work one wrap at a time to keep your components properly centered and the final fold tight.
Phase One: Achieving the Crispy, Smashed Patty Base
Start by seasoning and aggressively breaking up the 80/20 ground beef mixture while it cooks in the skillet over medium high heat. The objective is a finely textured crumble with deep caramelization, not large chunks, which allows for smooth, even distribution within the wrap.
Once the beef is fully browned, ensure every single drop of rendered fat is drained immediately, as moisture mitigation is your top priority.
Layering Logic: The Order of Operations for Maximum Flavor Dispersion
Proper layering is the ultimate difference between a great Cheeseburger Crunch Wrap and a messy failure, so begin by placing the foundational cheese 'glue' right on the large tortilla.
Next comes the warm, seasoned beef, followed immediately by the rigid tostada crunch layer, acting as a crucial internal barrier. The fresh, cold toppings, like the pickles and shredded lettuce, and the tangy sauce must always sit on top of this moisture barrier to maximize temperature contrast and maintain their crispness.
The Crucial Fold: Sealing the Crunch Wrap Against Blowouts
Begin your fold by pulling one edge of the large tortilla tightly up and over the center stack, securing the contents firmly against the inner structure. Continue working clockwise, creating small, neat, overlapping pleats until the entire filling is completely covered and sealed into a tight hexagon shape.
The very final folded section must tuck snugly underneath the starting pleat; this critical tension prevents the wrap from unravelling when it hits the hot griddle.
The Final Sear: Getting That Golden Brown Exterior
Preheat your griddle or skillet to a medium setting and add a generous pat of butter or a light coating of oil for both flavor and superior coloring. Always place the assembled wrap onto the heat seam side down first; the pressure and heat from the pan will immediately lock the fold into place permanently.
Cook the wrap for two to three minutes per side, applying gentle but firm pressure with your spatula until the exterior is a beautiful, deeply golden brown and audibly crisp.
Troubleshooting and Refinements for Your Wraps
If you encounter issues during cooking, they almost always relate back to two factors: too much internal moisture or insufficient folding tension. Learning to adjust for these factors ensures perfect results every time you prepare this meal.
If your wraps are unwrapping during the searing stage, it indicates that the initial fold lacked essential tension; try using a slightly wider tortilla next time for more overlap. Alternatively, hold the wrap down firmly with your spatula for the first sixty seconds to help the seam fuse together.
For those focused on making Healthy Meals To Cook , remember that meticulous fat drainage from the beef greatly reduces overall calorie count and improves crispness.
Customizing Your Crunch: Variations and Dietary Swaps for the Cheeseburger Crunch Wrap
This recipe is highly adaptable, allowing for easy substitutions based on dietary needs or flavor preferences, whether you are preparing a quick family meal or planning a weekend feast. The structural method remains the same, which means the crunch is guaranteed, regardless of your filling.
Prep Ahead: Tips for Batch Cooking and Freezing
The cooked beef filling and the tangy secret sauce are excellent candidates for advance preparation and can be stored separately in airtight containers for up to three days. If you plan on batch making and freezing, assemble the wraps completely, but intentionally skip adding the fresh, moist lettuce and tomatoes.
Freeze the completed, un-seared wraps wrapped tightly in plastic film, then cook them directly from frozen on the griddle for 5– 7 minutes per side.
Avoiding the Steam Trap: How to Maintain Maximum Crunch
After expertly searing the Cheeseburger Crunch Wrap , do not make the mistake of immediately wrapping it tightly in foil or placing it in a closed container.
This action instantly traps residual steam released from the warm beef, which quickly migrates to the crisp tortilla exterior, rendering it soft and chewy. Allow the wrap to rest uncovered for at least thirty seconds after removing it from the heat before slicing to ensure the maximum external crunch is maintained.
Making It Vegetarian: Plant Based Patty Substitutes
This recipe structure proves highly versatile for various plant based alternatives while maintaining its satisfying textural integrity. Try substituting the ground beef with a finely chopped, sautéed mixture of mushrooms and onions, or use a high-quality meat free crumble that has been thoroughly seasoned.
For a firmer vegetarian option, cubed and grated halloumi cheese works wonderfully, providing a salty, meaty texture that perfectly complements the rich and tangy burger sauce.
Nutritional Profile Snapshot
While inherently a comfort food, simple component swaps allow this recipe to fit various dietary needs, perfect for those monitoring intake or seeking specific macros. Using 90/10 lean beef and high fiber Tortilla Wraps decreases the overall fat and boosts fiber content, making it a viable option for those counting calories.
A cheeseburger crunch wrap weight watchers friendly version can utilize low-fat cheese and light mayonnaise in the sauce, significantly reducing the point value without sacrificing much flavor.
For a low-carb alternative, a cheeseburger crunch wrap keto version is easily achieved by swapping the standard flour tortilla for a low-carb tortilla and skipping the small amount of fresh tomato.
| Component Swap | Benefit | Dietary Focus |
|---|---|---|
| Low-Carb Tortilla | Significantly reduces total carbohydrate load | Cheeseburger Crunch Wrap Keto |
| 90/10 Ground Beef | Lowers total saturated fat content | Weight Watchers / General Health |
| Air Fryer Finishing | Reduces the need for added cooking oil | Cheeseburger Crunch Wrap Air Fryer |

Recipe FAQs
My wrap keeps unravelling! What's the secret to sealing the Cheeseburger Crunch Wrap properly?
The folding needs to be tight think of it as wrapping a proper pasty, overlapping the edges precisely and firmly as you go. Crucially, always start griddling the assembled wrap seam side down; the heat acts as a glue, sealing everything shut before it can unravel.
I can’t get hold of those small tostadas; is there a good stand-in for the crunch?
Absolutely. If you can’t source the small tostadas, simply use sturdy, lightly crushed nacho cheese chips (like Doritos) sprinkled over the beef for an extra flavour boost and texture. Alternatively, you can crisp up a regular small soft taco tortilla in a dry frying pan until it is rigid and brittle.
Can I prep these ahead of time for a quicker dinner, or do they have to be cooked immediately?
You can certainly prep the seasoned beef and the tangy burger sauce up to two days in advance; keep them chilled until needed. However, you must assemble the wraps just before griddling, as the moisture from the fresh lettuce and tomatoes will make the tortilla damp and prone to splitting if left waiting.
This looks like proper indulgence are there any easy ways to lighten the calorie load or switch up the fillings?
To lighten it up, swap the 80/20 beef for lean ground turkey or chicken and use a reduced fat mayonnaise in the sauce, perhaps even increasing the mustard to maintain the tang. For a twist, ditch the beef entirely and use seasoned sautéed mushrooms and halloumi for a brilliant vegetarian take.
What heat level should I use when griddling, and how do I avoid a burnt tortilla?
Maintain a medium heat, ensuring the pan is hot enough to achieve that lovely golden crust without scorching the flour. Use a spatula to press down firmly on the wrap as it cooks; this ensures excellent contact with the pan and guarantees even colouring and a properly melted interior.
Ultimate Cheeseburger Crunch Wrap Recipe
Ingredients:
Instructions:
Nutrition Facts:
| Calories | 795 kcal |
|---|---|
| Protein | 16.2 g |
| Fat | 29.3 g |
| Carbs | 34.4 g |
| Fiber | 3.5 g |
| Sugar | 3.0 g |
| Sodium | 1029 mg |
