Chicken Parmesan: Get the Ultimate Crispy Crust, Guaranteed
- The Ultimate Crispy Chicken Parmesan: Golden, Cheesy, and Utterly Delicious
- The Science of Crispness: Why This Chicken Parmesan Recipe Delivers
- Essential Components for Authentic Chicken Parmesan
- Mastering the Method: Step-by-Step Instructions for the Perfect Dish
- Troubleshooting Your Chicken Parmesan: Expert Tips and Avoiding Soggy Results
- Prepping Ahead and Storing Leftovers Safely
- Classic Pairings: What to Serve Alongside Your Meal
- Recipe FAQs
- 📝 Recipe Card
The Ultimate Crispy Chicken Parmesan: Golden, Cheesy, and Utterly Delicious
There is nothing in the world that smells better than a pan of real Pollo alla Parmigiana bubbling away in the oven. That sound that sizzle, followed by the rich, acidic aroma of tomato and the nutty scent of melted cheese it’s pure magic.
The ideal cutlet should shatter the moment your fork touches it, followed by impossibly tender meat inside.
Honestly, this isn't just a recipe; it's a lifesaver. It looks completely impressive, making it perfect for date night, but the process is straightforward enough to pull off on a frantic Tuesday evening.
You get maximum comfort food impact without spending three hours in the kitchen, and it’s miles better than anything you’ll get delivered.
I used to struggle with the dreaded soggy bottom, the bain of all Parmigiana cooks. But after countless experiments (and maybe one or two kitchen fires), I’ve nailed the technique. Let’s stop talking and crack on with the ultimate crispy chicken parm that you’ll be making forever.
The Science of Crispness: Why This Chicken Parmesan Recipe Delivers
What Makes This Version Truly Crispy?
Panko breadcrumbs are the undisputed champion here, offering far superior texture than standard fine crumbs. Panko’s flaky structure creates better surface area, giving you that perfect, shatteringly crisp texture we desperately want.
The true secret sauce (pun intended) is the immediate transfer to a wire rack after frying. This small step allows air to circulate underneath the cutlets, preventing trapped steam from ruining the crust while it drains.
Defining Pollo alla Parmigiana: History and Comfort
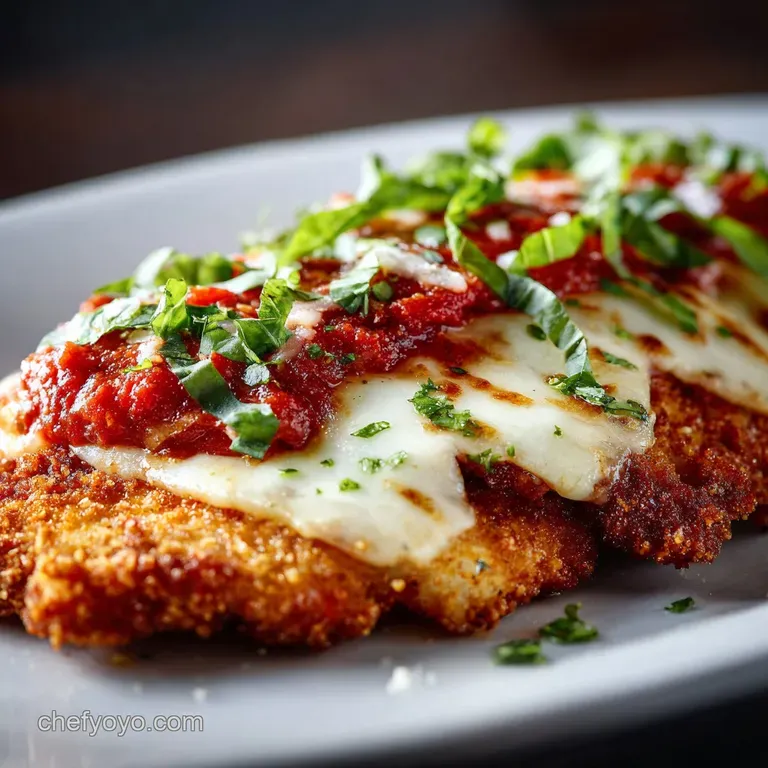
Chicken Parmesan is classic Italian American cuisine, a brilliant adaptation of eggplant parm. It takes a simple fried cutlet, smothers it in rich marinara, and blankets it with luscious mozzarella and aged Parmesan. This dish transcends regions; it's simply hearty, soulful food.
I always make this recipe when I need a serious hug in a bowl, usually served with a side of buttered pasta.
Equipment Checklist: Tools for Success
You absolutely need a heavy bottomed skillet for even heat distribution cast iron is brilliant if you have one. A meat mallet is also non-negotiable for tenderizing the cutlets. If you don't have a mallet, you can carefully use a heavy rolling pin or even the bottom of a wine bottle, but watch those fingers!
The Double Dredge Technique Explained
Why flour first? Because flour acts like high performance Velcro for the egg wash. That initial dusting creates a dry, porous layer. The egg sticks perfectly to the flour, and then the sticky egg holds onto the Panko like a stubborn child. This layered system is exactly why the crust doesn't fall off in the hot oil.
Achieving Maximum Tenderness Before the Fry
Pounding the cutlets thin does two essential things: it physically tenderizes the tough muscle fibers, and more importantly, it ensures uniform thickness. Aim for ¼ inch thick.
Uniformity is key because it guarantees the cutlet cooks completely in the pan just as the crust achieves its perfect golden brown color, avoiding dry, overcooked spots.
Balancing the Marinara Sauce Acidity and Richness
The sauce shouldn't compete with the chicken; it should complement it. If your favorite store-bought marinara tastes a little too sharp (high acidity), stir in a tiny pinch of sugar and maybe a knob of butter. The butter adds richness, and the sugar mellows the tomatoes.
Use a good quality sauce, seriously it makes a difference!
Essential Components for Authentic Chicken Parmesan
Sourcing the Perfect Cutlets: Thickness Matters
Start with boneless, skinless breasts. I always recommend slicing the breast horizontally first to create two thinner pieces before you even grab the mallet. You want them thin enough so they cook quickly and evenly without steaming up in the pan, which would ruin the crust.
The Ideal Breadcrumb Mixture: Panko vs. Traditional
As I mentioned, Panko wins every single time. Don't even try using fine breadcrumbs unless you enjoy a dense, soft crust; we are aiming for maximum crunch. We mix the Panko with finely aged Parmesan, dried oregano, and a solid dose of garlic powder for a crust that is explosive with savory flavor.
Dairy Details: Selecting Mozzarella and Aged Parmesan
Use low-moisture, whole milk mozzarella. The fresh stuff packed in water is gorgeous for salads, but it will release too much liquid in the oven, potentially soaking your crisp crust. The aged Parmesan should be freshly grated, not the green shaker stuff; the flavor profile is miles apart.
Quick Ingredient Swaps and Allergy Notes
We all run out of ingredients sometimes, or maybe we just need a lighter option. Don't worry, I've got you covered.
| Ingredient | Quick Swap or Substitution |
|---|---|
| All-Purpose Flour | Use finely ground cornstarch or a certified gluten-free flour blend. |
| Eggs | Whisk together 1/4 cup milk or water with 1 tablespoon of olive oil. |
| Mozzarella | Use provolone slices for a sharper, more complex flavor profile. |
| Panko Breadcrumbs | Crushed cornflakes give an unbelievably crispy alternative if Panko is missing. |
Mastering the Method: step-by-step Instructions for the Perfect Dish

Preparation Phase: Pounding, Seasoning, and Dredging the Cutlets
First, preheat your oven to 400°F (200°C). Then, spread about a cup of your marinara sauce evenly across the bottom of your baking dish this layer keeps the cutlets from sticking. Slice and pound your seasoned cutlets to that even ¼-inch thickness.
Set up your three station dredging line: Flour, Egg, and the seasoned Panko mixture.
Pan-Frying Technique: Oil Temperature and Timing
Pour the oil into your heavy skillet until it’s about a half inch deep. Heat the oil over medium high heat until it reaches 350°F (175°C); you can test it with a pinch of Panko it should sizzle immediately. Fry the cutlets in batches of two or three so you don't drop the oil temperature.
Fry for about 3– 4 minutes per side until they are deeply golden brown.
Chef's Note: After frying, transfer the cutlets immediately to a wire cooling rack set over a baking sheet. This is the single most important step to avoid a soggy bottom crust, letting air move freely underneath.
Assembling the Layers and Baking to Molten Perfection
Place the drained cutlets directly into the sauced baking dish. Spoon about two tablespoons of marinara sauce over the top of each cutlet, just enough to moisten without drowning the crust. Layer the mozzarella and dust heavily with your extra grated Parmesan.
Bake for 15– 20 minutes until the cheese is beautifully melted, bubbly, and slightly browned.
Resting and Serving the Finished Entrée
When the oven timer goes off, resist the urge to immediately grab your plate. Remove the baking dish and let the Parmesan rest on the counter for five minutes. This resting time allows the sauce and melted cheese to stabilize, ensuring that when you slice into it, all the delicious moisture stays exactly where it should be.
Troubleshooting Your Chicken Parmesan: Expert Tips and Avoiding Soggy Results
The Critical Importance of Preheating the Sauce
Putting cold sauce onto a hot, freshly fried cutlet is a one-way ticket to soggy town. The cold marinara instantly drops the temperature of the crust, causing steam and condensation. Instead, warm your marinara gently on the stove while the cutlets fry.
How to Fix Breadcrumbs Falling Off (The Wet Hand/Dry Hand Rule)
This is the most common frustration, but the fix is simple: the wet hand/dry hand rule. Use your left hand only for the wet ingredients (eggs and wet chicken). Use your right hand only for the dry ingredients (flour and Panko).
This prevents your hands from turning into sticky, clumpy messes that pull the coating off the chicken.
Temperature Control: Ensuring the Cutlets are Cooked Through
Since we pounded them thin, the cutlets cook very quickly. You want them mostly cooked in the pan the internal temperature should hit around 155°F (68°C) before the cheese layer goes on.
The remaining oven time will push the internal temperature safely to 165°F (74°C) without drying the meat out. If you overcook them in the pan, they will be shoe leather after baking.
Maximizing Flavor: Resting Time After Baking
That five minute rest period isn't just for cooling; it's vital for maximizing flavor. It allows the cutlets to finish carrying over heat, and it gives the mozzarella layer time to set up slightly.
If you cut into the Parmigiana immediately, the cheese runs everywhere, and the chicken releases its precious juices onto the plate.
Prepping Ahead and Storing Leftovers Safely
Can You Freeze Uncooked Breaded Cutlets?
Yes, this is a phenomenal meal prep hack! Once you have breaded the cutlets using the flour/egg/Panko stations, lay them flat on a sheet pan lined with parchment paper. Flash freeze until they are solid (about 2 hours), then stack them in a freezer bag or airtight container.
They keep beautifully for up to three months. Crucially, do not thaw them before cooking. Fry them straight from frozen, adding about two minutes per side.
Best Method for Reheating Day-Old Parmigiana
Microwaving is a crime against crispness, turning your beautiful crust into a chewy sponge. The best way to reheat is in the oven or an air fryer set to 350°F (175°C). Place the leftovers on a small, foil lined tray and bake for 10– 15 minutes until the cheese is melted and the crust is revitalized.
Classic Pairings: What to Serve Alongside Your Meal
Chicken Parmesan is rich and savory, so it pairs perfectly with simple, slightly acidic or fresh sides.
- The Classic Italian American: Serve over a generous bed of spaghetti or linguine, allowing the delicious marinara sauce to coat the noodles.
- The Fresh Green: A simple, peppery Arugula (Rocket) Salad dressed with lemon juice, olive oil, and a shaving of Parmesan is the perfect counterpoint to the richness of the cheese.
- A Lighter Carb Option: If you are trying to cut back on pasta, try serving this atop a bowl of spaghetti squash or alongside some Chicken Enchilada Stuffed Zucchini Boats - The Healthy Low Carb Dinner Swap which uses zucchini prepared in a fantastic, lighter way.
- Looking for a Different Flavor Next Time? If you love easy, flavorful weeknight proteins, you should definitely check out my sticky Grilled Bourbon Chicken: The Best Sticky, Smoky Glaze Recipe recipe it’s totally different, but equally delicious.

Recipe FAQs
Why did my crispy crust turn soggy after baking?
The crust gets soggy primarily due to moisture migration from the sauce and steam trapped underneath the cutlet. To combat this, ensure the chicken is very crispy before adding the sauce, and apply only a moderate amount of sauce directly onto the crust before baking, reserving extra sauce for the side.
Additionally, baking the cutlets on a wire rack set over a baking sheet allows air circulation, preventing the bottom from steaming.
Do I really need to pound the chicken breasts flat?
Yes, pounding is a crucial step for the best results. It ensures a uniform thickness (ideally about 1/4 to 1/3 inch), guaranteeing the chicken cooks evenly and quickly without drying out the thinner parts.
Flat cutlets also maximize the surface area for the crispy breading and contribute to the dish's overall tenderness.
Can I freeze prepared Chicken Parmesan for later?
Yes, Chicken Parmesan freezes very well, especially the fully cooked portions. Wrap individual baked portions tightly in heavy duty aluminum foil, then place them in a freezer safe bag or container; they will last up to 3 months.
Thaw overnight in the refrigerator and reheat in a 350°F oven until heated through, adding fresh cheese near the end.
What is the best cheese substitute if I don't have fresh mozzarella?
Provolone is an excellent substitute for mozzarella, offering a similar, satisfying melt and a slightly tangier flavor profile that complements the marinara. If you need a lower moisture option that browns well and has a lovely stretch, a blend of Fontina and Monterey Jack works very nicely.
How can I make this dish healthier by baking the chicken instead of frying?
You can certainly bake the chicken, but you will need to take steps to maximize crispiness. Preheat your baking sheet coated with olive oil in a 400°F (200°C) oven, then bake the breaded cutlets for about 15-20 minutes, flipping halfway, before adding the sauce and cheese.
Be careful not to overbake, as this method is more prone to drying out the meat.
How do I know when the chicken cutlets are fully cooked and safe to eat?
The safest and most reliable way to check for doneness is to use an instant read thermometer inserted into the thickest part of the cutlet. The internal temperature must register 165°F (74°C) to be considered safe.
Visually, the meat should look completely opaque white, and the juices should run perfectly clear.
Can I bread the chicken cutlets ahead of time?
Yes, you can bread the chicken cutlets up to 12 hours ahead of time, which can save valuable preparation time. Place the breaded cutlets on a wire rack set over a baking sheet, cover them loosely with plastic wrap, and refrigerate them until ready to fry.
This resting period actually helps the coating adhere better, resulting in a sturdier, crispier crust when cooked.
Ultimate Crispy Chicken Parmesan

Ingredients:
Instructions:
Nutrition Facts:
| Calories | 352 kcal |
|---|---|
| Protein | 7.0 g |
| Fat | 22.0 g |
| Carbs | 36.0 g |
