Lucky Lollipops: Zesty Lemon Cake Pop Treat
- Introducing the Zesty Lemon & Almond "Lucky Lollipops": A Modern Twist
- The Science of Texture: Why Almond Sponge is Superior for Cake Pop Confections
- Essential Components for Your Zesty Lollipop Base
- Crafting the Perfect Confection: A Step-by-Step Guide to Making Lucky Lollipops
- Troubleshooting and Expert Advice for Flawless Results
- Maximizing Freshness: Storing and Freezing Your Lemon Treats
- Elegant Serving Ideas and Delightful Flavor Pairings
- Recipe FAQs
- 📝 Recipe Card
Introducing the Zesty Lemon & Almond "Lucky Lollipops": A Modern Twist
When you open the container, that sharp, bright aroma of fresh lemon zest hits you immediately. It’s followed by the sweet, nutty comfort of baked almond, promising a bite that is both refreshing and deeply satisfying.
These Zesty Lemon and Almond "Lucky Lollipops" are creamy on the inside, surprisingly tender, and coated in a crisp shell of vanilla rich white chocolate. Honestly, they’re utterly addictive.
I call them Lucky Lollipops because they always feel like a celebration, whether you are hosting a huge party or just need a little boost on a dreary Tuesday.
Forget spending seventy dollars at the fancy bakery; this Lucky Lollipops recipe is incredibly budget friendly, demands only basic baking skills, and creates a dozen perfect, professional looking treats.
They are the definition of high reward for minimal fuss, and trust me, they make the most Creative Lollipop Gifts .
So listen up, because we aren’t messing around with sticky hard candy today. We are leveling up the humble cake pop using quality ingredients and razor sharp temperature control.
If you’ve ever wondered how to get that perfectly smooth coating on your Homemade Lollipops , you are in the right place, friend.
The Science of Texture: Why Almond Sponge is Superior for Cake Pop Confections
Most standard cake pop recipes call for boxed cake mix, which is fine, but it often results in a mushy texture that cracks easily under a cold coating. This Citrus Cake Pops recipe flips the script by starting with a dedicated almond sponge.
The ground almonds (or almond meal) are the secret weapon here.
Almond flour contains healthy fats that prevent the sponge from drying out during baking. This results in a structurally robust crumb that holds its shape beautifully when mixed with the lemon binder.
It’s dense enough to sit happily on a stick but remains moist when you take a bite, giving you the Best Homemade Lollipops texture possible. Don't skip the ground almonds; they are crucial for structural integrity.
Introduction Detail 1
This process of baking, crumbling, and rebinding creates a dense, fudgy interior, which is exactly what we want. We need that structure to support the beautiful white chocolate shell. Think of it less as cake and more as a sophisticated confectionary dough.
Introduction Detail 2
The high fat content of the cold cream cheese in the binder also plays a critical role. When combined with sharp lemon juice and cold cake crumbs, the mixture quickly sets in the fridge, making the rolling and dipping process infinitely easier.
Temperature control is your biggest ally in making perfect Lollipop Confections .
Essential Components for Your Zesty Lollipop Base
Ingredients Detail 1
You need high-quality ingredients to make these simple treats truly shine. Please measure your ingredients accurately, especially the ground almonds, and ensure your butter and eggs are at room temperature for the sponge. This is a very robust recipe, but precision always helps.
- For the Almond Sponge: Unsalted butter, granulated sugar, large eggs, all-purpose flour, baking powder, fine sea salt, ground almonds, whole milk, and 1 Tbsp of fresh lemon zest.
- For the Lemon Binder: Full fat cream cheese (cold!), powdered sugar, and fresh lemon juice.
- For the Coating: Quality white chocolate, a tiny bit of coconut oil (trust me), lollipop sticks, and shiny sprinkles for that Lucky Candy effect.
Chef's Note: Always use quality white chocolate for the coating. Cheap candy melts often have a strange waxy texture, and they definitely won't give you the clean, crisp snap you want in a high end treat.
Ingredients Detail 2
Did you realize halfway through the recipe that you are missing a key item? Don't panic! Most of these ingredients are easily swapped out in a pinch.
| Ingredient | Viable Substitution | Why It Works |
|---|---|---|
| Ground Almonds | Finely ground walnuts or hazelnuts | Provides necessary fat and structure. |
| All-Purpose Flour | Certified gluten-free baking blend | Maintains the necessary gluten structure for the cake (no need to increase liquids). |
| Cream Cheese | Full fat mascarpone cheese | Offers similar richness and firmness when chilled, often sets faster. |
| White Chocolate | high-quality vanilla candy melts | Easier to melt and temper for novice dippers. |
| Coconut Oil | Vegetable shortening (Crisco) | Thins the chocolate coating for a smoother, less gloppy finish. |
Crafting the Perfect Confection: A step-by-step Guide to Making Lucky Lollipops
Instructions Detail 1: Baking and Mixing the Base
- Bake the Cake Base: Preheat your oven to 350°F (175°C). Cream the butter and sugar for a full 5 minutes until fluffy; this incorporates air, which we will destroy later, but it makes a better crumb. Beat in the eggs one at a time, then stir in that beautiful lemon zest. Combine the dry ingredients separately, then alternate adding the dry mix and the milk to the batter. Bake for about 30 minutes, or until a skewer comes out clean.
- Crumble Time: Let the cake cool completely this is non-negotiable! Once cool, crumble the entire thing into a large bowl. You want fine, even crumbs, like sand, with absolutely no large lumps left behind.
- Binder & Chill: Beat the cold cream cheese, icing sugar, and lemon juice until smooth. Add this binder to the crumbs and mix thoroughly, pressing it together until it forms a cohesive, slightly sticky "dough." Cover the bowl and chill this mixture for a minimum of 60 minutes. It should feel quite firm when ready.
Instructions Detail 2: Rolling and Dipping
- Roll and Firm: Roll the chilled mixture into uniform balls, aiming for about 1.5 ounces each, and place them on a parchment lined tray. Put them back in the fridge while you get the chocolate ready. You need them icy cold.
- Melt the Chocolate: In a deep, narrow mug (this is vital for easy dipping), melt the white chocolate and coconut oil in 30 second bursts in the microwave, stirring well after each one. The oil helps thin the chocolate so it drips off nicely. You want it smooth and liquid, but not steaming hot.
- Secure the Sticks: Dip the tip of your Lollipop stick into the melted chocolate, then insert it about halfway into a chilled cake ball. Repeat until all sticks are "glued" in place. Chill again for 15 minutes to let that glue set hard.
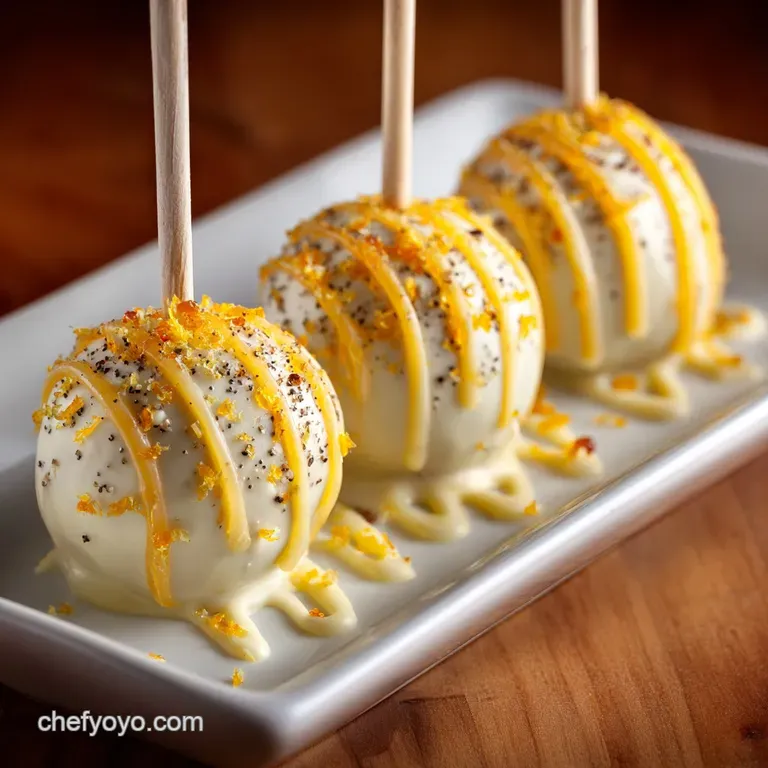
- The Dip: Holding the secured stick, dip the ball fully into the melted chocolate. Pull it straight out, letting the excess coating drip off by tapping the stick gently against the side of the mug. Immediately sprinkle with your gold or silver glitter for that Celebratory Cake Pops finish!
- Set Upright: Place the wet lollipop into a Styrofoam block or dedicated stand to set. Let them sit at room temperature or chill for 30 minutes until the shell is completely hard and crisp.
Troubleshooting and Expert Advice for Flawless Results
We all mess up sometimes! I once dipped cake pops that weren't cold enough, and they instantly slumped right off the stick into the hot chocolate a tragedy I wish upon no one. Here are the most common pitfalls and how to avoid them.
Mistake 1: The Cake Ball Slumps or Cracks
- The Fix: This almost always means the cake ball was not cold enough, or the chocolate was too hot. Ensure your cake balls have chilled for at least 90 minutes total before the final dip. If the chocolate feels hot to the touch, let it cool for a minute or two before dipping.
Mistake 2: The Coating is Lumpy and Too Thick
- The Fix: Your chocolate is too viscous. Did you use the coconut oil? If not, melt in another half teaspoon. A thinner chocolate means a thinner, smoother coating, which looks professional and tastes better. Remember to really tap that stick against the side of the bowl to encourage the excess to run off.
Mistake 3: The Lollipop Falls Off the Stick
- The Fix: You didn't allow the initial chocolate "glue" to set properly. The purpose of that first dip is strictly to bond the cake to the stick. Always chill the lollipops for 15 minutes after gluing the sticks in place. This little step saves so much heartache.
Maximizing Freshness: Storing and Freezing Your Lemon Treats
These Easy Lollipops keep beautifully, which makes them perfect for prepping ahead of a big event. Honestly, they taste even better the day after they are made, once the flavors have fully melded inside that crisp shell.
Once the chocolate shell is completely set, store the Lucky Lollipops in an airtight container in the refrigerator for up to 5 days. Layer them gently, separated by parchment paper, to prevent them from sticking or damaging the coating.
But does it freeze well? You bet. Place the fully set lollipops on a tray and flash freeze them until hard (about 1 hour). Then, transfer them to a freezer bag or container, removing as much air as possible. They keep well for up to 3 months.
To serve, thaw them overnight in the refrigerator, then bring them to room temperature for about 15 minutes before eating. Never try to reheat a cake pop; just let it naturally warm up on the counter.
Elegant Serving Ideas and Delightful Flavor Pairings
Additional_Info Detail 1: Flavor Variations
These lollipops are delicious as is, but you can easily tweak the sponge and coating for a whole new confectionary experience.
- Lime and Ginger Luck: Swap the lemon zest and juice for lime, and add ½ teaspoon of ground ginger to the sponge batter. Coat in dark chocolate for a delicious kick.
- Pistachio Dream: Replace half the ground almonds with ground pistachios. Use vanilla extract instead of lemon in the binder. Coat in white chocolate and decorate with finely chopped pistachios.
- Salted Caramel Swirl: Use a standard vanilla sponge base. Make the binder with caramel sauce and cream cheese. Swirl a little extra caramel into the white chocolate before dipping for a beautiful marbled effect.
Additional_Info Detail 2: Display Tips
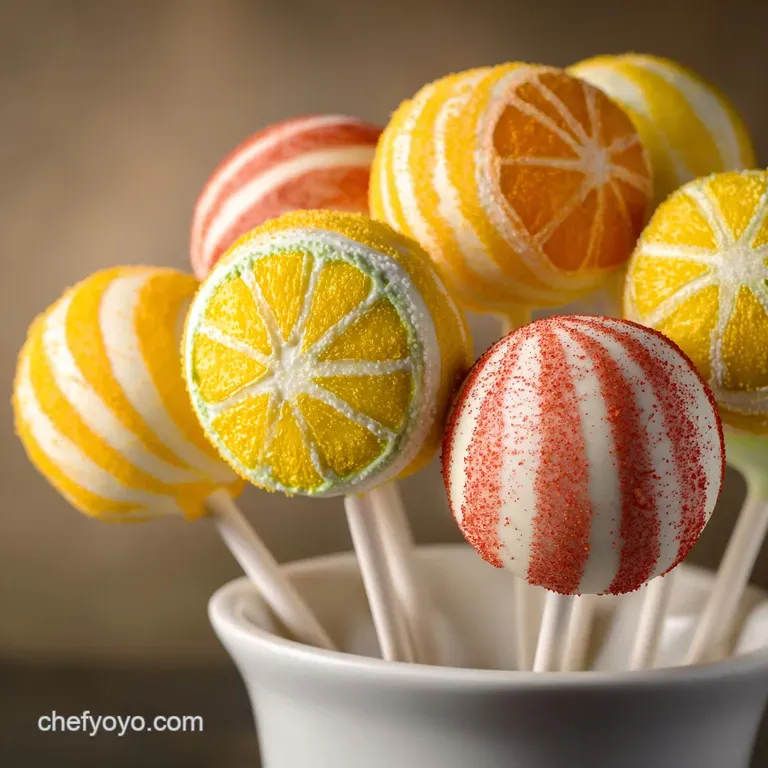
Presentation is key, especially when you are making Creative Lollipop Gifts . Displaying them standing up makes a huge visual impact.
You can buy dedicated cake pop stands, but a gorgeous and simple hack is to use a large glass vase or jar filled with granulated sugar or rock salt. Stick the Lollipop Confections directly into the sugar, which provides the perfect support and makes it look like they are standing in glittery snow.
Serve these bright, zesty treats alongside a sparkling glass of iced tea or a sharp, cold glass of Prosecco. The citrus notes truly sing with something bubbly.

Recipe FAQs
Why is my chocolate coating cracking or sliding off the lollipops?
Cracking is most often caused by a rapid temperature change (thermal shock). Ensure the formed cake pops are chilled until firm, but not frozen solid, before dipping. If the coating is too thick, thin it slightly with a teaspoon of neutral oil (like coconut or grapeseed) to add elasticity and prevent it from sliding off the cold cake.
My lollipop base is too sticky and won't hold a round shape. What is the correction?
The consistency relies on the precise ratio of cake crumb to binder. If the mixture is too sticky, it indicates excess binder; incorporate one tablespoon of finely ground almond flour or powdered sugar to absorb the moisture.
If the mixture is too wet, chill it in the freezer for 15 minutes before handling, as cold fats are easier to shape.
How far in advance can I prepare these, and what is the best storage method?
Finished, coated lollipops can be stored in an airtight container at cool room temperature for up to three days, or refrigerated for up to one week. If they are refrigerated, always let the lollipops sit at room temperature for about 15 20 minutes before serving to ensure the cake base is moist and tender.
Can I substitute the lemon zest for a different citrus fruit or flavoring?
Yes, the bright flavor profile works beautifully with other citrus. You can substitute the lemon zest with lime or orange zest for a slightly warmer profile. If you choose an extract (like almond or vanilla), be mindful that almond flavor is strong, so use half a teaspoon or less to avoid overpowering the delicate cake base.
What is the secret to ensuring the lollipop sticks stay firmly inserted?
You must use the coating as an adhesive. Dip the tip of the lollipop stick approximately half an inch into the melted chocolate, then immediately push it into the center of the cake ball.
Chill the cake pops for 10 minutes after inserting the sticks to allow the internal chocolate "glue" to set before fully dipping the pop.
How can I make the Lucky Lollipops suitable for a gluten-free diet?
Since the base is already rich in almond flour, you can substitute the all-purpose flour with an equal amount of a certified gluten-free flour blend that contains xanthan gum for structure. Ensure all decorative additions, such as sprinkles, are also certified gluten-free to maintain safety.
Can I freeze the finished lollipops?
While possible, freezing can sometimes cause the chocolate coating to develop small stress cracks or minor condensation when thawing. If you choose to freeze, place them in a single layer in an airtight container for up to two months.
Thaw them slowly in the refrigerator overnight before letting them reach room temperature just prior to serving.
Zesty Lemon Lucky Lollipops
Ingredients:
Instructions:
Nutrition Facts:
| Calories | 240 kcal |
|---|---|
| Fat | 14 g |
| Fiber | 1 g |
