Classic Homemade Orange Candy Recipe
- Time: Active 20 minutes, Passive 1 hours 30 mins, Total 1 hours 50 mins
- Flavor/Texture Hook: Tangy, sun ripened citrus with a shimmering, crystalline crunch
- Perfect for: Holiday gifting, artisanal cocktail garnishes, or a rustic charcuterie addition
- Mastering This Classic Homemade Orange Candy Recipe
- Why This Artisanal Confection Works
- Critical Metrics for Sugaring Success
- The Alchemy of Citrus Elements
- Essential Equipment for the Kitchen
- Mastering the Slow Infusion Process
- Solving Common Candy Making Pitfalls
- Creative Flavor and Ingredient Variations
- Scaling Guidelines for Large Batches
- Debunking Sugar Confectionery Myths
- Storage and Sustainability Guidelines
- Plating Levels for Every Occasion
- Recipe FAQs
- 📝 Recipe Card
Mastering This Classic Homemade Orange Candy Recipe
The aroma of simmering citrus and warm sugar hitting a cold kitchen is a sensory trigger I'll never tire of. It reminds me of a tiny confectionery shop I stumbled upon in a back alley of Florence, where the windows were lined with jars of glowing, candied fruits that looked more like stained glass than food.
I remember the shopkeeper telling me that the secret wasn't the sugar, but the water or rather, how many times you changed it.
When I first tried a classic homemade orange candy recipe at home, I was impatient. I rushed the process, simmered them once, and ended up with peels so bitter they were practically inedible. It was a rustic disaster. But after years of trial and error, I've learned that patience is the primary ingredient.
This isn't just a snack, it's a preservation of the season's brightest flavors, concentrated into a velvety, chewy treat that feels like a tiny luxury.
We're going to treat these oranges with the respect they deserve. We aren't just boiling them in syrup, we're performing a slow, artisanal exchange where the bitterness of the pith is replaced by a shimmering sweetness.
Whether you're using these to top a decadent cake or eating them straight from the jar, the result is a sophisticated sweet that puts store-bought versions to shame. Trust me, once you see that first slice turn translucent against the light, you'll be hooked.
Why This Artisanal Confection Works
The Physics of the Pith: Triple blanching utilizes thermal leaching to systematically extract bitter neohesperidin compounds from the white pith while keeping the essential oils in the zest intact. This ensures a mellow, floral flavor profile rather than a sharp, astringent one.
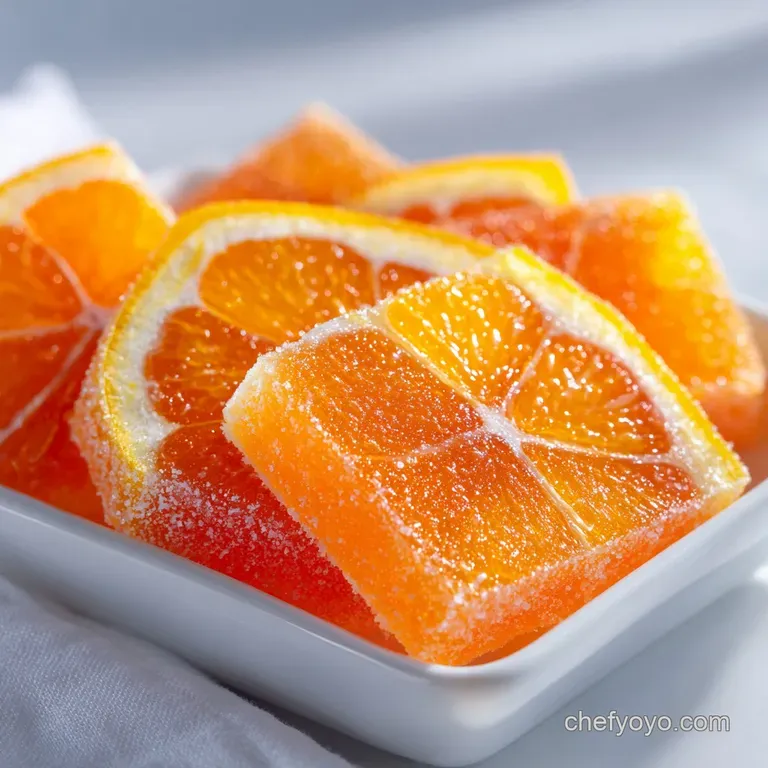
Osmotic Pressure Balance: By simmering the fruit in a precise 1:1 sugar to water ratio, we encourage controlled osmosis where sugar molecules slowly displace the water within the fruit cells. This prevents the fruit from collapsing and results in that sought after translucent, stained glass appearance.
Crystallization Inhibition: The addition of light corn syrup introduces glucose, an interfering agent that prevents the sucrose molecules from bonding together into gritty crystals. This keeps the internal texture of your classic homemade orange candy recipe smooth and velvety rather than grainy.
Pectin Stabilization: Gentle heat during the long simmer helps the natural pectins in the orange peel to set slightly. This creates a structural "shatter" when you first bite through the dried sugar crust, followed immediately by a soft, yielding center.
| Method | Total Time | Texture | Best For |
|---|---|---|---|
| Traditional Simmer | 1 hours 50 mins | Tender, translucent, deep flavor | Gifting and snacking |
| over High heat Rapid Boil | 45 minutes | Tougher peel, opaque center | Quick kitchen scraps |
| Cold Steep Method | 48 hours | Very soft, intensely floral | High end pastry work |
The traditional method remains the gold standard for anyone seeking a professional result. While it takes longer, the slow migration of sugar into the fruit fibers ensures the candy doesn't become leather like or unpleasantly tough once dried.
Critical Metrics for Sugaring Success
To achieve the finest results with this classic homemade orange candy recipe, we must observe specific physical checkpoints. Precision in temperature and timing separates a sticky mess from a shelf stable artisanal masterpiece.
- Internal Temperature: The sugar syrup should reach a steady 190°F to 200°F during the simmer phase to ensure proper infusion without carmelization.
- Visual Transparency: The white pith of the orange must transition from solid white to a semi clear, "cloudy glass" state before the heat is turned off.
- Curing Duration: A full 24 hour air dry period is non negotiable for the sanding sugar to adhere without weeping or becoming tacky.
The Alchemy of Citrus Elements
Choosing your fruit is the most important decision you'll make today. I always reach for heavy bottomed Navel oranges because their thick skins provide a substantial, "meaty" candy. If you're feeling adventurous, this technique works beautifully for other citrus, much like how a Buckeye Candy Recipe relies on the right ratio of fat to sugar for that iconic texture.
| Ingredient | Science Role | Pro Secret |
|---|---|---|
| Navel Oranges | Structural base and aromatic oils | Pick fruit with bright, unblemished, "pebbly" skin for maximum oil content. |
| Granulated Sugar | Preservative and sweetener | Use a high purity white sugar to ensure the syrup remains crystal clear. |
| Light Corn Syrup | Texture stabilizer | This prevents the candy from becoming "crunchy" or gritty over time. |
Essential Citrus Foundation Components
- 4 Large Navel Oranges (approx. 800g): Why this? Navels are seedless and have a thick, flavorful rind ideal for candying.
- 3 cups (720ml) Filtered Water: Why this? Filtered water prevents mineral off flavors from affecting the delicate citrus notes.
Simple Syrup Matrix Essentials
- 3 cups (600g) Granulated White Sugar: Why this? Sugar provides the osmotic pressure needed to preserve and sweeten the fruit.
- 2 tbsp Light Corn Syrup: Why this? Acts as an "interfering agent" to keep the syrup smooth and glossy.
Finishing with Sanding Sugar
- 1/2 cup (100g) Sanding Sugar: Why this? Larger crystals provide a better "shatter" and don't dissolve into the fruit as easily.
| Original Ingredient | Substitute | Why It Works |
|---|---|---|
| Navel Oranges | Grapefruit | Thicker rind; provides a sophisticated, bitter sweet contrast. |
| Light Corn Syrup | Honey | Adds floral notes. Note: Will darken the color and add a distinct honey flavor. |
| Sanding Sugar | Granulated Sugar | Works fine, but the finish will be less "sparkly" and more prone to melting. |
When substituting, keep in mind that thinner skinned fruits like lemons or limes will require a shorter simmer time. The goal is always that translucent look, regardless of the fruit's starting thickness.
Essential Equipment for the Kitchen
You don't need a laboratory, but a few specific tools will make this classic homemade orange candy recipe much more manageable. I highly recommend a wide, shallow stainless steel pan rather than a deep pot.
This allows the orange slices to lay in a single or double layer, ensuring they all get equal time in the sugar bath without being crushed by the weight of others.
- Wide Stainless Steel Skillet: Provides maximum surface area for even evaporation.
- Wire Cooling Rack: Essential for airflow during the 24 hour curing process.
- Parchment Paper: To catch the inevitable sugar drips under the cooling rack.
- Sharp Mandoline or Chef's Knife: For achieving those consistent 1/4 inch slices.
Chef's Tip: If you find your slices are sticking to the wire rack, give the rack a very light spray with neutral oil before laying the fruit down. It makes a world of difference when it's time to peel them off.
Mastering the Slow Infusion Process
Phase 1: Bitterness Extraction
- Slice the 4 Large Navel Oranges into 1/4 inch rounds. Note: Consistency here ensures all pieces candy at the same rate.
- Boil a large pot of plain water and drop the slices in for 2 minutes. until the water turns slightly yellow.
- Drain the slices and immediately plunge them into an ice bath. Note: This shocks the fruit and keeps the colors vibrant.
- Repeat the boil and ice bath two more times with fresh water. until the pith loses its sharp bite.
Phase 2: Sugar Infusion
- Combine 3 cups Filtered Water, 3 cups Granulated White Sugar, and 2 tbsp Light Corn Syrup in your wide skillet.
- Dissolve the sugar over medium heat, stirring gently. until the liquid is completely transparent.
- Arrange the blanched orange slices in the syrup in a mostly single layer.
- Simmer on the lowest heat setting for 1 hours 30 mins. until the rinds look translucent and the syrup has thickened.
Phase 3: The Curing
- Transfer the slices carefully to a wire rack set over parchment paper.
- Dry the slices at room temperature for 24 hours until they are tacky but no longer dripping.
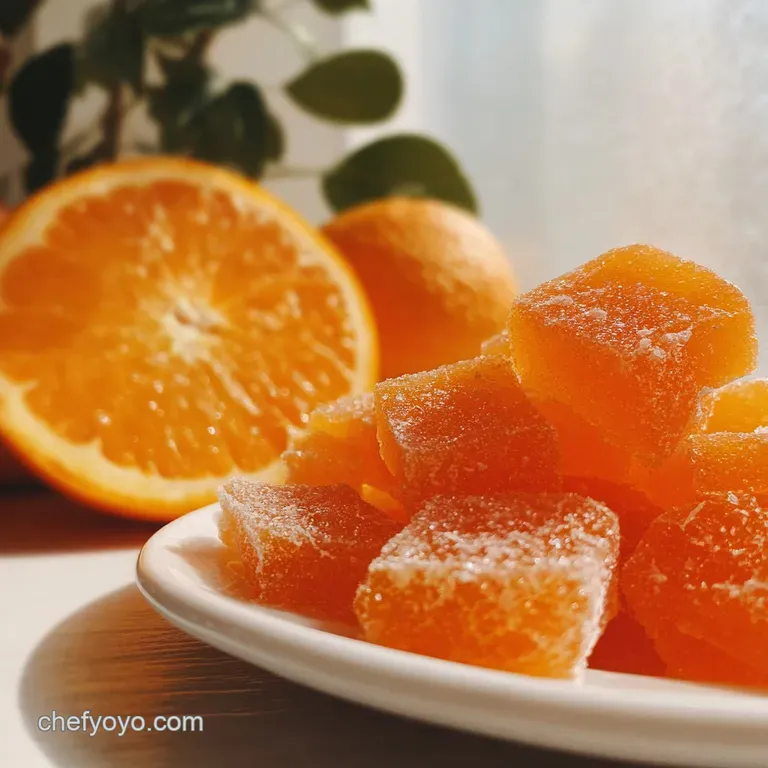
- Coat each slice in 1/2 cup Sanding Sugar. until they are fully encrusted and shimmering.
Solving Common Candy Making Pitfalls
Making candy is as much about managing moisture as it is about sugar. If your kitchen is particularly humid, you might find the drying process takes longer. I once tried making these during a summer thunderstorm and they stayed sticky for three days!
If that happens, you can pop them into a very low oven (around 150°F) for an hour to help them along.
Resolving Cloudy Fruit Centers
If the centers of your oranges look opaque rather than clear, it usually means the sugar hasn't fully penetrated the cell walls. This happens if the simmer was too short or the heat was too high, causing the outside to "seal" before the inside was ready.
Fixing a Tacky Texture
A candy that stays unpleasantly sticky even after drying often lacks enough corn syrup or wasn't simmered long enough to reach the correct concentration. You can try a second toss in sanding sugar to help create a barrier.
| Problem | Root Cause | Solution |
|---|---|---|
| Slices are tough | Simmered too fast | Keep the heat at a bare simmer; never a rolling boil. |
| Sugar falls off | Slices were too dry | Lightly mist with a tiny bit of water before dredging in sugar. |
| Syrup is gritty | Sugar crystallized | Add an extra teaspoon of corn syrup and stir less during the simmer. |
Achieving Uniform Candy Slices
✓ Use a mandoline for perfectly even slices (safety guard is a must). ✓ Slice off the "poles" of the orange first to get a flat starting surface. ✓ Don't discard the ends candy them anyway for a "rustic" chef's snack.
✓ Use Navel oranges specifically to avoid the hassle of fishing out seeds. ✓ Ensure your knife is freshly sharpened to prevent "sawing" through the delicate flesh.
Creative Flavor and Ingredient Variations
Once you've mastered the classic homemade orange candy recipe, the world of citrus confections opens up to you. You can apply this exact same logic to lemon peels, lime rounds, or even thick cut pomelo rinds.
For a truly Mediterranean vibe, try adding a few sprigs of fresh rosemary or a couple of star anise pods to the simmering syrup to infuse the fruit with herbal notes.
If you enjoy the contrast of fruit and richness, these are spectacular when dipped halfway into dark chocolate, much like the flavor profile found in a Cranberry Bliss Bars recipe. The bitterness of the cocoa perfectly balances the intense sweetness of the candied orange.
The Spicy Maya Twist
Add 1/2 teaspoon of cayenne pepper and a cinnamon stick to the syrup. The resulting "heat" is subtle but builds beautifully, making these a fantastic pairing for a mezcal based cocktail.
Decadent Dark Chocolate Dip
After the slices have dried for 24 hours but before the sugar coating, dip half the slice into tempered dark chocolate. Place on parchment until set. This creates a "polished" look perfect for high end gifting.
Blood Orange Color Variation
Substitute the Navels for Blood Oranges. The resulting syrup and candy will be a deep, moody crimson. Note: Blood oranges have thinner skins, so reduce the simmer time by 15-20 minutes.
Scaling Guidelines for Large Batches
When scaling this recipe down for a small treat, you can easily halve everything. Just ensure you use a smaller pan so the syrup still covers the oranges. If you're scaling up for holiday gifts, things get a bit more complex.
- Scaling UP (2x-4x): Do not simply double the liquid. Increase the sugar and water by 1.5x for every doubling of fruit. You want enough syrup to cover, but too much will slow down the concentration process. Work in batches to avoid overcrowding the pan, which can lead to torn slices.
- Scaling DOWN (1/2): Use a small saucepan and reduce the simmer time by about 10 minutes, as the smaller volume of liquid will evaporate more quickly.
Debunking Sugar Confectionery Myths
A common misconception is that you need to boil the syrup to a "hard ball" stage to make these candies. That's actually incorrect for this specific classic homemade orange candy recipe. We are aiming for a saturation of the fruit, not a hard candy coating.
If you boil it too hard, you'll end up with orange flavored lollipops rather than tender, chewy fruit.
Another myth is that you can't reuse the leftover syrup. In reality, that leftover orange infused syrup is liquid gold. It's essentially a concentrated orange simple syrup, which is the secret ingredient in a world class Orange Crush Recipe. Save it in a glass jar in the fridge for your next cocktail night.
Storage and Sustainability Guidelines
Storage: These candies are incredibly shelf stable due to the high sugar content. Keep them in an airtight container at room temperature for up to 4 weeks. If you live in a very humid climate, the refrigerator is a better bet to keep them from getting sticky, where they will last for 2 months.
Freezing: You can freeze these for up to 6 months. Layer them between sheets of parchment paper so they don't fuse together. Thaw at room temperature for an hour before serving; they might need a fresh toss in sanding sugar if they look dull.
Zero Waste Tip: Don't throw away those blanching waters! The first boil is too bitter, but the second and third boils can be cooled and used to water acid loving plants like azaleas or blueberries.
Plus,, any "ugly" broken slices can be chopped up and folded into muffin batter or used as a rustic garnish for morning oatmeal.
Plating Levels for Every Occasion
Presentation is where your artisanal effort really shines. Depending on the setting, you can style these oranges to look like a rustic home treat or a high end restaurant dessert.
| Level | Styling Technique | Visual Impact |
|---|---|---|
| Simple | Piled high in a Mason jar with a twine ribbon | Rustic, approachable, "homemade" charm |
| Polished | Laid flat on a white marble board with dark chocolate shards | Sophisticated, modern, contrast heavy |
| Restaurant | Propped vertically in a swirl of mascarpone or atop a tart | Architectural, elegant, high end pastry style |
Elegant Charcuterie Board Companion
Place three or four shimmering slices next to a sharp, aged cheddar or a creamy gorgonzola. The acidity and sweetness cut through the fat of the cheese in a way that is absolutely velvety on the palate.
Gilded Cocktail Glass Garnish
Cut a small slit into a slice and perch it on the rim of an Old Fashioned or a Negroni. As the sugar dissolves into the drink, it adds a changing layer of complexity to the cocktail. It's a much more "artisanal" touch than a simple twist of raw peel.

Recipe FAQs
How to make candied orange at home?
Slice the oranges thinly, then triple blanch the peels in boiling water, shocking them in ice water after each boil. Next, simmer the blanched peels gently in a 1:1 sugar syrup (with a touch of corn syrup) until translucent, about 90 minutes.
Finally, dry them completely on a rack for 24 hours before tossing them in sanding sugar for a crystalline finish.
Why do we blanch orange peel multiple times before candying it?
Yes, multiple blanching steps are essential for quality. This thermal leaching process systematically extracts the harsh, bitter compounds (neohesperidin) from the white pith without destroying the essential oils in the zest. This leaves you with a sweet, tender fruit rather than an astringent one.
What is the best sugar for candied oranges?
Use a mix of granulated white sugar and light corn syrup. The granulated sugar forms the primary syrup base, but the corn syrup is critical as it acts as an interfering agent to prevent the final product from crystallizing and becoming grainy.
How long do homemade candied oranges last?
At room temperature, they last up to 4 weeks in an airtight container. Due to their high sugar content, they are well preserved, but storing them in the refrigerator will extend their quality to about 2 months, especially in humid climates.
Can I substitute honey for corn syrup in the candying process?
Yes, you can substitute honey, but it changes the final flavor profile. Honey will add a distinct floral note and may cause the syrup to darken slightly during the long simmer. If you enjoy rich, complex flavors, this works well, similar to how sugar reacts in our Classic English Toffee Recipe.
What is the required thickness for the orange slices?
Aim for a consistent 1/4 inch thickness for optimal results. Uniform thickness ensures that all the pieces absorb the syrup at the same rate during the long simmer. If slices vary, some will be chewy while others might become leathery.
Is it true that I must use a wide, shallow pan?
No, this is a common misconception, but it is highly recommended. While you can use a deep pot, a wide, shallow skillet allows the orange slices to lay in a single layer, ensuring even syrup saturation and evaporation. Overcrowding prevents proper infusion.
Classic Homemade Orange Candy

Ingredients:
Instructions:
Nutrition Facts:
| Calories | 139 kcal |
|---|---|
| Protein | 0.4 g |
| Fat | 0.1 g |
| Carbs | 35.6 g |
| Fiber | 0.8 g |
| Sugar | 33.8 g |
| Sodium | 3 mg |
