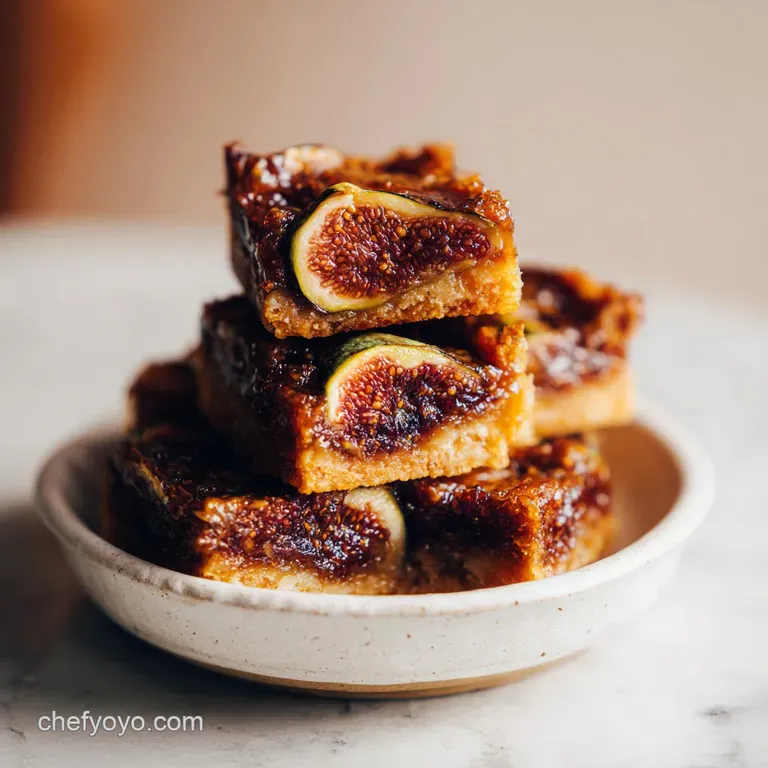
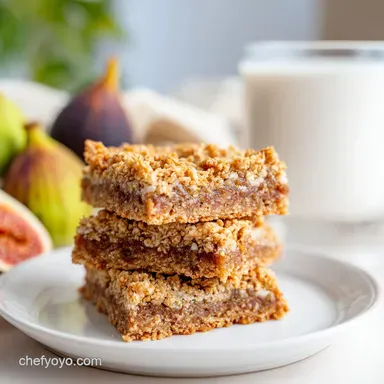
Homemade Fig Bars with Buttery Oat Crumble
- Time: Active 15 minutes, Passive 35 minutes, Total 50 minutes
- Flavor/Texture Hook: Jammy, citrus bright filling with a buttery, toasted oat shatter
- Perfect for: School lunchboxes, hiking snacks, or a rustic afternoon tea
- Baking Wholesome Homemade Fig Bars
- Understanding The Science of Texture
- Essential Recipe Specifications and Yields
- Pantry Staples for Fig Filling
- Basic Tools for Easy Baking
- Step-by-Step Filling and Assembly
- Solving Common Baking Obstacles
- Scaling the Recipe Up or Down
- Myths About Baking With Figs
- Storing and Repurposing Your Bars
- Ideal Pairings for Snack Time
- Recipe FAQs
- 📝 Recipe Card
Baking Wholesome Homemade Fig Bars
The kitchen currently smells like a sun soaked orchard in late August. There is something about the way dried mission figs transform when they meet a splash of water and a hit of lemon they go from chewy, humble fruit to a thick, mahogany velvet that bubbles and pops on the stove.
I remember the first time I tried making these; I was so determined to move away from the plastic wrapped tubes of my youth, but I ended up with a filling so runny it soaked through the crust like a soggy sponge. It was a mess, but the flavor was there, and that was enough to keep me tinkering.
After a few burnt pans and crumbly disasters, I finally nailed the ratio. The secret is that tiny bit of fresh fig mixed with the dried ones it adds a brightness that dried fruit alone just can't mimic. We are going for a crust that provides a distinct snap before yielding to that jammy interior.
You don't need any fancy gadgets here, just a sturdy pot and a bit of patience while the figs break down into that gorgeous, seedy paste. If you have ever felt like store-bought snacks are a bit too "processed," these are the solution you've been looking for.
Trust me, once you pull these out of the oven and see that golden oat crust shimmering with a bit of sea salt, you'll never go back to the boxed stuff. We are making a snack that feels artisanal but comes together with the ease of a simple crumble.
It is wholesome, honest food that makes your house smell like a professional bakery. Let's get into the "how" so you can get these into your oven as soon as possible.
Understanding The Science of Texture
Balancing Pectin and Moisture
Pectin Power: Figs are naturally high in pectin, which acts as a structural glue when simmered with lemon juice and honey. This creates a stable, jammy gel that won't leak out of the bars during the over high heat baking process.
Exploiting the Maillard Reaction
Toasted Depth: The combination of brown sugar and butter in the crust triggers the Maillard reaction at 350°F (180°C). This process browns the milk solids in the butter, creating those nutty, toasted notes that complement the earthy sweetness of the figs.
Preventing Moisture Migration
Starch Barrier: By mixing the oats and flour with cold butter, we coat the starches in fat. This creates a waterproof barrier that prevents the moisture from the fig filling from migrating into the crust, keeping it from turning gummy.
| Method | Time | Texture | Best For |
|---|---|---|---|
| Dried & Fresh Mix | 50 minutes | Jammy & Bright | Maximum flavor and artisanal feel |
| Dried Only | 40 minutes | Dense & Chewy | Pantry pull baking on short notice |
| Fresh Fig Only | 65 minutes | Soft & Syrupy | Seasonal summer abundance |
While we are focusing on the fruit forward side of baking, if you ever find yourself craving something a bit more decadent, you should definitely check out my Seven Layer Bars recipe. They share that same layered structure but lean into chocolate and coconut for a completely different vibe.
| Component | Science Role | Pro Secret |
|---|---|---|
| Dried Mission Figs | Concentrated Sugar | Use the dark Mission variety for a deeper, more "Newton like" flavor profile. |
| Old Fashioned Oats | Structural Fiber | Avoid quick oats; the large flakes create the "shatter" texture we want. |
| Cold Butter | Steam Leavening | Grate your butter while frozen to ensure perfectly even distribution in the dough. |
| Lemon Juice | pH Balancer | The acidity cuts through the heavy sugar and helps the pectin set the jam. |
Essential Recipe Specifications and Yields
This recipe is designed to yield 16 generous squares if you are using an 8x8 inch square baking pan. If you decide to double the batch for a crowd, keep in mind that the filling will take a few extra minutes to reduce on the stove because of the increased volume.
We are aiming for a total cook time of 35 minutes in the oven, but the real indicator is that golden brown hue on the edges.
The prep is relatively quick at 15 minutes, mostly involving chopping the figs and rubbing the butter into the flour. If you're feeling organized, you can even make the filling the night before. Chilled filling is actually easier to spread over the base without tearing the dough.
This is a great shortcut for busy mornings when you want to get the baking done before the house wakes up.
| Feature | Fresh Figs Added | Dried Figs Only |
|---|---|---|
| Moisture Level | High (Jammy) | Low (Chewy) |
| Flavor Profile | Floral/Bright | Deep/Caramel |
| Shelf Life | 4-5 days | 7-10 days |
Pantry Staples for Fig Filling
For the jammy core, we are using 2 cups dried Mission figs (stems removed and chopped) and 0.5 cup fresh figs for that floral note. You'll need 2 tablespoons honey to round out the sweetness and 1 small lemon for its zest and juice. To spice things up, grab 0.5 teaspoon ground cinnamon and 0.5 teaspoon ground nutmeg.
We use 0.5 cup water to help everything break down.
The crust requires 1.5 cups old fashioned rolled oats and 1.25 cups all purpose flour. You’ll also need 0.5 cup packed brown sugar, 0.75 cup cold cubed unsalted butter, 0.5 teaspoon baking soda, and 0.25 teaspoon sea salt.
- Dried Mission Figs: Replace with dried Calimyrna figs for a nuttier, lighter colored filling.
- Fresh Figs: Use an extra 0.5 cup of dried figs plus a tablespoon of orange juice if fresh ones aren't in season.
- Old Fashioned Oats: Steel cut oats are too hard, but you can use a gluten-free oat blend if needed.
- Honey: Maple syrup works perfectly here and adds a subtle woodsy flavor.
- Unsalted Butter: Coconut oil (solidified) works for a dairy-free version, though the crust will be shorter and more crumbly.
Chef's Tip: Before you start mixing the crust, rub the lemon zest into the brown sugar with your fingertips. The oils from the zest will infuse the sugar, making every bite of the crust fragrant and bright.
Basic Tools for Easy Baking
You don't need a stand mixer for these Fig Bars. In fact, I prefer using my hands for the crust to ensure I don't overwork the gluten. You'll want a medium saucepan for the filling something with a heavy bottom like a Le Creuset pot to prevent the sugars from scorching.
A sharp chef's knife is essential for those dried figs; they can be quite sticky, so a little trick I use is wiping the blade with a tiny bit of oil before I start.
An 8x8 inch baking pan is the standard here. If you use a glass pan, remember that it holds heat longer than metal, so you might need to shave 2 or 3 minutes off the bake time to avoid a dry base.
For the crust, a simple pastry cutter or even two forks will do the trick to incorporate the butter, though honestly, rubbing the cubes between your thumbs and forefingers is the most reliable way to get those pea sized lumps that create a flaky texture.
step-by-step Filling and Assembly

Concentrating the Fig Essence
- Prep the fruit. Remove the tough stems from the 2 cups of dried Mission figs and roughly chop them. Note: Smaller pieces break down faster into a smooth paste.
- Simmer the filling. Combine the dried figs, 0.5 cup chopped fresh figs, 0.5 cup water, 2 tablespoons honey, lemon juice, cinnamon, and nutmeg in your saucepan.
- Reduce to jam. Cook over medium low heat for about 12 minutes, stirring often, until the water has evaporated and the figs are soft and jammy.
- Pulse or mash. Use a potato masher or a quick pulse in a blender to reach your desired consistency. Note: I like a few chunks for a rustic feel.
Constructing the "No Roll" Foundation
- Mix the dry base. In a large bowl, whisk together 1.5 cups oats, 1.25 cups flour, 0.5 cup brown sugar, 0.5 teaspoon baking soda, and 0.25 teaspoon sea salt.
- Incorporate the butter. Add the 0.75 cup cold cubed butter to the dry mix and work it in until it looks like coarse crumbs with some pea sized pieces.
- Press the base. Firmly press about two thirds of this oat mixture into the bottom of your lined 8x8 pan. Note: Use the bottom of a measuring cup to get a flat, even layer.
- Layer and bake. Spread the fig filling over the base, then sprinkle the remaining crumble on top. Bake at 350°F (180°C) for 35 minutes until the top is golden and the edges are bubbling.
Speaking of layered treats, if you find yourself with extra oats and butter, you might want to see How to Make recipe for a version that uses a graham cracker base. It's a great way to see how different fats and starches interact!
Solving Common Baking Obstacles
Why Your Crust is Falling Apart
A crumbly crust usually happens because the butter was too warm when it went into the oven. If the butter melts before the flour has a chance to set its structure, the whole thing loses its integrity.
Always keep that butter cold, and if your kitchen is particularly warm, pop the assembled bars in the fridge for 15 minutes before they hit the oven. This ensures the fat stays solid until the heat can create those little steam pockets for a better "shatter."
Remedying a Dry Filling
If your fig jam looks more like a brick than a spread, you likely simmered it for too long or at too high a heat. This evaporates all the "free water" that keeps the pectin hydrated. You can easily fix this by stirring in a tablespoon of warm water or orange juice at a time until it loosens up.
It should be thick enough to hold its shape but soft enough to spread like room temperature peanut butter.
| Problem | Root Cause | Solution |
|---|---|---|
| Soggy Bottom | Filling was too wet or added while hot | Simmer filling until no liquid remains; cool to room temp before assembly |
| Burnt Edges | Oven running hot or dark pan | Use an oven thermometer; check 5 mins early if using a dark metal pan |
| Filling Leaking | Not enough pectin/acid | Ensure you use the full lemon juice amount to help the jam set properly |
Common Mistakes Checklist
- ✓ Never use warm butter for the crust; it leads to a greasy, flat base.
- ✓ Don't skip the lemon juice; the acidity is vital for both flavor and the jam's "set."
- ✓ Avoid over processing the figs; a little texture makes them feel much more artisanal.
- ✓ Let the bars cool completely in the pan before slicing, or they will crumble into a mess.
- ✓ Always line your pan with parchment paper for easy removal.
Scaling the Recipe Up or Down
If you're baking for just one or two people, you can easily halve this recipe and use a standard loaf pan. For a half batch, use 1 egg yolk if you want a richer crust, or just stick to the halved measurements and reduce the bake time by about 20%. Keep a close eye on the oven around the 25 minute mark.
To double the recipe for a party, use a 9x13 inch baking pan. You won't need to double the salt or spices 1.5x the original amount is usually enough to avoid overpowering the fruit.
The cooking time for the filling will increase to about 20 minutes on the stove since there is more mass to heat through. In the oven, a double batch might need an extra 5 to 10 minutes to ensure the center is fully set and the base is crisp.
| Target Servings | Pan Size | Ingredient Adjustment | Bake Time |
|---|---|---|---|
| 8 Bars | 9x5 Loaf Pan | 0.5x All Ingredients | 25-28 mins |
| 16 Bars | 8x8 Square | Standard Recipe | 35 mins |
| 32 Bars | 9x13 Rectangle | 2x Ingredients (1.5x spices) | 42-45 mins |
Myths About Baking With Figs
One common misconception is that you must soak dried figs overnight before using them. While soaking is great for salads, for these homemade fig bars, simmering them directly in the water and honey is actually better.
It allows the fruit to absorb the aromatics (cinnamon and nutmeg) while it softens, creating a much deeper flavor profile than a plain water soak ever could.
Another myth is that you need a high powered food processor to get the right filling consistency. I actually prefer the rustic texture of hand mashed figs. Over processing can turn the filling into a gummy, characterless paste.
A simple fork or potato masher gives you those lovely little bits of fig skin and seeds that provide a delightful crunch and prove to your guests that these were made from scratch.
Storing and Repurposing Your Bars
Fridge and Freezer: These bars stay fresh in an airtight container at room temperature for about 3 days. However, I think they actually taste better on day two once the moisture has equalized. For longer storage, keep them in the fridge for up to a week.
They freeze beautifully too wrap individual squares in parchment paper and toss them in a freezer bag for up to 3 months. Just thaw them on the counter for 20 minutes before eating.
Zero Waste Tips: If you find yourself with leftover fig filling, don't throw it out! It makes an incredible topping for morning yogurt or a base for a sophisticated grilled cheese sandwich with goat cheese and arugula. If the crust yields too many crumbs at the bottom of the pan, save them!
Those buttery, fig scented crumbs are the perfect "granola" to sprinkle over vanilla bean ice cream.
Ideal Pairings for Snack Time
These bars are quite earthy and rich, so they pair best with something that has a bit of acidity or bitterness to balance the sugar. A sharp, aged cheddar cheese is a classic pairing that highlights the savory notes in the oats.
If you are serving these as a dessert, a dollop of unsweetened Greek yogurt or a splash of cold cream can cut through the jammy sweetness perfectly.
For a cozy afternoon, a cup of Earl Grey tea is my go to. The bergamot in the tea echoes the lemon zest in the crust beautifully. If you're looking for another seasonal treat to round out a dessert platter, my Pumpkin Butterscotch Bars recipe offers a velvety contrast to the chewy texture of the figs. Together, they make a stunning, rustic spread for any autumn gathering.
Honestly, don't even bother with the low-fat versions of these ingredients. The joy of these bars is in the wholesome, full fat butter and the real honey. It's a treat that feels as good as it tastes. Happy baking!

Recipe FAQs
What are the main ingredients in homemade fig bars?
Dried Mission figs, oats, flour, and cold butter. The filling relies on dried figs simmered with water, honey, and lemon juice to create a jammy texture, while the crust uses oats and flour bound by cold butter for flakiness.
Do figs spike your blood sugar significantly?
They can, but context matters. Figs are high in natural sugars, meaning intake should be moderated, especially for those watching glucose levels. When baked into a bar with fiber rich oats, the sugar absorption is slightly slowed compared to eating plain dried fruit.
Are homemade fig bars considered healthy?
They are healthier than commercial versions, but still a treat. Homemade bars provide real fruit and whole grains from the oats, avoiding artificial colors and preservatives found in store brands. They still contain sugar and butter, so they are best enjoyed in moderation as a whole food snack.
What happens if I eat a lot of figs or fig bars?
Digestive distress is the main consequence due to high fiber. Figs are a known natural laxative because of their high fiber content, and overconsumption of any rich, high fiber baked good can cause bloating or cramping.
How do I prevent the fig filling from leaking out of the crust during baking?
Ensure the filling is thick and the crust base is packed firmly. Simmer the filling long enough so most of the water evaporates, creating a stable gel that won't run. If you mastered controlling the spread in our Chewy Peanut Butter Cookies recipe, you understand how stabilizing fat ratios prevents seepage.
What is the best method to ensure the oat crust remains crisp and not soggy?
Incorporate the butter while it is very cold. Working the cold butter into the flour and oats coats the starches in fat, creating a barrier that resists moisture migration from the jammy filling during baking.
How can I make the fig filling brighter and less intensely sweet?
Add fresh lemon zest and juice to the simmering fruit. The acidity of the lemon cuts through the deep, concentrated sugar of the dried figs, providing a necessary flavor lift. This technique of balancing strong sweetness is key in our Raspberry Chocolate Cake Roll recipe as well.
Homemade Fig Bars Recipe
Ingredients:
Instructions:
Nutrition Facts:
| Calories | 229 kcal |
|---|---|
| Protein | 2.9 g |
| Fat | 9.4 g |
| Carbs | 35.1 g |
| Fiber | 2.8 g |
| Sugar | 18.4 g |
| Sodium | 77 mg |
