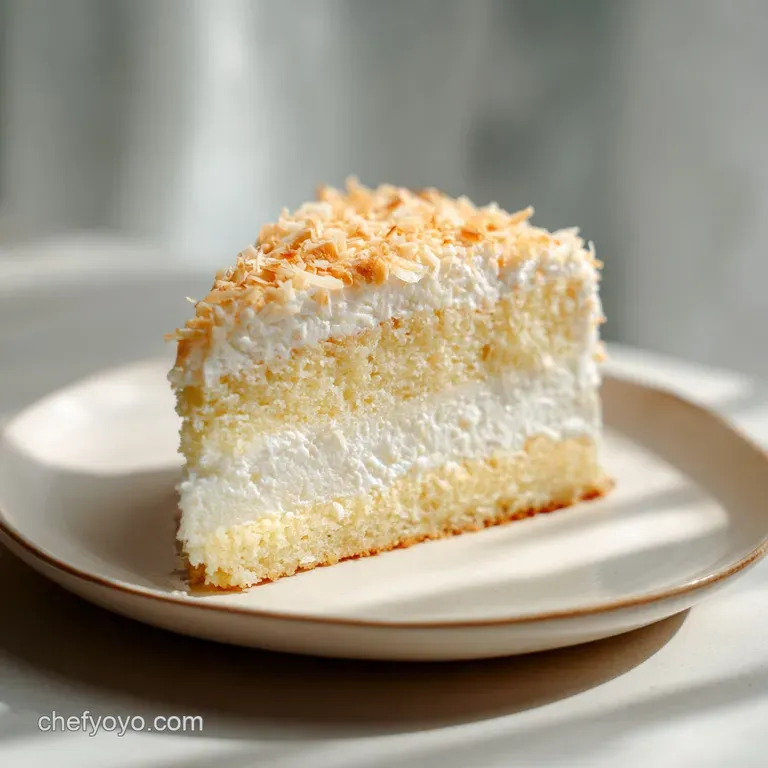
Coconut Cream Cake: Moist and Artisanal

- Time: Active 25 minutes, Passive 35 minutes, Total 60 minutes
- Flavor/Texture Hook: Velvety, melt in-the mouth sponge with a snowy, toasted coconut crunch
- Perfect for: Garden parties, milestone birthdays, or a weekend baking project
- Unlocking the Fluffiest Ever Coconut Cream Cake
- Essential Metrics for Successful Baking
- Selecting Wholesome Artisanal Cake Elements
- Tools for a Velvety Crumb
- Crafting Your Layered Coconut Masterpiece
- Rescuing Your Sponge and Frosting
- Inclusive Wholesome Recipe Variations
- Preserving Freshness and Reducing Waste
- Complementary Flavors for Your Slice
- Recipe FAQs
- 📝 Recipe Card
Unlocking the Fluffiest Ever Coconut Cream Cake
The air in my kitchen currently smells like a tropical breeze, thanks to a tray of toasted coconut cooling on the counter. There is something truly therapeutic about the scent it is nutty, sweet, and warm all at once.
I remember the first time I tried a real, artisanal Coconut Cream Cake at a small coastal bakery. It wasn't that dry, flavorless sponge we often see at grocery stores; it was heavy with moisture but somehow felt like eating a cloud.
I spent weeks trying to recreate that specific crumb, eventually realizing that the secret was not just in what you add, but how you mix it.
We are going for a rustic, wholesome vibe here. This isn't about stiff, artificial decorations. It is about a cake that looks like a fallen snowdrift and tastes like pure comfort. When you take your first bite, the sponge should practically shatter against the roof of your mouth before dissolving into a velvety pool of coconut cream.
It is the kind of cake that makes people go quiet for a second while they process the textures.
I have found that the best results come from treating the ingredients with a bit of respect. Using room temperature egg whites and slightly cool cream cheese makes a world of difference.
We are going to walk through the reverse creaming method together it sounds fancy, but it is actually the easiest way to ensure you don't overwork the gluten. If you have ever had a cake turn out tough or bread like, this technique is going to be your new best friend.
For a Shatter Tender Crumb
Traditional creaming beating butter and sugar until fluffy is great, but for this specific cake, we want a tighter, more tender crumb. By mixing the butter directly into the dry ingredients first, we coat the flour particles in fat.
This creates a physical barrier that prevents the flour from developing too much gluten once the liquids are added. The result is a sponge that is sturdy enough to hold a soak but tender enough to melt away.
Science of the Fat Soak
When we poke holes in the warm cake and pour over the cream of coconut mixture, we are performing a controlled hydration. The warm starches in the cake are still open and receptive, acting like tiny sponges.
Because our soak contains both fat (from the heavy cream) and sugar (from the cream of coconut), it doesn't just make the cake wet; it enriches the entire structure, keeping it moist for days.
Temperature Controlled Frosting
The reason we use cold cream cheese but slightly softened butter is all about stability. Cream cheese has a lower melting point and a higher moisture content than butter. If both are too warm, your frosting will turn into a puddle.
By keeping the cream cheese cold, we allow the sugars to emulsify into the fat without breaking the structure, giving us those beautiful, rustic swirls that hold their shape.
Essential Metrics for Successful Baking
Success in the kitchen often comes down to the numbers we track before the heat even hits the pan. For this cake, precision with your oven temperature and the internal state of your ingredients is non negotiable.
I always suggest using an oven thermometer because most home ovens are liars mine consistently runs 10 degrees cold, which can ruin a delicate sponge.
| Metric | Target Value | Visual or Tactile Cue |
|---|---|---|
| Butter (Cake) | 18°C - 20°C | Cubes are pliable but not greasy to the touch |
| Oven Temp | 175°C (350°F) | Steady heat; rack placed in the center position |
| Internal Temp | 96°C - 98°C | Skewer comes out with three or four moist crumbs |
| Cream Cheese | 4°C - 7°C | Straight from the fridge for maximum frosting lift |
If you are looking for a different kind of textural experience, you might find that the "soak" method here reminds you of other classics. For example, if you love the way a liquid infusion transforms a simple sponge, you should definitely check out my Classic Tres Leches Cake. It uses a similar principle but with a different dairy profile.
One thing I've learned over the years is that the weight of your flour matters more than the volume. If you don't have a scale, please use the "spoon and level" method for your 345g of cake flour.
Dipping the cup directly into the bag packs the flour down, and you could end up with 20% more than you actually need, leading to a dry, dense result.
Selecting Wholesome Artisanal Cake Elements
The soul of this Coconut Cream Cake lies in the quality of the coconut products you choose. I always reach for full fat canned coconut milk the kind you have to shake because the cream separates at the top.
Avoid the carton versions meant for drinking; they are mostly water and won't give you the artisanal richness we are looking for.
| Component | Purpose in Recipe | Chef's Secret |
|---|---|---|
| Cake Flour (345g) | Provides the low protein base for a delicate, fine textured crumb | Always sift it twice to incorporate maximum air |
| Cream of Coconut (120ml) | Delivers intense sweetness and a silky, fatty mouthfeel | Use the sweetened version (like Coco Lopez) for the soak |
| Egg Whites (4 large) | Acts as the structural leavening agent without the weight of yolks | Ensure no trace of yolk is present for a snowy white cake |
| Unsalted Butter (170g) | Creates the tender "short" texture through reverse creaming | Use a high-quality European style butter for better flavor |
For the dry ingredients, we are using 3 cups (345g) of sifted cake flour, 1.5 tsp of baking powder, and 0.5 tsp of baking soda. The combination of both leaveners ensures a good lift while the soda reacts with the slight acidity in the coconut milk to create those tiny, velvety bubbles.
Don't forget the 1 tsp of fine sea salt; it is the anchor that prevents the sugar from becoming overwhelming.
The fat profile is balanced by 0.75 cup (170g) of unsalted butter for the cake and 1.75 cups (350g) of granulated sugar. For the liquids, you'll need 1 cup (240ml) of full fat canned coconut milk, 2 tsp of pure vanilla extract, and 1 tsp of coconut extract.
That little hit of coconut extract might feel like cheating, but it boosts the aroma of the wholesome ingredients without tasting artificial.
Chef's Tip: Before you start mixing, pulse your 0.5 cup of sweetened shredded coconut in a food processor for 10 seconds. This turns the long strands into a fine "coconut snow" that distributes evenly throughout the batter, providing flavor without any distracting stringy textures.
Tools for a Velvety Crumb
You don't need a professional kitchen to make a spectacular Coconut Cream Cake, but a few specific tools will make the process much smoother. A stand mixer is my preferred choice here because the reverse creaming method requires a steady, low speed to incorporate the butter into the flour without creating a mess.
- Stand Mixer: Fitted with the paddle attachment. It is vital for achieving that "sandy" texture during the first phase of mixing.
- 8 inch Round Cake Pans (2): I prefer light colored aluminum pans. They reflect heat better than dark pans, which prevents the edges of your cake from browning too quickly or becoming tough.
- Parchment Paper: Essential for a clean release. Even with greased pans, this cake is moist and prone to sticking.
- Fine Mesh Sieve: For sifting your flour and powdered sugar. This is the difference between a grainy cake and a professional one.
- Bamboo Skewer: Not just for testing doneness, but for poking those all important holes for the soak.
When you are preparing your pans, I like to use a bit of softened butter followed by a dusting of flour, then the parchment circle at the bottom. It feels a bit old-fashioned and rustic, but it is the most reliable way to ensure your layers come out perfectly intact. If you find yourself enjoying this style of layered, infused dessert, you might also want to try my Strawberry Earthquake Cake for another fun, textured baking project.
Crafting Your Layered Coconut Masterpiece
Let's get into the flow of this bake. The timing is key we want the soak to go on while the cake is still warm, but the frosting to go on only once it is completely chilled.
Phase 1: Reverse Creaming Bake
- Preheat your oven to 175°C (350°F). Prepare two 8 inch round cake pans with butter and parchment paper.
- In your stand mixer, combine the 345g sifted cake flour, 350g sugar, baking powder, baking soda, and 1 tsp sea salt. Turn the mixer to the lowest setting for 30 seconds to distribute everything.
- Add the 170g of cubed, room temperature butter one piece at a time while the mixer is running on low. Mix until the mixture looks like coarse sand.Note: This coats the flour in fat and prevents gluten development.
- In a separate bowl, whisk together the 4 egg whites, 240ml coconut milk, vanilla, and coconut extract.
- With the mixer still on low, slowly pour the liquid mixture into the dry ingredients. Increase speed to medium for exactly 60 seconds to aerate the batter until it is velvety.
- Divide the batter evenly between pans. Bake for 30-35 minutes until a skewer inserted in the center comes out clean and the tops spring back.
Phase 2: Internal Infusion
- While the cakes bake, whisk together the 120ml cream of coconut, 60ml heavy cream, and the finely chopped shredded coconut.
- Once the cakes come out of the oven, let them rest in the pans for 10 minutes. Use a skewer to poke holes every 2 cm across the entire surface.
- Slowly pour the soak over the warm cakes, allowing it to disappear into the sponge. Let the cakes cool completely in the pans.
Phase 3: Frosting and Assembly
- Beat the 225g cold cream cheese and 115g softened butter until smooth and artisanal in texture.
- Gradually add the 500g sifted powdered sugar and 2 tbsp coconut cream. Whip on high for 2 minutes until stiff and fluffy.
- Frost the first layer, stack the second, and cover the entire cake. Press the 2 cups of toasted shredded coconut into the sides and top until fully coated.
| Step | Technique | Duration | Outcome |
|---|---|---|---|
| Butter Incorporation | Reverse Creaming | 3-4 minutes | Fine, sandy texture |
| Aeration | Medium Speed Whip | 60 seconds | Velvety, smooth batter |
| The Soak | Warm Infusion | 5 minutes | Moist, flavor deepened crumb |
| Toasting | Oven/Stovetop | 5-7 minutes | Golden, nutty crunch |
Between these steps, I usually take a moment to toast my coconut. I prefer doing it in a dry skillet over medium heat rather than the oven. It gives me more control, and the "sizzle" of the coconut oils hitting the pan is a great sensory cue. Just keep it moving it goes from white to burnt in about ten seconds!
Rescuing Your Sponge and Frosting
Even the best of us have days where the kitchen gods aren't smiling. If your Coconut Cream Cake isn't looking quite right, don't panic. Most issues can be traced back to temperature or mixing times.
For a Sunken Center
If your cake looks beautiful in the oven but craters the moment you pull it out, it usually means one of two things: either the oven door was opened too early, causing a sudden temperature drop, or the leavening agents were expired. Check the dates on your baking powder!
Also, ensure you aren't over beating the batter once the liquids are added; too much air will cause the cake to rise too fast and then collapse because the structure hasn't set.
To Fix Grainy Frosting
Grainy frosting usually happens when the powdered sugar wasn't sifted or if the butter was too cold and didn't emulsify properly with the cream cheese. If it’s already mixed, you can try beating it on high for another 3 minutes.
If that doesn't work, a tiny splash of warm coconut cream can sometimes help "melt" those sugar crystals into the fat.
| Problem | Root Cause | Solution |
|---|---|---|
| Greasy Crumb | Butter was too warm during mixing | Keep butter at 18°C; it should be cool, not melting |
| Runny Frosting | Cream cheese was too warm | Chill the entire bowl for 30 minutes, then re whip |
| Dry Cake | Overbaked or skipped the soak | Reduce bake time by 5 mins next time; add more soak now |
Common Mistakes Checklist:
- ✓ Always sift your cake flour standard All Purpose is too heavy for this artisanal crumb.
- ✓ Don't skip the 10 minute rest before soaking; the cake needs to be stable enough to hold the liquid.
- ✓ Use brick style cream cheese, not the spreadable tub kind, which contains too much water.
- ✓ Make sure your toasted coconut is completely cool before pressing it into the frosting, or it will melt the finish.
- ✓ Wipe your mixer bowl with a little lemon juice before whisking egg whites to ensure no grease ruins the lift.
Inclusive Wholesome Recipe Variations
This cake is quite adaptable if you have specific dietary needs. Because the flavor profile is so reliant on coconut, it actually lends itself well to dairy-free substitutions.
For a dairy-free Version
You can replace the butter in the cake with a high-quality vegan butter stick (look for one with a high fat content). For the frosting, use a vegan cream cheese and vegan butter alternative. Since we are already using coconut milk and cream of coconut, the tropical flavor remains perfectly intact.
Just be aware that vegan frostings tend to be softer, so you may need to add an extra 50g of powdered sugar for stability.
For a gluten-free Alternative
I have had great success replacing the 345g of cake flour with a 1:1 gluten-free baking blend. However, since gluten-free flours absorb moisture differently, I recommend increasing the coconut milk by 2 tablespoons.
The reverse creaming method actually works wonders for gluten-free bakes as it helps mimic the structure that gluten usually provides.
| Option | Adjustment | Expected Result |
|---|---|---|
| Less Sweet | Reduce sugar to 300g | A more subtle, sophisticated flavor |
| Extra Tropical | Add 1/2 cup crushed pineapple | A "Pina Colada" style moistness |
| Boozy Kick | Add 2 tbsp White Rum to soak | Adds a deep, artisanal complexity |
If you find yourself wanting to scale this recipe down for a smaller gathering, you can easily halve the ingredients and bake it in a single 8 inch pan or a 9x9 square tin. If you do this, reduce the baking time to about 25-28 minutes.
For scaling up, I recommend making two separate batches rather than doubling everything in one bowl, as the aeration of the egg whites can be lost in a massive volume of batter.
Preserving Freshness and Reducing Waste
Because of the "poke and soak" method, this Coconut Cream Cake actually stays moist much longer than a standard sponge. However, since it contains cream cheese frosting, it must be stored in the refrigerator.
- Fridge: Keep the cake in an airtight container or under a cake dome. It will stay velvety and fresh for up to 5 days. In fact, many people (myself included) think it tastes better on day two once the soak has fully permeated every crumb.
- Freezer: You can freeze the unfrosted, soaked layers for up to 3 months. Wrap them tightly in plastic wrap and then foil. To freeze the fully frosted cake, place it in the freezer for 1 hour to set the frosting, then wrap it carefully.
- Reheating: This cake is best served slightly chilled or at room temperature. If it's been in the fridge, let it sit on the counter for 20 minutes before serving so the butter in the frosting can soften slightly.
- Zero Waste Tip: If you have leftover cake scraps from leveling the tops, don't throw them away! Crumble them up, mix with a little leftover frosting, and roll them into "Coconut Truffles." Dip them in white chocolate and roll in more toasted coconut for a quick artisanal treat.
Complementary Flavors for Your Slice
When serving this masterpiece, think about balance. The cake is rich and creamy, so it pairs beautifully with something bright or slightly acidic. A side of fresh raspberries or sliced mango adds a vibrant pop of color and a necessary tartness that cuts through the coconut fat.
For beverages, a cold glass of sparkling hibiscus tea is a wonderful, non alcoholic pairing. If you're serving this as an after dinner treat, a light roast coffee with a splash of coconut milk mirrors the flavors of the cake without overpowering it.
One myth I want to debunk is that "all coconut cakes are dry." People often think this because shredded coconut can act like a sponge and pull moisture out of the cake. That is exactly why we use the "poke soak" method and pulse our coconut into a fine snow.
We are working with the ingredients' natural tendencies rather than against them. Another myth is that you must use fresh coconut. While fresh is lovely, the consistency of high-quality canned cream of coconut is actually more reliable for getting that artisanal, consistent result every single time.
This cake is a labor of love, but the "shatter tender" crumb and the way the toasted coconut crackles against the velvety frosting makes every minute worth it. Let's get baking!

Recipe FAQs
Is the "Tom Cruise cake" the same as this coconut cream cake?
No, they are different desserts. The cake famously associated with Tom Cruise is a white chocolate coconut bundt cake, whereas this recipe focuses on a layered sponge soaked with cream of coconut and finished with a cream cheese frosting.
What is the 1234 cake rule?
It is a traditional baking ratio. This classic method calls for 1 cup of butter, 2 cups of sugar, 3 cups of flour, and 4 eggs, serving as a foundational blueprint for many standard sponge cakes. If you enjoyed learning about these fundamental ratios, you can see how we apply similar building block techniques to our Neiman Marcus Cake.
Is there a specific version of this cake famous in Hawaii?
Yes, it is often called Haupia cake. Hawaiian style coconut cake typically features a layer of haupia a dense, pudding like coconut milk custard layered between traditional sponge cake and covered in coconut frosting.
Why is coconut cream so high in calories?
It has a high fat content. Coconut cream is derived from the solid portions of coconut milk, which contains a significant concentration of plant based saturated fats, contributing to its rich, velvety texture and caloric density.
How to ensure the sponge stays moist?
Whisk the soak ingredients thoroughly and apply while the cake is still warm. Poking deep holes across the surface with a skewer ensures the soak penetrates the interior layers, keeping the crumb soft and velvety for days.
How to achieve the perfect sandy texture when mixing butter and flour?
Keep the mixer on low speed and add the cubed butter one piece at a time. Continue mixing only until no large butter chunks remain and the mixture looks like coarse sand to ensure a light, tender structure.
Is it true I should bake the cake at 425°F to get a better rise?
No, this is a common misconception. Baking at higher temperatures often leads to a burnt exterior and raw center; always use the specified 350°F (175°C) to ensure an even, consistent bake throughout the layers.
Moist Coconut Cream Cake
Ingredients:
Instructions:
Nutrition Facts:
| Calories | 478 calories |
|---|---|
| Protein | 4.1 g |
| Fat | 26.5 g |
| Carbs | 70.8 g |
| Fiber | 1.5 g |
| Sugar | 53.2 g |
| Sodium | 195 mg |
