Cookie Frosting: Royal Icing for Professional Decorating
- The Queen's Glaze: Perfect Cookie Frosting for Piping and Flooding
- The Science of Stability: Why Meringue Powder Reigns Supreme
- Essential Elements: What You Need for Perfect Cookie Icing
- Whipping Up the Gloss: Detailed Guide to Making Royal Icing
- Professional Secrets and Troubleshooting Your Cookie Frosting
- Preserving Your Work: Storage Best Practices for Royal Icing
- Beyond the Basics: Pairing Your Glaze with the Perfect Cookie
- Recipe FAQs
- 📝 Recipe Card
The Queen's Glaze: Perfect Cookie Frosting for Piping and Flooding
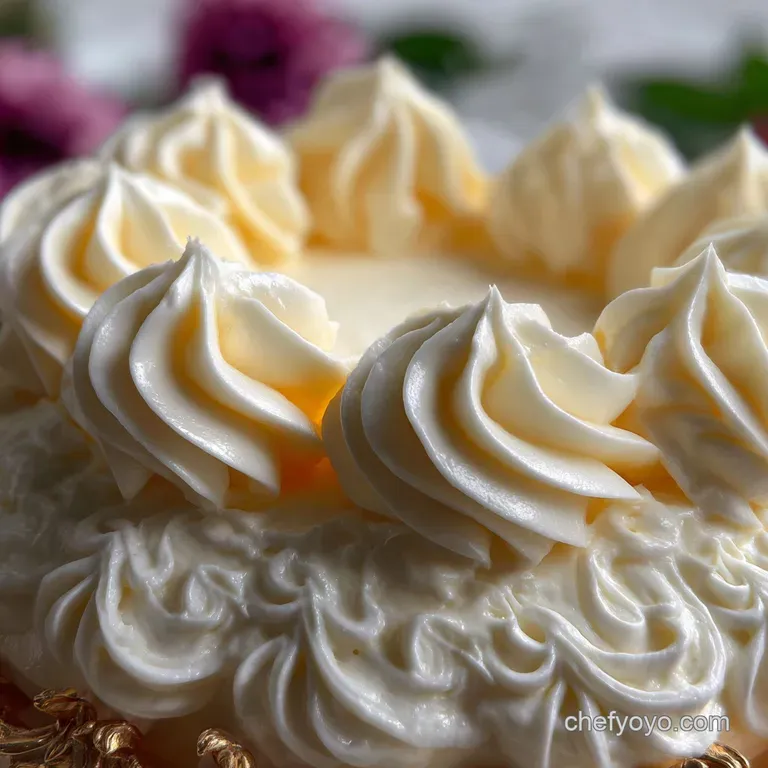
I swear, the texture of professional Cookie Frosting is just hypnotic. It’s that glossy, porcelain white sheen that makes you want to tap it lightly to check if it’s actually glass. Forget those gloopy, soft buttercream versions that melt in your hand.
We are diving into Royal Icing territory today, the only stuff capable of turning a simple sugar biscuit into a genuine masterpiece.
Why bother with this seemingly fancy glaze? Because it sets completely hard, making your decorated cookies stackable, shippable, and resistant to sticky fingers. Honestly, it’s also incredibly fast once you master the technique, transforming cheap ingredients into a bakery worthy finish that rivals any store-bought sugar cookie frosting - glossy royal icing that hardens .
This specific Cookie Frosting recipe leverages meringue powder, which is truly the secret weapon. It guarantees stability, removes the worry of using raw egg whites, and gives you that perfect, high gloss shine every single time.
Let's crack on and talk about how to make easy Royal Icing that behaves exactly the way you need it to.
The Science of Stability: Why Meringue Powder Reigns Supreme
The best Cookie Frosting needs structure, simple as that. You need a powerful protein binder to hold all that sugar together while the water evaporates. Meringue powder, essentially dried egg white mixed with stabilizer and starch, provides that protein bond without the hassle or risk associated with fresh whites.
The Difference Between Glazing and Decorating
People often get confused when choosing between the types of icing for cookies. A glaze is often thinner, sometimes made with just powdered sugar and milk, which gives a nice transparent coating but remains soft.
Royal Icing, our subject today, is the ultimate decorating choice because it allows for both detailed line work (piping) and smooth surface covering (flooding). It is the ideal [Royal Icing Recipe For Cookies] that demands precision.
What Sets Royal Icing Apart (Gloss and Hardness)
It’s all about the texture, really. When done correctly, the final Cookie Frosting sets with a beautiful, satin like gloss. That hardness comes from the combination of the high sugar ratio and the meringue proteins setting up tight when exposed to air.
This stability is why your decorated cookies can last for weeks if stored properly.
Essential Equipment Checklist (Stand Mixer vs. Hand Mixer)
I tried making this once with a wooden spoon and almost lost my arm. Don't be a hero. You absolutely need a mechanical mixer for this task; whipping that volume of sugar and protein requires powerful aeration.
A stand mixer is the dream because it frees your hands, but a solid handheld mixer works just fine, though you'll be standing there for a good seven minutes until the stiff peaks form.
How Meringue Powder Creates the Hard Shell
Think of meringue powder as construction glue. When you whip it with water, the proteins unwind and trap tiny air bubbles. As the water slowly evaporates from the finished Cookie Frosting , those air bubbles deflate slightly, and the remaining protein matrix solidifies, holding the dense sugar particles in place.
That’s how you get that incredible hard shell.
Achieving the Perfect Gloss Factor
Did you know that mixing speed and water temperature impact the final shine? Using slightly warm water at the start helps the sugar dissolve fully, which is crucial for gloss. Mix your icing on medium high speed (not the highest speed) for the required duration to introduce enough air without over incorporating too many massive bubbles.
Understanding Icing Viscosity and Flow
Viscosity is just a fancy way of saying how thick or thin the liquid is. When preparing Cookie Frosting , we aim for two main consistencies. The thick, newly whipped base is "piping" or "outline" consistency, suitable for borders.
When we add tiny amounts of water to that, we reach "flooding" consistency, which is used to fill in the outlined areas this should obey the famous 10 second rule.
Essential Elements: What You Need for Perfect Cookie Icing
Seriously, you only need four things, but quality matters here. If your powdered sugar is old and clumpy, your final Cookie Frosting will be grainy. Trust me, I learned that the hard way trying to rush through a batch of Crinkle Cookies: The Classic Fudgy Chocolate Christmas Cracker .
The Role of Powdered Sugar Density
Confectioner's sugar (icing sugar) isn't just ground granulated sugar; it contains a small percentage of cornstarch to prevent clumping. You must always, always sift it thoroughly, even if it claims to be non-clumping.
Sifting prevents lumps and allows the powder to incorporate smoothly into the water, resulting in a perfectly smooth finish.
Sourcing Quality Meringue Powder
Don't buy the cheap, off-brand stuff if you can avoid it. Look for recognizable brands in the baking aisle, especially those labeled for "Royal Icing." high-quality powder has a higher concentration of egg white protein, which translates directly to stronger, shinier, and more stable Cookie Frosting .
Water Temperature Matters
Start with lukewarm water. Not boiling hot, not ice cold. Lukewarm water dissolves the sugar faster and helps the meringue powder activate properly, giving you a head start on achieving that necessary shine.
Flavoring Extracts: Avoidance and Usage
Standard royal icing is notoriously sweet and tends to taste like, well, sugar. I always add a tiny splash of clear vanilla or, even better, almond extract. Crucial Tip: Use clear extracts only.
Brown extracts (like regular vanilla) will slightly discolor your brilliant white Cookie Frosting .
Chef's Note: If you want a truly neutral base, skip the extracts entirely and just use the meringue powder's mild vanilla scent, allowing the flavor of the cookie itself to shine.
Whipping Up the Gloss: Detailed Guide to Making Royal Icing
Making your base Cookie Frosting is simple once you have the right equipment. The goal here is aeration and stiffness think of it like making a meringue.
Stage 1: Combining Dry Ingredients Safely
Sift that powdered sugar right into your stand mixer bowl first. If you are using cream of tartar, sift that in too. In a separate cup, whisk your warm water, meringue powder, and clear extract until it’s lightly foamy. This pre-hydration step prevents the meringue powder from sticking in grainy pockets later on.
Stage 2: Achieving Stiff Peaks and Base Consistency
Pour the liquid into the bowl and mix everything on the lowest speed for about 30 seconds, just until the mixture looks like a paste. Now, ramp up the speed to medium high (setting 6 or 8). Beat the mixture for 5 to 7 minutes straight.
The icing should transform from a dull paste into a voluminous, glossy white mass that stands up straight when you lift the whisk. This is your thick, base piping consistency the perfect Best Frosting For Decorating Cookies.
Adjusting for Piping Consistency (The 15 Second Rule)
Believe it or not, the base stiff peak icing is often too thick for detailed piping. We want it to flow slightly, but still hold a defined line. Try dipping a spoon into the icing and letting the ribbon fall back.
If the line disappears in 15 to 20 seconds, it’s perfect for piping and outlining. If it takes longer, add half a teaspoon of water.
Preparing Icing for Flooding
Now, we make the thin stuff. Divide the base batch and set aside what you need for piping. For the remaining portions, add water very gradually , a teaspoon at a time. Mix the water in slowly by hand; you don't want to beat air back into the mixture at this stage.
You are aiming for the "10 second rule." When a ribbon of this thinned, Flood Cookie Icing Recipe falls back into the bowl, it should completely re-merge and disappear in 8 to 12 seconds. If it vanishes in 5 seconds, it’s too watery and will run right off your cookie.
Professional Secrets and Troubleshooting Your Cookie Frosting
We all make mistakes, especially when dealing with variables like temperature and humidity. I once used room temperature butter in my kitchen that was far too hot, and my royal icing ended up separating because of the lingering grease!
Preventing Air Bubbles During Mixing
Air bubbles are the enemy of smooth flooding. To minimize them, once your icing is fully mixed, switch from the whisk attachment to the paddle attachment and let it mix slowly (setting 2) for another two minutes. This low-speed mixing pushes the tiny air pockets out.
Also, when you transfer the icing to the squeeze bottles, tap the bottles gently on the counter to bring any residual bubbles to the surface before you start decorating.
How to Fix Runny or Grainy Icing
If you overshoot and your icing is too runny, the fix is simple: add more powdered sugar, one tablespoon at a time, until the consistency snaps back. If your Cookie Frosting is grainy, it means the sugar didn't dissolve fully.
Try adding a microscopic amount of water (literally a quarter teaspoon) and stirring vigorously by hand to help dissolve the crystals.
The Danger of Grease Contamination
Any fat whatsoever will destabilize the egg whites and prevent your Cookie Frosting from setting hard. Ensure your mixer bowl, beaters, and all utensils are spotless and free of residual oils, butter, or even lotion from your hands. This is why we don't worry about fat in our Hershey Kiss Cookies: Chewy Peanut Butter Blossoms , but it's vital here.
Dealing with Color Bleeding
Color bleed happens when colors touch too soon, especially dark reds and blacks. To prevent this, let the first layer of color (say, a white base) dry completely I mean bone dry, often 4 hours before piping dark colors on top.
If you’re layering, use minimal food coloring to achieve the desired shade, since highly concentrated color bleeds faster.
Preserving Your Work: Storage Best Practices for Royal Icing
So, you’ve whipped up a huge batch of this perfect cookie frosting recipe that hardens. You can’t use it all right now. What do you do?
Short Term Storage (Up to 3 Days)
Royal Icing stores brilliantly in the fridge for up to three days. Place the icing in an airtight container. Crucially, lay a piece of cling film directly onto the surface of the icing before sealing the lid. This prevents a hard crust from forming on top.
When you want to use it, let it come back to room temperature and give it a gentle stir (you may need a tiny drop of water to regain flow).
Can You Freeze Royal Icing?
Yes, you can freeze it! If I make an extra large batch of this sugar cookie icing recipe, I freeze the excess in freezer bags. Thaw it completely in the refrigerator overnight. You will notice that it separates a bit and looks weirdly grainy. Do not panic!
Whip it briefly on low speed using the paddle attachment, and it should come right back to its original consistency.
Beyond the Basics: Pairing Your Glaze with the Perfect Cookie
This Royal Icing is strong, sweet, and structurally sound. It needs a cookie that can handle its magnificence. Look for recipes designed for cutting, like a robust gingerbread or a classic vanilla butter cookie.
Need something that sets harder and offers even more stability for intricate designs? Check out my guide on Cookie Icing: Royal Recipe That Dries Hard .
Ultimately, mastering this Cookie Frosting unlocks a whole new level of baking confidence. It allows you to create edible art that tastes as fantastic as it looks. Now go forth and make some showstoppers!

Recipe FAQs
Why is my royal icing too thick or crumbly?
Your icing needs more liquid to reach the proper consistency. Gradually add water, 1 teaspoon at a time, until the mixture is smooth and workable. For royal icing, it is much easier to thin it out than it is to thicken it up, so always add liquid cautiously.
Why is my icing taking too long to dry or lacking a glossy shine?
The most common culprit is contamination by fat or oil, even trace amounts left on mixing bowls or utensils. Ensure all equipment is meticulously clean, as fat prevents the icing from properly crystallizing and setting hard. High humidity or applying icing too thickly can also significantly slow the drying time.
How long can I store leftover royal icing, and how should I preserve it?
Royal icing can be stored in an airtight container at room temperature for up to two weeks, or refrigerated for up to one month. To prevent a hard crust from forming, press plastic wrap directly onto the surface of the icing before sealing the container. Stir or re-whisk gently before use.
Can I change the flavor of my royal icing?
Yes, absolutely; flavor extracts are a wonderful addition to royal icing. Substitute the standard vanilla extract with clear flavorings like almond, lemon, or clear butter extracts. It is essential to use clear, colorless extracts so the icing base remains pure white and does not take on a muddy hue.
What is the difference between piping consistency and flooding consistency?
Piping consistency is stiff, similar to toothpaste, and holds its shape for creating outlines and intricate details. Flooding consistency is much looser; when a knife is dragged through it, the surface should smooth itself entirely flat within 5 to 10 seconds, which is perfect for filling in outlined areas.
Why do my colored icing details bleed into each other?
Color bleeding usually occurs when the bottom layer of icing is not completely dry before the second colored layer is applied. Always ensure the base layer has dried completely ideally 6 to 8 hours or using a low-temp dehydrator before adding dots or lines.
Adding too much liquid colorant can also contribute to the bleeding issue.
Can I use fresh egg whites instead of meringue powder in this recipe?
While traditional recipes use fresh egg whites, meringue powder is strongly recommended for superior stability and food safety. Meringue powder eliminates the small risk of salmonella, ensures a consistently hard and glossy set, and provides better piping structure. If substituting, use a pasteurized egg white product.
Perfect Cookie Frosting Guide

Ingredients:
Instructions:
Nutrition Facts:
| Calories | 475 kcal |
|---|---|
| Protein | 0.0 g |
| Fat | 0.1 g |
| Carbs | 125.0 g |
