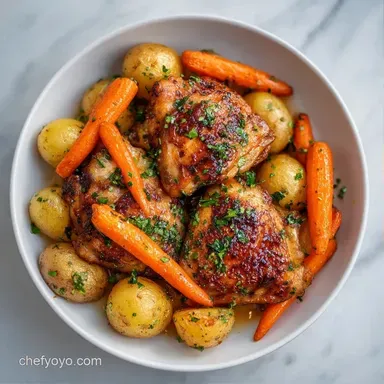
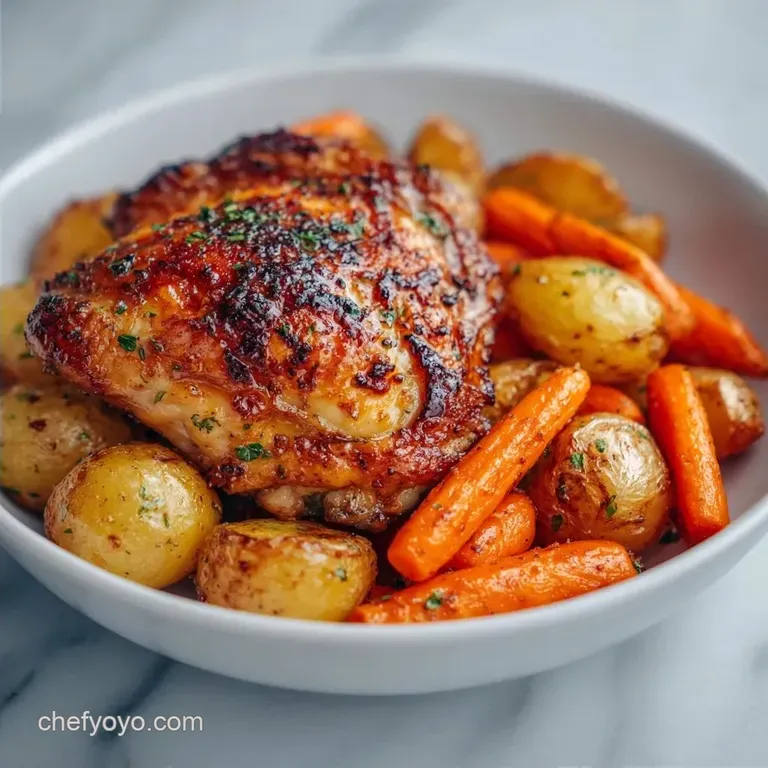
Skillet Chicken Thighs: Crispy with Carrots
- Time: 5 min active + 25 min cooking
- Flavor/Texture Hook: Velvety meat with golden, crackling skin
- Perfect for: A stress free weeknight dinner
- The Secret to Crispy Skillet Chicken Thighs
- Why These Thighs Work
- The Ingredient Breakdown
- What You'll Need
- Essential Pan Hardware
- Making Your Dinner
- Solving Common Problems
- Troubleshooting Common Issues
- Dietary Tweaks
- Adjusting the Batch Size
- Common Kitchen Myths
- Storage and Waste
- Plating Your Meal
- Recipe FAQs
- 📝 Recipe Card
The Secret to Crispy Skillet Chicken Thighs
That first loud, aggressive sizzle when the skin hits the hot oil is the best sound in the kitchen. It's the moment you know you're on the right track. There's something about the smell of rendering chicken fat mixed with smoked paprika that just makes the whole house feel cozy, even on a rainy Tuesday.
I used to struggle with the skin. My first few attempts ended with chicken that was practically glued to the pan, and I spent more time scrubbing my cast iron than actually eating. The mistake? I was tossing them in the pan while they were still damp from the package.
Once I realized that moisture is the enemy of a good sear, these Skillet Chicken Thighs became my absolute go to.
Now, I don't even think about it. I just pat them dry, get the pan screaming hot, and let the fat do the work. This recipe is a quick win because it combines the stovetop's intensity with the oven's gentle heat, meaning you get the best of both worlds without needing a dozen different pots and pans.
Why These Thighs Work
- The Dry Surface: Removing surface moisture prevents the meat from steaming, which is what allows the skin to actually shatter when you bite into it.
- Fat Rendering: Starting skin side down melts the subcutaneous fat, which then acts as the cooking oil for the carrots and potatoes.
- Fond Utilization: The browned bits stuck to the pan are flavor gold; the chicken broth lifts them up to create a built in sauce.
- Dual Heat Method: Searing provides the texture, while the oven ensures the thickest part of the thigh reaches 165°F without burning the exterior.
| Method | Time | Texture | Best For |
|---|---|---|---|
| Skillet to Oven | 30 mins | Crispy skin, tender veg | Weeknight quality |
| Sheet Pan | 45 mins | Roasted, softer skin | Hands off cooking |
| Slow Cooker | 6 hours | Fall apart, no crust | Meal prep |
The Ingredient Breakdown
| Ingredient | Science Role | Pro Secret |
|---|---|---|
| Chicken Thighs | Fat source | Use bone in for more depth |
| Carrots | Natural sugar | Cut into 1 inch chunks |
| Chicken Broth | Deglazing agent | Low sodium lets you control salt |
| Lemon Juice | Acid balance | Adds brightness to heavy fats |
What You'll Need
For the chicken, you'll need 4 bone in, skin on chicken thighs (about 2 lbs). I highly suggest keeping the skin on, as that's where all the flavor and texture live. If you're looking for something even more indulgent, you can follow a similar searing technique as my creamy chicken mushrooms to get that rich, savory base.
- 2 cloves garlic, smashed (Substitute
- 1 tsp garlic powder)
- 1 tbsp fresh lemon juice (Substitute
- Apple cider vinegar)
- 1 tsp dried thyme (Substitute
- Rosemary)
Essential Pan Hardware
You don't need a professional kitchen, but a few specific tools make this easier. A 12 inch cast iron skillet is the gold standard here because it holds heat better than anything else.
If you don't have one, a heavy stainless steel pan works, but avoid non stick if you can, as they don't develop that beautiful brown crust (the fond) as well.
I also recommend a meat thermometer. Guessing when chicken is done is a recipe for either raw meat or rubbery thighs. Also, keep a pack of heavy duty paper towels handy for the prep phase, as we're going to be drying that chicken like it's a prized possession.
Making Your Dinner
Phase 1: The Perfect Sear 1. Pat the chicken thighs completely dry with paper towels. Note: Damp skin will steam, not sear 2. Season both sides of the chicken with salt, pepper, and paprika. 3. Heat the cast iron skillet over medium high heat. 4.
Place chicken skin side down and cook undisturbed for 5-7 mins until the skin is golden and releases easily. 5. Flip the chicken thighs over.
Phase 2: The Vegetable Roast 6. Toss the carrots, potatoes, and smashed garlic into the spaces between the chicken thighs. Note: Let the veg soak up the rendered chicken fat 7. Pour the chicken broth, lemon juice, and thyme around the edges of the pan.
Until it just bubbles.
Phase 3: The Oven Finish 8. Transfer the skillet to a preheated oven at 400°F (200°C). 9. Roast for 12-15 mins until the thickest part of the thigh reaches 165°F.
Chef's Tip: Don't crowd the pan! If the thighs are touching too much, they'll release moisture and you'll lose that crispy texture. If you have a small pan, sear the chicken in two batches first.
Solving Common Problems

Troubleshooting Common Issues
| Issue | Solution |
|---|---|
| Why is the chicken skin rubbery | This usually happens if the pan wasn't hot enough or if you flipped the chicken too early. If the meat is sticking, it's not ready to flip. |
| Why are the carrots still hard | If your carrot chunks are too large, they won't cook through in the 15 minutes the chicken spends in the oven. Stick to 1 inch chunks. |
| Why did the pan sauce evaporate | The oven is a dry environment. If you leave the chicken in for too long, the broth will vanish. Check the temp at the 12 minute mark. |
Mistakes to Avoid:
- ✓ Don't use cold chicken; let it sit for 15 mins to take the chill off.
- ✓ Never stir the vegetables too often; let them brown in the fat.
- ✓ Avoid using extra virgin olive oil with a very low smoke point.
- ✓ Don't skip the lemon juice; it cuts through the richness.
Dietary Tweaks
If you're cutting carbs, this is an easy win. Just swap the potatoes for cauliflower florets or radishes. Radishes are a secret weapon here- they lose their bite and become velvety when roasted, making them a great potato replacement for those on a keto diet.
For a dairy-free version, you're already set since we use olive oil. If you want a different protein, you can try boneless skinless thighs, but you'll lose the crispiness. In that case, I'd suggest checking out my Chicken Shawarma for a different way to get massive flavor from boneless cuts.
| Original Ingredient | Substitute | Why It Works |
|---|---|---|
| Gold Potatoes | Cauliflower | Similar bulk, lower carb. Note: Less creamy texture |
| Chicken Broth | Vegetable Broth | Maintains moisture. Note: Slightly different savory profile |
| Smoked Paprika | Cumin + Chili Powder | Earthy heat. Note: More "taco like" flavor |
Adjusting the Batch Size
When you're scaling this recipe, the biggest risk is overcrowding. If you try to double the amount of Skillet Chicken Thighs in one pan, you'll end up with a boil rather than a sear.
Cooking for Two (Half Batch): Use a smaller 8 or 10 inch skillet. Reduce the broth by a third so you don't drown the chicken. The oven time remains roughly the same, but start checking the internal temp about 3 minutes earlier.
Cooking for a Crowd (Double Batch): Work in batches for the sear. Brown 4 thighs, remove them to a plate, then brown the next 4. Once all are seared, put them all back in the pan with the vegetables.
Increase the broth slightly (to about 3/4 cup) to ensure there's enough liquid for the larger volume of meat.
Common Kitchen Myths
Myth: Searing seals in the juices. This is one of the biggest lies in cooking. Searing doesn't create a waterproof barrier; it actually causes some moisture loss. However, it creates a massive amount of flavor through browning, which is why we do it.
Myth: You must cook chicken thighs to exactly 165°F. While 165°F is the safe minimum, thighs are different from breasts. Because they have more connective tissue, they actually taste better and have a more tender texture when cooked to 175°F.
Don't panic if you go a little over.
Storage and Waste
Storage Guidelines: Keep your leftovers in an airtight container in the fridge for up to 4 days. The skin will lose its crunch in the fridge, but you can bring it back by popping the chicken under a broiler for 2-3 minutes.
For the freezer, these hold up well for 3 months, though the potatoes can get a bit grainy.
Zero Waste Tips: Don't throw away the chicken bones if you're using whole thighs! Toss them in a freezer bag and once you have a few, simmer them with onion scraps and celery for a quick homemade stock.
Also, if you have leftover pan sauce, drizzle it over some steamed rice or quinoa for a quick lunch the next day.
Plating Your Meal
Since this is a one pan wonder, the easiest way to serve it is right out of the skillet. Place the cast iron on a wooden trivet in the center of the table. Arrange the carrots and potatoes around the chicken, and spoon that concentrated pan sauce over the top.
For a pop of color, garnish with fresh chopped parsley or a few slices of fresh lemon. If you want to make it a bit fancier, serve it alongside a light arugula salad with a simple vinaigrette to balance out the richness of the rendered fat.
It looks rustic, smells incredible, and tastes like you spent hours on it when it really only took 30 minutes.
Recipe FAQs
How to cook chicken thighs in a pan?
Sear skin side down in a hot cast iron skillet for 5 7 minutes. Flip the thighs, add vegetables and liquids, then roast at 400°F (200°C) for 12 15 minutes.
What kind of skillet is best to use for frying chicken?
Cast iron is the best choice. Its superior heat retention ensures a deep, golden sear on the skin. If you mastered the high heat searing here, see how the same principle works in our roast turkey method for golden skin.
How to pan cook chicken thighs so they don't burn the pan?
Pat the chicken completely dry with paper towels before seasoning. Excess moisture causes splashing and sticking, while a light coating of olive oil helps the meat release easily.
How long do chicken thighs take to cook in a frying pan?
Allow about 25 minutes of total cook time. This includes 5 7 minutes of stovetop searing and 12 15 minutes in a 400°F (200°C) oven until the internal temperature reaches 165°F.
How to cook four chicken thighs on a griddle?
Place the thighs skin side down on a preheated medium high surface. Cook undisturbed for 5 7 minutes, then flip and finish in the oven to ensure the thickest part reaches 165°F.
Is it true you should flip the chicken as soon as it looks golden?
No, this is a common misconception. Only flip once the skin releases easily from the pan; flipping too early often results in rubbery skin.
How to store leftover skillet chicken thighs?
Keep them in an airtight container in the fridge for up to 4 days. To restore the crunch to the skin, pop the chicken under a broiler for 2 3 minutes.
Skillet Chicken Thighs And Carrots