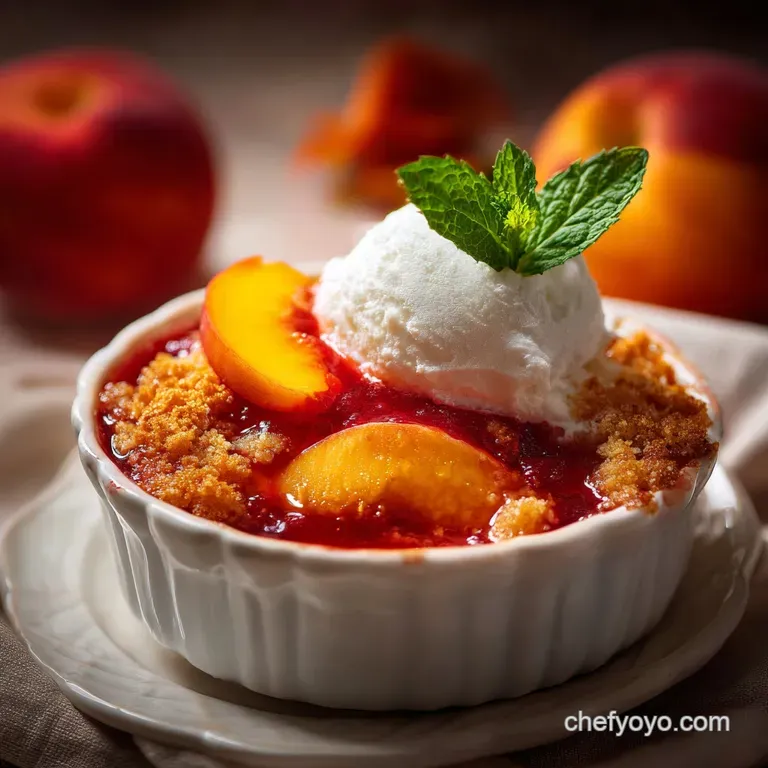
Southern Peach Cobbler: Shattering Crust and Spiced Fruit
- Time: Active 20 minutes, Passive 45 minutes, Total 65 minutes
- Flavor/Texture Hook: Shattering golden crust over velvety spiced fruit
- Perfect for: Sunday family gatherings or wholesome summer celebrations
- The Secret to an Authentic Southern Peach Cobbler Recipe
- Fast Track Planning for the Best Summer Dessert
- The One Step That Makes the Topping Crisp
- The Essential Elements for a Wholesome Peach Filling
- Basic Tools for a Flawless Artisanal Bake
- The Step by Step Path to Golden Perfection
- Solving Common Baking Hurdles for Better Results
- Adjusting the Batch for Different Crowds
- Debunking Common Peach Cobbler Myths
- Practical Storage and Zero Waste Kitchen Strategies
- Perfect Pairings to Complete Your Dessert Table
- Recipe FAQs
- 📝 Recipe Card
The Secret to an Authentic Southern Peach Cobbler Recipe
The kitchen currently smells like a dream, filled with the heavy, floral aroma of sun ripened fruit and the sharp, woody scent of ground cinnamon. There is something truly therapeutic about standing over a bowl of 2.5 lbs fresh peaches, watching the sugar draw out those glossy, amber juices until they pool at the bottom.
It reminds me of those humid July afternoons back home, where the only thing moving faster than the porch fans was the speed at which we'd disappear a tray of cobbler. This isn't that dense, cake like version you find in school cafeterias; this is the real deal, with a topping that actually crackles when your spoon hits it.
You’re going to love how the peaches slump into a velvety, jam like consistency while the biscuit topping stays remarkably light. I remember making the mistake of using over soft peaches once, and the whole thing turned into a puddle.
Now, I look for fruit that has a slight give but still holds its shape under a knife. When that hot peach juice starts bubbling up around the edges of the mahogany brown crust, you’ll know exactly why we do this. It's rustic, it's honest, and it’s about to become the most requested item in your repertoire.
We are aiming for a specific contrast here: the fruit should be tender but not mushy, and the topping must provide a structural "shatter" that protects the soft interior. By pre baking the fruit for 10 minutes, we ensure the peaches are fully cooked by the time the biscuit top reaches its peak color.
This little trick prevents that heartbreaking scenario where the crust is perfect but the peaches are still crunchy and raw. Trust me, once you see those first bubbles of spiced syrup breaking through the dough, you’ll be hooked.
Fast Track Planning for the Best Summer Dessert
When you are juggling a busy weekend, having a clear roadmap makes the difference between a relaxing bake and a kitchen crisis. I like to start by getting my peaches peeled and sliced first because they need that 15 minutes of maceration time to really develop their flavor profile.
While they sit there getting glossy and fragrant, you can leisurely preheat your oven and prep the dry ingredients. It's all about the flow; by the time the oven hits 400°F (200°C), your fruit is ready for its first short stint in the heat.
The boiling water step is the most critical part of the timing. You don't want to boil the water too early and let it cool down; it needs to be whistling hot right when it hits the flour and butter. This "blooms" the starch and creates that signature shaggy dough that bakes up so crisp.
If you’re planning a big dinner, you can actually have the fruit pre baked and the dry ingredients whisked together hours ahead of time. Just wait to add the boiling water and drop the dough until you’re ready for the final 30-35 minutes of baking.
| Method Type | Prep Style | Texture Result | Best Context |
|---|---|---|---|
| Traditional Artisanal | Fresh peeled fruit, hand cut butter | Shattering crust, vibrant fruit | Peak peach season |
| Pantry Shortcut | Canned peaches, melted butter topping | Soft, cake like, very sweet | Quick weeknight craving |
| Frozen Fruit Swap | Thawed/drained frozen slices | Jammy, consistent, easy | Year round baking |
Choosing your method depends entirely on what you have in the fruit bowl. If you're using the traditional artisanal approach I've laid out here, the reward is a deep, complex flavor that just can't be replicated with a can.
However, if it's the middle of January and you're craving that summer feeling, the frozen fruit swap works beautifully as long as you drain the excess liquid. The key is maintaining that high 400°F (200°C) oven temperature to ensure the crust doesn't just steam, but actually browns into that glorious mahogany shade.
The One Step That Makes the Topping Crisp
The Boiling Water Bloom: Adding boiling water to the cold butter and flour mixture partially gelatinizes the starches, creating a dough that sets quickly in the oven for a crisp, rather than crumbly, finish.
Pectin Breakdown: Pre baking the peaches for 10 minutes allows the natural pectins to begin softening before the dough is added, ensuring the fruit and crust finish at the exact same moment.
Maceration Magic: Letting the peaches sit with sugar for 15 minutes creates a natural syrup, which the cornstarch then thickens into a velvety sauce as it bubbles.
The Cold Fat Friction: Using cold, cubed butter and cutting it into "pea sized" bits creates tiny pockets of fat that steam during baking, contributing to a light, airy biscuit structure.
| Component | Science Role | Pro Secret |
|---|---|---|
| Boiling Water (0.33 cup) | Starch Gelatinization | Must be bubbling hot to properly hydrate the flour proteins. |
| Cornstarch (1 tbsp) | Viscosity Control | Prevents the 2.5 lbs of peaches from turning into a runny soup. |
| Cold Butter (0.5 cup) | Steam Generation | Keep it in the fridge until the very second you need to cut it in. |
The interaction between the boiling water and the cold butter is where the magic happens. While it seems counterintuitive to use both hot and cold elements, the hot water hydrates the flour instantly while the cold butter remains in discrete "islands." When this hits the 400°F (200°C) oven, those butter islands melt and release steam, which is trapped by the quickly setting starch.
This is how we achieve a topping that is simultaneously tender on the bottom (where it touches the fruit) and crisp on the top.
The Essential Elements for a Wholesome Peach Filling
- 2.5 lbs fresh peaches: Sliced into even wedges. Why this? Fresh fruit provides the most complex acidity and floral notes.
- 0.75 cup + 0.5 cup + 2 tbsp granulated sugar: Divided for filling, dough, and topping. Why this? Creates distinct layers of sweetness and a crunchy sugar cap.
- 1.5 cups all purpose flour: The structural base of our biscuit. Why this? Provides enough protein for a sturdy, non crumbly crust.
- 0.5 cup unsalted butter: Cold and cubed. Why this? Essential for creating that flaky, artisanal biscuit texture.
- 1 tbsp cornstarch: To thicken the natural juices. Why this? Keeps the filling velvety instead of watery.
- 1 tbsp lemon juice: To brighten the fruit. Why this? Balances the heavy sweetness of the peaches and sugar.
- 1 tsp vanilla extract: For depth of flavor. Why this? Rounds out the spices and enhances the peach aroma.
- 1 tsp cinnamon & 0.25 tsp nutmeg: Our warm spice blend. Why this? Adds the classic "Southern" soul to the dish.
- 2 tsp baking powder: Our leavening agent. Why this? Gives the biscuit dough its necessary lift and lightness.
- 0.5 tsp kosher salt: To sharpen the flavors. Why this? Salt makes the sugar and fruit flavors "pop."
- 0.33 cup boiling water: The secret hydration step. Why this? Creates the unique shattering texture of the crust.
| Original Ingredient | Substitute | Why It Works |
|---|---|---|
| Fresh Peaches | Canned Peaches (drained) | Convenient year round. Note: Reduce filling sugar by 2 tbsp as canned fruit is sweeter. |
| All Purpose Flour | Cup for-cup gluten-free Blend | Similar weight and structure. Note: May require 2 additional mins of baking. |
| Unsalted Butter | Salted Butter | Adds rich fat. Note: Omit the 0.5 tsp kosher salt from the recipe. |
For a cozy twist that adds a different dimension of warmth, you might find that this Apple Crisp recipe offers a similar comfort with a crunchier, oat based topping. Both desserts rely on that perfect ratio of fruit to crust, but the cobbler's biscuit top provides a more substantial, bread like finish.
Basic Tools for a Flawless Artisanal Bake
You don't need a high tech kitchen to master this peach cobbler recipe, but a few specific tools will make the process much smoother. I swear by a 9x13 inch ceramic or glass baking dish. Metal pans can sometimes heat up too quickly, leading to scorched edges before the center is set.
A glass dish allows you to peek at the bottom to see if the peach juices are bubbling and thickened properly.
A sturdy pastry cutter is also a lifesaver. While you can use two knives or your fingers to work the butter into the flour, a pastry cutter keeps the butter colder for longer. If you use your hands, the warmth of your palms can melt the butter prematurely, leading to a greasy crust instead of a flaky one. If you're looking for more inspiration on traditional summer bakes, checking out this Peach Cobbler summer recipe might give you some ideas on different vessel choices, like cast iron skillets for extra crispy edges.
Finally,, make sure you have a reliable way to boil water quickly a standard stovetop kettle or an electric one works perfectly. The speed at which you incorporate that boiling water into the flour mixture is key. You want to stir it "quickly" until a shaggy dough forms, then stop immediately.
Over mixing at this stage will develop too much gluten, turning your artisanal crust into something tough and rubbery.
The step-by-step Path to Golden Perfection
- Preheat your oven to 400°F (200°C).
- Toss the sliced peaches, 0.75 cup sugar, lemon juice, cornstarch, cinnamon, nutmeg, and vanilla in a large bowl.
- Let the mixture sit for 15 minutes until the peaches are glossy and swimming in syrup. Note: This is maceration; it builds the flavor base.
- Pour the fruit into a 9x13 inch dish and bake for 10 minutes until the fruit begins to soften and sizzle.
- Whisk the flour, 0.5 cup sugar, baking powder, and salt in a separate bowl.
- Work the cold butter into the flour until it looks like coarse, pea sized crumbs. Note: Don't overwork it; those lumps of butter mean flakiness.
- Add the boiling water and stir fast until a thick, shaggy dough pulls away from the sides.
- Drop large spoonfuls of dough over the hot peaches.
- Sprinkle with the last 2 tablespoons of sugar until the top is evenly coated.
- Bake for 30-35 minutes until the top is a deep mahogany brown and the fruit is vigorously bubbling.
Solving Common Baking Hurdles for Better Results
Why Your Cobbler Filling is Too Runny
This usually happens for one of two reasons: either the peaches were exceptionally juicy or the cornstarch didn't reach a high enough temperature to activate. Cornstarch needs to reach a full boil (around 203°F) to properly thicken liquids.
If your oven temperature is off, or if you pulled the dish out the moment the crust looked brown without checking for "bubbling" in the center, the starches won't set. Always look for thick, slow popping bubbles in the middle of the dish before declaring it done.
The Topping is Raw in the Middle
If the outside of your crust is dark but the underside (the part touching the fruit) is still doughy, your dough portions were likely too large. When dropping the dough, aim for golf ball sized mounds rather than giant slabs. This allows the heat to circulate between the mounds and cook the dough from all sides.
Plus,, if you skipped the 10 minute pre bake of the peaches, the cold fruit will act as a heat sink, drawing heat away from the bottom of the dough and preventing it from cooking through.
| Problem | Root Cause | Solution |
|---|---|---|
| Soggy Bottom Crust | Peaches weren't pre baked | Ensure fruit is hot and bubbling before adding dough. |
| Pale, Soft Topping | Oven temp too low | Verify oven with a thermometer; bake at a true 400°F. |
| Gritty Texture | Sugar didn't dissolve | Ensure peaches macerate for the full 15 minutes before baking. |
Common Mistakes Checklist:
- ✓ Don't peel the peaches if they are organic and thin skinned; the skin adds beautiful color and fiber.
- ✓ Never use warm or room temperature butter; it must be "cold from the fridge" to create steam pockets.
- ✓ Avoid over mixing the dough once the water is added; 10-15 seconds of stirring is usually enough.
- ✓ Do not crowd the dough mounds; leave small gaps for the steam to escape from the fruit below.
- ✓ Always let the cobbler rest for at least 15 minutes after baking to let the juices set.
Adjusting the Batch for Different Crowds
If you find yourself needing to scale this down for a quiet night in, cutting the recipe in half works beautifully. Use an 8x8 inch square pan instead of the 9x13. You’ll want to reduce the baking time by about 5-8 minutes, but the temperature stays the same.
For the egg half trick often used in baking, since this recipe is egg free, you just have to be careful with the boiling water. Measure it precisely! Even a tablespoon too much can turn your shaggy dough into a batter, which will ruin that shattering artisanal finish.
Scaling up for a large party (like a 2x batch) is a bit more of a logistical challenge. I recommend using two separate 9x13 inch dishes rather than one giant pan. If you double the depth of the peaches in a single deep pan, the bottom layer of fruit will turn to mush before the top layer is even hot, and the crust will likely burn before the center of the fruit bubbles.
When doubling, remember that you don't necessarily need to double the cinnamon and nutmeg exactly 1.5x the spices usually provides a more balanced flavor without becoming overpowering.
| Servings | Pan Size | Peach Amount | Cook Time Adjustment |
|---|---|---|---|
| 4 People | 8x8 inch square | 1.25 lbs | Reduce by 5-10 minutes |
| 9 People | 9x13 inch oblong | 2.5 lbs | Standard 30-35 mins |
| 18 People | Two 9x13 inch pans | 5 lbs | Rotate pans halfway through |
Debunking Common Peach Cobbler Myths
One of the most persistent myths is that you absolutely must peel your peaches. Honestly, I've found that leaving the skins on not only saves twenty minutes of tedious work but also provides a more "wholesome" and rustic look.
The skins soften significantly during the maceration and double bake process, becoming almost undetectable while adding a lovely rosy hue to the syrup. Unless the skins are particularly fuzzy or thick, leave them on and enjoy the extra texture.
Another misconception is that "more sugar equals better fruit." In reality, dumping too much sugar on your peaches will cause them to release too much water too quickly, leading to a soupy mess.
The 0.75 cup we use for the filling is carefully calculated to balance the acidity of the lemon juice while letting the natural peach flavor shine. We aren't making jam; we’re making cobbler. The goal is a balanced sweetness that doesn't mask the artisanal quality of the fruit itself.
Practical Storage and Zero Waste Kitchen Strategies
If by some miracle you have leftovers, this cobbler stays delicious for about 3 days in the fridge. To keep the crust from getting too soft, cover the dish loosely with foil rather than airtight plastic wrap. When you're ready for round two, skip the microwave.
Reheating a slice in a 350°F (180°C) oven or toaster oven for 10 minutes will bring back some of that original "shatter" to the crust that a microwave would just steam away.
For a zero waste approach, don't throw away those peach pits or any peels you do decide to remove! You can simmer them with a bit of water and sugar to create a quick peach simple syrup. This syrup is incredible in iced tea or drizzled over vanilla yogurt the next morning.
If your peaches are slightly overripe and bruising, don't worry those are actually the best ones for cobbler because their sugar content is at its peak. Just trim off any genuinely bad spots and proceed with the recipe as usual.
Perfect Pairings to Complete Your Dessert Table
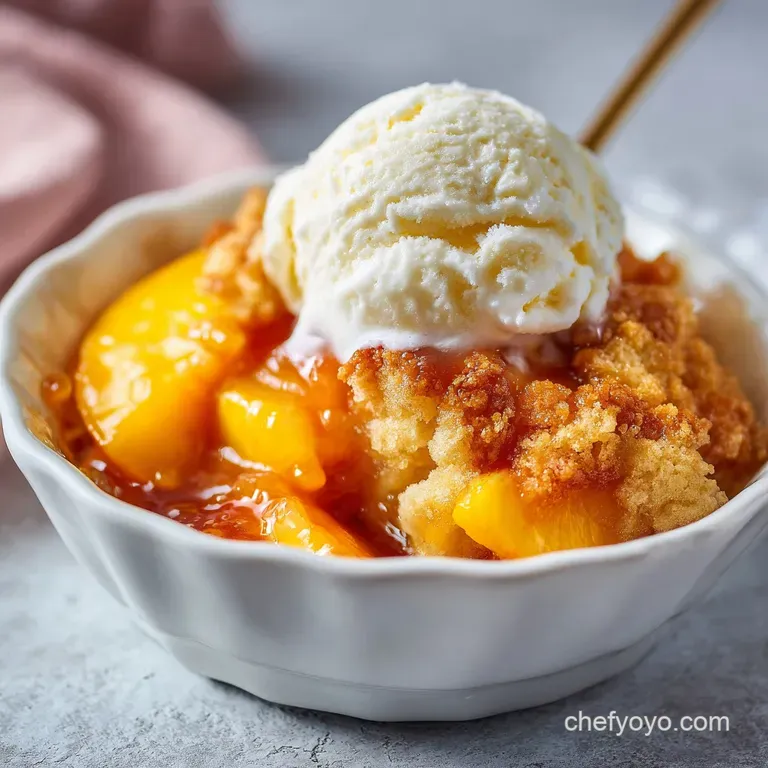
While this peach cobbler recipe is a powerhouse on its own, it practically begs for a cooling companion. A scoop of high-quality vanilla bean ice cream is the classic choice, as the melting cream mingles with the warm peach syrup to create a sort of "instant" peaches and cream sauce.
If you want something a bit more artisanal, try a dollop of lightly sweetened crème fraîche or even a drizzle of heavy pouring cream. The slight tang of the crème fraîche cuts through the sugar and highlights the nutmeg in the crust.
For a drink pairing, a glass of cold milk is the childhood favorite, but for the adults, a late harvest Riesling or a glass of bourbon on the rocks works surprisingly well. The oaky notes of the bourbon echo the cinnamon and vanilla in the filling.
If you're serving this as part of a larger spread, it pairs beautifully with other rustic bakes. You might even consider serving it alongside a savory element like sharp cheddar cheese a common Southern tradition that provides a brilliant salty sweet contrast.
Whatever you choose, make sure the cobbler is the star; it's earned its place at the center of the table.

Recipe FAQs
What are the most common mistakes when making peach cobbler?
Using fruit that is too soft or over ripened. This causes the cobbler to turn into a thin, watery puddle rather than a thick, jammy filling. Always select peaches that have a slight give but still maintain their shape when sliced.
What ingredients are in peach cobbler?
The filling requires 2.5 lbs of fresh peaches, 0.75 cup sugar, lemon juice, cornstarch, cinnamon, nutmeg, and vanilla. For the biscuit topping, you will need all-purpose flour, 0.5 cup sugar, baking powder, kosher salt, cold cubed unsalted butter, and 0.33 cup boiling water.
How do you make a 3 ingredient cake mix cobbler?
Avoid using cake mixes entirely for the best results. This traditional recipe relies on a precise ratio of flour, baking powder, and cold butter to create a crisp, artisanal crust that provides a much better texture than boxed mixes.
Is it better to use canned or frozen peaches for cobbler?
Fresh peaches are significantly better for this recipe. They provide the correct structural integrity and flavor balance, whereas canned or frozen options often introduce excess moisture that prevents the topping from achieving its signature shattering finish.
Is it true I must use a high sided cast iron skillet for the best crust?
No, this is a common misconception. A 9x13 inch baking dish works perfectly for this recipe, allowing for the correct distribution of heat to produce a deep mahogany crust on the dough and bubbling fruit below.
How to achieve the perfect golden brown topping?
Bake at 400°F for 30-35 minutes until the topping reaches a deep mahogany brown. Sprinkling the final 2 tablespoons of sugar over the dough before baking is essential for creating that distinct, crunchy texture.
How to ensure the filling thickens properly?
Let the peach mixture macerate for 15 minutes before pre-baking. This step allows the sugar and cornstarch to interact with the juices, which you can see in action with syrupy starch thickened fillings to ensure a velvety, sliceable consistency.
Southern Peach Cobbler

Ingredients:
Instructions:
Nutrition Facts:
| Calories | 338 kcal |
|---|---|
| Protein | 3.3 g |
| Fat | 10.6 g |
| Carbs | 59.7 g |
| Fiber | 2.4 g |
| Sugar | 40.2 g |
| Sodium | 238 mg |
