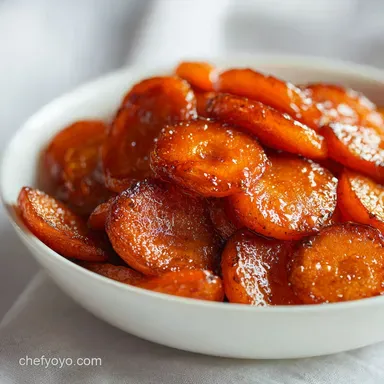
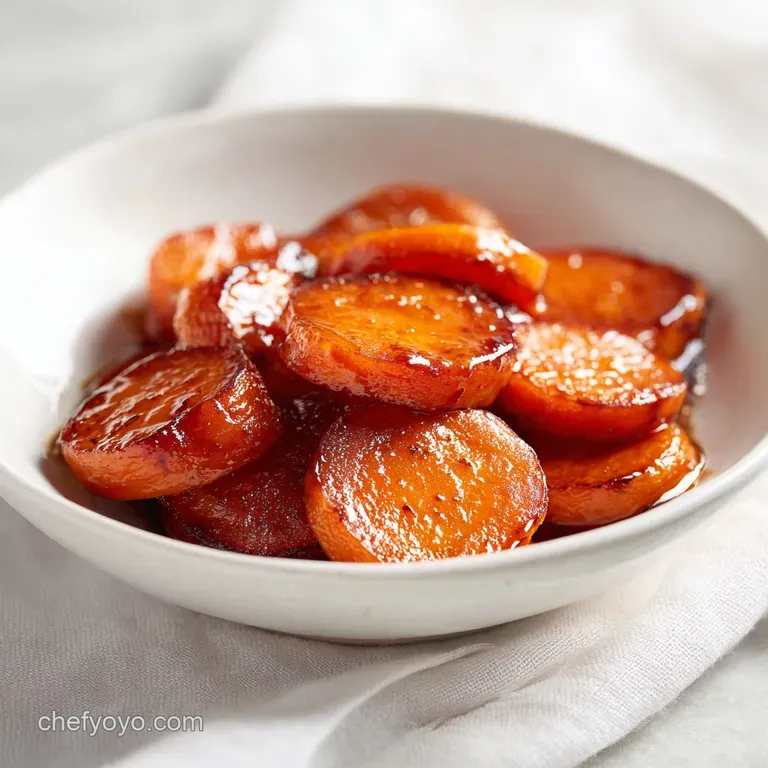
Brown Sugar Glazed Carrots: Caramelized and Tender
- Time: 5 min active + 15 min cooking = Total 20 mins
- Flavor/Texture Hook: Velvety mahogany glaze with a snappy center
- Perfect for: Quick weeknight sides or holiday dinner tables
- Easy Brown Sugar Glazed Carrots
- Why These Carrots Work
- The Component Breakdown
- The Full Shopping List
- Necessary Kitchen Tools
- The Step-by-Step Process
- Fixing Common Glaze Issues
- Troubleshooting Common Issues
- Fun Flavor Twists
- Scaling Guidelines
- Truths About Glazing
- Storage and Waste Tips
- Best Ways to Serve
- Recipe FAQs
- 📝 Recipe Card
Easy Brown Sugar Glazed Carrots
That first sizzle when the carrots hit the hot oil is the most important sound in this whole process. I remember a few years back, I tried to make these for a family dinner and I did what most people do, I simmered them in the glaze from the start.
They ended up looking like orange jam, totally devoid of any bite or structure. It was a disaster that tasted okay but felt like baby food.
I spent a few weekends messing around with the timing, and I finally realized that the sear is everything. Once you get that golden brown crust on the coins, the glaze just clings to them instead of boiling them.
Now, this is my go to side because it takes almost no effort but looks like you spent an hour over the stove.
You can expect a side dish that is snappy, sweet, and has a deep, rich color. We are going for a glistening, mahogany look that makes the rest of the plate pop. It's a simple win that works every single time if you just trust the sear.
Why These Carrots Work
- The Initial Sear: Cooking the carrots in oil first creates a crust that prevents them from getting soggy once the liquid glaze is added.
- Sugar Melting Point: Brown sugar contains molasses, which creates a thicker, stickier syrup than white sugar would.
- The Butter Bond: Butter acts as the bridge, carrying the sugar and water to coat every single inch of the carrot in a velvety layer.
- Water Buffer: That tiny bit of water stops the sugar from burning instantly, giving it time to dissolve into a smooth sauce.
Right then, before we get into the ingredients, you need to decide how you want to cook these. While I love the skillet, some people prefer the oven.
| Method | Time | Texture | Best For |
|---|---|---|---|
| Stovetop | 20 mins | Snappy & Glistening | Weeknight meals |
| Oven | 30 mins | Caramelized & Soft | Big holiday crowds |
| Air Fryer | 15 mins | Slightly Charred | Small portions |
Since we are focusing on the skillet method here, let's look at what each ingredient is actually doing for the final result.
The Component Breakdown
| Ingredient | Science Role | Pro Secret |
|---|---|---|
| Brown Sugar | Caramelization | Use "dark" brown sugar for a deeper, toffee like taste |
| Unsalted Butter | Fat/Emulsifier | Cold butter melts slower and creates a smoother sauce |
| Olive Oil | over High heat Medium | Prevents the butter from burning during the initial sear |
The Full Shopping List
For this recipe, you'll need a few basics. I highly recommend getting the whole carrots and slicing them yourself rather than buying the pre cut bags, as they hold their texture much better.
- 1 lb carrots, peeled and sliced into 1 inch coins Why this? Consistent thickness means they all cook at the same rate
- 1 tbsp olive oil Why this? Higher smoke point than butter for the sear
- 1/4 tsp salt Why this? Balances the sweetness of the brown sugar
- 1/4 tsp black pepper Why this? Adds a subtle earthy heat
- 2 tbsp unsalted butter Why this? Provides the velvety mouthfeel
- 3 tbsp packed light brown sugar Why this? Adds a molasses depth that white sugar lacks
- 1 tbsp water Why this? Helps the sugar dissolve without scorching
Quick Substitutes:
| Original Ingredient | Substitute | Why It Works |
|---|---|---|
| Brown Sugar | Maple Syrup | Similar sugar profile. Note: Result is thinner and more liquid |
| Butter | Coconut Oil | Same fat content. Note: Adds a slight tropical coconut scent |
| Olive Oil | Avocado Oil | Neutral flavor and high smoke point. Note: No flavor change |
Necessary Kitchen Tools
You don't need a fancy setup for this. I usually just grab a heavy bottomed 12 inch skillet. If you use a thin pan, the sugar is more likely to develop "hot spots" and burn in one area while the rest stays raw. A stainless steel or cast iron pan is best for that initial sear.
I also suggest a sturdy spatula or tongs. You'll be tossing the carrots around quite a bit once the glaze thickens, and you want something that can scrape the bottom of the pan to get all those caramelized bits back onto the vegetables.
The step-by-step Process
Let's crack on with the actual cooking. Just remember, the key is to keep the carrots moving once the sugar goes in.
- Peel the carrots and slice them into consistent 1 inch rounds. Toss them in a bowl with olive oil, salt, and pepper until lightly coated.
- Heat a 12 inch skillet over medium high heat. Add the carrots in a single layer and cook without stirring for 3–4 minutes until the bottoms are golden brown.
- Toss the carrots and cook for another 3 minutes until they are browned on multiple sides.
- Lower the heat to medium. Push the carrots to the edges of the pan to clear a spot in the center.
- Add the butter, brown sugar, and water to the center of the skillet.
- Stir the glaze constantly for 1–2 minutes until the butter is melted and the sugar has fully dissolved.
- Toss the carrots back into the center of the glaze.
- Stir continuously for 3–5 minutes until the sauce thickens into a glistening, mahogany colored coating.
- Remove from heat immediately to prevent the sugar from turning bitter.
Chef's Note: If you see the glaze starting to bubble too aggressively or look like it's separating, add one extra teaspoon of water to bring it back together.
Fixing Common Glaze Issues

One of the biggest worries with a brown sugar glazed carrots recipe is the sugar burning. Sugar goes from "perfectly caramelized" to "burnt and bitter" in about ten seconds. If you smell something acrid, pull the pan off the heat immediately.
Troubleshooting Common Issues
| Issue | Solution |
|---|---|
| Why Your Glaze Is Too Thin | If your sauce is watery and hasn't coated the carrots, it's usually because the heat was too low or you didn't cook it long enough. The water needs to evaporate so the sugar and butter can bond. |
| Why Your Carrots Are Mushy | This happens when you skip the sear or use a lid. Keeping a lid on the pan traps steam, which boils the carrots instead of roasting them. Always leave the pan open for this recipe. |
| Why Your Sugar Burnt | If the sugar turns black, the heat was too high or you didn't add the water. The water creates a buffer that allows the sugar to melt evenly. |
Common Mistakes Checklist:
- ✓ Sliced carrots to the same thickness (no tiny pieces!)
- ✓ No lid used during the searing or glazing process
- ✓ Butter and sugar added to the center, not poured over the carrots
- ✓ Removed from heat the moment the glaze looks mahogany
Fun Flavor Twists
Once you have the base down, you can really play around with this. If you want something a bit more complex, try adding a pinch of cinnamon or a squeeze of fresh orange juice at the very end. The acidity of the orange cuts through the heavy sweetness of the brown sugar.
For a savory kick, a teaspoon of Dijon mustard stirred into the butter and sugar makes a brilliant contrast. This version pairs especially well with my Homemade Meatloaf because the tanginess of the mustard balances the richness of the meat.
If you have an air fryer, you can toss the carrots in the oil and salt, air fry at 400°F for 10 minutes, and then toss them in the melted butter and sugar mixture in a bowl. It's a great way to get that charred edge without using the stove.
Scaling Guidelines
When you're cooking for a crowd, you can't just multiply everything by four and expect the same result. If you put 4 lbs of carrots in a standard skillet, they will crowd the pan and steam instead of sear.
Scaling Down (Half Batch): Use a smaller 8 inch skillet. Reduce the searing time by about 20% because the pan will heat up faster with less mass.
Scaling Up (Double or Triple Batch): Work in batches for the sear. Brown the carrots in two groups, then combine them in the pan for the glazing step. Only increase the salt and pepper to 1.5x, as too much salt can inhibit the sugar from caramelizing properly. According to Serious Eats, managing the surface area of your pan is the most critical part of getting a proper sear on vegetables.
Truths About Glazing
There are a few things people tell you about glazed carrots that just aren't true. For one, you don't need to boil the carrots in water before glazing them. In fact, doing that just adds unnecessary moisture that makes the final glaze slide right off.
Another myth is that you need "fancy" organic carrots for this to work. While heirloom carrots look pretty, standard carrots from the grocery store have a higher sugar content, which actually helps them glaze better.
Storage and Waste Tips
If you happen to have leftovers, store them in an airtight container in the fridge for up to 4 days. When you reheat them, do it in a skillet over medium heat with a tiny splash of water. This will loosen the glaze and bring back that glistening look.
I don't recommend freezing these, as the texture of the carrot changes and the glaze can become grainy.
As for zero waste, don't throw away your carrot peels! Collect them in a freezer bag along with onion scraps and celery ends. Once the bag is full, simmer them in water for a few hours to make a basic vegetable stock. It's a great way to get more value out of your produce.
Best Ways to Serve
These carrots are a powerhouse side dish because they fit in anywhere. Because they are sweet and salty, they balance out heavy, savory mains. They are an absolute dream next to a Turkey Meatloaf or a roast chicken.
If you're serving them for a brunch, try adding a sprinkle of fresh parsley on top for a pop of color. The bright green against the mahogany carrots looks professional. Just remember to serve them immediately, as the glaze is at its peak velvetiness right when it comes off the heat.
Trust me on this, don't let them sit in the pan too long or the sugar will harden into a candy shell.
Recipe FAQs
Why are my glazed carrots mushy?
Avoid using a lid during cooking. Keeping the pan covered traps steam and boils the carrots instead of searing them.
Why is my brown sugar glaze too thin?
Increase the cooking time or heat. The water must evaporate completely for the butter and sugar to bond into a thick coating.
How to prep the carrots for a consistent cook?
Slice carrots into uniform 1 inch rounds. Tossing them in olive oil, salt, and pepper ensures they brown evenly in the skillet.
Is it true that I can't use medium high heat because the sugar will burn?
No, this is a common misconception. You use medium high heat for the initial sear, then lower the heat to medium specifically before adding the brown sugar and butter.
Can I freeze these carrots for later?
No, avoid freezing them. The carrot texture degrades and the glaze often becomes grainy upon thawing.
How to reheat leftover glazed carrots?
Place them in a skillet over medium heat with a splash of water. This loosens the glaze and restores the glistening finish.
What should I serve with these carrots?
Pair them with a rich protein. These sweet carrots balance the savory depth of a braised beef tongue.
Brown Sugar Glazed Carrots