Cheesy Stuffed Bell Peppers: Beef and Rice
- Time: 15 min active + 45 min cook = Total 60 mins
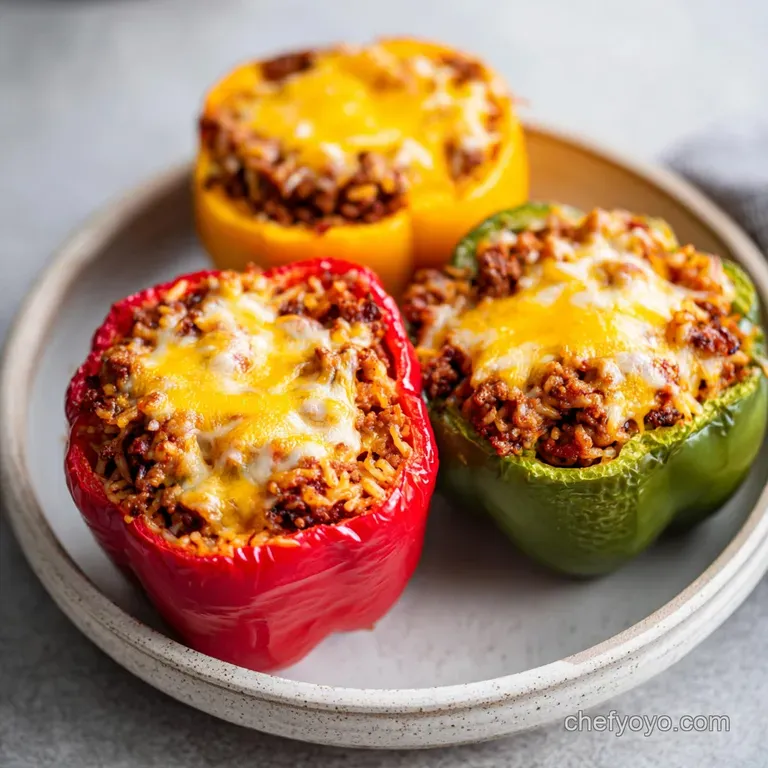
- Flavor/Texture Hook: Bubbling mahogany cheese over velvety, savory filling
- Perfect for: Budget-friendly weeknight dinners or meal prep
- Easy and Hearty Stuffed Bell Peppers
- Why These Peppers Actually Work
- Recipe Specs
- The Shopping List Breakdown
- Necessary Kitchen Gear
- The Step-by-Step Process
- Fixing Common Pepper Problems
- Troubleshooting Common Issues
- Customizing Your Filling
- Scaling Your Batch
- Pepper Myths
- Storage and Waste Tips
- Serving Your Meal
- Recipe FAQs
- 📝 Recipe Card
The scent of garlic and smoked paprika hitting a hot skillet is enough to make anyone hungry, but for a long time, I had a real problem with this dish. I used to just stuff the peppers and throw them in the oven, thinking the filling would steam the shells. The result?
I'd bite into a mouthful of savory beef and rice, only to find the pepper was still basically raw and crunchy. It was a total disaster that made me avoid this classic for a while.
Then I realized that the filling and the pepper have completely different cooking times. The meat is already mostly cooked before it goes in, but the pepper is a thick, watery vegetable that needs a head start. By pre roasting the shells, I finally found the secret to getting that tender, slightly charred exterior that holds up to the filling. Now, my Stuffed Bell Peppers always have that consistent, melt in-your mouth texture.
You can expect a meal that feels rustic and wholesome without costing a fortune. We're using a few smart tricks to stretch the ingredients, like utilizing the rice to add bulk and the tomato sauce to keep the lean beef from drying out.
Trust me on this, once you try the pre bake method, you'll never go back to the old way of doing things.
Easy and Hearty Stuffed Bell Peppers
To get this right, we have to talk about the architecture of the pepper. If you've ever had a pepper tip over in the pan, you know the frustration of a "filling spill." I've learned that slicing a tiny sliver off the bottom to create a flat base is a total lifesaver.
It keeps everything upright and ensures the cheese stays on top where it belongs, rather than sliding down the sides.
Right then, let's look at the filling. I've found that simmering the beef, rice, and sauce together for a few minutes before stuffing is the key to a cohesive center. If you just mix them cold, the filling can feel grainy or fall apart.
When you simmer it, the starch from the rice binds with the tomato sauce, creating a velvety texture that feels a bit more like a professional bake and less like a bowl of loose meat and rice.
I also want to mention the beef. I usually go for lean ground beef to avoid a pool of grease at the bottom of the dish, but if you're using a fattier blend, just drain the skillet after browning. Honestly, don't even bother with low-fat cheese here.
The mozzarella provides the necessary fat and salt to balance the acidity of the tomato sauce, and that mahogany crust is where the real flavor lives.
Why These Peppers Actually Work
Understanding the "why" helps you tweak the recipe without ruining the result. Here is the breakdown of what's happening in your oven:
- Pre Roasting: Heating the peppers first breaks down the rigid pectin in the cell walls, which means they soften much faster than the filling cooks. This prevents the "raw pepper" syndrome.
- Starch Binding: Cooking the rice first and then simmering it with the sauce allows the grains to absorb the savory liquids, preventing a dry or crumbly center.
- Moisture Barrier: Rubbing the inside of the peppers with oil creates a slight barrier that helps the pepper roast rather than just steam from the inside out.
- Carryover Heat: The thick walls of the pepper act as an insulator, keeping the filling hot and moist even after you take them out of the oven.
According to roasting guides on Serious Eats, high heat is essential for creating the charred, sweet flavor in nightshade vegetables. By hitting them with 400°F (200°C) immediately, we're triggering that caramelization before the filling even enters the picture.
| Method | Time | Texture | Best For |
|---|---|---|---|
| Oven Bake | 60 mins | Charred & Soft | Large batches / Meal prep |
| Stovetop | 40 mins | Steamed & Tender | Single portions / Quick meals |
Recipe Specs
When you're planning your evening, it helps to have the exact numbers. This recipe is designed to be efficient and budget smart, meaning we aren't wasting time or expensive ingredients.
- Prep Time: 15 minutes
- Cook Time: 45 minutes
- Total Time: 60 minutes
- Yield: 6 servings
- Temperature: 400°F (200°C)
- Dish Size: 9x13 inch baking pan
The beauty of this dish is that it's a complete meal in one shell. You've got your protein from the beef, your carbs from the rice, and your vitamins from the peppers. It's rustic, filling, and doesn't require a dozen different side dishes to feel like a feast.
The Shopping List Breakdown
I like to keep my shopping simple. Most of this stuff is probably already in your pantry. If you're on a tight budget, remember that you can often find "imperfect" bell peppers at a discount, and as long as they are firm, they work perfectly for this.
For the Pepper Bases
- 6 large bell peppers Why this? Large ones provide more room for filling.
- 1 tbsp olive oil Why this? Prevents sticking and helps roasting.
- 1/2 tsp salt Why this? Draws out moisture for better roasting.
For the Savory Filling
- 1 lb lean ground beef Why this? Provides structure without excess grease.
- 2 cups cooked white rice Why this? Absorbs sauce and adds heartiness.
- 1 medium onion, finely diced Why this? Essential aromatic base.
- 3 cloves garlic, minced Why this? Adds punchy, savory depth.
- 15 oz tomato sauce Why this? Binds the filling and adds acidity.
- 1 tbsp Worcestershire sauce Why this? Adds umami and saltiness.
- 1 tsp dried oregano Why this? Earthy, herbal notes.
- 1/2 tsp smoked paprika Why this? Gives a hint of wood fired flavor.
For the Cheesy Topping
- 1.5 cups shredded mozzarella cheese Why this? Great melt and mild flavor.
- 1/4 cup fresh parsley, chopped Why this? Freshness to cut through the richness.
| Original Ingredient | Substitute | Why It Works |
|---|---|---|
| Lean Ground Beef | Ground Turkey | Leaner option. Note: May need a pinch more salt |
| White Rice | Quinoa | Higher protein. Note: Nuttier flavor and denser texture |
| Mozzarella | Pepper Jack | Same melt. Note: Adds a spicy kick to the topping |
| Tomato Sauce | Crushed Tomatoes | Chunkier texture. Note: More rustic and less smooth |
Necessary Kitchen Gear
You don't need a fancy kitchen to make these. I've made these in a tiny apartment with barely any counter space. A couple of basic tools will do the trick.
- 9x13 inch baking dish: This is the standard size. If you use one that's too small, the peppers will be crowded and won't roast evenly.
- Large skillet: I prefer a stainless steel or cast iron pan for browning the beef. You want a good sear on that meat to build flavor.
- Sharp Chef's knife: Essential for dicing the onion and garlic finely so they blend into the filling.
- Wooden spoon: Perfect for stirring the filling and scraping the brown bits (the fond) off the bottom of the pan.
Chef Note: If you find your peppers are always tipping over, try using a muffin tin or a deep casserole dish to keep them snugly in place.
The step-by-step Process
Let's crack on. Follow these steps, and pay attention to the visual cues. The timing is a guide, but the "look" of the food is the real truth.
- Prepare the peppers. Cut the tops off the bell peppers and remove the seeds and membranes. Rub the insides with olive oil and salt. Note: This preps the skin for over high heat roasting.
- Pre bake the shells. Place the peppers upright in a 9x13 inch baking dish and pre bake at 400°F (200°C) for 10–12 minutes until the skin looks slightly matte and the peppers have softened just a bit.
- Brown the meat. In a skillet over medium high heat, brown the ground beef until it's no longer pink and has a few browned, crispy edges.
- Sauté aromatics. Add the diced onion and garlic to the skillet and sauté until the onion is translucent and the garlic smells fragrant.
- Simmer the filling. Stir in the cooked rice, tomato sauce, Worcestershire sauce, oregano, and paprika. Simmer for 5 minutes until the mixture is thick, cohesive, and bubbling slightly.
- Stuff the peppers. Spoon the beef and rice mixture generously into each pre roasted pepper, pressing down slightly to pack it. Note: Packing it prevents the filling from shrinking and leaving a gap.
- Add cheese. Top each pepper with a generous handful of shredded mozzarella cheese.
- Final bake. Bake for another 20–25 minutes until the cheese is bubbling and mahogany colored in spots.
- Garnish. Sprinkle with chopped fresh parsley before serving.
Fixing Common Pepper Problems

Even with a good plan, things can go sideways. Usually, it comes down to moisture or heat management. Here is how to handle the most frequent hiccups.
Troubleshooting Common Issues
| Issue | Solution |
|---|---|
| Why Your Peppers Stay Crunchy | If the pepper is still too firm, you likely skipped the pre bake or used peppers that were too thick walled. The pre bake is non negotiable for a velvety texture. If you're in a rush, you can microwav |
| Why the Filling is Too Dry | This usually happens if the rice was overcooked before being added, or if the beef was cooked too long. To fix this, add an extra tablespoon of tomato sauce or a splash of beef broth to the filling be |
| Why Your Peppers Tip Over | This is a structural issue. If the peppers aren't sitting flat, they'll lean, and the cheese will slide. Always slice a thin piece off the bottom of the pepper to create a stable base. |
Common Mistakes Checklist
- ✓ Did I pre bake the peppers for at least 10 minutes?
- ✓ Is the filling simmered and cohesive, not just mixed?
- ✓ Did I slice the bottoms of the peppers for stability?
- ✓ Is the oven fully preheated to 400°F (200°C)?
- ✓ Did I pack the filling tightly to avoid air pockets?
Customizing Your Filling
Once you've got the basic Stuffed Bell Peppers down, you can really have some fun with the flavors. I love treating the filling as a canvas for different cuisines.
If you want to go in a different direction, you might try lean turkey stuffed peppers for a lighter, more protein dense meal. Turkey is a bit leaner than beef, so I recommend adding a bit more olive oil to the sauté to keep the texture silky. For those who love a smoky, spicy vibe, you can swap the bell peppers for roasted poblano peppers, which adds a natural heat and a deeper, earthier flavor to the dish.
For a vegetarian version, swap the beef for a mix of cooked lentils and finely chopped mushrooms. The mushrooms provide that "meaty" chew, while the lentils add the necessary protein. You'll want to increase the smoked paprika slightly to make up for the lack of beefy depth.
If you're following a low carb or Keto lifestyle, simply replace the white rice with cauliflower rice. Just be careful: cauliflower rice releases a lot of water, so you'll need to simmer the filling for an extra 5-7 minutes to ensure the sauce thickens up and doesn't make the peppers soggy.
Quick Choice Guide:
- Want more kick? Add diced jalapeños to the beef.
- Want it creamier? Mix some cream cheese into the rice.
- Want more veg? Stir in shredded carrots or zucchini.
Scaling Your Batch
Making this for a crowd is easy, but you can't just multiply everything by four and expect it to work the same way. There are some physics involved when you crowd a pan.
Scaling Down (1-2 servings) If you're just cooking for yourself, use a small loaf pan instead of a 9x13. Reduce the baking time for the final roast by about 5 minutes, as smaller batches often cook faster.
If the recipe calls for a whole egg (in other variations), beat one in a cup and use half.
Scaling Up (12+ servings) When doubling the recipe, don't double the salt and spices. Start with 1.5x the seasoning and taste before stuffing. If you're using multiple baking dishes, rotate them halfway through the baking process. The ones on the top rack will brown faster than the ones on the bottom.
For massive batches, I recommend browning the beef in two separate pans. If you crowd a single skillet with 2 lbs of meat, it will steam in its own juices instead of browning, and you'll lose that essential savory crust.
| Item | Single Batch (6) | Double Batch (12) | Adjustment Note |
|---|---|---|---|
| Beef | 1 lb | 2 lbs | Brown in two batches |
| Rice | 2 cups | 4 cups | Use a larger pot to simmer |
| Sauce | 15 oz | 30 oz | Keep an eye on liquid levels |
| Bake Time | 45 mins | 50-55 mins | Extend slightly for denser pans |
Pepper Myths
There are a few things people tell you about these that just aren't true. Let's set the record straight.
Myth: Searing the meat "seals in" the juices. Searing is about flavor, not sealing. The juices escape regardless of how you brown the meat. The reason we sear the beef is to create those browned bits that add a rich, savory depth to the overall dish.
Myth: You must use red peppers for the best flavor. Color is mostly about sweetness. Red and orange peppers are sweeter, while green peppers are slightly more bitter and "grassy." All of them work, but if you want a more traditional, savory profile, a mix of colors is actually best.
Storage and Waste Tips
I hate wasting food, and with this recipe, there's a lot of potential for zero waste cooking.
Storage Guidelines Store any leftover Stuffed Bell Peppers in an airtight container in the fridge for up to 4 days. To reheat, I recommend the oven or an air fryer at 350°F (175°C) for 10 minutes.
This keeps the cheese from getting rubbery, which often happens in the microwave.
Freezing Tips You can freeze these! Just make sure they are completely cooled before freezing. Wrap them individually in foil and place them in a freezer bag. They'll stay good for about 3 months. When you're ready to eat, thaw them in the fridge overnight and bake as usual.
Zero Waste Ideas Don't throw away the pepper tops! You can chop them up and toss them into a vegetable stock or freeze them to use in a future stir fry. Also, if you have leftover cooked rice, you can mix it into a fried rice dish the next day with some of the leftover beef filling.
Serving Your Meal
To make this feel like a complete dinner, you need a few things to balance out the richness of the cheese and beef.
The Refreshing Pair A crisp, acidic side is the way to go. A simple arugula salad with lemon vinaigrette or a cucumber and red onion salad cuts through the heaviness of the mozzarella and provides a bright contrast.
The Comfort Pair If you're going for a full on comfort meal, serve these alongside a dollop of sour cream and some sliced avocado. The coolness of the cream and the buttery texture of the avocado complement the smoky paprika and savory beef perfectly.
When you plate them, let the peppers rest for about 5 minutes after they come out of the oven. This allows the filling to set slightly, so when you cut into them, the center stays together rather than sliding out onto the plate.
Garnish with that fresh parsley right at the end for a pop of color that makes the dish look as good as it tastes.
Recipe FAQs
Should I cook my bell peppers before stuffing them?
Yes, pre-bake them. Roast the peppers at 400°F for 10 12 minutes before filling to ensure they reach a velvety texture rather than staying crunchy.
What can you stuff bell peppers with?
A savory blend of ground beef, rice, and tomato sauce. Sautéed onion and garlic combined with smoked paprika and oregano create a cohesive, flavorful filling.
What are some common mistakes to avoid when making stuffed peppers?
Skipping the pre-bake or overcooking the rice. Neglecting the initial roast leaves peppers too firm, while overcooked rice leads to a dry or mushy filling.
Should I cover my stuffed peppers when I put them in the oven?
No, leave them uncovered. This allows the mozzarella cheese to bubble and brown into a mahogany color.
How to stop stuffed peppers from tipping over?
Place them upright in a 9x13 inch baking dish. Pack the beef and rice mixture firmly into the pepper to create a stable internal structure.
How to reheat leftovers without making the cheese rubbery?
Use an oven or air fryer at 350°F. Heat for 45 minutes to maintain the best texture, as microwaves often ruin the consistency of the cheese.
Is it true that you can only use white rice as a filler?
No, this is a common misconception. You can easily swap the grain, such as making quinoa stuffed peppers for a different texture.
Cheesy Stuffed Bell Peppers

