The Classic Baristas Vanilla Syrup Café Quality Homemade

Unlocking the Secret to Professional Coffeehouse Syrup
If you are serious about achieving café quality beverages at home, the quality of your flavouring elements is non-negotiable. This is the definitive Vanilla Syrup Recipe —a formula that guarantees an intense, aromatic sweetness far superior to anything commercially bottled.
We are moving beyond simple sweetness and harnessing the deep, complex notes that only real vanilla provides. This foundational recipe is the first step toward mastering your home barista skills, ensuring every latte, cold brew, or even Vanilla Syrup For London Fog tastes authentically luxurious.
The Case for Making Your Own Vanilla Syrup
The immediate and obvious benefit of creating Homemade Vanilla Syrup is control: control over ingredients, flavour intensity, and crucially sugar content.
When you look closely at the ingredients list of mass produced syrups, even popular varieties like Vanilla Syrup Starbucks often contain corn syrup, artificial flavourings, and preservatives. Not only does this compromise the taste, but it adds unnecessary additives.
By contrast, our simple syrup requires only three core components. On top of that,, making your own drastically reduces cost. While tracking Vanilla Syrup Starbucks Calories might be a priority for some, prioritizing pure ingredients means every calorie contributes real flavour, not chemical residue.
This project is about elevating the everyday experience while saving money in the long run.
Ditching the Artificial: Why Real Vanilla Beans Matter
The difference between vanilla extract and a true vanilla bean is the difference between a photograph and being there in person. Extracts rely on alcohol to carry the flavour, and when heated, much of that delicate aroma dissipates.
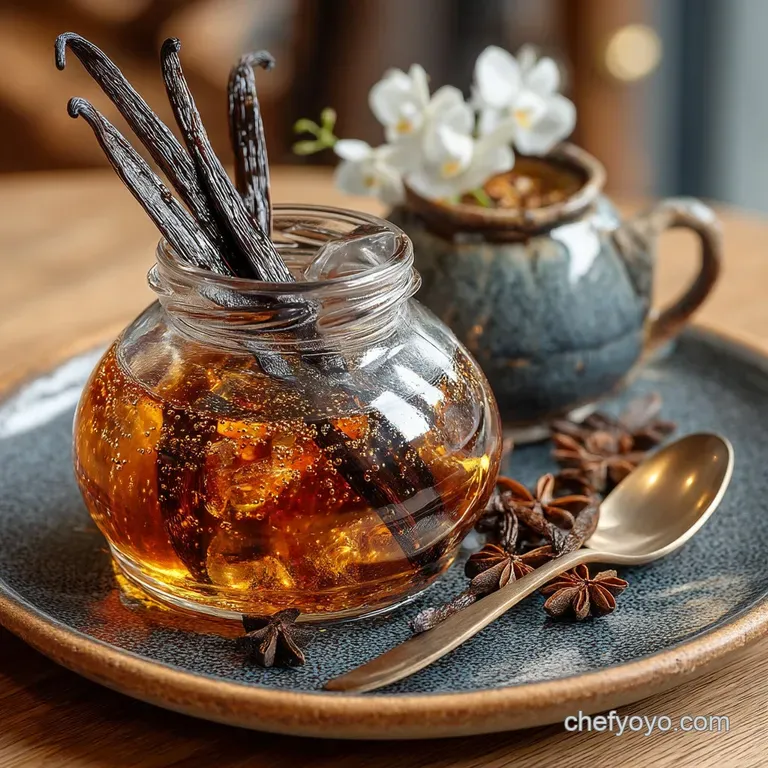
This recipe, however, relies entirely on a high-quality vanilla bean, which contains hundreds of aromatic compounds locked within its oily "caviar" and tough skin. Infusing the entire pod allows those complex compounds to slowly leach into the cooling syrup, resulting in a depth and richness that pure extract simply cannot duplicate.
This deep, brown flecked Vanilla Syrup is a testament to the power of using nature’s best.
Achieving Barista Status in Under 10 Minutes
Despite its sophisticated flavour profile, this recipe is incredibly fast. The active preparation and cooking time combined is less than 10 minutes. We spend about five minutes slicing the bean and measuring our ingredients, followed by six minutes gently heating the mixture.
The majority of the stated preparation time is passive the crucial steeping period where the flavour develops. This means that, with very little effort, you can produce a generous batch of professional grade syrup, making it highly accessible even for busy morning routines.
Sourcing the Essentials for Perfect Vanilla Syrup
The high quality of the finished Vanilla Syrup For Coffee depends almost entirely on the quality of the ingredients chosen, as the ingredient list is intentionally minimal.
Water to Sugar Ratio: Achieving the Ideal Viscosity
We utilize the standard 1:1 simple syrup ratio (one cup of filtered water to one cup of granulated sugar, approximately 200g sugar to 240ml water). This classic ratio yields a medium thin viscosity, which is ideal for dissolving quickly into cold beverages like iced lattes and cocktail shakers, ensuring a uniform sweetness without clumping or creating a heavy mouthfeel.
Using filtered water is paramount here; tap water often contains mineral residues that can compromise the clarity and clean flavour of the syrup.
Selecting and Prepping Your Star Ingredient: The Vanilla Bean
For the most intense flavour, look for plump, moist vanilla beans from Madagascar (often labelled Bourbon) or Tahiti. Madagascar beans are classically sweet and creamy, while Tahitian beans offer a more floral, fruitier note. Whichever you select, the preparation is key.
Using a sharp paring knife, the bean must be split lengthwise from tip to tail, cutting just through the outer skin. Then, the blunt back of the knife is used to scrape every last bit of the sticky, black vanilla 'caviar' into the saucepan, maximizing the essential oils and aroma.
Tools of the Trade: Required Equipment for Syrup Success
The right equipment facilitates a smooth process and ensures the longevity of your product. A medium, non-reactive saucepan (stainless steel is perfect) is required to prevent metallic tastes from leaching into the syrup.
A fine mesh sieve is necessary for straining the finished syrup and removing the seeds, resulting in a cleaner product. Finally, invest in a funnel and an airtight, sterilised glass bottle.
Sterilizing the storage container is a critical step that extends the shelf life of your Homemade Vanilla Syrup significantly.
Related Recipes Worth Trying
- The Quintessential Crack Silky Classic Vanilla Bean Crème Brûlée — Master the Classic Crème Brûlée Recipe at home Learn how to achieve a silky custard base and that perfect shattering caramel top with my foolproof guide
- Foolproof Classic French Vanilla Crème Brûlée Recipe — Learn how to master the perfect Classic French Creme Brulee with this simple traditional recipe Achieve that shatteringly crisp top over smooth custard Easy...
- NoFuss Vanilla Cottage Cheese Ice Cream Recipe High Protein — Whip up the Best Vanilla Cottage Cheese Ice Cream This nochurn recipe is rich highprotein and incredibly simple Perfect healthy cottage cheese dessert
Step-by-step: Crafting Your Aromatic Vanilla Syrup Base
Follow these precise steps to transition from simple ingredients to a complex flavour base. This methodology ensures maximum flavour extraction without over reducing the syrup.
The Barista Method: Splitting and Scraping the Pod
Begin by combining your measured water, sugar, and a small pinch of salt in the saucepan. Next, add the scraped vanilla seeds and the now-empty bean pod. This "Barista Method" ensures that the tiny seeds, rich in oil, disperse immediately, while the pods contribute the subtle, lasting aromatic notes.
Place the pan over medium heat and stir constantly with a whisk or wooden spoon until the granulated sugar is completely dissolved. It is essential that the liquid becomes perfectly clear before proceeding; stop stirring once the mixture is transparent.
The Infusion Process: Extracting Maximum Flavor
Once the sugar is dissolved, bring the mixture up to a gentle simmer for just 30 to 60 seconds. This brief simmer pasteurizes the syrup, making it shelf stable. Immediately remove the saucepan from the heat.
At this point, stir in the optional teaspoon of pure vanilla extract, if using adding it off the heat preserves its volatile flavour compounds. Now begins the most crucial passive stage: the infusion.
Allow the vanilla bean pod and seeds to steep and cool entirely within the liquid, which typically takes 45 to 60 minutes. This slow cooling maximizes the flavour extraction, resulting in that wonderfully robust Vanilla Syrup For Coffee Recipe flavour.
When to Remove the Heat: Avoiding Crystallization and Off-Flavors
Over boiling simple syrup is the primary cause of crystallization, where the dissolved sugar structure breaks down. By maintaining a gentle simmer for under a minute and then immediately removing the syrup from the heat, we ensure we dissolve the sugar fully for clarity and stability without evaporating too much water.
Too much evaporation would result in a syrup that is too thick and prone to becoming grainy over time.
Mastering Storage and Shelf Life for Homemade Syrup
Proper storage is key to enjoying your high-quality product for weeks to come. Once the syrup is completely cooled, pour it through a fine mesh sieve (you may line it with muslin cloth for extra clarity, ensuring no tiny seed specks remain).
Use a funnel to transfer the strained syrup into a clean, sterilised glass bottle. Because it has been briefly simmered and is concentrated sugar water, this Vanilla Syrup will keep beautifully in the refrigerator for about three to four weeks.
Always ensure the container is airtight to prevent oxidation or the absorption of refrigerator odors.
Beyond the Latte: Creative Uses for Your Vanilla Syrup
While the primary application is often the Vanilla Syrup For Coffee —making that morning Americano or macchiato instantly better this product has versatility that extends far beyond the coffee cup.
Troubleshooting Thin or Cloudy Syrup Consistency
If your finished syrup seems too thin, it likely means you didn't allow the initial simmer long enough, or you used slightly more than a 1:1 ratio of water to sugar. To fix this, simply return the strained syrup to the pan and simmer it very gently for an additional two to three minutes.
If the syrup appears cloudy, it’s often due to impurities in un-filtered water or over agitating the mixture while it was boiling. While harmless, cloudiness can be minimized by carefully straining through multiple layers of cheesecloth.
Custom Flavor Twists: Spiced Vanilla and Bourbon Variations
Once you have mastered the foundational Vanilla Syrup Recipe , it's easy to customize. For a seasonal twist, try the Spiced Vanilla Variation by adding a whole cinnamon stick, two star anise pods, or a pinch of cracked cardamom to the saucepan during the simmering phase.
For an adult friendly flavour profile perfect for cocktails, swap out a quarter cup of the water for a smooth bourbon (added off the heat along with the vanilla extract) to create a sophisticated Bourbon Vanilla Syrup.
Recreating Café Favorites: Calculating Syrup per Serving
To achieve the flavour balance found in cafés, understanding dosage is essential. A standard serving of this Vanilla Syrup for a medium (12 16 ounce) hot or iced drink is generally 1 tablespoon (15 ml).
If recreating a popular café beverage like a vanilla latte, start with 1 tbsp and adjust up or down depending on the roast of your espresso and your preferred sweetness level. This measured approach ensures you maximize the use of your syrup without over sweetening.
Maximizing the Vanilla Bean: Reusing the Spent Pod
Do not discard that beautiful vanilla bean once you have strained the syrup! The used pod, though depleted of much of its flavour, still contains enough aromatic oils to be reused. Rinse the pod, pat it dry, and place it directly into a jar of granulated sugar.
Over the course of a week, the pod will slowly infuse the sugar, yielding fragrant homemade vanilla sugar, perfect for baking or dusting baked goods, demonstrating a truly zero waste approach to your gourmet ingredients.
Recipe FAQs
I've made a big batch; how long does this liquid gold last in the fridge before it goes off?
If you've followed the instructions and briefly simmered the syrup, you’re looking at a shelf life of about 3 to 4 weeks, sometimes longer, when stored in a sterilised, airtight container in the refrigerator. Just like keeping milk fresh, a proper seal is key!
Always check the syrup before use; if it looks cloudy, smells sour, or shows any mould (a true tragedy!), it’s time for a fresh batch.
Can I make this proper homemade Vanilla Syrup using vanilla extract if I haven't got a whole bean handy?
Absolutely, you can use extract in a pinch, though the flavour won't be quite as deep and rounded as that gorgeous bean caviar. If you’re making a substitution, use 3 teaspoons of high-quality pure vanilla extract in place of the bean.
Crucially, wait until you have removed the syrup from the heat and it’s cooling before adding the extract; boiling it will cause that precious flavour to evaporate away into thin air, which would be a crying shame.
My syrup looks a bit cloudy, or it’s gone crunchy at the bottom. What went wrong?
Don't panic! Crunchy bits mean the syrup has crystallised, usually because you either boiled it too long or you didn’t fully dissolve the sugar before simmering. If it looks cloudy, it might just be the natural vanilla oil mixing with the liquid, which is fine, but it can also be a sign the sugar wasn’t fully dissolved at the start.
For best results, stir until the liquid is absolutely crystal clear before you even think about turning up the heat.
What else can I use this gorgeous syrup for, besides my morning cuppa?
This syrup is an absolute multi tasker and frankly deserves its own standing ovation. Beyond your usual latte or cold brew, it makes a brilliant addition to adult beverages; swap it for plain simple syrup in an Old Fashioned for a smooth vanilla twist, or use it to sweeten tea cocktails.
It’s also divine drizzled over plain Greek yoghurt, fresh fruit salad, or poured liberally onto your Sunday morning stack of pancakes or French toast.
Is there a way to make this syrup a bit lighter on the waistline, perhaps a sugar swap?
Yes, but tread carefully, as texture is key here! You can certainly substitute standard sugar with baking friendly alternatives like erythritol or monk fruit, ensuring you use a 1:1 measurement swap for the sugar volume.
Do note that these sweeteners don’t always dissolve quite as smoothly, so you might need a longer, gentler simmer and a slightly longer cooling time to ensure your finished syrup remains smooth and doesn't separate.
Classic Homemade Vanilla Syrup

