Lemon Bars: Tart and Creamy

- Time:15 minutes active + 40 minutes baking + 2 hours chilling = Total 2 hours 55 mins
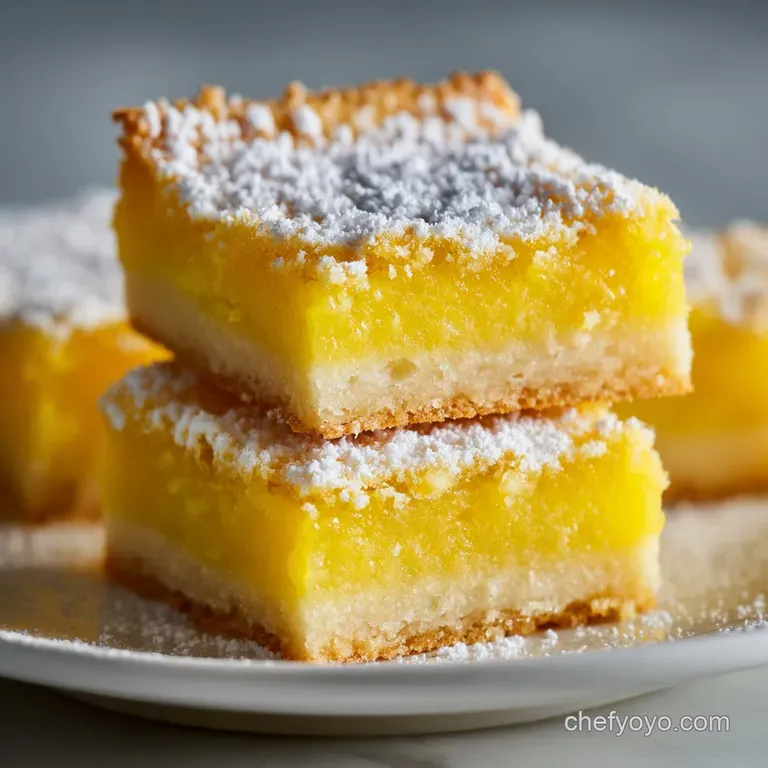
- Flavor/Texture Hook: Tart, velvety filling on a shatter crisp shortbread base
- Perfect for: Spring brunches, budget-friendly dessert platters, or a zesty afternoon treat
Ever wonder why some lemon squares taste like artificial candy while others taste like a fresh grove of citrus? It's usually because people rely on bottled juice or over bake the filling until it's rubbery. I remember the first time I tried making these for a neighbor's housewarming party.
I was so worried about the filling being too runny that I left it in the oven way too long. Instead of those velvety squares, I ended up with something closer to a lemon flavored sponge cake.
The magic happens when you trust the jiggle. I learned that the filling shouldn't look "done" in the oven; it just needs to be set at the edges. Once it hits the fridge, the proteins in the eggs and the starch from the flour lock everything into that signature creamy texture.
This recipe for Lemon Bars is all about getting a rustic, wholesome result without spending a fortune on fancy ingredients. We're using simple pantry staples, but the technique is what makes them taste like they came from a high end bakery.
It's a bright, punchy dessert that cuts through the richness of the butter, and it's honestly one of the most rewarding things to bake when you want something that looks impressive but stays budget friendly.
Secrets for Perfect Results
Right then, let's talk about what actually makes this work. Since we're going for a budget smart approach, you don't need the most expensive organic lemons to get a professional result. You just need to understand how the ingredients interact.
Starch Stabilization: The small amount of flour in the filling prevents the lemon juice from separating. It creates a network that holds the liquid in place, ensuring the filling is velvety rather than watery.
Temperature Control: Using room temperature eggs is a non negotiable. According to King Arthur Baking, ingredients at room temperature emulsify more easily, which means your filling won't break or develop weird lumps.
The Fat Barrier: Pre baking the crust creates a toasted, nutty layer that acts as a shield. This prevents the lemon filling from soaking into the shortbread, which is how you avoid that dreaded soggy bottom.
Acidic Balance: Fresh lemon zest contains oils that provide a deeper aroma than the juice alone. By adding both, you get a layered citrus punch that feels artisanal and fresh.
| Fresh Lemons | Bottled Juice | Impact | Savings |
|---|---|---|---|
| Vibrant, aromatic | Flat, one dimensional | Huge flavor boost | Low (bottled is slightly cheaper) |
| Natural zest available | No zest | Better texture/scent | Negligible |
| Variable acidity | Consistent | More authentic taste | Small |
Essential Component Guide
When you're working with a simple list of ingredients, the quality and role of each one matter more. I've found that you can use store brand butter and flour and still get a world class result as long as you follow the ratios.
| Ingredient | Science Role | Pro Secret |
|---|---|---|
| All purpose Flour | Structure & Thickening | Chill the dough for 10 mins if it feels too oily |
| Unsalted Butter | Tenderness & Flavor | Melt it slowly to avoid separating the milk solids |
| Large Eggs | Emulsification & Lift | Whisk gently to avoid adding too much air |
| Fresh Lemon Juice | Tartness & Set | Rub the zest into the sugar first to release oils |
Necessary Kitchen Tools
You don't need a professional kitchen for this, but a few specific tools make it way easier. I use a standard 8x8 or 9x9 inch square baking pan. If you have a smaller pan, your bars will be thicker, so you'll need to add about 5 minutes to the final bake.
A parchment paper liner is my biggest tip here. Don't just grease the pan; the parchment allows you to lift the entire block of Lemon Bars out of the pan once they're chilled. This is the only way to get those clean, sharp edges when you slice them.
An offset spatula is great for pressing the crust evenly, but a flat bottomed measuring cup works just as well. Just make sure you get the corners, or the filling will leak down the sides and burn.
The step by step Process
Let's crack on with the baking. Remember, the goal is a crust that smells like toasted cookies and a filling that still has a slight wobble when you pull it out.
Phase 1: Pressing and Pre Baking the Crust
- Preheat your oven to 350°F (175°C) and line your pan with parchment paper. Note: Leave an overhang on the sides for easy removal.
- Combine 120 g all purpose flour, 115 g melted butter, 30 g powdered sugar, and 1.5 g salt until a soft dough forms.
- Press the dough evenly into the bottom of the pan using an offset spatula. Note: Ensure the edges are firmly pressed.
- Bake for 20 minutes until the edges are just barely golden and the crust smells nutty.
Phase 2: Whisking the Zesty Filling
- In a medium bowl, whisk together 180 g granulated sugar, 16 g all purpose flour, 1 g baking powder, and 1.5 g salt.
- Add 4 large eggs (room temperature) and whisk until combined, but do not over aerate. Note: Too many bubbles will cause the top to crack.
- Stir in 160 ml fresh lemon juice and 6 g lemon zest until the mixture is a smooth, pale yellow liquid.
Phase 3: The Final Bake and Chill
- Pour the filling over the hot crust and smooth the top. Note: Pouring onto a hot crust helps seal the bottom.
- Bake for an additional 20-25 minutes until the edges are set, but the center should have a slight, jelly like jiggle.
- Remove from oven and cool completely at room temperature before transferring to the fridge for 2 hours to lock in the structure.
Chef's Note: After the fridge chill, sift 15 g non melting powdered sugar over the top just before serving. It adds a professional finish and balances the tartness.
Fixing Common Texture Issues
The most common struggle with Lemon Bars is getting the consistency right. If the filling is too soft, it's usually a temperature or timing issue. If it's too tough, it's usually an over baking issue.
Why Your Filling Didn't Set
If your bars are still runny after cooling, you likely under baked them or didn't chill them long enough. The eggs need to reach a specific temperature to coagulate and hold the lemon juice. According to Serious Eats, the internal temperature of custards is key to a stable set.
If Your Crust is Crumbling
A crumbly crust usually happens when the butter is too cold or the flour wasn't mixed in enough. If the dough feels like sand, add a teaspoon of melted butter to bind it.
If the Top is Sticky
A sticky surface often comes from too much humidity or not enough sugar in the filling. Ensure you're using the exact weights for the granulated sugar to maintain the correct syrup to egg ratio.
| Problem | Root Cause | Solution |
|---|---|---|
| Filling "weeps" liquid | Over whisking eggs | Whisk until just combined, no foam |
| Crust is soggy | Under baked base | Bake until edges are golden brown |
| Top has deep cracks | Oven too hot | Lower temp to 325°F and bake longer |
Common Mistakes Checklist
- ✓ Did you use room temperature eggs to prevent curdling?
- ✓ Is the parchment paper overlapping the edges?
- ✓ Did you stop baking when the center still had a jiggle?
- ✓ Did you wait the full 2 hours in the fridge before slicing?
- ✓ Did you weigh your ingredients instead of using cups?
Customizing Your Batch
Since we're keeping things budget smart, you can easily swap ingredients without ruining the dish. If you want to make these gluten-free Lemon Bars, you can replace the all purpose flour with a 1:1 gluten-free blend. Just note that the crust might be slightly more fragile and the filling a bit denser.
For those who prefer a different base, you can make Lemon Bars with Graham Cracker Crust by mixing 150 g graham cracker crumbs with 60 g melted butter and 20 g sugar. Press this into the pan and bake for 10 minutes before adding the filling.
If you're feeling fancy, try a Raspberry Lemon Twist. Swirl a few tablespoons of raspberry jam into the top of the filling with a toothpick before baking. For another buttery treat to serve alongside these, my Butter Cookie Recipe provides a great textural contrast.
Scaling Your Recipe
Cutting it in half (½): Use a loaf pan instead of a square pan. Reduce the baking time for the crust by about 5 minutes. For the eggs, beat one egg in a small bowl and use half of it by weight.
Doubling the batch (2x): Work in two separate pans rather than one deep one. If you use a deeper pan, the center will remain raw while the edges burn. Lower the oven temperature to 325°F (160°C) and extend the final bake time by 10-15 minutes to ensure the heat reaches the middle.
Pro Tip for Large Batches: When doubling the lemon juice, don't increase the salt and baking powder by a full 2x. Go with 1.5x for the leavening and salt to avoid a metallic aftertaste in the filling.
Debunking Citrus Myths
You might hear that you should use bottled lemon juice for "consistency." This is a myth. Bottled juice is often pasteurized and contains preservatives that flatten the flavor profile. Freshly squeezed juice provides the bright, acidic pop that makes these Lemon Bars stand out.
Another common misconception is that you should whisk the eggs and sugar until they are thick and pale (like a meringue). While this works for some cakes, for these bars, it introduces too much air. This results in a filling that puffs up in the oven and then collapses, creating a wrinkled, pitted surface.
Finally, some people think adding cornstarch is necessary for a thick filling. While it works, using a small amount of flour (as we do here) creates a more rustic, velvety texture that doesn't taste "starchy."
Keeping Them Fresh
These Lemon Bars are best stored in the refrigerator. Place them in an airtight container, but put a piece of parchment paper between layers so they don't stick together. They'll stay fresh and tart for up to 4 days.
If you want to save some for later, you can freeze them for up to 3 months. Slice them first, then wrap each bar individually in plastic wrap before placing them in a freezer bag. To eat, let them thaw in the fridge overnight.
Zero Waste Tip: Don't throw away your lemon rinds! After zesting and juicing, you can simmer the leftover peels with sugar and water to make a simple lemon syrup for cocktails or pancakes. Alternatively, freeze the peels in a bag to use in future infusions.
Best Serving Pairings
To balance the intensity of the citrus, pair these with something creamy or earthy. A dollop of unsweetened whipped cream or a side of fresh raspberries works beautifully.
If you're putting together a dessert platter, these pair excellently with other fruit based treats. My Homemade Fig Bars offer a deeper, honey like sweetness that complements the sharp tang of the lemon.
For a budget friendly presentation, serve them on a wooden board with a few mint leaves for a pop of color. The contrast between the pale yellow filling and the dark board makes them look truly artisanal. Keep the powdered sugar dusting for the very last second to ensure it doesn't dissolve into the filling.
Recipe FAQs
What makes these lemon bars taste professional?
The combination of a pre-baked crust and a slow chill. Pre-baking the shortbread ensures a shatter crisp base, while the two-hour refrigerator rest locks in the velvety filling structure.
What ingredients are in a lemon bar?
They use pantry staples like flour, butter, and sugar combined with fresh lemons and eggs. This version specifically uses all-purpose flour, unsalted butter, powdered and granulated sugars, salt, baking powder, fresh lemon juice, and zest.
Should lemon bars be jiggly when done?
Yes, the center should have a slight, jelly like jiggle. Only the edges should be set; baking until the center is firm results in a rubbery, cake like texture.
What's the difference between a lemon curd and a lemon bar?
A lemon bar is a structured dessert with a crust, while a curd is a standalone creamy sauce. Bars include flour and baking powder to stabilize the filling for clean slicing, whereas curd relies only on eggs and butter for thickness.
How to store lemon bars to keep them fresh?
Store them in an airtight container in the refrigerator. They remain fresh for up to 3 days, and keeping them chilled ensures the filling remains stable.
Is it true I can use bottled lemon juice for the same result?
No, this is a common misconception. Bottled juice lacks the bright, punchy flavor of fresh citrus and can taste artificial. If you loved the sweet tart balance here, see how we use a similar acid technique in our tangy condiment.
Why is my lemon bar filling runny?
It likely needs more chilling time. The filling only fully sets after spending 2 hours in the fridge, which allows the egg proteins and starch to lock the structure.
Classic Lemon Bars

