The Definitive Crackfree Classic New York Cheesecake

- Why This Recipe Crowned The Ultimate Classic New York Cheesecake
- Unlocking The Signature Dense & Creamy Texture
- The Essential Components: Sourcing Quality Components
- Phase One: Constructing The Impenetrable Graham Crust
- Phase Two: The Art of Crafting The Perfect Filling
- Phase Three: Baking Secrets For A Crack-Free Surface
- The Slow Descent: Crucial Cooling Protocol
- Troubleshooting & Elevating Your Classic New York Cheesecake Experience
- Recipe FAQs
- 📝 Recipe Card
Why This Recipe Crowned The Ultimate Classic New York Cheesecake
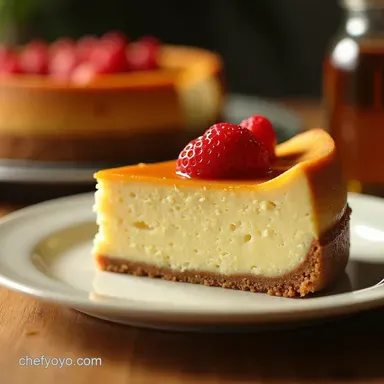
Forget those airy, bouncy imposters; this is the real deal. Inspired by the legendary cheesecakes of Katz’s Deli and Junior’s, this recipe delivers that signature, rich density, a subtle tang from sour cream, and a perfect, buttery graham cracker crust.
It’s the benchmark against which all other cheesecakes are judged. Be warned: once you master this, you’ll be perpetually baking for friends and family! The difficulty level here is deemed "Medium." While the ingredient assembly is straightforward, achieving the perfect, velvety smooth consistency and avoiding those dreaded surface fissures requires meticulous attention to temperature control and the implementation of a proper water bath.
Our total time commitment spans about four hours, factoring in crucial chilling periods, but the active preparation time is a manageable 35 minutes. This endeavor yields about 12 generous slices of what I confidently call the Best Classic New York Cheesecake you will ever attempt.
Unlocking The Signature Dense & Creamy Texture
The hallmark of an Authentic New York Cheesecake Ingredients profile is its luxurious mouthfeel it should almost resist the knife slightly before melting on the tongue.
This density is not accidental; it is engineered through specific ratios of fat and dairy, combined with a non-negotiable slow baking process.
Setting The Standard: A True NYC Icon
What separates a standard baked cheesecake from a Traditional New York Cheesecake is the commitment to high fat dairy and the inclusion of an acidic component, which is our sour cream.
That characteristic slight tang isn't just flavor; the acidity helps tenderize the proteins in the eggs and cream cheese, resulting in a smoother final product that is remarkably dense yet incredibly creamy. We are aiming for near solid perfection without the slightest graininess.
Beyond The Basics: What Makes This Recipe Unforgettable
The secret weapon in achieving this texture lies in the combination of the custard and the technique. While many recipes omit it, our formula includes just two tablespoons of all-purpose flour.
This small addition acts as a structural stabilizer, binding the filling just enough to resist excessive rising and subsequent collapsing, thus greatly aiding in producing a Crack Free New York Cheesecake .
On top of that,, the careful temperature management ensures the fats emulsify beautifully, leading to that deep, satisfyingly rich taste.
Essential Equipment For Cheesecake Mastery
To succeed with this recipe, you absolutely need the right tools. A 9 inch springform pan is non-negotiable, as it allows for easy extraction of the delicate baked cake. Equally important is a large, deep roasting pan, which will serve as the vessel for our essential water bath (bain marie).
Finally, heavy duty aluminum foil is required to create a waterproof barrier around your springform pan; do not skimp on the layering here, as water seepage ruins everything!
The Essential Components: Sourcing Quality Components
Success in baking, especially with something as sensitive as cheesecake, begins and ends with the quality and preparation of your ingredients. Using the right Authentic New York Cheesecake Ingredients ensures a superior outcome before you even switch on the mixer.
Cream Cheese Selection: Temperature Is Non-Negotiable
For the filling, you require four 8-ounce blocks of full fat cream cheese that's just over two pounds of the star ingredient. The most common mistake in cheesecake baking is rushing this step: the cream cheese must be completely, thoroughly softened to room temperature.
If there are any cold lumps, you will be forced to overmix the batter later trying to eliminate them, leading directly to incorporated air and potential cracking. Aim for a consistency where it yields easily to light pressure.
Flavor Accelerants: Achieving That Perfect Tang
The signature zip of a New York Cheesecake with Sour Cream comes from the dairy combination. We use one full cup of full fat sour cream and half a cup of heavy cream, both also warmed to room temperature.
Crucially, a tablespoon of fresh lemon juice is required, not just for its tang, but because its acidity aids in creating that impossibly smooth emulsion. Don't forget the two teaspoons of quality vanilla extract for depth.
Precision Measurement For The Graham Cracker Base
The foundation of this dessert demands attention. For the crust, gather 1 ½ cups of finely ground graham cracker crumbs, ¼ cup of granulated sugar, and 6 tablespoons of melted, slightly cooled, unsalted butter. The butter should bind the crumbs without leaving excess liquid pooled at the bottom.
Required Dairy & Binders For The Filling Structure
Beyond the main dairy components, you will need 1 ½ cups of granulated sugar to balance the tang. As mentioned, just two tablespoons of all-purpose flour provide structural integrity.
Finally,, four large eggs, all brought to room temperature, are the final critical binder, added one at a time with the utmost care.
Phase One: Constructing The Impenetrable Graham Crust

We begin by preheating your oven to 350° F ( 175° C). In a medium bowl, combine your graham cracker crumbs, the ¼ cup of sugar, and the melted butter. Use a fork to mix thoroughly until the texture resembles wet sand.
Press this mixture firmly and evenly across the bottom of your prepared 9 inch springform pan. A flat bottomed measuring cup works perfectly for pressing it down tightly. Bake this crust for 8 to 10 minutes until it smells fragrant.
Once baked, remove it from the oven and let it cool completely on a wire rack while you prepare the luxurious filling. Now is the time to prepare your foil shield: wrap the outside bottom and sides of the cooled springform pan with at least two, preferably three, thick layers of heavy duty aluminum foil to ensure a watertight seal against the bathwater.
Related Recipes Worth Trying
- The Perfect Silky Smooth New York Cheesecake Recipe — Forget cracks This foolproof recipe yields a rich velvety New York style cheesecakethe perfect comforting classic Get ready for the best bake yet
- Sunshine in a Bowl Quick Zesty Classic Shrimp Ceviche — Whip up this authentic easy Shrimp Ceviche recipe using the power of fresh lime Its bright punchy and the perfect light seafood dinner Get the foolproof...
- The Best Classic Beef Stew Recipe for Winter Comfort — Forget watery versions learn how to make the best beef stew with meat that melts in your mouth This classic beef stew recipe builds deep flavour from...
Phase Two: The Art of Crafting The Perfect Filling
This phase is where patience pays dividends. In a large mixing bowl, use an electric mixer (stand or hand held) to beat the room temperature cream cheese until it is perfectly smooth think pudding consistency, with zero lumps. Scrape down the bowl thoroughly.
Next, gradually beat in the 1 ½ cups of sugar until just combined and slightly fluffy. Now, incorporate the room temperature sour cream, heavy cream, vanilla extract, and lemon juice, mixing until the batter is uniformly creamy. Once smooth, gently whisk in the two tablespoons of flour.
The final, most delicate step involves the eggs. Add them one-by-one, mixing on the absolute lowest speed only until the yellow of the yolk disappears into the batter. As soon as the last egg is incorporated, stop mixing immediately .
Over agitation at this stage introduces air, which is the primary culprit behind surface cracks. Pour the resulting smooth batter over your cooled crust and gently tap the pan a few times on the counter to encourage any trapped large air bubbles to rise and pop.
Phase Three: Baking Secrets For A Crack Free Surface
Achieving that flawless, Crack Free New York Cheesecake surface relies almost entirely on gentle, even heat provided by the water bath.
Preparing The Springform Pan (Water Bath Ready)
Ensure your foil wrapped springform pan is ready. Place it inside the large, deep roasting pan on your oven’s centre rack.
Gentle Blending Technique: Avoid Incorporating Air
To reiterate the importance of this stage: from the moment the sour cream goes in until the eggs are just incorporated, resist the urge to whip. We are folding and combining gently, not aerating. Air expands during baking, forcing the surface to stretch and crack as it cools too quickly.
Implementing The Essential Low-and-Slow Water Bath Method
Carefully pour boiling water into the outer roasting pan until the water level reaches about halfway up the side of the foil wrapped springform pan. This steam jacket insulates the cheesecake, allowing it to cook slowly and evenly.
Begin baking at 350° F ( 175° C) for 15 minutes. Then, significantly reduce the oven temperature to 250° F ( 120° C) and continue baking for an additional 55 to 70 minutes.
Monitoring Internal Doneness (The Slight Jiggle Test)
You are looking for a set edge, but the centre about two inches across should still have a noticeable, gelatinous wobble when the pan is nudged gently. It should look almost underdone in the middle. This residual heat will finish cooking it during the cooling phase.
The Slow Descent: Crucial Cooling Protocol
If you want to master the Classic New York Cheesecake , you must master the cooling process. Thermal shock is the enemy of a smooth surface.
The Two-Stage Cooling Process: Preventing Thermal Shock
Do not pull the cheesecake directly from the oven into a cool kitchen. First, turn off the oven entirely, but leave the cheesecake inside the water bath. Prop the oven door open slightly a wooden spoon handle works perfectly for this and allow the cake to cool gradually inside the turned off oven for a full hour.
This gentle reduction in temperature allows the structure to stabilize without shrinking too rapidly. After the hour, carefully remove the cheesecake from the water bath, remove the surrounding foil wrap, and let it sit on a wire rack at room temperature for another hour.
Achieving Optimal Chill Time For Firm Slices
Once cooled to room temperature, cover the cheesecake loosely with plastic wrap, taking care not to let the wrap touch the surface. Transfer it to the refrigerator for a mandatory minimum of 8 hours, though overnight chilling is highly recommended.
This extended chilling time allows the proteins to fully set, resulting in the dense, luxurious slice expected of a Creamy New York Cheesecake .
Troubleshooting & Elevating Your Classic New York Cheesecake Experience
Even with the best intentions, minor issues can arise. Preparation for these issues ensures you still end up with a fantastic final product.
Handling Surface Cracks (If Disaster Strikes)
If, despite your best efforts, a fine crack does appear upon cooling, do not despair! The flavor and texture of this Homemade New York Style Cheesecake will remain intact.
The solution is purely cosmetic: once fully chilled, cover the entire top surface with a thin, bright layer of tart raspberry jam or a rich, homemade salted caramel sauce. The topping hides the flaw beautifully while adding a complementary flavor note.
Preserving Perfection: Storage Guidelines
This cheesecake stores exceptionally well. Once fully chilled, it can remain tightly wrapped in the refrigerator for up to five days.
Freezing Instructions For Long Term Enjoyment
If you need to store it longer, place the fully chilled and unwrapped cake in the freezer for about two hours until firm. Then, wrap it very tightly first in plastic wrap and then in a layer of aluminum foil. When ready to thaw, unwrap it and let it defrost slowly overnight in the refrigerator.
Avoid thawing at room temperature to maintain the best texture.
To truly enjoy this spectacular dessert, follow these steps diligently. When you finally slice into this rich creation, you’ll understand why the Classic New York Cheesecake remains the undisputed king of desserts.

Recipe FAQs
Why did my Classic New York Cheesecake crack on top?
Cracking is usually caused by two things: overmixing the eggs (which incorporates too much air) or drastic temperature changes during cooling. Always mix eggs gently on low speed, and never skip the crucial step of slowly cooling the cheesecake in the turned off oven for an hour before removing it.
Do I absolutely have to use a water bath for this recipe?
Yes, for a true, dense, and smooth New York style, the water bath (bain marie) is mandatory. It keeps the oven humidity high and cooks the cheesecake gently and evenly, preventing the edges from setting too fast before the centre, which also causes cracks.
Can I make this cheesecake ahead of time, and how should I store leftovers?
Absolutely! Cheesecakes taste even better the next day once they've fully chilled and set, so plan to bake it the day before serving. Wrap leftovers tightly in plastic wrap, and they will keep beautifully in the fridge for about 5 to 7 days.
My cream cheese wasn't soft enough and now the filling looks lumpy what can I do?
That's a right pickle, as lumps mean over beating later on! If you catch it early, try blending the mixture carefully with an immersion blender for just a few seconds to smooth it out, or press the batter through a fine mesh sieve before pouring it into the crust.
How long does the Classic New York Cheesecake actually need to chill for the best texture?
While you can technically slice it after 8 hours, for that truly luxurious, melt-in-your mouth density that defines a New York slice, leave it in the fridge overnight (12 hours is ideal). This allows the texture to firm up properly, making slicing clean and tidy.
Crackfree New York Cheesecake
Ingredients:
Instructions:
Nutrition Facts:
| Calories | 168 kcal |
|---|---|
| Protein | 2.5 g |
| Fat | 8.9 g |
| Carbs | 31.1 g |
| Fiber | 0.3 g |
| Sodium | 55 mg |
