The Chefs Secret Weapon Mellow Zingy Lactofermented Garlic

The Transformative Power of Lacto Fermented Garlic
There is a form of kitchen alchemy that strips the abrasive, raw heat from garlic, leaving behind a mellow, complex, and intensely savory ingredient that tastes absolutely nothing like its original form. This is the magic of Fermented Garlic .
For those of us seeking to elevate our pantry staples beyond simple pickling, learning How To Make Fermented Garlic using the lacto fermentation process is a rewarding endeavor that yields a chef’s secret weapon.
These soft, tangy cloves and their salty, probiotic brine are versatile additions to nearly any dish, proving that the best culinary transformations often involve time, salt, and beneficial bacteria.
What Exactly is Lacto Fermentation?
Lacto fermentation is a traditional, natural preservation method that relies on Lactobacillus bacteria, which are naturally present on the surface of most fruits and vegetables.
When these ingredients are submerged in a salty, anaerobic (oxygen free) environment in this case, a brine the good bacteria thrive and begin converting the naturally occurring sugars into lactic acid.
This acid acts as a powerful, natural preservative while simultaneously introducing tremendous complexity to the flavor. Unlike quick pickles, which use harsh vinegar, Lacto Fermented Garlic maintains its nutritional integrity, develops a much more nuanced tang, and, crucially, imbues the food with beneficial probiotics, making it a truly "live" culture food.
The Surprising Flavor Profile of Aged Cloves
If you are accustomed to the sharp, pungent heat of raw garlic, prepare to be surprised. The fermentation process radically alters the flavor compounds. After its active fermentation period of 7 to 14 days, the resulting Garlic Clove is no longer fiery; instead, it becomes soft yet slightly firm, savory, and boasts a unique, satisfying zing.
The taste profile is sweet, sour, yeasty, and profoundly garlicky but without the aggressive burn. This complexity makes the finished product perfect for eating whole or mashing into dips where raw garlic would be overpowering.
For optimum flavor, allowing the jar to mature for an additional two to four weeks in the refrigerator further deepens this complexity.
Why This Blue Hue is Totally Normal
One of the most common reasons home fermenters panic is the sight of their beautiful product suddenly turning a vibrant blue or teal green. This stunning visual change, which actually contributes to the unique Garlic Aesthetic , is entirely harmless and completely edible.
This phenomenon is a benign chemical reaction: trace amounts of sulfur compounds naturally present in the garlic react with trace minerals often copper found in the water or non-stainless steel tools or the naturally produced acid in the brine.
Rest assured, if your fermented garlic has turned blue, it simply means the process is working.
Essential Gear and Quality Ingredients for Successful Fermentation

Successful home fermentation hinges on meticulous sanitation and precise measurements. When preparing your first batch using this fermented garlic recipe , the active preparation time is quite minimal only about 15 to 20 minutes but the quality of the components you choose is non-negotiable.
Choosing the Right Garlic: Freshness is Key
To produce approximately two cups (500 ml) of the finished product, you will need about 1.5 pounds (680 g) of fresh, firm, whole garlic bulbs. Look for bulbs that are heavy and free of sprouting or soft spots. The physical act of preparing the cloves is the longest part of the active process.
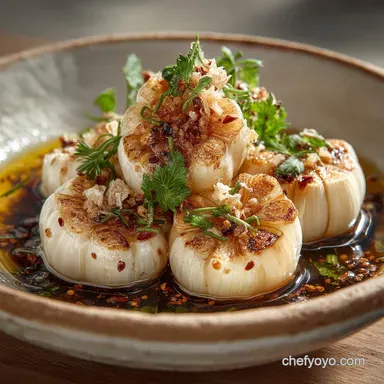
Once peeled, you will want a stunning White Garlic Close-up of the nearly 450 grams of cloves destined for the jar. Ensure you trim away any woody root ends or damaged patches, and remember: do not slice or crush the cloves; they must remain whole to maintain their texture throughout the fermentation period.
Building the Perfect Saline Brine
The brine solution is the lifeblood of this recipe, and its composition is critical to encouraging the right microbial growth. We are aiming for a classic 3% brine solution. This is achieved by dissolving precisely two tablespoons (30 grams) of non-iodized sea salt or kosher salt into four cups (945 ml) of water.
Using non-iodized salt is crucial, as the iodine and anti caking agents found in standard table salt can inhibit the beneficial bacterial activity needed for a safe and successful ferment.
On top of that,, always use filtered or distilled water; chlorine found in standard tap water will actively kill the precious Lactobacillus bacteria we are trying to encourage.
Tools of the Trade: Jars and Airlocks
Beyond the raw ingredients, you need reliable, sterilized equipment. A large, quart or litre sized Mason Jar with a tight fitting lid is standard. Crucially, you must secure a clean and sanitized Fermenting Weight (ceramic or glass is ideal) to keep the cloves completely submerged below the brine line.
This prevents exposure to oxygen, which invites mold and spoilage. While a standard jar lid can work (if loosened daily for burping), investing in a dedicated airlock lid system is highly recommended, as it allows the necessary CO2 to escape passively without letting airborne contaminants in.
Related Recipes Worth Trying
- Silky Garlic Mashed Potatoes Recipe The Ultimate Creamy Side — Discover the secret to truly Best Mashed Potatoes Our foolproof Garlic Mashed Potatoes recipe uses warm infused cream for a velvety lumpfree texture Perfect...
- Effortless Lemon Garlic Salmon Recipe A Quick Weeknight Winner — This easy baked salmon recipe uses a punchy lemon garlic marinade to deliver maximum flavour with minimal fuss Ready in under 30 minutes its a healthy...
- Cracking Good oven-roasted Garlic Cabbage Steaks with Lemon Drizzle — Forget boiled cabbage These oven-roasted Garlic Cabbage Steaks caramelise into nutty perfection They are healthy easy and a brilliant Keto Cabbage Steaks...
Initiating the Process: step-by-step Fermented Garlic Instructions
Now that we have our sanitized equipment and perfectly measured ingredients, it’s time to initiate the process. Follow these steps meticulously to ensure a safe and delicious outcome.
Prep Work: Peeling Cloves with Ease
The initial active phase begins with the arduous task of peeling nearly a pound and a half of garlic. Once peeled, ensure your sterilized jar is ready. Place the peeled whole cloves into the jar, packing them snugly but gently.
If you wish to incorporate optional flavorings, such as a few sprigs of fresh dill or a teaspoon of whole black peppercorns, layer them in with the garlic now. Remember to leave adequate headspace at least 1.5 to 2 inches (5 cm) from the rim.
Mixing the Brine and Submerging the Garlic
Start by dissolving the non-iodized salt into a portion of warm filtered water, then combine this with the remaining cold filtered water. This brine must be allowed to cool completely to room temperature before it touches the garlic.
Hot brine will immediately kill the bacteria on the cloves, stalling the fermentation before it starts. Pour the cooled brine over the packed garlic, ensuring all solids are covered, and then gently secure your weight on top.
This step of ensuring full submersion is perhaps the single most important rule in all of home preservation.
The Waiting Game: Managing Activity and Burping
Place the sealed jar in a cool, dark location, ideally maintaining a temperature between 65 75°F (18 24°C). Within the first two to three days, you should notice small bubbles rising to the surface this is the glorious sign that the Lactobacillus are hard at work.
If you are using a standard lid (not an airlock), you must unscrew the lid once or twice daily for the first seven to ten days to release the carbon dioxide gas build-up. Skipping this "burping" step is a serious safety risk and could lead to a messy, potentially explosive kitchen calamity.
After about 7 to 14 days, the active bubbling will slow down, signaling that the garlic is ready to move to cold storage.
Maximizing Flavor, Use, and Longevity of Your Fermented Garlic
Once your active fermentation phase is complete, you are left with a batch of beautifully mellow, tangy garlic and a cloudy, probiotic rich brine. This is where the fun begins.
Creative Culinary Uses for Your Tangy Cloves
The versatility of the fermented product is extraordinary. Mince the cloves finely and mix them into softened butter for a complex, instant garlic butter ideal for finishing steak or spreading on crusty bread.
The cloves can be served whole on charcuterie boards, offering a bright, zingy counterpoint to rich cheeses and cured meats. Do not discard the brine! It carries the essence of the fermented garlic recipe and can be used in place of vinegar in dressings and marinades, lending an irreplaceable salty, probiotic tang to roasted vegetables or homemade vinaigrettes.
Understanding the Health Perks of Live Culture Foods
Beyond the magnificent flavor, one of the primary motivations for making this product is the significant fermented garlic benefits . Because this method relies on live cultures, these cloves are rich in beneficial bacteria that support gut health and aid in digestion.
The fermentation process also makes some nutrients more bioavailable, transforming a healthy ingredient into a powerful functional food that tastes wonderful and supports your internal ecosystem.
Long Term Storage: Refrigeration and Shelf Life
Once active bubbling has ceased, the fermentation process must be slowed down to prevent the garlic from becoming overly soft or mushy. Transfer the sealed jar directly to the refrigerator. The cold temperature stabilizes the product and encourages maturation.
While you can certainly eat the cloves immediately, allowing the jar to rest in the fridge for an additional two to four weeks dramatically improves the flavor profile. Stored correctly in the refrigerator, homemade Fermented Garlic maintains its quality for six months or longer.
Solving Common Fermentation Challenges
The key to preventing spoilage is diligence. The most common cause of mold or yeast growth is any solid material floating above the brine. If you notice fuzz or discoloration on top, it means oxygen exposure has occurred.
Always ensure the Garlic Clove is securely pinned beneath the brine by a quality fermentation weight. If your finished cloves are mushy, it likely means the temperature during the active phase was too high (above 80°F/27°C) and the fermentation happened too quickly; remember that temperature control is king for producing perfectly crisp, tangy results.

Recipe FAQs
I hear some jars turn blue or green! Is my Fermented Garlic safe to eat if it changes colour?
Absolutely, don’t panic! This is a classic bit of kitchen alchemy and is completely harmless. The vibrant blue or green hue is simply a chemical reaction between trace amounts of sulfur compounds in the garlic and copper, usually found in your water supply or sometimes even non-stainless steel tools.
It's perfectly safe to consume and often fades back to a mellow yellow or creamy white over a few weeks in the fridge.
How do I know if I've mucked up the fermentation, and what are the signs of spoilage?
The main litmus test for a successful ferment is smell and sight. A healthy batch should smell pleasantly sour, tangy, and yeasty like a good pickle or sourdough starter never rotten or foul.
If you see fuzz (mould) forming on the surface of the brine, or if any garlic cloves float above the liquid and turn dark and slimy, it’s best to throw the whole lot out. Clean equipment and keeping everything submerged beneath the brine is the golden rule here.
My garlic still tastes quite salty and is a bit too crunchy. Have I done something wrong?
Not at all, you just need a dash more patience! While the initial bubbling stops after 7 14 days, the real flavour maturation happens slowly in the fridge. The saltiness will mellow significantly, and the texture will soften over the next 2 4 weeks as the lactic acid fully penetrates the cloves.
Think of the refrigeration period as a necessary curing time to develop that complex, mellow zing.
What’s the best way to use this mellow, zingy fermented garlic once it’s ready?
This garlic is far sweeter and more complex than raw garlic, making it incredibly versatile. Finely mince the cloves and stir them into dressings or mash them into soft butter for an instant, potent garlic butter for spreading on toast. Crucially, don't waste the brine!
It’s probiotic liquid gold use it to splash into marinades, whisk into vinaigrettes instead of vinegar, or even use a tablespoon when proofing bread dough.
Once the active bubbling stops, how long can I keep my jar of fermented goodness?
Once you transfer the jar to the fridge, the cold temperature puts the fermentation into slow motion, making it quite stable. Stored correctly in a sealed jar in the refrigerator, fermented garlic will easily keep for six months or longer.
Ensure the garlic is always kept below the brine, even during prolonged storage, topping up with a fresh 3% brine solution if needed.
Mellow Lacto Fermented Garlic Recipe
Ingredients:
Instructions:
Nutrition Facts:
| Calories | 267 kcal |
|---|---|
| Protein | 0.0 g |
| Fat | 28.4 g |
| Carbs | 3.5 g |
| Fiber | 0.0 g |
| Sodium | 19584 mg |
