Basic Neapolitan Pizza Dough Recipe
- Time: Active 20 minutes, Passive 24 hours, Total 24 hours 25 mins
- Flavor/Texture Hook: A crisp, blistered exterior with a chewy, airy crumb and subtle tang.
- Perfect for: Slow weekend projects, hosting friends, or a mindful kitchen ritual.
- Make-ahead: Cold ferment the dough in the fridge for up to 72 hours for even deeper flavor.
- Mastering the Truly Wholesome Basic Neapolitan Pizza Dough Recipe
- The Artisanal Magic Behind Every Crust
- Precision Checkpoints for Baking Success
- Sourcing Simple and Wholesome Ingredients
- Essential Tools for a Rustic Kitchen
- Step-by-Step Guide to Pillowy Dough
- Overcoming Common Bread Baking Hurdles
- Creative Ways to Adapt Your Crust
- Keeping Your Dough Fresh and Tasty
- Achieving a Professional Rustic Presentation
- Critical Level of Sodium
- Recipe FAQs
- 📝 Recipe Card
Mastering the Truly Wholesome Basic Neapolitan Pizza Dough Recipe
There is a specific sound that happens when you pull a fresh pizza from the heat - a delicate, papery crackle as the crust settles. I remember the first time I actually got it right.
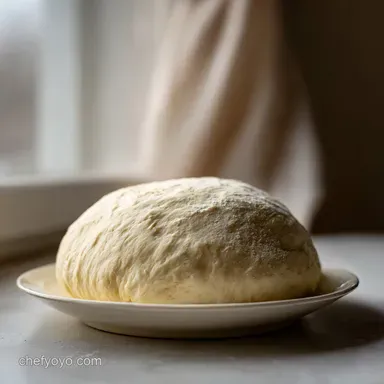
I was standing in my kitchen, flour dusted up to my elbows, watching the dough transform from a shaggy mess into a silky, translucent ball. When it finally hit the stone, the aroma of toasted grain and fermented yeast filled the room, and I knew I’d moved past the "cardboard crust" phase of my life forever.
Honestly, the biggest mistake I ever made was trying to rush the process. I used to think more yeast meant better bread, but all I got was a doughy, heavy mess that tasted like a brewery. This recipe is about the quiet magic of patience.
We’re using a tiny amount of yeast and letting the clock do the heavy lifting. You don't need a fancy stand mixer or a $1,000 oven to get that iconic leopard spotting on your crust, just a simple bowl and your own two hands.
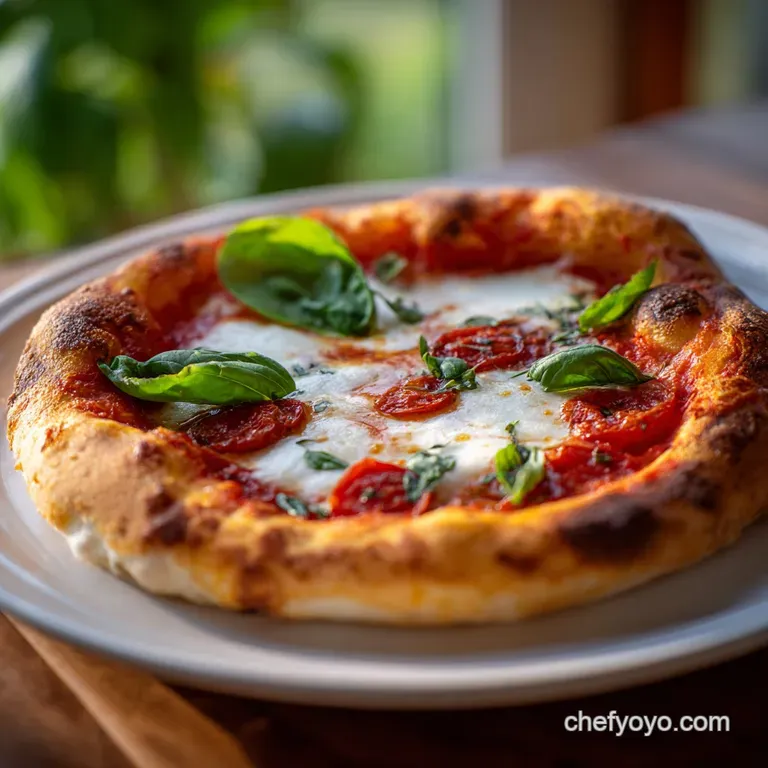
We are aiming for a result that feels artisanal and rustic, something you'd find in a back alley shop in Naples. The texture should shatter slightly on the first bite before giving way to a velvety, airy interior. This is the kind of cooking that grounds you.
It's predictable, wholesome, and once you see those first bubbles forming under the surface of your dough, you'll be just as obsessed as I am. Let's get into the details of how this works.
The Artisanal Magic Behind Every Crust
The success of this dough isn't down to luck, it's about managing the environment where the yeast lives. When we keep the hydration around 65%, we create a habitat where gluten can align itself without being forced by aggressive kneading.
- Slow Fermentation: A long rest allows enzymes to break down complex starches into simple sugars, resulting in better browning and easier digestion.
- Enzymatic Activity: Salt doesn't just season, it regulates the yeast's "appetite," ensuring the dough doesn't over proof and collapse.
- Starch Gelatinization: High initial heat causes the water in the dough to turn to steam instantly, forcing the air pockets to expand and "set" the structure.
| Method | Cook Time | Texture Outcome | Best For |
|---|---|---|---|
| Cast Iron Stovetop | 3-4 mins | Crispy, charred bottom | Apartment dwellers |
| Standard Oven (260°C) | 5-7 mins | Evenly golden, softer rim | Family dinner night |
| Pizza Oven (450°C) | 60-90 secs | Blistered, smoky, airy | Authentic Naples style |
Choosing your cooking method depends entirely on what gear you have, but trust me, the stovetop to broiler method is a total secret weapon for home cooks. It mimics the intense floor heat of a brick oven using just a standard pan.
If you've ever struggled with a soggy middle, the stovetop start is going to change your life. It ensures the base is firm before the cheese even thinks about melting.
Precision Checkpoints for Baking Success
When we talk about bread, small numbers lead to big results. This component analysis helps you see exactly why we use these specific ratios for our basic neapolitan pizza dough recipe. If the flour is too weak or the water too cold, the rhythm of the fermentation gets thrown off.
| Ingredient | Science Role | Pro Secret |
|---|---|---|
| 'Tipo 00' Flour | Provides fine protein structure | Sift it once to ensure no clumps for a smoother hydration. |
| Sea Salt | Tightens gluten strands | Dissolve it in the water first to ensure even distribution. |
| Active Dry Yeast | Biological leavening agent | Keep it away from direct salt contact during the initial mix. |
Because we are using such a small amount of yeast (only 1g!), the temperature of your room plays a massive role. If your kitchen is particularly chilly, you might need an extra hour of room temperature resting before it goes into the fridge.
I usually look for the dough to look "relaxed" and slightly plump, like a soft pillow, before I decide it's ready for its long nap.
Sourcing Simple and Wholesome Ingredients
You only have four ingredients here, so there is nowhere for low quality to hide. We want to focus on wholesome, unadulterated components that honor the tradition of the craft.
- 600g 'Tipo 00' Flour: Why this? The fine grind allows for a silky dough that stretches without tearing easily.
- 390g Water (21°C): Why this? Room temp water keeps the yeast calm and prevents premature over proofing.
- 18g Fine Sea Salt: Why this? Enhances the natural nutty flavor of the wheat while controlling fermentation.
- 1g Active Dry Yeast: Why this? A tiny amount ensures a slow, flavor developing rise over 24 hours.
If you can't find '00' flour, you can use a strong bread flour, though the texture will be slightly heartier and less "melt in-the mouth." For those looking for more variety, check out this Homemade NoKnead Pizza recipe for a different approach to hydration. The key is to avoid using standard all purpose flour if possible, as it lacks the protein strength to hold those beautiful air bubbles we're after.
| Original Ingredient | Substitute | Why It Works |
|---|---|---|
| 'Tipo 00' Flour | Bread Flour | High protein content maintains the chew. Note: Crust will be slightly thicker. |
| Fine Sea Salt | Kosher Salt | Provides the same mineral kick. Note: Use 1.5x the volume if using coarse grains. |
| Active Dry Yeast | Instant Yeast | No blooming required. Note: Use the same weight for this long ferment. |
Using the right water is also a hidden trick. If your tap water smells heavily of chlorine, it can actually stunt the yeast. I usually let a pitcher of water sit out on the counter for an hour before starting, or I use filtered water.
It sounds picky, but when you're making something this simple, these tiny tweaks are what separate a good crust from a legendary one.
Essential Tools for a Rustic Kitchen
We are keeping this minimal because that's the spirit of a basic neapolitan pizza dough recipe. You don't need a kitchen full of gadgets to make world class dough; in fact, working by hand helps you "feel" when the gluten has developed correctly.
- Digital Scale: This is non negotiable. Measuring flour by cups is a recipe for dry, tough bread.
- Large Mixing Bowl: Glass or ceramic works best to keep the temperature stable.
- Bench Scraper: Perfect for dividing the dough and cleaning your workspace without wasting flour.
- Damp Kitchen Towel: To cover the dough and prevent a dry "skin" from forming during the rise.
If you eventually want to dive deeper into the pizza world, you might consider a pizza stone or steel, but for now, a heavy baking sheet or a cast iron skillet will do the job beautifully. I've spent years refining my Homemade Pizza Night recipe using just these basics, and it never fails to impress. Focus on the technique first, then worry about the fancy gear later.
step-by-step Guide to Pillowy Dough

- Whisk the dry. Combine 600g 'Tipo 00' flour and 1g active dry yeast in your large bowl. Note: Whisking aerates the flour and ensures the tiny bit of yeast is distributed.
- Dissolve the salt. Stir 18g fine sea salt into 390g room temperature water until the water looks clear again.
- Combine ingredients. Pour the salted water into the flour and mix by hand until no dry flour remains.
- Initial rest. Cover the shaggy mass with a damp towel for 20 minutes. Note: This allows the flour to fully hydrate without you having to work for it.
- Knead briefly. Work the dough on a clean surface for about 5 minutes until the surface looks smooth and matte.
- Bulk ferment. Place back in the bowl, cover tightly, and leave at room temperature for 8 hours.
- Divide and ball. Cut into 4 equal pieces (about 250g each) and tension roll them into tight, smooth balls.
- Cold ferment. Place balls in individual oiled containers and refrigerate for 16 hours. Note: This is where the flavor "ripens" into that artisanal tang.
- Final Proof. Take the dough out 2 hours before baking until it reaches room temperature and looks jiggly.
- Shape and bake. Stretch gently by hand, top with Neapolitan Tomato Sauce recipe, and bake at your highest oven setting (260°C+) for 5-7 minutes.
When you're stretching the dough, try to leave the outer edge (the cornicione) untouched. This preserves all those gas bubbles we worked so hard to create. If you press them out, your crust will stay flat and dense instead of puffing up into that beautiful, airy rim.
Use the gravity method: let the dough hang over your knuckles and rotate it slowly, letting its own weight do the stretching.
Overcoming Common Bread Baking Hurdles
Even with the best intentions, dough can be temperamental. It’s a living thing, after all! If your dough feels more like a puddle than a ball, or if it keeps snapping back like a rubber band when you try to stretch it, don't panic. These are common issues that every baker faces at some point.
The Problem of the Elastic Snap Back
If you try to stretch your dough and it immediately shrinks back to its original size, it’s telling you the gluten is too tight. This usually happens if the dough is still too cold or if it hasn't rested long enough after being balled. The solution is simple: walk away.
Give it another 30 minutes to relax on the counter, and it will become much more cooperative.
| Problem | Root Cause | Solution |
|---|---|---|
| Dough is too sticky | High humidity or under kneading | Dust hands with flour and use quick, light touches. |
| Crust is tough/chewy | Over worked or low temperature | Reduce kneading time and ensure the oven is preheated for 1 hour. |
| No bubbles in rim | Yeast was killed or expired | Check yeast date and ensure water isn't hotter than 30°C. |
One of the most frustrating things is the "sticky peel" fail, where you've beautifully topped your pizza only for it to get stuck to the board. To prevent this, work fast once the dough is on the peel and give it a little "jiggle" test before adding every topping.
If it doesn't slide, add a tiny bit more flour or semolina underneath.
Common Mistakes Checklist: ✓ Always weigh your ingredients; volume measurements are too inconsistent for bread. ✓ Don't skip the room temperature rest after the fridge; cold dough won't stretch.
✓ Avoid over topping the pizza; too much moisture leads to a "soggy middle." ✓ Preheat your baking surface for at least 45 minutes to ensure maximum heat transfer. ✓ Use a damp cloth to cover dough, not just a dry one, to prevent a crusty skin.
Creative Ways to Adapt Your Crust
Once you've mastered the basic neapolitan pizza dough recipe, the world is your oyster. You can start playing with the foundations to suit your mood. I love adding a tablespoon of high-quality olive oil to the dough if I know I'm baking at a lower temperature; it helps the crust stay supple and adds a rich, golden hue.
If you’re in the mood for something different, you can use this same dough to make Homemade Pizza Rolls recipe. Just roll the dough out slightly thinner and fill it with your favorite cheese and herbs. For a more rustic, wholesome vibe, try replacing 50g of the '00' flour with whole wheat flour. It adds a beautiful nutty aroma and a bit of "tooth" to the final bite without making the crust too heavy.
- If you want a crispier base
- Substitute 10% of the flour with Semolina (Pasta Flour).
- If you want more tang
- Let the dough cold ferment for up to 72 hours.
- If you want a softer crust
- Add 10g of olive oil to the initial water mix.
Keeping Your Dough Fresh and Tasty
The beauty of this dough is that it actually gets better with a little time. You can make a big batch over the weekend and have fresh pizza ready to go throughout the week. For the best results, store each dough ball in its own airtight container that has been lightly coated with olive oil.
This gives the dough room to expand without sticking to the lid.
- Fridge: Store for up to 3 days. The flavor will peak around the 48 hour mark.
- Freezer: Wrap individual balls tightly in plastic wrap, then place in a freezer bag. Store for up to 2 months.
- Reheating: If you have leftover cooked pizza, skip the microwave! Use a dry skillet over medium heat for 3 minutes to crisp the bottom, then add a few drops of water to the pan and cover with a lid for 30 seconds to melt the cheese.
For zero waste, don't throw away any scraps of dough. You can fry them in a little oil and toss them in cinnamon sugar for a quick rustic dessert, or bake them as simple breadsticks with a bit of garlic butter. Every bit of this fermented gold is worth saving.
Achieving a Professional Rustic Presentation
You've put in the work, so let's make sure the final result looks as artisanal as it tastes. Presentation is about highlighting those beautiful irregularities that tell your guests this was made by hand.
I always finish my pizzas with a tiny drizzle of extra virgin olive oil and a few torn leaves of fresh basil after it comes out of the heat. This keeps the herbs vibrant and green rather than shriveled and black.
If you want that high end look, don't be afraid of the "char." Those dark spots on the crust aren't burnt; they are caramelized bubbles of flavor known as leopard spotting. They provide a bitter counterpoint to the sweetness of the tomatoes and the creaminess of the mozzarella.
Serve your pizza on a wooden board to absorb any excess moisture and maintain that "shatter" in the crust.
Finally, resist the urge to cut the pizza immediately. Give it just 60 seconds to rest. This allows the cheese to set slightly so it doesn't slide off the slice when you pick it up.
A simple, wholesome presentation honors the ingredients and the 24 hours of patience you put into this basic neapolitan pizza dough recipe. Enjoy the process, and even more importantly, enjoy that first, crunchy, airy bite.

Critical Level of Sodium
1752 mg mg of sodium per serving (76% % of daily value)
The American Heart Association recommends limiting sodium intake to approximately 2,300mg per day for most adults. High sodium intake can contribute to high blood pressure and other health problems.
Tips to Reduce Sodium in Your Bread:
-
Reduce Salt by 25%-25%
Reducing the amount of salt from 18g to 13.5g will significantly lower the sodium content. Start with this adjustment and see if you still enjoy the flavor.
-
Use Low-Sodium Sea Salt-5%
Certain brands of sea salt contain less sodium than others. Check the nutrition label and opt for a lower sodium sea salt if available.
-
Measure Accurately-5%
Ensure you are accurately measuring the salt. Using a kitchen scale is the best way to ensure you're not adding more than intended. Small overestimations can add up quickly.
-
Enhance Flavor with Herbs
Experiment with dried herbs and spices like rosemary, thyme, or garlic powder to boost the flavor of your bread without adding sodium. These can create a more complex and satisfying flavor profile.
Recipe FAQs
What is the secret to Neapolitan pizza dough?
It is time and temperature control, not complicated ingredients. The secret lies in a long, slow cold fermentation, usually 16 to 72 hours, which allows enzymes to develop deep flavor and an airy structure.
Is Neapolitan pizza dough different from regular pizza dough?
Yes, primarily because of the flour and hydration. Authentic Neapolitan dough uses 'Tipo 00' flour for its fine grind and lower protein content, coupled with a higher hydration level (around 65%) than many thick crust American styles.
What is the 55 rule for pizza dough?
No, the "55 rule" is not a standard Neapolitan metric, though temperature is key. In traditional Neapolitan baking, the critical number is often related to the final dough temperature being around 24°C after mixing, which is essential for predictable fermentation.
What is the ratio for Neapolitan pizza dough?
The essential ratio is approximately 100 parts flour to 65 parts water (100:65 hydration). Using the recipe's metric weights, this translates to 600g flour to 390g water for a standard batch of four pizzas.
How to achieve the leopard spotting (char) on the crust?
Bake at the highest possible temperature your home oven allows, ideally 260°C or higher. This rapid, intense heat causes the dough's outer layer to blister and caramelize quickly before the base overcooks.
Can I substitute 'Tipo 00' flour with standard all-purpose flour?
No, you should try to avoid it for true Neapolitan results, though bread flour is acceptable. '00' flour creates a silkier texture; substituting with AP flour results in a tougher, less airy crust due to different protein structures.
Why does my dough keep tearing when I try to stretch it thin?
The gluten structure is too tense and has not relaxed sufficiently before stretching. Let the dough rest, covered, at room temperature for an extra 30 minutes after balling; this allows the tight gluten network to relax, similar to the rest period needed when perfecting delicate pasta doughs in our Homemade Butternut Squash recipe.
Neapolitan Pizza Dough Recipe
Ingredients:
Instructions:
Nutrition Facts:
| Calories | 548 calories |
|---|---|
| Protein | 15.6 g |
| Fat | 1.5 g |
| Carbs | 114 g |
| Fiber | 4.1 g |
| Sugar | 0.4 g |
| Sodium | 1752 mg |
