Homemade Bread Recipe: No-Knead and Airy
- Time: 10 min active + 3 hours 45 mins resting/bake = Total 3 hours 55 mins
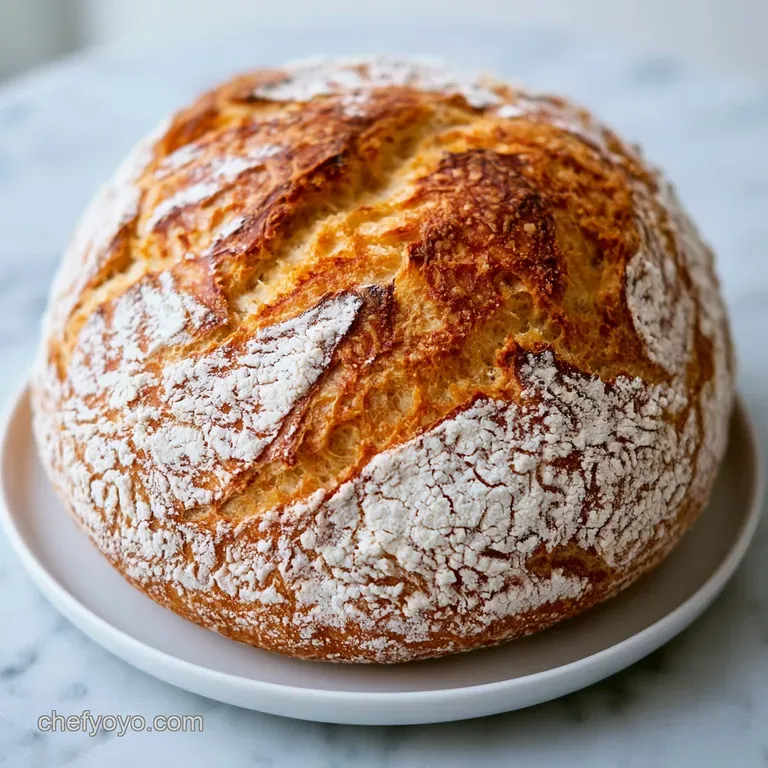
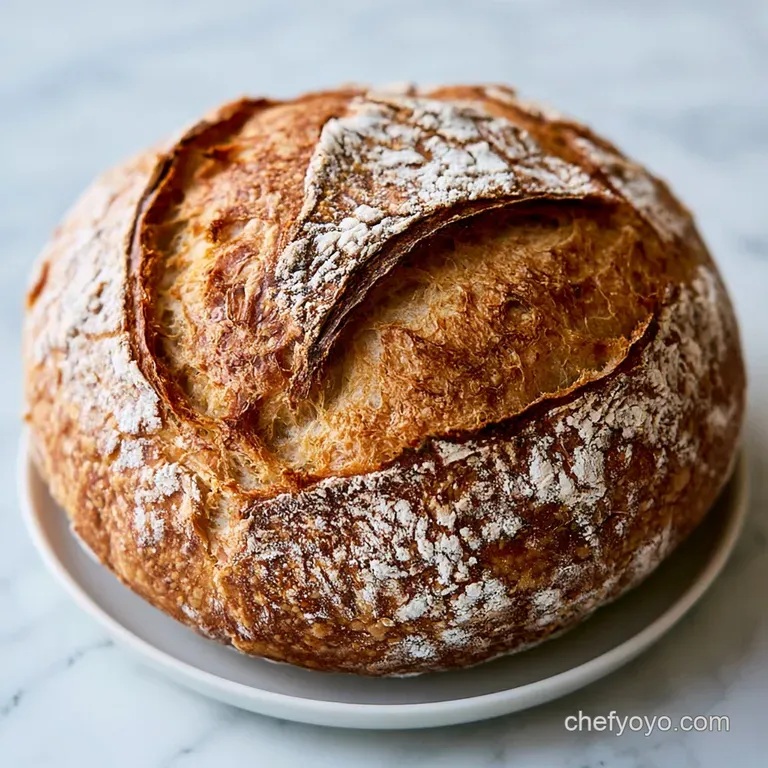
- Flavor/Texture Hook: Shatter crisp mahogany crust with a light, airy interior
- Perfect for: Weekend brunch, cozy dinners, or beginner bakers
- Loaf Success Secrets
- Component Analysis
- Gathering Your Baking Essentials
- Essential Tools For Baking
- Simple Step-by-Step Guide
- Fixing Common Baking Issues
- Fun Ways To Customize
- Adjusting The Batch Size
- Bread Truths and Myths
- Keeping Your Bread Fresh
- Serving and Presentation Tips
- Recipe FAQs
- 📝 Recipe Card
Imagine the sound of a crust cracking as it cools on the rack, that rhythmic "singing" that only comes from a hot oven. Then there's the smell, a warm, nutty aroma that fills every corner of the house, making everything feel instantly cozy.
I used to think you needed a professional degree or a fancy stand mixer to get this result. I once tried a recipe that required kneading for 20 minutes, and I honestly almost gave up because my arms were shaking and the dough was a sticky mess.
This homemade bread recipe changes everything. We're swapping the manual labor for time, letting the dough do the heavy lifting while we relax. You just mix, wait, and bake.
Loaf Success Secrets
- Slow Fermentation: Giving the dough hours to sit allows gluten to align naturally, so you don't have to knead it by hand.
- The Steam Trap: According to King Arthur Baking, keeping moisture trapped in the oven prevents the crust from setting too early, which allows the bread to expand fully.
- Thermal Shock: Dropping cold dough into a screaming hot pot creates an instant burst of heat, resulting in that shatter crisp exterior.
| Feature | Fresh Dutch Oven Loaf | store-bought Loaf |
|---|---|---|
| Texture | Shatter crisp crust | Soft and spongy |
| Flavor | Nutty and complex | Bland or overly sweet |
| Ingredients | 4 simple items | Dozens of preservatives |
Component Analysis
| Ingredient | Science Role | Pro Secret |
|---|---|---|
| Bread Flour | Protein structure | Higher protein creates a taller rise |
| Instant Yeast | Gas production | Mixes directly with dry ingredients |
| Warm Water | Activation | Keeps fermentation steady and predictable |
| Sea Salt | Flavor and control | Slows yeast to prevent over proofing |
Gathering Your Baking Essentials
For this recipe, we keep it minimal. You don't need a pantry full of additives, just high-quality basics.
- 3 cups (375g) bread flour Why this? Higher protein for a better rise (Substitute: All purpose flour - Note: Loaf will be slightly denser)
- 1 1/2 tsp (5g) fine sea salt Why this? Enhances flavor and controls yeast (Substitute: Kosher salt - Note: Use slightly more by volume)
- 1/2 tsp (2g) instant yeast Why this? Faster, no need to bloom (Substitute: Active dry yeast - Note: Must dissolve in warm water first)
- 1 1/3 cups (315ml) warm water Why this? Wakes up the yeast (Substitute: Warm milk - Note: Creates a softer, more velvety crumb)
Essential Tools For Baking
You don't need much, but the pot is the secret weapon here. I recommend a cast iron Dutch oven such as Lodge for the most consistent heat.
- Large mixing bowl
- Sturdy spoon or spatula
- Plastic wrap or a damp towel
- Parchment paper
- Digital kitchen scale (highly recommended for accuracy)
Simple step-by-step Guide
- Whisk the bread flour, fine sea salt, and instant yeast in a large bowl. Note: Ensure no clumps of yeast remain.
- Pour in the warm water and stir with a spoon until a shaggy mass forms and no dry flour remains.
- Cover the bowl tightly with plastic wrap or a damp kitchen towel.
- Let the dough sit at room temperature for 3 hours until it has doubled in size and looks bubbly.
- Place a Dutch oven with the lid on into the oven and preheat to 450°F (232°C).
- Turn the dough out onto parchment paper and shape it into a rough ball.
- Carefully lift the parchment and drop the dough into the preheated Dutch oven.
- Cover with the lid and bake for 30 minutes.
- Remove the lid and bake for an additional 12-15 minutes until the crust is deep mahogany brown and sounds hollow when tapped.
Fixing Common Baking Issues
It's totally normal to have a few hiccups when you first try a homemade bread recipe. Most of the time, it's just a matter of temperature or timing.
Sticky Dough Issues
If your dough feels more like batter than bread, you might be in a very humid environment. Don't keep adding flour, as that can make the bread heavy. Just use a wet hand to shape the ball.
Poor Rise Causes
This usually happens if the water was too hot (killing the yeast) or the room was too cold. If your kitchen is chilly, let the dough rise in the oven with the light turned on for a bit of warmth.
Burnt Bottom Fix
Some Dutch ovens hold heat too intensely at the base. If you notice the bottom is scorching, try placing a baking sheet on the rack directly below the pot to deflect some heat.
| Problem | Root Cause | Solution |
|---|---|---|
| Flat Loaf | Over proofed dough | Reduce first rise by 30 mins |
| Pale Crust | Oven temp too low | Use an oven thermometer to verify 450°F |
| Dense Crumb | Not enough rise time | Let it double fully before baking |
Common Mistakes Checklist
- ✓ Used a digital scale for flour (cups are often inaccurate)
- ✓ Water was warm (not boiling)
- ✓ Kept the lid on for the full first 30 mins
- ✓ Allowed the loaf to cool before slicing
Fun Ways To Customize
Once you've nailed the base, you can start playing with flavors. For a more complex, tangy profile, you might enjoy an artisan sourdough bread recipe, though that requires a starter.
If you want to stick with this easy homemade bread recipe, try adding a tablespoon of rosemary or a handful of toasted sesame seeds to the flour mix. As noted by USDA FoodData, adding whole grains or seeds can increase the fiber content, though it may slightly alter the rise.
Adjusting The Batch Size
When you're scaling a homemade bread recipe, remember that heat distribution changes with volume.
Scaling Down (1/2 Batch): Use a smaller pot or a cake pan with a lid. Reduce the final bake time by about 20% and keep a close eye on the color.
Scaling Up (2x Batch): I suggest working in batches rather than one giant loaf. If you must bake two loaves at once, lower the oven temperature by 25°F and extend the bake time by 10-15 minutes to ensure the centers are fully cooked.
Bread Truths and Myths
Myth: You have to knead bread for it to be fluffy. Truth: Time does the work. Long fermentation allows gluten strands to form on their own, which is why this no knead method works so well.
Myth: All yeast must be "proofed" in sugar water first. Truth: Instant yeast is designed to be mixed directly into dry ingredients. Proofing is mostly necessary for older active dry yeasts to check if they're still alive.
Keeping Your Bread Fresh
Since there are no preservatives in this homemade bread recipe, it won't stay soft as long as store-bought versions. Store it in a paper bag at room temperature for 2 days. For longer storage, slice it and freeze it for up to 3 months.
If you have leftovers, don't toss them! Stale bread is actually better for croutons or a savory bread pudding. If you're serving this as a side, it pairs beautifully with soft dinner rolls for a full carb spread.
Serving and Presentation Tips
To get that professional look, slice the bread into thick, rustic slabs. I love serving this homemade bread recipe warm with a generous slab of salted butter and a drizzle of honey.
For a real feast, tear the bread by hand and place it in a wooden bowl. The contrast between the shatter crisp crust and the soft interior is what makes this dish a winner. Just remember: wait at least 30 minutes before slicing, or the steam will escape too quickly and leave the inside gummy.
Recipe FAQs
What is the secret to making homemade bread?
Slow fermentation and a hot Dutch oven. Letting the dough sit for 3 hours develops flavor and structure without manual labor. If you enjoyed working with this high hydration dough, see how we adapt it for our pizza dough recipe.
What are the ingredients to make bread from scratch?
Bread flour, fine sea salt, instant yeast, and warm water. These four pantry staples are all you need to create a bakery style loaf.
How to get a professional, shatter crisp crust at home?
Bake in a preheated Dutch oven at 450°F. The lid traps steam during the first 30 minutes, which allows the bread to expand fully before the crust hardens.
Is it true that homemade bread is healthier than store-bought?
Yes, because you control every ingredient. You avoid the preservatives, artificial conditioners, and hidden sugars common in commercial loaves.
Why did my bread fail to rise?
Check your yeast freshness and water temperature. Water that is too hot kills the yeast, while water that is too cold prevents the dough from doubling in size during the rest period.
How to store homemade bread to keep it fresh?
Keep it in a paper bag or bread box at room temperature. Avoid the refrigerator, as the cold temperature actually accelerates the staling process.
Is it true you must knead the dough for 20 minutes to get an airy interior?
No, this is a common misconception. A long, 3-hour ferment allows the gluten to align naturally, achieving a light texture without any kneading.
Homemade Bread Recipe

