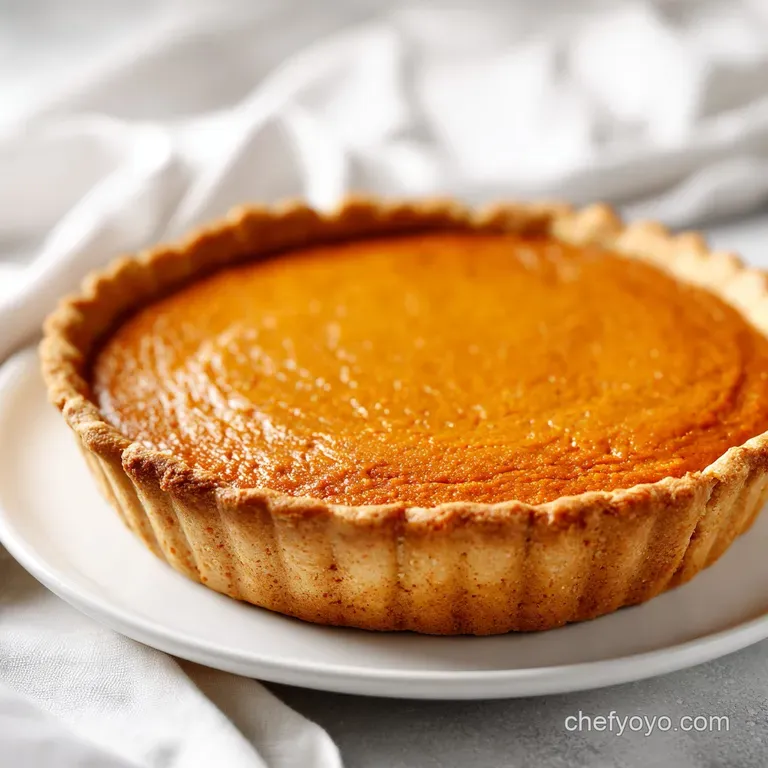
Sweet Potato Pie: Southern and Silky
- Time: 35 min active + 2 hours cooling = Total 3 hours 20 mins
- Flavor/Texture Hook: Velvety, spiced filling inside a crust that actually shatters
- Perfect for: Holiday centerpieces, Sunday family dinners, or a rustic autumn treat
The Secrets to Great Sweet Potato Pie
The first thing you'll notice when the oven door opens is that heavy, warm scent of cinnamon and toasted sugar that practically hugs you. I remember the first time I tried to make this for a family gathering. I was impatient and boiled the potatoes instead of roasting them. The result?
A filling that tasted "flat" and had a strange, slightly grainy texture that just wouldn't settle. It was a total letdown, but it taught me that the magic happens in the dry heat of the oven.
When you roast the potatoes, you're not just cooking them, you're concentrating the essence of the vegetable. That smell the way the skins char slightly and the insides turn into a rich, jammy gold is where the real flavor lives.
Once you fold that concentrated puree into a mixture of brown sugar and melted butter, you get a filling that feels velvety on the tongue and tastes like a warm memory.
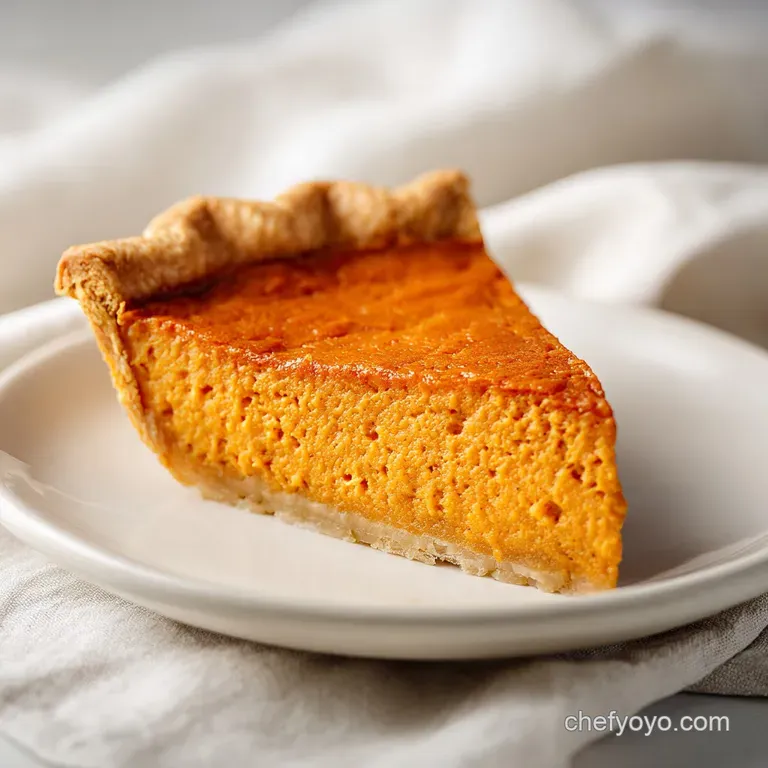
Trust me on this: the wait is the hardest part. You'll pull this pie out and it'll look gorgeous, but if you slice into it while it's still warm, you're going to get a soupy mess. You've got to let it sit for a full 2 hours.
This patience transforms the filling from a loose custard into a sliceable, creamy dream. Let's crack on and get your kitchen smelling like a Southern autumn.
What Makes the Filling Velvety
Concentrated Sugars: Roasting the potatoes evaporates the internal water, which intensifies the natural sweetness and prevents the pie from becoming watery.
Protein Stability: Using evaporated milk instead of regular milk provides a higher solids to water ratio, creating a tighter, more stable custard matrix.
Fat Distribution: Melting the butter before mixing it with the sugar ensures the fat is evenly dispersed, which gives the filling its silky, melt in-your mouth feel.
Starch Gelatinization: The natural starches in the sweet potato bind with the egg proteins during the bake to create a structure that holds its shape without feeling rubbery.
| Servings | Ingredient Adjustments | Pan Size | Cook Time |
|---|---|---|---|
| 4 people | ½ recipe (use 1 egg) | 6 inch pan | 30-35 mins |
| 8 people | Full recipe | 9 inch pan | 40-50 mins |
| 16 people | 2x recipe (bake in 2 pans) | Two 9 inch pans | 40-50 mins |
The Ingredient Deep Dive
When we're talking about a budget friendly but high impact dessert, the quality of your base is everything. I always suggest looking for Jewel or Garnet sweet potatoes because they have the highest sugar content and a deep orange color that looks stunning once baked. If you're looking for other ways to use these tubers, my Murasaki Sweet Potato Mash is another great way to bring out those earthy notes.
For the crust, the coldness of the butter is the only thing that matters. If the butter melts before it hits the oven, you lose those tiny pockets of steam that make the crust flaky. I've learned the hard way that room temperature butter leads to a tough, cookie like crust rather than one that shatters.
The choice of evaporated milk is a specific trick I picked up from an old family recipe. Regular milk has too much water, which can lead to a "weeping" pie where a layer of liquid separates from the filling. By using evaporated milk, we're essentially using a pre concentrated liquid that mimics the richness of heavy cream but with a more stable structure, similar to the technique used in a Silken Pumpkin Pie.
| Ingredient | Science Role | Pro Secret |
|---|---|---|
| Roasted Puree | Primary Structure | Roast until slightly caramelized for deeper flavor |
| Evaporated Milk | Emulsion Stabilizer | Shake the can well to ensure fats are mixed |
| Brown Sugar | Moisture & Color | Pack it tight for consistent sweetness |
| Cold Butter | Flakiness Agent | Grate frozen butter for the most tender crust |
The Essential Tool Kit
You don't need a professional kitchen to pull this off, but a few specific tools make the process a lot smoother. A 9 inch pie plate is the standard, but I prefer glass or ceramic because they distribute heat more evenly than thin metal pans, which helps prevent the bottom crust from burning before the center is set.
A blender or food processor is non negotiable for the filling. If you try to mash the potatoes by hand, you'll likely end up with small lumps. While "rustic" is a great look for some dishes, in a custard pie, lumps are the enemy.
You want that filling to be completely smooth, almost like a thick frosting, before it goes into the crust.
Right then, here's a quick checklist of the gear you'll need to have ready on your counter: - 9 inch pie plate (glass or ceramic) - Large mixing bowl and a whisk - Hand mixer or stand mixer (like a KitchenAid) - Blender or food processor - Rolling pin - Fork (for docking the potatoes and mixing the flour) - Baking
Sheet (to catch any drips)
Step-by-step Baking Process
Phase 1: Roasting and Prepping
First, let's get those potatoes going. Prick your sweet potatoes with a fork and roast them at 400°F (200°C) until a knife slides in with zero resistance. According to a Serious Eats roasting guide, roasting vegetables at high heat triggers a deeper caramelization of natural sugars compared to boiling. Let them cool just enough to handle, then peel back the skins and blend the flesh until it's completely smooth.
Phase 2: The Flaky Crust
Mix your all purpose flour and salt in a bowl. Cut in the cold cubed butter using a pastry cutter or your fingers until the mixture looks like coarse crumbs. Stir in the ice cold water slowly, just until the dough holds together. Don't overwork it, or the crust will be tough!
Wrap the dough and chill it in the fridge for at least 30 minutes. This prevents the crust from shrinking down the sides of the pan.
Phase 3: The Filling Emulsion
In a medium bowl, whisk your melted butter and brown sugar together. It'll look like a thick paste. Beat in the eggs one at a time, making sure each is fully incorporated before adding the next. Stir in the evaporated milk, vanilla extract, cinnamon, nutmeg, and salt. Now, fold in your roasted sweet potato puree.
Mix until the filling is a uniform, deep orange hue with no streaks of butter or sugar.
Phase 4: The Final Bake
Roll out your chilled dough and press it into the pie plate. Pour in your filling and smooth the top with a spatula. Bake at 350°F (175°C) for 40-50 minutes.
You're looking for the edges to be set and a slight jiggle in the center think of it like a firm gelatin. If the center sloshes, it needs more time.
Phase 5: The Patient Cool
Take the pie out and let it cool on a wire rack. This is the part where you have to resist the urge to cut in. Allow it to sit for at least 2 hours. The custard finishes setting as it cools, ensuring you get those clean, velvety slices.
Fixing Common Filling Issues
Even the best home cooks hit a snag now and then. I once made a pie that looked perfect on top but was basically a sweet potato soup in the middle because I pulled it out too early. The "jiggle test" is your best friend here; if it looks like a bowl of pudding, it's not done.
If it looks like a soft sponge, you're golden.
Another common issue is the "grainy" filling. This usually happens if the butter and sugar aren't fully emulsified or if the potato puree wasn't blended smooth. If you notice the mixture looks curdled before it goes in the oven, a quick whirl in the blender will fix it right up.
Troubleshooting Common Issues
| Issue | Solution | ||||||
|---|---|---|---|---|---|---|---|
| Why Your Filling Is Runny | This usually comes down to underbaking or skipping the cooling period. If the proteins in the eggs haven't reached the right temperature, they won't form the network needed to hold the liquid. | ||||||
| Why Your Crust Is Soggy | A "soggy bottom" happens when the filling moisture seeps into the dough. Chilling the crust and ensuring the filling is thick helps, but the real culprit is often a low oven temperature. | ||||||
| Why Your Top Is Cracking | Cracks usually mean the pie was overbaked. When the eggs overcook, they tighten up and pull away from the edges, creating a split in the center. | Problem | Root Cause | Solution | --------- | --- |
Creative Flavor Swaps
If you're feeling adventurous, this recipe is a fantastic canvas for other flavors. I love adding a splash of bourbon to the filling about 2 tablespoons to create a bourbon sweet potato pie.
The oaky, vanilla notes of the bourbon cut through the sweetness of the brown sugar and add a sophisticated depth.
For those who want something a bit more indulgent, a sweet potato pie with marshmallows on top is a classic for a reason. Just add a layer of mini marshmallows during the last 5 minutes of baking and pop it under the broiler for 60 seconds until they're toasted and golden.
If you're cooking for someone who avoids dairy, you can swap the evaporated milk for full fat coconut milk. It works surprisingly well, though it adds a subtle tropical note that pairs beautifully with an extra pinch of ginger.
| Original Ingredient | Substitute | Why It Works |
|---|---|---|
| Evaporated Milk | Full fat Coconut Milk | Similar fat content. Note: Adds coconut flavor |
| Brown Sugar | Maple Syrup | Liquid sweetness. Note: Reduce other liquids by 2 tbsp |
| All Purpose Flour | Almond Flour | Nutty flavor. Note: Crust will be more fragile/crumbly |
| Unsalted Butter | Coconut Oil (solid) | Plant based fat. Note: Keep it very cold for flakiness |
Right then, if you can't decide on a flavor, here's a quick decision shortcut for you: - If you want a boozy kick, add 2 tbsp bourbon to the filling. - If you want a gooey topping, add toasted marshmallows at the end. - If you want a deeper spice profile, add 1/4 tsp ground cloves.
Storage and Waste Guide
Once you've sliced into your Sweet Potato Pie, you'll want to keep the rest fresh. This pie holds up remarkably well in the fridge. Cover it loosely with foil or plastic wrap and it'll stay velvety for about 3-4 days. I actually think it tastes better on day two because the spices have more time to meld together.
If you're looking to freeze it, I recommend freezing the pie unbaked. Bake the crust, fill it, and freeze it tightly wrapped. When you're ready to eat, let it thaw in the fridge overnight and then bake it as usual.
Freezing a fully baked custard pie can sometimes lead to a grainy texture once thawed, so the unbaked route is much safer.
As for zero waste, don't toss those sweet potato skins! While we peel them for the puree, the skins are packed with nutrients. I like to toss them in a bit of oil and salt and roast them at 400°F for 10 minutes to make quick, crispy potato skins as a snack while the pie is in the oven.
The Best Pairing Ideas
Serving this pie is all about balance. Because the filling is so rich and sweet, you need something to cut through that density. A dollop of unsweetened whipped cream is the gold standard, but I like to add a tiny pinch of flaky sea salt on top of the cream to make the flavors pop.
A strong, bitter drink is the perfect companion. A dark roast coffee or a spicy chai tea provides a great contrast to the creamy, spiced filling. If you're serving this at a party, a glass of chilled dessert wine or a small pour of bourbon complements the cinnamon and nutmeg beautifully.
If you want to turn this into a full dessert spread, serve it alongside some fresh tart berries, like raspberries or blackberries. The acidity of the fruit cleanses the palate between bites of the rich pie, making every spoonful taste as vivid as the first.
Trust me, that contrast of warm, spiced custard and cold, tart berries is a total winner.
Recipe FAQs
What ingredients go in sweet potato pie?
The pie uses flour, salt, cold and melted butter, ice-cold water, roasted sweet potato puree, brown sugar, eggs, evaporated milk, vanilla extract, cinnamon, and nutmeg. These ingredients combine to create a spiced, velvety custard inside a flaky homemade crust.
What are common mistakes when making sweet potato pie?
Underbaking or skipping the 2-hour cooling period are the most frequent errors. This prevents the egg proteins from setting, leaving the filling runny. Overbaking can also lead to the top of the pie cracking.
Can heart patients eat sweet potatoes?
Yes, sweet potatoes are generally heart healthy. However, patients should consult their doctor regarding the butter and brown sugar content in this specific dessert.
How to roast the sweet potatoes for the filling?
Prick the potatoes with a fork and roast at 400°F (200°C). Bake until a knife slides in with zero resistance, then peel and blend the flesh until completely smooth.
How to prevent a soggy crust?
Chill the crust before filling and bake at 350°F. Ensuring the dough is cold and the oven temperature is accurate prevents moisture from seeping into the base.
Is it true that sweet potato pie must be served immediately after baking?
No, this is a common misconception. The pie must cool for at least 2 hours to ensure the custard sets completely before slicing.
Can I substitute sweet potatoes with regular potatoes?
No, regular potatoes lack the natural sugar and texture needed for this custard. If you prefer a savory potato dish, try our garlic herb potato soup.
Homemade Sweet Potato Pie