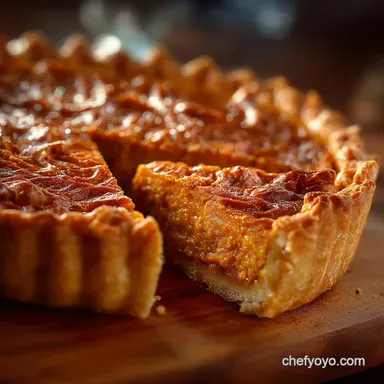
The Chefs Secret Flaky Deeply Spiced Sweet Potato Pie
- Unearthing the Rich Heritage of Southern Sweet Potato Pie
- Essential Ingredients for a Luxurious Sweet Potato Pie Filling
- Necessary Equipment to Bake Your Masterpiece
- Stage One: Preparing the Sweet Potato Base
- Assembly and Achieving the Signature Golden Crust
- Planning Ahead: Freezing, Storing, and Serving Your Pie
- Customizing Your Pie: Flavor Swaps and Dietary Adjustments
- Recipe FAQs
- 📝 Recipe Card
Unearthing the Rich Heritage of Southern Sweet Potato Pie
Few desserts carry the historical significance and cultural weight of a properly prepared Sweet Potato Pie . It is the undisputed king of Southern tables, a legacy dish often associated with the rich traditions of Black Folks Sweet Potato Pie recipes passed down through generations.
While its cousin, the pumpkin pie, might dominate commercial bakery shelves, true enthusiasts know that the deep, earthy sweetness and complex spice profile of the sweet potato offers an undeniable advantage in the great sweet potato pie vs pumpkin pie debate.
Our rendition focuses on achieving a perfectly balanced, velvety custard filling nested within a spectacularly flaky crust, elevating this classic from simple dessert to magnificent centerpiece.
The secret to this superior finished product lies in careful ingredient selection and the preparation method of the star tuber itself.
The Flavor Advantage of Roasted vs. Boiled Sweet Potatoes
The single most critical step that separates a mediocre sweet potato pie recipe from a masterwork is how the potatoes are cooked. We emphatically recommend roasting over boiling. When you boil sweet potatoes, they absorb water, leading to a duller flavor and a watery filling that struggles to set.
However, roasting whole sweet potatoes pierced and baked at a high heat (200°C or 400°F) for 45 to 60 minutes causes the starches to convert fully into natural sugars.
This caramelization intensifies the sweetness and depth of the root vegetable, ensuring that the 1 kg of flesh used in the recipe yields a concentrated flavor base that requires less added sugar and zero concern about a runny texture.
Mastering the Perfect Balance of Warming Spices
The signature warmth of great Sweet Potato Pastries comes from a precise, heady blend of autumnal spices. While cinnamon is essential (we use a full teaspoon), relying solely on it is a mistake.
To achieve that true, complex Southern flavor, you must incorporate supporting players: half a teaspoon each of ground nutmeg and ginger, and a subtle quarter teaspoon of allspice. The ginger adds a welcome bite, while the allspice provides an almost peppery undertone.
A chef’s note: always use freshly grated nutmeg if possible; its volatile oils deliver a fragrance and flavor that pre-ground nutmeg simply cannot match.
Achieving the Essential Buttery, Flaky Foundation
The foundation of any great pie is its structure, and our sweet potato pie crust is essential for supporting the rich, weighty filling. We call for a classic all-butter dough because the high fat content ensures maximum flakiness and flavor.
Crucially, the dough must be handled minimally and kept ice-cold. Once the dough is rolled out, fitted to the 9 inch deep dish plate, and crimped, it must be returned to the refrigerator or freezer for at least 30 minutes.
This mandatory chill time is the key defense mechanism against shrinkage during baking, ensuring that when we introduce the heavy, spiced filling, the edges remain perfectly crisp and defined.
Essential Ingredients for a Luxurious Sweet Potato Pie Filling
Moving beyond the spice rack, the quality of the custard ingredients dictates the pie's final texture and richness. Our recipe calls for 115g (half a cup) of melted butter, two standard eggs, plus one extra egg yolk, which adds emulsification power and richness without excess liquid.
For sweetness, we use a balanced blend of 150g of granulated sugar and 100g of dark brown sugar, providing sweetness and a subtle molasses note. Crucially, we use 240 ml (1 cup) of evaporated milk.
This is important to note, as some recipes call for Sweet Potato Pie With Condensed Milk ; however, evaporated milk offers the necessary creaminess and structure without the overwhelming sweetness that condensed milk introduces, giving the baker more control over the final flavor profile.
Finally, a tablespoon of pure vanilla extract brightens the entire mix.
Necessary Equipment to Bake Your Masterpiece
Transitioning from preparation to execution requires the right tools to ensure professional level results and that coveted, silky smooth filling.
Selecting the Right Fats and Creams for Ultimate Velvety Texture
The combination of the melted butter and evaporated milk forms the basis of the smooth custard. The butter introduces necessary fat and flavor, marrying beautifully with the starchy potatoes. The evaporated milk is responsible for the signature velvety texture.
Unlike standard whole milk, evaporated milk is concentrated, allowing the custard to set firmly without requiring excessive amounts of flour or starch.
The Role of Molasses and Brown Sugar in Deepening Flavor
The addition of dark brown sugar is primarily responsible for the pie’s depth of flavor. Dark brown sugar contains a higher percentage of molasses than light brown sugar, which complements the earthiness of the sweet potato puree perfectly.
This subtle molasses note is what gives the finished Sweet Potatoes Pie Recipe a complex, sophisticated sweetness rather than just a sugary taste.
Must Have Tools for Blending and Baking
To achieve that lump free, silken consistency that makes this dessert truly luxurious, several tools are indispensable. A stand mixer or a good quality hand mixer is highly recommended for blending the ingredients into the puree. However, the most critical piece of equipment is a fine mesh sieve or a potato ricer.
After roasting and mashing, pressing the 500g of sweet potato flesh through a sieve removes any remaining fibrous threads or minor lumps, ensuring your final filling is perfectly smooth.
You will also need a 9 inch deep dish pie plate and an aluminum foil pie shield, which is crucial for protecting the crimped edges of the crust from scorching late in the bake.
Related Recipes Worth Trying
- Silky Sweet Potato Pie Recipe The Secret to a Smooth CrackFree Filling — Bake the ultimate Sweet Potato Pie This recipe guarantees a creamy silky filling and a flaky neversoggy sweet potato pie crust The perfect Fall Comfort Food
- Cranberry Apple TwiceBaked Sweet Potatoes Fluffy Autumn Side Dish — Master the art of Cranberry Apple TwiceBaked Sweet Potatoes Fluffy creamy and packed with sweet potatoes apples cranberries this side dish is a showstopper...
- The Flaky Foolproof AllButter Pie Crust Recipe The Classic — Master this easy homemade Butter Pie Crust recipe It delivers beautifully flaky rich pastry layers perfect for any pudding or quiche Say goodbye to tough crusts
Stage One: Preparing the Sweet Potato Base
The journey to the perfect pie starts with handling the raw materials. Following the roasting instructions baking the potatoes whole at 200°C (400°F) allows the potatoes to become exceptionally soft and easily manageable.
Once they are tender enough, allow them to cool slightly (about 15 minutes) until you can handle them safely. Peel off the skins, discard them, and proceed to mash the flesh thoroughly.
Even if you plan to use a mixer later, forcing this warm, mashed potato through the fine mesh sieve is the required step to measure out the 500g (about 2 cups) of smooth puree. It is vital that this puree is allowed to cool completely to room temperature before being incorporated into the wet ingredients to prevent the melted butter from seizing or the eggs from curdling.
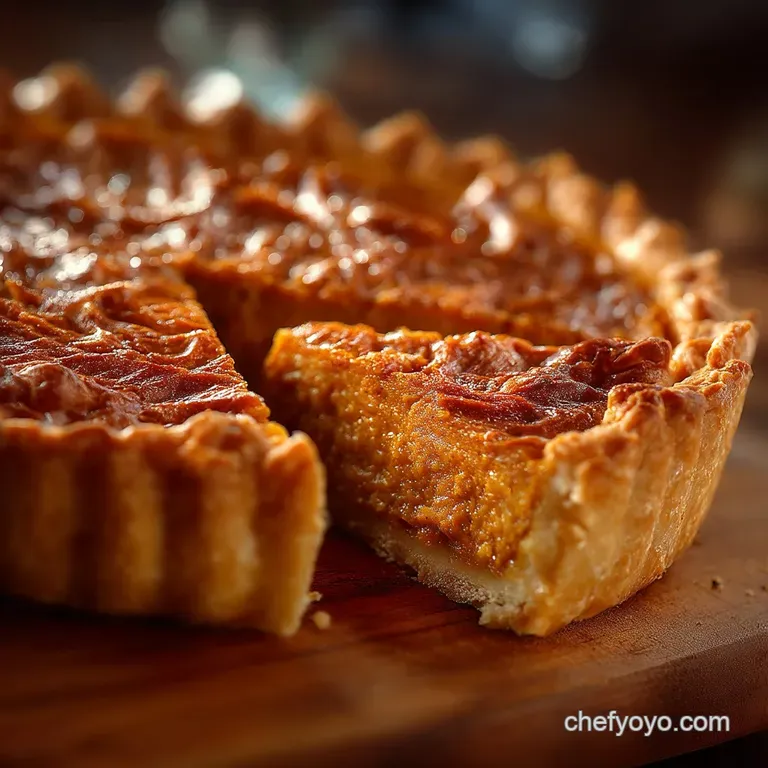
Assembly and Achieving the Signature Golden Crust
With your base prepared and your sweet potato pie crust chilled, it is time to assemble the masterpiece and move toward the oven.
Technique Guide: Roasting Sweet Potatoes for Maximum Sweetness
As a quick refresher before assembly: remember that the low-moisture, concentrated sweetness achieved by roasting makes the pie filling richer and more robust. This technique is paramount for ensuring the natural flavors of the starches shine through the spices and dairy, which is the hallmark of a truly great Sweet Potatoes Pie Recipe .
Combining Wet Ingredients for a Silky Smooth Batter
In a large bowl, begin by whisking together the cooled melted butter, both granulated and brown sugars, the eggs and extra yolk, evaporated milk, and vanilla extract. Whisk until the sugars are largely dissolved and the mixture is homogenous.
Next, whisk in your carefully measured spice blend and the half teaspoon of fine sea salt. Once the wet and dry elements are perfectly blended, add the cooled, sieved sweet potato puree. Use the hand mixer on medium low speed and beat just until the mixture is uniform, silky, and creamy.
Avoid overmixing, as this can encourage the starch and protein structure to toughen.
Pre-Baking the Crust: Avoiding the Soggy Bottom Syndrome
Your chilled pie shell should be perfectly firm before receiving the filling. Pour the smooth batter directly into the unbaked, chilled shell. The extremely cold temperature of the crust is your final insurance policy against the dreaded "soggy bottom." The cold butter in the crust hits the oven and creates steam immediately, firming up the pastry before the hot liquid filling has a chance to soak into the bottom layer.
Monitoring Internal Temperature for the Ideal Set Sweet Potato Pie
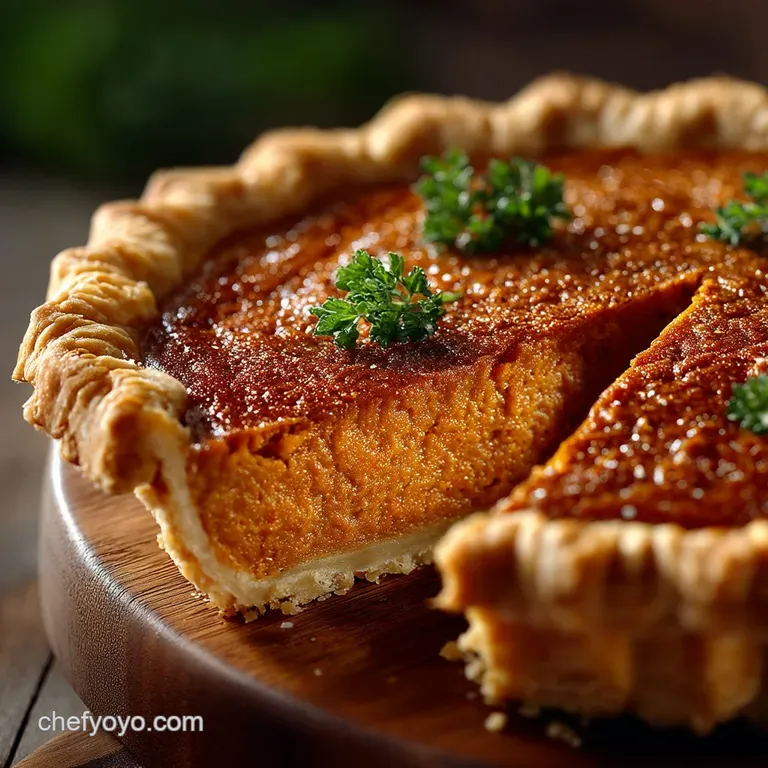
Preheat your oven to a moderate 175°C (350°F). Place the filled pie onto a baking sheet for easier handling and to catch any potential spills. Bake for 55 to 65 minutes.
After the first 20 minutes, loosely shield the exposed sweet potato pie crust edges with foil or a pie shield to prevent burning. The pie is done when the edges are visibly set and slightly puffed, and the center has a gentle, minimal jiggle like set jelly.
If you prefer to use a kitchen thermometer, the internal temperature should register 85°C (185°F). Remove the pie immediately and cool completely on a wire rack for at least three hours before contemplating slicing.
Planning Ahead: Freezing, Storing, and Serving Your Pie
A fully cooled Sweet Potato Pie is a stable and resilient dessert, perfect for entertaining. Proper planning ensures peak flavor and texture when serving.
Optimal Refrigeration and Storage Times for Freshness
Because the filling is a rich, egg-based custard, the pie must be stored in the refrigerator once fully cooled. Cover it tightly with plastic wrap or aluminum foil. Stored this way, the pie remains fresh and delicious for three to four days.
If you wish to freeze the pie, allow it to cool completely, wrap it tightly in a double layer of plastic wrap, followed by a layer of foil, and freeze for up to two months. Thaw overnight in the refrigerator before serving.
Can This Dessert Be Made 48 Hours in Advance?
Absolutely. The Sweet Potato Pie is arguably better served the day after baking. The custard benefits immensely from the extended chilling period, which allows the flavors to meld and the structure to firm up completely.
Making this recipe two days ahead of a holiday celebration not only saves you precious time but guarantees the perfect sliceable texture.
The Best Toppings and Garnishes for Serving
While this pie stands proudly on its own, a few garnishes elevate the serving experience. The classic accompaniment is a dollop of fresh vanilla bean whipped cream, sweetened lightly with icing sugar.
Alternatively, a thin drizzle of homemade salted caramel sauce adds a textural contrast and complex salinity that cuts beautifully through the sweetness of the pie. Pair a slice of the rich Sweet Potatoes Pie Recipe with a strong espresso or black coffee.
Customizing Your Pie: Flavor Swaps and Dietary Adjustments
The core sweet potato pie recipe is magnificent, but a few simple variations can tailor it to specific tastes or dietary needs.
Adding a Decadent Chocolate Swirl Variation
For an indulgent twist, melt 50 grams of good quality dark chocolate and swirl it gently through the filling just before baking. Alternatively, a sophisticated flavor upgrade is incorporating two tablespoons of high-quality bourbon along with the vanilla extract, which adds a complex, smoky depth to the custard.
For a brighter finish, try adding the zest of one lemon to counteract the richness.
Tips for Making a dairy-free or gluten-free Sweet Potato Pie
To execute a successful dairy-free version, substitute the evaporated milk with canned full fat coconut milk; its thickness mimics the required texture perfectly. Ensure you use a reliable non-dairy butter substitute (or vegetable shortening) for the sweet potato pie crust as well.
For those requiring a gluten-free option, use a reputable 1:1 gluten-free flour blend for the crust, or bypass the rolling process entirely by opting for a press-in pecan or oat-based crust instead.
Recipe FAQs
My pastry always shrinks or burns! How do I stop getting a soggy bottom on my Sweet Potato Pie?
Preventing a soggy bottom is paramount, and the secret lies in proper chilling make sure your pie shell is well chilled (or even frozen) before pouring in the filling. To protect the crimped edges from scorching, use a proper pie shield or carefully wrap thin strips of aluminium foil around the crust after about 20 minutes of baking time, which acts as a safeguard.
This looks like a right faff. Can I make the filling or the whole pie ahead of time?
Absolutely, you can get ahead of the game! You can prepare the cooked sweet potato puree up to three days in advance and keep it sealed in the fridge. If you want to tackle the entire thing, bake the Sweet Potato Pie completely, cool it fully, and store it covered in the refrigerator for up to four days.
Just bring it up to room temperature before serving.
I don't fancy sieving the potatoes. Is that extra step really necessary for the classic creamy texture?
If you're aiming for that truly velvety, restaurant quality silken filling the chef's secret, if you will then yes, the sieve is your new best mate. While a ricer helps, pushing the potato through a fine mesh sieve eliminates any microscopic fibrous bits, guaranteeing a texture akin to a perfect crème brûlée.
It's a bit of elbow grease, but worth the effort.
How do I know when the pie is properly baked and not undercooked or cracked?
The "jiggle test" is the bee's knees for custard pies. The edges of the filling should be set and slightly puffy, but the centre (about 5 cm wide) should still wobble slightly, like set jelly.
Promptly remove it from the oven at this stage even if you think it needs another five minutes as it finishes setting perfectly while cooling on the wire rack.
I need to use up leftovers. What’s the best way to store Sweet Potato Pie, and how long does it last?
Once the pie has fully cooled (this is critical!), cover it tightly with cling film or foil and store it in the refrigerator; it keeps beautifully for 3 to 4 days. If you want to keep it longer, you can freeze the cooled pie (or individual slices) tightly wrapped in plastic and then foil.
It will remain delicious for up to three months, simply defrosting overnight in the fridge.
Silky Spiced Sweet Potato Pie Recipe