The Fluffy Crown Jewel Ultracrisp Buttermilk Waffles Whipped Egg White Method
- Beyond Batter: Unlocking the Secret to Truly Fluffy Homemade Waffles
- The Ultimate Waffle Blueprint: Why Technique Trumps All
- The Foundation: Essential Ingredients for Superior Waffles
- Pro Gear: Choosing the Right Waffle Iron and Mixing Tools
- Phase I: Preparing the Base and Whipping the Whites
- Phase II: The Delicate Fold and Grilling Ultimate Homemade Waffles
- Waffle Wisdom: Troubleshooting and Serving Suggestions
- Expanding the Menu: Delicious Toppings and Flavor Variations
- Recipe FAQs
- 📝 Recipe Card
Beyond Batter: Unlocking the Secret to Truly Fluffy Homemade Waffles
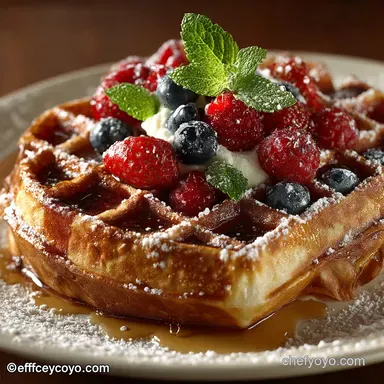
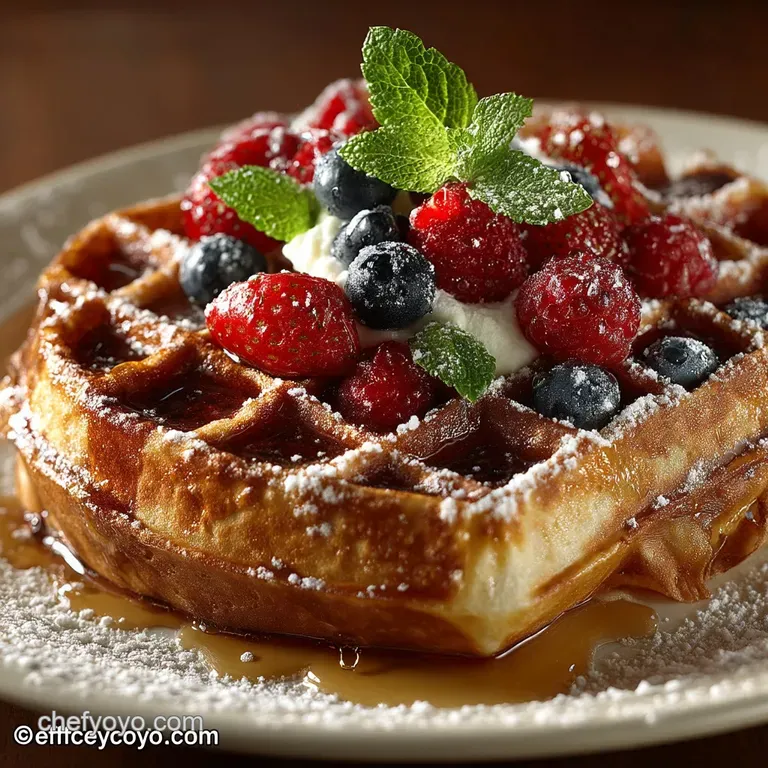
The difference between a passable pancake and a truly transcendent waffle lies entirely in texture. We aren't seeking mere cooked batter; we are chasing that impossible architectural marvel: a golden, deeply grooved exterior that shatters on impact, protecting an interior as light and airy as a cloud.
This pursuit requires specialized technique, moving us firmly Beyond Batter and into the realm of structured baking. Achieving these ultimate Homemade Waffles means embracing the power of aeration, turning a simple breakfast into an event.
When executed properly, this technique delivers The Best Waffle Recipe Ever, transforming your morning routine into a celebratory brunch.
The Ultimate Waffle Blueprint: Why Technique Trumps All
Many home cooks are intimidated by the complexity often associated with achieving café quality results, but while this is not an easy homemade waffles recipe in the sense of a 'dump and stir' mix, the payoff is immeasurable. The technique is the key differentiator here.
We rely on the separation of eggs and the stabilization of air, a method often reserved for soufflés or meringues, to deliver unparalleled lift. This is how we guarantee a structural integrity that withstands the addition of heavy syrups and rich toppings, resulting in the perfect texture every single time.
The Crisp-to-Fluff Ratio: Defining Waffle Perfection
The hallmark of a great waffle is defined by this critical balance. Our goal is a ratio where the exterior provides a satisfying, buttery crunch , while the interior maintains a delicate fluff .
This texture contrast is achieved through the dual action of both chemical leaveners (baking powder and baking soda) and mechanical leavening (whipped egg whites), ensuring maximum lift before the high heat sets the structure.
Our Promise: Ditching the Soggy Middle Forever
A soggy middle occurs when two things go wrong: either the batter is too dense, or the cooking temperature is too low, causing the batter to steam itself soft before the crust can set.
We bypass these pitfalls by using full fat buttermilk and melted butter for flavor and tenderness, while simultaneously injecting maximum air volume via the meringue base. On top of that,, cooking on a fully preheated iron ensures rapid moisture evaporation, cementing the sought after Crisp Waffle Recipe exterior.
Understanding the Power of Aeration in Baking
Aeration is paramount to this specific recipe. The medium difficulty rating is solely based on the requirement to whip the two egg whites until they form stiff, glossy peaks. When these whipped whites are gently folded into the base mixture, they act as miniature hot air balloons, ready to expand dramatically when they hit the hot iron.
This approach provides a significant structural advantage over recipes that simply whisk whole eggs into the batter, ensuring an incredibly light result ideal for Healthy Crispy Waffles.
Setting Up Your Waffle Station: Pre-Cook Preparation
The art of mise en place cannot be overstated here. Before you begin mixing, ensure your electric waffle iron is preheated to medium high this takes a dedicated 10- 15 minutes. While the iron warms, melt the 1/2 cup (115g) of unsalted butter and set it aside.
It must be melted enough to incorporate easily but cooled sufficiently so it won't scramble the egg yolks later. Total prep time, including initial setup and mixing, is about 20 minutes.
The Foundation: Essential Ingredients for Superior Waffles
The foundation of any outstanding breakfast dish starts with quality ingredients, and the selection here is straightforward yet precise. For this ultimate Breakfast Waffles Recipe, we rely on 2 cups (240g) of sifted all-purpose flour, balanced with 2 Tbsp of granulated sugar for sweetness and browning, and 1/2 tsp of fine sea salt to enhance the overall flavor profile.
The lift comes from a powerful combination of 1 Tbsp of baking powder and 1 tsp of baking soda, perfectly calibrated to react with the cold acidity of the buttermilk. The wet ingredients include 1 3/4 cups (420ml) of full fat buttermilk, the cooled melted butter, 1 tsp of vanilla extract, and two separated large eggs.
Pro Gear: Choosing the Right Waffle Iron and Mixing Tools
While the ingredients are simple, the technique demands appropriate tools. An electric waffle iron, whether Belgian or standard depth, is essential. For the whipping stage, an electric hand mixer or a stand mixer is highly recommended, as manually whipping the egg whites to stiff peaks takes significant effort.
You will also need two large mixing bowls, a rubber spatula for the delicate folding process, and a wire rack ready for the finished waffles.
Sourcing the Best Buttermilk and Cultured Butter
The use of full fat buttermilk is non-negotiable for this particular recipe as it provides essential fat for tenderness and the necessary acidity to activate the baking soda. For the rich, golden hue and deep flavor, choose high-quality cultured butter whenever possible, melting the 1/2 cup (one stick) required quantity and cooling it slightly before incorporation.
The Role of Sugar and Baking Powder in Structure
In addition to contributing a subtle sweetness, the 2 tablespoons of sugar play a crucial role in promoting deep caramelization (the Maillard reaction) on the hot plates, which helps achieve that superior crispness.
The baking powder is the primary leavener, providing initial lift, while the baking soda acts as a secondary booster when it hits the acid in the buttermilk.
Measuring Matters: Precision in Dry Ingredients
Baking is a science, and precision ensures consistency. When measuring the 2 cups of all-purpose flour, gently spoon it into the cup before leveling it off, or better yet, weigh it (240g).
Sifting the flour, baking powder, baking soda, and salt together guarantees an even distribution of leaveners and prevents unwanted lumps in the final mixture.
Waffle Iron Recommendations for Deep Pockets
While any standard waffle iron will work, a Belgian style iron creates deeper pockets, allowing for more air to be trapped inside and providing greater surface area for crisping. Remember to lightly brush or spray the plates with oil or spray, even if using a non-stick model, for effortless release and perfect browning.
Related Recipes Worth Trying
- Beef Enchiladas with Red Sauce Rich Homemade Chili Sauce Recipe — Forget the cans Our proper Beef Enchiladas with Red Sauce feature a deeply smoky homemade chili sauce over savoury ground beef The ultimate Sunday comfort...
- Homemade Taco Seasoning Forget the Packets for Superior Taco Meat — Ditch the salty shop packets This easy Homemade Taco Seasoning recipe delivers incredible smoky depth Includes cornstarch for perfectly thickened velvety...
- Chefs Guide to Silky Smooth Homemade Amaretto Liqueur — Ditch the synthetic bottles This chefapproved guide delivers Silky Smooth Homemade Amaretto Liqueur Rich complex and miles better than shopbought Perfect...
Phase I: Preparing the Base and Whipping the Whites
The process begins by combining all 2 cups of dry ingredients flour, sugar, salt, and leaveners in a large bowl. In a separate bowl, the cold buttermilk, slightly cooled melted butter, vanilla extract, and the two egg yolks are whisked until smooth.
While this mixture rests for a brief 10– 15 minutes (allowing the gluten to relax), focus on whipping the two egg whites.
Phase II: The Delicate Fold and Grilling Ultimate Homemade Waffles
The critical final steps involve carefully combining the components and then cooking them to perfection. This careful handling is what ensures your homemade waffles recipe easy results in a light, airy outcome.
Creaming the Wet Ingredients for Silky Smoothness
After whisking the 1 3/4 cups of cold buttermilk with the egg yolks, cooled melted butter, and vanilla, pour this wet mixture directly into the bowl of dry ingredients. Stir gently with a rubber spatula until the mixture is just moistened.
Lumps are acceptable; overmixing is not, as it develops gluten and creates dense, tough results.
Whipping Egg Whites to Stiff, Glossy Peaks
Using a clean, dry bowl (fat residue prevents whipping), beat the two egg whites on high speed. Continue until they reach the stiff peak stage the foam should be glossy and hold its shape rigidly when the whisk is lifted. This meringue is the secret weapon guaranteeing an unparalleled cloud like texture.
The Crucial Technique: Gentle Folding, Not Stirring
This step determines the success of the entire recipe. First, take about one-third of the whipped egg whites and fold them firmly into the batter to lighten it (sacrificial folding). Then, add the remaining two-thirds of the meringue.
Using a large rubber spatula, lift the batter from the bottom of the bowl and fold it gently over the meringue. Rotate the bowl and repeat until the streaks of white have just disappeared. The resulting batter will be thick, airy, and dramatically frothy.
The Moment of Truth: Timing and Temperature for Crisp Edges
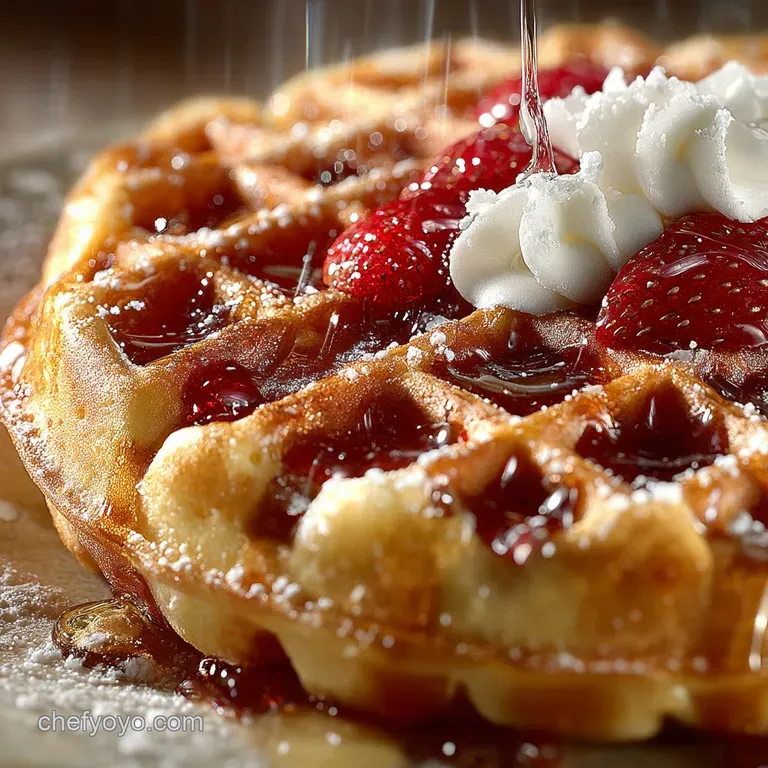
Using a ladle or measuring cup, pour approximately 1/2 cup (120ml) of batter onto the center of the preheated waffle iron. Close the lid and resist the urge to peek! Cook for 3– 5 minutes, or until the steam coming from the sides of the iron slows down almost completely.
The waffle should be deep golden brown and audibly crisp when removed. Immediately transfer the cooked ultimate Homemade Waffles to a wire cooling rack; never stack them, or they will lose their treasured crisp edges.
Waffle Wisdom: Troubleshooting and Serving Suggestions
Mastering the homemade waffles recipe easy journey involves knowing how to solve common issues and selecting the perfect accompaniments. For those aiming for a slightly lighter option, simply reduce the amount of sugar in the batter without compromising the necessary crispness.
If you’re attempting a homemade waffles small batch, simply halve the ingredients; the technique remains identical.
Expanding the Menu: Delicious Toppings and Flavor Variations
Once you have mastered the base recipe, the possibilities for flavor innovation are endless. For a brighter profile, try adding 1 Tbsp of lemon zest and 2 tsp of poppy seeds to the dry mixture.
Alternatively, skip the sugar and vanilla, and incorporate savory elements like grated mature cheddar and chives for a unique twist a delightful option for anyone looking for homemade waffles no milk substitutions for flavour adjustments.
Storing and Reheating Waffles for Day-Two Crispness
To store leftovers, allow the waffles to cool completely on the wire rack, then stack them with parchment paper in an airtight container or freezer bag. For reheating, the best method to revive that crispness is the toaster or a toaster oven set on medium high. Avoid the microwave, which turns them instantly soggy.
If cooking for a crowd, keep finished waffles crisp by placing them directly on a wire rack in a low oven (100°C / 200°F).
Troubleshooting Flat or Dense Waffles (Common Errors)
The two most frequent causes for a failed waffle are overmixing the batter (leading to toughness) and deflating the egg whites (leading to flatness). If your waffles are dense, next time, stir the wet and dry ingredients less aggressively, and ensure your folding technique is light and gentle.
If they are flat, your iron was likely not hot enough, or your egg whites were under whipped.
Calculating the Calorie Count: Understanding Your Brunch
Based on the core ingredients, a single standard waffle (before syrups or toppings) is estimated to contain between 300 to 350 kcal. This estimate covers the richness provided by the buttermilk and 1/2 cup of melted butter.
While it is certainly a generous treat, incorporating fresh berries and minimizing added syrups can help maintain a balanced Breakfast Waffles Recipe experience.
Sweet Alternatives: Adding Spices or Citrus Zest
Beyond the buttermilk base, the batter accepts flavor additions beautifully. Try incorporating 1 tsp of ground cinnamon and a pinch of nutmeg to the dry ingredients for a warm, autumnal flavor.
Alternatively, for a truly decadent treat, swirl a mixture of brown sugar, cinnamon, and melted butter into the batter just before cooking for a "Cinnamon Roll Waffle" effect.
Recipe FAQs
I followed the recipe, but my waffles weren't fluffy what went wrong with the whipped egg whites?
The secret to that heavenly lift is a gentle hand when folding the whites into the batter. Treat them like delicate soufflés overmixing is the absolute villain here, as it quickly deflates all the air you worked so hard to incorporate.
Stop folding the moment no large streaks of white remain; a few lumps in the batter are perfectly acceptable and far better than a tough, dense waffle.
How do I stop my delicious Homemade Waffles from going soggy once they come out of the iron?
This is a crucial point: never stack hot waffles! That common mistake traps steam, which instantly softens the crispy exterior you’ve achieved. Always transfer your fresh waffles immediately to a wire cooling rack so that air can circulate around the entire surface.
If you're cooking a large batch, keep them crisp by holding them on the rack in a low oven (about 100°C/200°F) until ready to serve job's a good 'un!
Help! I haven't got any buttermilk kicking about. Is there a simple substitution?
Don't fret, there’s a quick fix if you’re caught short! Measure out your milk (full fat is best) and stir in one tablespoon of white vinegar or lemon juice per cup required. Let this mixture stand for about five minutes until it curdles slightly.
This acidic blend reacts perfectly with the baking soda, delivering the necessary lift and tang for brilliant results.
What's the best way to store or freeze these Homemade Waffles for a quick weekday breakfast?
These freeze beautifully! Once your waffles are completely cooled on the wire rack, stack them between small squares of baking parchment to prevent sticking. Seal them tightly in an airtight bag or container, and they’ll keep well for up to three months.
To reheat, simply pop them straight into the toaster or air fryer until they are piping hot and crisp again no need to defrost!
Does the type of waffle iron really matter for achieving this 'Ultra Crisp' texture?
While this fantastic batter will work in any iron, a Belgian waffle iron (with deeper pockets) tends to offer the most satisfying contrast: a cavernous, fluffy interior against a highly crisp outer surface. More important than the type, however, is the heat.
Ensure your iron is thoroughly preheated; hitting a scorching hot surface sets the exterior instantly, which is key to locking in the crispness.
Ultracrisp Homemade Waffles Recipe